Page is loading ...

*
{-^
SATOH
TRACTOR
f
L
s-65()G
REnAIR
MANML
SATOH AGRICUTTURAL
MACHINE
7
Publication
No.
03
MFG.
CO*LTD,

CO}ITENTS
ENGiINE
SYSTEM
...-....."""""""""'t"r"""""""""""'t"""".."""
A
CLUTCH
SYSTEM
//../..I{.|EE..L,
r
.
..'
r, r r, .
. r.,
/'..r(.hEE..k
rr...rrrrrrr..r.r..rt!r.
B
STEERI
ilG
LI
I{KAGE
SYSTEII
TRANsMlssl0il sysTE
|l
.#6rn.
A.....
KEo.*
fr.i.r{s..........
ll
BRAKE
SYSTEM...r..r.......r.........r...........................r..................rrr.
E
ELECTRI0AL
SYSTEM
r
e.
r
.,frn6.
DRAFT
CoNTRoL.....,...........................r................................r.......
H
p0UuER
ASSISTED
STEERIJ{G......................................................
I

I
Tt
SATOH
TruTOR
ENGINE
SYSTEM
.
PUBLICATI0il
JIo.03-A
MoDEL
s.65()(G
REPAIR
MANUAL
I
i
t
I
(i
{-

I
CONTENTS
THE ENGINE
.
GENERAL
1.
Cylinder
Head
2. Cylinder
Block
3.
Pistons and
Crankshaft
4.
Valve
Mechanism
5.
lntake
and
Exhaust
Mechanism
6. Governor
7.
Cooling
System
8. Lubricating
Mechanism
9.
Elestrical
SYstem
ETUGINE
Disassembling
Order
1-1
.
Removing
the
Engine
.
.
1-2.
Disasembling
the
Engine
Checking
Maintenance
and Limit
of
Adiustment
2-1
.
Cylinder
Head .
.
2-2.
Piston
and Cylinder
Block
2-3. Connecting
Rod
24.
Crankslraft
and
Main
Bearing
Metal
2-5.
Camshaft
.
.
2-6.
Timing
Chain Sprocket
and
Chain
Adiuster
AssemblingOrder ..
..
3-1
. Assembling
the
Engine
3-2.
Mounting
the
Engine
Spgcifications
.. ..........
LUBRICATIOT{SYSTEM
....
1.
Lubrication System
-
General
2. Disassembling
the
Oil
Pump
.
.
.
.
2-1
.
Removing
the
Oil
Pump
2-2.
Disasembling the
Oil
Pump
3. Checking,
Maintenance
and Limit
of Adiustment
3-1
. Checking
and
Adjusting
the
Oil
Pump
3-2. Oil
Filter
Replacement
3-3.
Checking
and
Adjusting the Oil
Pump
Driven Gear
Shaft
34.
Adjusting
the
End
Play
of
Oil
Pump
Driven Gear Shaft
4
tT'I?"ruili,ff':
:
:
1.
2.
3.
4.
3
3
3
7
15
15
18
21
23
25
26
27
27
38
38
39
39
40
40
40
40
40
41
41
42
42
42
42

5, Specif
ications
51.
Oil
Pump
Specifications
5-2.
Oil
F
ilter Specif
ications
SYSTEM
....
Cooling
System
-
General
- .
Disasembling
Order
.
.
2-1
.
Removing the
Water
PumP
2-2.
Disassembling
the
Water
PumP
Checking
Maintenance
?nd
Limit of
Adiustment
31 .
lnspection of
Water
PumP
.
.
3l2. Checking
the
Thermostat
AssemblingtheWaterPumP
....
..
Mounting
thg
Water
Pump .
. .
. . . .
. .
.
lrstalling
the
Thermostat
.
.
.
.
.
.
.
. .
.
Specifications
..
..
7-1
.
WaterPump
r.
.
.
.
.
. .
.
.
. . .
.
7-2.
ThgrmosEt..
,o....o.
.42
.42
.42
.43
j
COOLING
1.
2.
3.
*4.
5.
6.
7.
FUEL
SYSTEM
Fuel
System
-
.Generct
AirCleaner o o
. .
.
2-1
.
Rennving
the
Air
Cleaner
Element
2-2. Checking
the
Air
Cleaner
.
.
. .
2-3.
Air
Cleaner Specifications
.
.
Fugl
Pump...,.....
31
"
Removing
the
Fuel
Pump
. .
3-2. Disasembling
the
Fuel Pump
.
.
3-3. Checking the
Fuel
Pump
34.
Assembling
the
Fuel
Pump
.
.
35.
lnsUlling
the
Fuel
Pump
36.
Fuel
Pump
Specifications
.
. .
.
4.
Fugl Filtgr
. . .
. .
.
...
. , . . .
.
5. Carburetor
..
..
51
.
C"onstruction
.
.
5-2.
Disassembling the
Carburetor
$3.
Checking,
Maintenance
and
Limit of
5.4.
Assembling
the
Carburetor
.
.
t5.
MountingtheCarburetor
.... .
$6. Specif
ications
.
.
1.
2.
43
43
43
43
4
M
4
4
45
45
45
45
45
47
47
47
47
47
47
47
47
48
48
48
49
49
49
50
50
50
54
55
55
55
I_
gOiustment

6. Governor
6-1.
Governor System
-
General
6-2.
Governor
-
Operation
and
Construction
6-3.
Purpose
of Governor
Adjustments
&4.
Maintenance
6-5.
lnterlock
Adjustment between
C;rburetor
Spark
Plug
.55
55
.56
.58
.58
.58
.59
59
59
59
59
59
59
60
61
61
61
6l
63
.63
.63
.63
.63
.63
.63
.63
.63
.64
.il
.64
.u
.64
.u
.64
.65
.65
.65
.65
.65
and
Governor
IGTTIITION
SYSTEM
1.
Spark
Plug
1
-1
.
lnspection and
Adjustment
of
1-2.
Spark
Plug
Specifiiitions
Distributor
2-1 .
Removing
the
Distributor
2-2. Disasembling the
Distributor
2-3.
Checking,
Maintenanc€ and
Limit
of
Adjustment
24. Asembling
the
Distributor
2-5.
Mounting
the
Distributor
2-6.
lgnition Timing
lnspection and
Adiustment
2-7 . Distributor
Specifications
TOURBLESHOOTI]UG
1.
The Ergine
Lacks
Power .
.
1
-1
.
Fuel
C.omprssion
is
lnsuff
icient
1-2. lgnition
Timing
is
lncorrect
1-3. Fuel
Lsrel
is
Low
14.
Carburetor
Dravw
lnsufficient
Amount
of
Air
1-5. Engine
Overheats
.
.
.
.
2.
Fuel
Canzumption
is
Excessive
2-1 .
Engine
Oil
Leaks
2-2.
Oil
Comes
Up
into the
Combustion
Chamber
2-3. Oil
Comes
Down
from
Valve
System
Engine is
Hard
to Surt
3-1.
Engine
has
Starting
Difficulty
:
.
3-2.
lgnition System
is Defective
3-3.
Engine
34. Carburetor
Engine
is
Noisy
4-1
.
Piston
+2. Crankshaft
+3.
ConnectingRod
.... ....
U.
tMiscellaneous
3.
4.
I
l

6.
5.
F
iring
lrregularities
S1.
lgnition
System
*2.
Air-fuel Mixture
$3.
Valves
.
.
u. cylinderHead
.. ....
lncorrest
ldle
Speed
Adiustment
.
.
Gl .
Carburgtor
.
.
.
.
. . . .
G2.
AirEnteringFuel
Line
....
....
6-3.Va1vgs...........o....
il.
Cylindgr
Head . .
.
. .
.
.
.
. . .
.
Engine
Runs
not
Smoothly
(when
acceleratedl
.
. . .
7-1
. Carburgtor
. o
.
.
.
.
. . .
.
. .
.
. . . . .
7-2.
lgnitionSystgm
..
......
...
7
3" Ergine,
.
.
. . . . .
. .
.
.
.
.
.
.
.
. .
.
.
.
.
.
.
.
65
65
65
65
66
66
66
66
66
66
66
66
66
66
7.

THE
ENGINE
-
GENERAL
TllE
ENGINE-GENERAL
This
PB
engine is a
high
performance,
water-cooled,
4-cylinder,
in-line
gasoline
engine,
employing
the overhead
valve
and
high
cam
shaft system.
The
cylinder
bore
and the
piston
stroke
measure
2'6772
in'
(68
mm) and
2'6772
in'
(68
mm)'
respectively. ln
this sense, the
cylinder
is
o{ a
square type,
having a total
displacement
of
60.2 cu.
in'
(987
cc)
and a
compr.ession
ratio
of
8.6 to l.
The maximum output
is
25
PS
at
2,800
r.p.m. and
the
maximum torque
46'9
lt-lbl2,2$O
r.p.m.
(6.5
kg-m/2,2OO r.p.m.). The description
of
the
engine is as
follows:

t
1.
Cylinder
Head
Being
made
of
a
light
alloy, the
cylinder
head
is light
in
weight,
provid
ing excellent
rad iation
eff
iciency.
The
domeshaped combustion
chamber
is shrinkage-
fitted
with
ductile cast iron
valve seats.
The
intake
and the
exhaust
valves
are
arranged
opposite
to
each
other the
cylinder head;
that
is,
the
cros-flow
design
is
employed
for
better combustion
eff
iciency.
2. Cylinder
Block
The
cylinder
block
is
precisioncast
from a
light
alloy
meEl
by
means
of
pressure
die
casting.
To
support
the
crankshaft,
f
ive
bearings
of
the deep
skirt
type
are
employed.
The
cylinder
liners
are
made
of
special
cast iron
and
replaceable.
They
are directly
cooled
by
water
and sealed
with
two
"4"
rings.
3.
Pistons
and
Crankshaft
The
pistons
are
of a
conical ellipse type
manufacturd
by
LO-EX.
The
crankslraft
is made
of
ductile
cast
iron
supsior in
durability
and wear-resistance,
and
supported
by
five main
bearings.
The
main
bearings
are
made
of an aluminum alloyed
with
tin,
which
is
also excellent in
durability
and
wear-resistance.
4.
UalYe
Meclnnism
The
high
cam
shaft design
is employed,
along
with
five
special
iron
bearings,
for increased rigidity.
This
permits
high
speed
relolutions.
The
cam
shaft
is
driven
by a
Renold-made
chain,
wtrose tension
is
adjustable
by
means
of
the
chain.
adjuster
and
vibration
dampr. To
reduce the
cfrain
noise, the
contacting
surfaces of
the
chain
is
finished with
heat-proof
and
wear-proof
rubber.
5.
lntake
and
Exhaust
Mechanism
The
exhaust
manifold
is made
of cast
iron,
and
the
intake
manifold
made of
a
light
alloy
metal.
Both
manifolds ?re
of
independent
branch
Wpe.
The hot
spot
is heated
by
warmed
"cooling
water".
ln
the
intake system,
a Stronberg
type
carburetor,
having a
downdraft
double-venturi
is used.
6.
GoYernor
The
Governor
is
of
f
ly weight
type
and controlled
by
means of
all
speed
governor
system.
-1
8.
Lubricating
Mechanism
Total
pressure
lubrication is carried
out by
a
trochoid
gpar
oil
-pump,
which is
driven
by
the
cam shaft drive
gear.
A
cartridge
type oil
f ilter
is
employed.
9.
Electrical
System
Electrical
component
is
of
12-volt
capacity.
The
alternator
is
l
Samp.
capacity, and the starter of
1.O-kW.
As
the
battery,
the
N40L
Wpe
is used,
and
the distributor
is
provided
with
a
vacuum
and
centrif
ugal
type
automatical
advancer.
7. Cooling
System
Cooling
system
is
the type
of
forcedcirculation,
and
the
pressure
in the
radiator
is 9.954 lbs/sq.
in.
by
which
the
high
efficiency
of
heat
radiation is secur-
ed.
Their
qystem
is
incorporated
with
the
Wax
type
thermostat
and
the
water
pump
is
of the
centrifugal
type.
The miterial
of
cooling
fan
is the synthetic
resin,
consisting
of
4
wings,

ENGINE
ENGINE
1.
Disassembling
0rder
Note:
Notes
on
Engine Dirssembly
Both
engine and
transmission
are very
heavy
in weight. ln
addition,
they
must
be
kept in
a
horizontal
position
while
being disassembled,
and therefore,
engine
disassembly operations
should
be
performed
on solid
f loors.
To keep
the
tractor in a
horizontal
position,
place
a
wooden wedge between the
front extension and
the
axle beam.
Be sure
that
necessary wrenche, such as
a special
tool
(No.
N033S
SOCKET
WRENCH SET), special
tool
(No.
BT-100 DOUBLE
OFFSET
BOX
WRENCH SET),
and
(No.
BT-9 OPEN-END
WRENCH
SET),
and other
special tools
including a
chain
block are all available on
hand.
Put
a rnark
on
each engine
component
part
such as a
piston.
piston
ring,
valve, valrre spring,
metal,
tappet,
push
rod. etc. in order of the
cylinders,
so that
you
will not
corifuse
dbout
parts.
Take
special
care not
to datnage
the
removed
parts,
and
put
them
in order.
l-1
.
Remoying
the Engine
1.
Bemove
the negative
(-)
corde
from
the
battery.
2.
Remove
the
wires from
the alternator
(A)
,
starting
motor
(B)
and
hed
light
(cl.
c
o
o
o
o
b
\
Fig. I
Remove
the
bonnet.
Disconnect
the
wires
from
the oil
pressure
switch
(A)
and
the
water heat
gauge
(B)
.
Fig.
2
5.
Removing
the
radiator
Throughly
drain
off the cooling water from
the
radiator
and
cylinder
block. Loose
the water hose
clip
(A)
and
pull
out
the
water
hose from
the
radiator.
Remove
the
radiator
mounting
bolts
(B)
,
(C),
and
fitting
nut for
radiator
support
(D),
and
remove
the
radiator.
3.
4.
Fig.
3

ENGINE
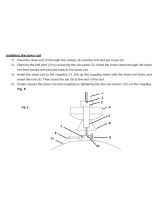
6.
Removing
the
tractor
meter
cable,
throttle
wire
and
choke
wire
Remove
the
governor
cover
{A),
and
disconnect
the
tractor meter
cable
(B)
,
throttle
wire
(C)
and
choke
wire
(D)
.
Remove
the
governor
cover.
*l
Fig.
4
7 .
Removing
the
fuel
pipe
Remove
the
fuel
pipe
(Al
.
To
prevent
entering
the
fuel
tank, cover
it
with
a
cloth
"
Fig.
6
9.
Figr'
7 end
I
10.
Removing
the hydraulic
oil
pipe
a.
Remove
the
hydraulic
oil
pipe
clamp
(A).
Removing
the
silencer
pipe
Remove
the
nut
(A)
mountlng
both
exhaust
manifold
and silencer
pipe,
and
remove
the
silenc-
er
mounting nut
(B).
Then
remove
the
silencer
pipe.
dust
from
clean
dry
Fis.
5
8.
Removing
the
drag
link
Pu
ll
out
the split
p
in
from
the
ball
socket
connecting
the
Pitman
arm
and
drag
link,
and
remove
the slotted
nut
(A).
Remove
the
ball
socket
by
using
the
special
tool
(No.
TRH-12
TIE
ROD
END
REMOVEBI
Fig. 9

EN GINE
Fig.
l0
c.
Remove
the banjo bolt
(Cl"
Fig.
I I
d. Loosen
the strainer
body
(D),
and
take it
out.
Fig.
t 2
e.
b.
Remove
the magnet
plug
(B),
and
drain
off the
hydraulic
oil case.
When reusing
the oil,
put
it
in a
clean
container
while
taking
care
not
to
allow dust
to
enter
the
oil.
Remove
the
pump
flange
mounting
bolt
(E)
from
both
inlet
and outlet
sides. Cover the
ends
of the
pipe
so that
no
dust
will enter
the
pipe.
Removing
the
hydraulic
pump
and
pump
bracket.
Remove
the
four
bolts setting
the
pump
joint
(A),
and
remove
the
pump
joint.
Remove
the
four nuts
(B)
from
the
pump
(C).
Remove
the
two
screw
(M8
x
25l,
and
three bolts
(MB
x 45)
from
the
pump
bracket,
and
remove
the bracket
(D).
Note:
As alignment
of
the center
line
betureen
crankshaft
and the
hydraulic
oil
pump
had
been
correctly
fixed
at
0.001
181
in.
(0.03
mm)
during
factory
assembly, do
not
attempt
to
remove
the
pump
unless otherwise
it is definitely
necsary
to
work
out
its
remowt.
Removing
the
flange
coupling
and
CG-type
rubber
coupling
Remove
the
three
bolts
which
fasten
the
CG-type
rubber
coupling
to
the
crak
pulley,
and
remove
the
flange
coupling
and
CG-type rubber
coupling.
Fig.
l3
11.
Fig.
14
12.

EN
G INE
13.
Remove
the
engine
mounting
rubber
mounting
nut
(A)
on
both
right
and
left sides,
and
remove the
engine support
mounting bolt
(B).
Fig. 15
14.
Removing the
alternator
and
V-belt
a.
Remove
the
bolt
as shown
in
Fig.
16,
and
remo\€
the alternator
strap
tB)
from
the
alternator
(A)-
b.
Remove
the
alternator
mounting
nut and bolt,
and
remove
the
alternator
and
V-belt
(C)
from
the
alternator
bracket.
i,,'
{e
Fig.
16
15.
lnstall the chain
block
on
the engine
hanger
(A)
on
the
manifold on
both exhaust
and
inuke
sides.
Do
not
hoist
the
engine, but
pull
the
wire so that
it
becomes
slightly tight.
Place
a
garage
jack
under
the clutch
housing.
Do
not
iack
up the tractor,
Just
raise
the
jack
so
that
it is
just
tightly
locked under
the
tractor.
Remove
the'bolts
(A)
,
four
each on both
right
and
left sides,
and
the
four
bolts
(B)
,
also
four
each
on
both sides,
which
mounting
the
chasisand
clutch
housing.
Remove
the three
screws
(C)
from
the
re*,r
plate,
and
pull
the
re:,r
plate
downuard.
Pull
out
the
clrasis
and
front
axle
toward the
front.
Removing
the
engine mounting
and
alternator
bracket
Remove
the
mounting
nut,
and
remove
the
engine
mounting
(A)
from
the
alternator
bracket.
l
Fig. l7
16"
17.
Fig. t
8
18.
19.
a.

EN
GI
NE
Fis.
l9
b.
Remove
the
three
mounting
nuts, and
remove
the
alternator
bracket
(B)
from
the
cylinder
block-
Fis. fr
20.
Remove
the
starter
starter.
mounting
nut,
and
remove
the
Remove
the
four
nuts
(A)
and
nuts
(B)
(one
each
on both
right
and
left
sides)
,
which
mounting
the
engine
and
clutch
housing.
Next,
adjust
the
chain
block
suspending
the
engine
so that
the
stud bolt
will not be
under
excessive
load.
Then
pull
the
engine toward
the
front.
Fig.
22
1-2.
Dlsasembling
the
Engine
1. lnstall
the
engine on
the
special
tool
(No.
@90010
ENGINE
STAND)
by
mears of
one
bolt
and
three
nuts then
renpving
the
clutch
unit.
Fig.
23
21
.
Fis.
2l

_l
EN
GIN
E
2.
Draining
the
engine lubricants
Remove
the drain
plug
and
drain
off the engine
lubricants.
Fig.
24
3-
Remove
the
clutch, flywheel
and
crank
pulley
a.
As
shown
in
Fig.
25,
remove
6
pcs.
of scrarus
and
remove
the
clutch"
Make
sure
that
the
removal
order
for
screws
should
be diagonally
done.
Fig.
25
b. As
shown
in
Fig.
26, raise
up
the
lock
washer
of
its
bent
portion.
c.
As
shown
in
Fig.
26, install
the
special
tool
(No.
0490100
RtNG
GEAR
BRAKE)
so
that
the crank-
shaft
and
f lywheel
cannot
be
rotated.
d. Remove
6
pcs.
of the
rock
bolts
and
remove
the
flywheel
(A)
from
the
crankshaft.
Fig.
fi
e. Rernove
lock
bolt from
the
crank
pulley
(A)
at
the
front
of the
engine.
Fig"
27
f
.
Remove
the
special
tool
(No.
0490100
R
tNG
GEAR
BRAKE).
4. Removing
the
air
cleaner
a.
Loosen
two hose
bands,
and
remove
the hot
air
hose
(A)
from
the
air
cleaner
and
the
carburetor.
Fig.
28
b,
Loosen
two wing
nuts,
and
raise
the
clamp
(B).
Remove
the air
cleaner
bands
(c)
and
remove
the
air cleaner"
'*t
J

EN G INE
R
emoving
the
d
istributor
Pull
the
high
tension
wire
out of
each
spark
plug,
Pull
out
the vacuum
advance
hose
(A)
connected
to
the
distributor,
as
shown in
Fig.
30.
Unscraru
the nuts
(B),
and
pull
upward
the
distributor,
as
shown in Fig.
31.
Fig.
3l
Removing
the
V-belt
and
idler
assembly
Screw
in
the
adjusting
bolt
(A)
to make
the
V-belt
tight,
and
loosen
the
governor
pulley
lock
nub,
as
shown
in
Fig.
32.
Loosen
the adlusting
bolt
and
move
the
idler
pulley
(B
)
in the
direction
of
the
arrow
shown
in
F
is
33.
Then
pull
down the
governor
operating
lever
(C)
to the carburetor
side, and
remove
the
V-belt
(D)
from
each
pulley.
Unscrew
two
nuts
and
bolts, and
remove
the
idler
assembly
(E)
from
the
governor
bracket
and
the
timing
chain
cover.
Fb.
33
7.
Removing
the
governor
and
governor
bracket
a.
Remove
the
lock nut which
has
been already
loosened
according
to 6-a
above,
and
slip
the
governor pulley
(A)
off
the
governor
shaft. Then
remove
the
key
(B)
on
the
governor
shaft.
b
c.
Fig.
29
Fig.
fi
6.
a.
5.
ct.
b.
c.
';.
Fis.
32
Fig.
34

I
10
EN
GINE
b.
Remove
the
governor
operating
lever
and
remove
the
rod
assembly.
c.
Remove
the
nuts
and
bolts shornrn
in
Fig.
35.
d. Unscrew
three
nuts
shown in
Fig.
36,
and
remove
the
governor.
Remove
the
governor
bracket
and
remove
the engine
bracket
from
the cylinder
block.
Fig.35
e.
Unscrew
three
bolts and nuts
(
D), then,
the
gpvernor
(A),
the
go\emor
bnacket
(B)
and
the
engine
bracket ,(C)
which
have
already
.bem
removed
aaording
to 74
above, can
be separated.
Fig. 37
8.
Removing
the
cooling fan and
cooling
fan
oom-
plete
a. Unscrew
four
bolts, and
remove
the cboting
fan
(A)
,
fan
spacer,
pump
pulley
(B)
from
the
cooling
fan
complete.
b.
Unscrew
three
nuts,
and
remove
the cooling
fan
complete
(C)
and
alternator
strap from
the
rylin-
der
head.
c.
Take
out the thermosEt
from
the thermostat
casing.
'Removing
the
water
pump
Pull
the
inake rnanifold
water
hose
(A)
out
of
the
water
pump
by loosening
the clip.
Unscrew
four nuts,
and
remove
the alternator stay
(C)
and
water
pump
(B)
from
the cylinder head.
Fig.
fi
Fig.
39
:Fig.
s6
b.
Fig.
4l

EN
GIN
E
11
R
emoving
the
oil
f
ilter
Pull
out
the oil
level
gauge.
Remove
the oil
f
ilter
from the
cylinder
block
by
using an
special
tool
(No.
0490130 OIL
FILTER
WRENCH}
(A).
Fig.
42
I 1. Removing
the
fuel
filter
a. Unscrew the carburetor
connecting bolt,
remove
the
f
uel
hose
(Al
connected
to
carbu
retor.
b. Unscrew
two
nuts,
and
remove
the
fuel
pump
from
the cylinder block.
Then remove
the
and
the
(B)
in-
su
lator.
c.
Remove
the
oil
pressure
switeh
(C)
and
the
breather
pipe
(D).
Fis.
43
12.
R
emoving
the
carburetor
Unscrew
two
nuts, and
remove
the carburetor
(A).
Remove
the
insulator
(B)
from
the
intake
manif
old.
Fig.
44
13.
Removing
the
intake
manifold
Unscrew
eight
nuts
and
remove the
engine
hanger
(A).
Then
remove
the
intake
manifold
(B)
from
the
cyl
inder
head,
together
with the
governor
cover
stay
and the
a
ir cleaner
stay
mounted
thereon.
Fig. 45
14"
Rernoving
the exhaust manifold
Unscrew
eight nuts, remove
the
engine
hanger
(A)
,
and
then
remove
the
exhaust
manifold
(B)
from
the
cylinder
head.
10.
a.
b.
Fig.
46

-l
12
EN
GI
NE
-trlE
Fig.47
15.
Removing
the
rocker
arm cover
Unscrew
two
bolts
and
remove
the
rocker
arm
cover
from
the
cYlinder
head-
16.
Removing the
cylinder
hed
assembly
a. Unscrew ten
cylinder
head
nuts.
b.
Pull
upward
rocker
arm
asembly
(A).
c.
Pull
upward
eight
push
rods
(B).
d.
Remove
the
cylinder
head
assembly
(C)
from the
cylinder block.
e.
Remove the
cylinder
had
gasket.
Fis.
48
17.
Pull
eight
tappet
followers
from
the
cylinder
head
by using
a
proper
tool
such as
a magnet.
>'*.g-
ap
18. Removing
the
oil
pump
drive
gear
shaft.
a. Unscrew
two
nutS
and
remove the
oil
pump
drive
gear
cover
(A).
b.
Unscrew
three
nuts and
remove the
blind
cover
(B).
c.
Lift
off
the oil
pump
drive
gear
shaft
(D)
together
with the
shim
(E)
and
the
thrust
washer
(C)"
Fig.
fi
19. Turn
the
engine upside
down and
noW
the
oil
pan
is
upward.
20.
Removing
the oil
pan.
Undo twenty-two
nuts securing
the oil
pan
(B)
and
lift off the oil
pan
from
the
rylinder
block.
21
.
Unfasten
the
lock
bolts
and
remove the crank*raft
Pullqr
(A)
from
the crankshaft.
Fig.
5l
?E
,#€
Fi,.
49

EN
GI
]'IE
13
22.
Removing
the
timing
chain
cover
Undo
nine
nuts
and
remove the
timing chain
cover
(A)
Fig.
52
23.
Removing
the
chain
adjuster
assembly.
a. Undo
two nuts and
remove
the
chain
adjuster
assembly
(A).
b.
Remove
the oil baffle
plate
(B)
from
the
crank-
shaft.
c.
Remove
the
key
(C)
from
the
crankshaft.
d. Undo two nuts
and
remove
the
vibration damper
assembly
(D),
Fis.
53
24.
Removing the timing chain.
a"
Undo two
nuts securing the camshaft
(A)
b.
Remove
the
camshaft
& camsprocket
wheel
and
the timing
sprocket
wheel
together
with
the
timing
chain
(B)
from
the crankshaft
and
the
rylinder
block as
shown
in
Fig.
54.
{-t
Fig. 54
25.
Removing the
front
Plate.
Undo
two
nuts and
r'emove
the
front
plate
from
the
cylinder
block.
Fig.
55
n.
Removing
the oil
pump.
a. Loosen the
conn€tion nuts
and detach the oil
pipe
(A)
from
the
cylinder
block.
b.
Unscrew two
nuts
and
remove
the oil
strainer
(B)
from
the
oil
pump
(C).
c.
Unscrew
four
nuts
and lift up the oil
pump.
)
>-,
'\\
4,
{rir*
\
*
''
rl-.
l>*
Il
1r Il
ll
t
f=1
Di'r-
Fig.
56
>\-{
/