Raritan Dominion KX III Installation guide

Type
Installation guide

Raritan Dominion KX III is an enterprise-class, secure, digital KVM (Keyboard, Video, Mouse) switch that delivers the highest performance and flexibility for managing and controlling multiple servers from a single console. With its advanced features, the KX III enables IT administrators to securely access, monitor, and control physical and virtual servers, regardless of their location. You can use the KX III to:

  • Remotely access and control multiple servers from a single console
  • Manage servers from different locations over a network or the Internet
  • Securely access servers with strong encryption and authentication mechanisms
Dominion KX III Quick Setup Guide
1
QSG
-DKX3-v3.5.0-0J-E 255-62-0003-00-RoHS
Dominion® KX III
Thank for choosing the Dominion KX III, the industry's highest performance enterprise-class, secure, digital KVM
(Keyboard, Video, Mouse) switch.
This Quick Setup Guide explains how to install and configure the KX III. For details on using the KX III, access online help
from the application or the
Support page
http://www.raritan.com/support
on the Raritan website. Online help is your
primary resource but a PDF version of the help is also available on the Support page.
Package Contents
Each KX III ships as a stand-alone product in a standard 1U or
2U 19" rackmount chassis, depending on your KX III model.
The KX III device ships with the following contents:
1 - KX III device
1 - KX III Quick Setup Guide
1 - Rackmount kit
2 - AC power cords
1 - Set of 4 rubber feet (for desktop use)
1 - Application note
1 - Warranty card
QS Rule
In Raritan products that require Rack Mounting, please follow
these precautions:
Operation temperature in a closed rack environment may
be greater than room temperature. Do not exceed the
rated maximum ambient temperature of the appliances.
See
Specifications in online help.
Ensure sufficient airflow through the rack environment.
Mount equipment in the rack carefully to avoid uneven
mechanical loading.
Connect equipment to the supply circuit carefully to avoid
overloading circuits.
Ground all equipment properly, especially supply
connections, such as power strips (other than direct
connections), to the branch circuit.
QS Rule
Rack Mounting
The KX III can be mounted in 1U (1.75", 4.4 cm) of vertical
space in a standard 19" equipment rack.
Note: The Raritan device depicted in the rack mounting
diagrams is for example purposes only and may not depict
your device. The mounting instructions are specific to your
device.
Forward Mount
The steps correspond to the numbers shown in the front
rackmount diagrams.
1. Secure the cable-support bar to the back end of the side
brackets using two of the included screws.
2. Slide the KX III between the side brackets, with its rear
panel facing the cable-support bar, until its front panel is
flush with the “ears” of the side brackets.
3. Secure the KX III to the side brackets using the remaining
included screws (three on each side).
4. Mount the entire assembly in your rack, and secure the
side brackets' ears to the rack's front rails with your own
screws, bolts, cage nuts, and so on.
5. When connecting cables to the rear panel of the KX III,
drape them over the cable-support bar.
Rear Mount
The steps correspond to the numbers shown in the rear
rackmount diagrams.
1. Secure the cable-support bar to the front end of the side
brackets, near the side brackets' “ears,” using two of the
included screws.
2. Slide the KX III between the side brackets, with its rear
panel facing the cable-support bar, until its front panel is
flush with the back edges of the side brackets.
3. Secure the KX III to the side brackets using the remaining
included screws (three on each side).
QUICK SETUP GUIDE
Dominion KX III Quick Setup Guide
2
QSG
-DKX3-v3.5.0-0J-E 255-62-0003-00-RoHS
4. Mount the entire assembly in your rack and secure the
side brackets' ears to the rack's front rails with your own
screws, bolts, cage nuts, and so on.
5. When connecting cables to the rear panel of the user
station or switch, drape them over the cable-support bar.
QS Rule
Step 1: Configuring Network Firewall Settings
TCP Port 5000
Enable remote access to KX III by allowing network and
firewall communication on TCP Port 5000.
Alternatively, configure KX III to use a different TCP port, and
allow that port network and firewall communication.
TCP Port 443
Allow access to TCP Port 443 (Standard HTTPS) so you can
access KX III via a web browser.
TCP Port 80
Allow access to TCP Port 80 (Standard HTTP) to enable
automatic redirection of HTTP requests to HTTPS.
QS Rule
Step 2: Configuring KVM Target Servers
Mouse Settings
Raritan recommends using Absolute Mouse Synchronization
to minimize mouse settings on target servers. For additional
information, see
Additional Supported Mouse Settings
(http://www.raritan.com/help/kx-iii/v3.0.0/en/index.htm#3
3105) Additional Supported Mouse Settings in Online Help.
In this mode, absolute coordinates are used to keep the client
and target cursors in synch, even when the target mouse is
set to a different acceleration or speed.
This mode is supported on servers with USB ports and is the
default mode for virtual media CIMs.
Absolute Mouse Synchronization requires the use of a virtual
media CIM -
D2CIM-VUSB
D2CIM-DVUSB
D2CIM-DVUSB-DVI
D2CIM-DVUSB-HDMI
D2CIM-DVUSB-DP
Target Server Video Resolutions
For a list of supported target video server resolutions, see KX
III Supported Target Server Video Resolutions in Online
Help.
QS Rule
Step 3: Connecting the Equipment
A: AC Power
1. Use the power cords that came with KX III. Use both cords
with AC power outlets for dual-power failover protection.
Optional For details on enabling power supply autodetection
from the Remote Console, see Specify Power Supply
Autodetection in online help.
B: Network Ports
Connect a standard Ethernet cable from the LAN1 network
port to an Ethernet switch, hub, or router.
To enable the failover or isolation mode capabilities, connect
a standard Ethernet cable from the LAN2 network port to an
Ethernet switch, hub, or router.
Dominion KX III Quick Setup Guide
3
QSG
-DKX3-v3.5.0-0J-E 255-62-0003-00-RoHS
C: Local User Port (Local Console)
To connect the keyboard and mouse:
Connect a USB keyboard and mouse to the respective
Local User port on the back of KX III.
Use the KX III Local User port for administrative and target
device access at the rack. The Local User port is required for
installation and setup, but is optional for subsequent use.
D: Local DVI-D Port
A single link DVI cable is used to connect to a local DVI
monitor or keyboard tray (not included with the KX III).
Connect to the DVI port on Raritan's T1700-LED or T1900-LED
keyboard tray.
Use a required DVI-D to VGA converter to connect to VGA
monitors. See Connect to a VGA Monitor (Optional)
(http://help.raritan.com/kx-iii/v3.0.0/en/#32544)Online
Help
E. Connect Target Servers to KX III
1. Connect the keyboard, mouse and video plugs on the CIM
to the corresponding ports on the target server.
2. Connect the CIM to an available target server port on the
back of the KX III via a Cat5/5e/6 cable.
F. Tier (Optional)
See Configuring and Enabling Tiering
(http://www.raritan.com/help/kx-iii/v3.2.0/en/index.htm#3
3184) in Online Help.
G: Modem Port (Optional) - KX III QSG
See Configuring Modem Settings in Online Help
H: Dominion Serial Access Module (Optional)
Connecting a KX III and a Dominion Serial Access Module
(DSAM) provides serial access for the KX III.
1. Connect the DSAM unit's USB cable to any USB port on the
KX III device.
2. Connect the serial devices to the serial ports on the DSAM
unit.
QS Rule
Step 4: Configuring the KX III
For the following steps, you must change the default
password and assign the KX III its IP address at the Local
Console.
All other steps can be performed either from the Local
Console, or the KX III Remote Console via a supported web
browser using the KX III's default IP address.
Java
1.7 or 1.8 is required to use the Java-based Virtual KVM
Client. Java 1.8.0_40 is required to use the VKCS.
Microsoft .NET
®
4.0 (or later) is required to use KX III with the
Microsoft Windows
®
-based Active KVM Client (AKC).
Factory Default Login Information
The KX III device is shipped from the factory with the following
default settings built in:
Username = admin
All lowercase.
This user has administrative privileges.
Password = raritan
All lowercase.
IP address = 192.168.0.192
Important: For backup and business continuity purposes, it
is strongly recommended you create a backup
administrator username and password, and keep that
information in a secure location.
Change the Default Password
The first time you start the KX III device, you are required to
change the default password.
1. Once the unit has booted, enter the default username
admin and password raritan.
2. Click Login.
3. Enter the old password raritan, then enter and reenter
a new password.
4. Passwords can be up to 64 characters in length consisting
of English alphanumeric characters and special
characters.
5. Click Apply.
6. Click OK on the Confirmation page.
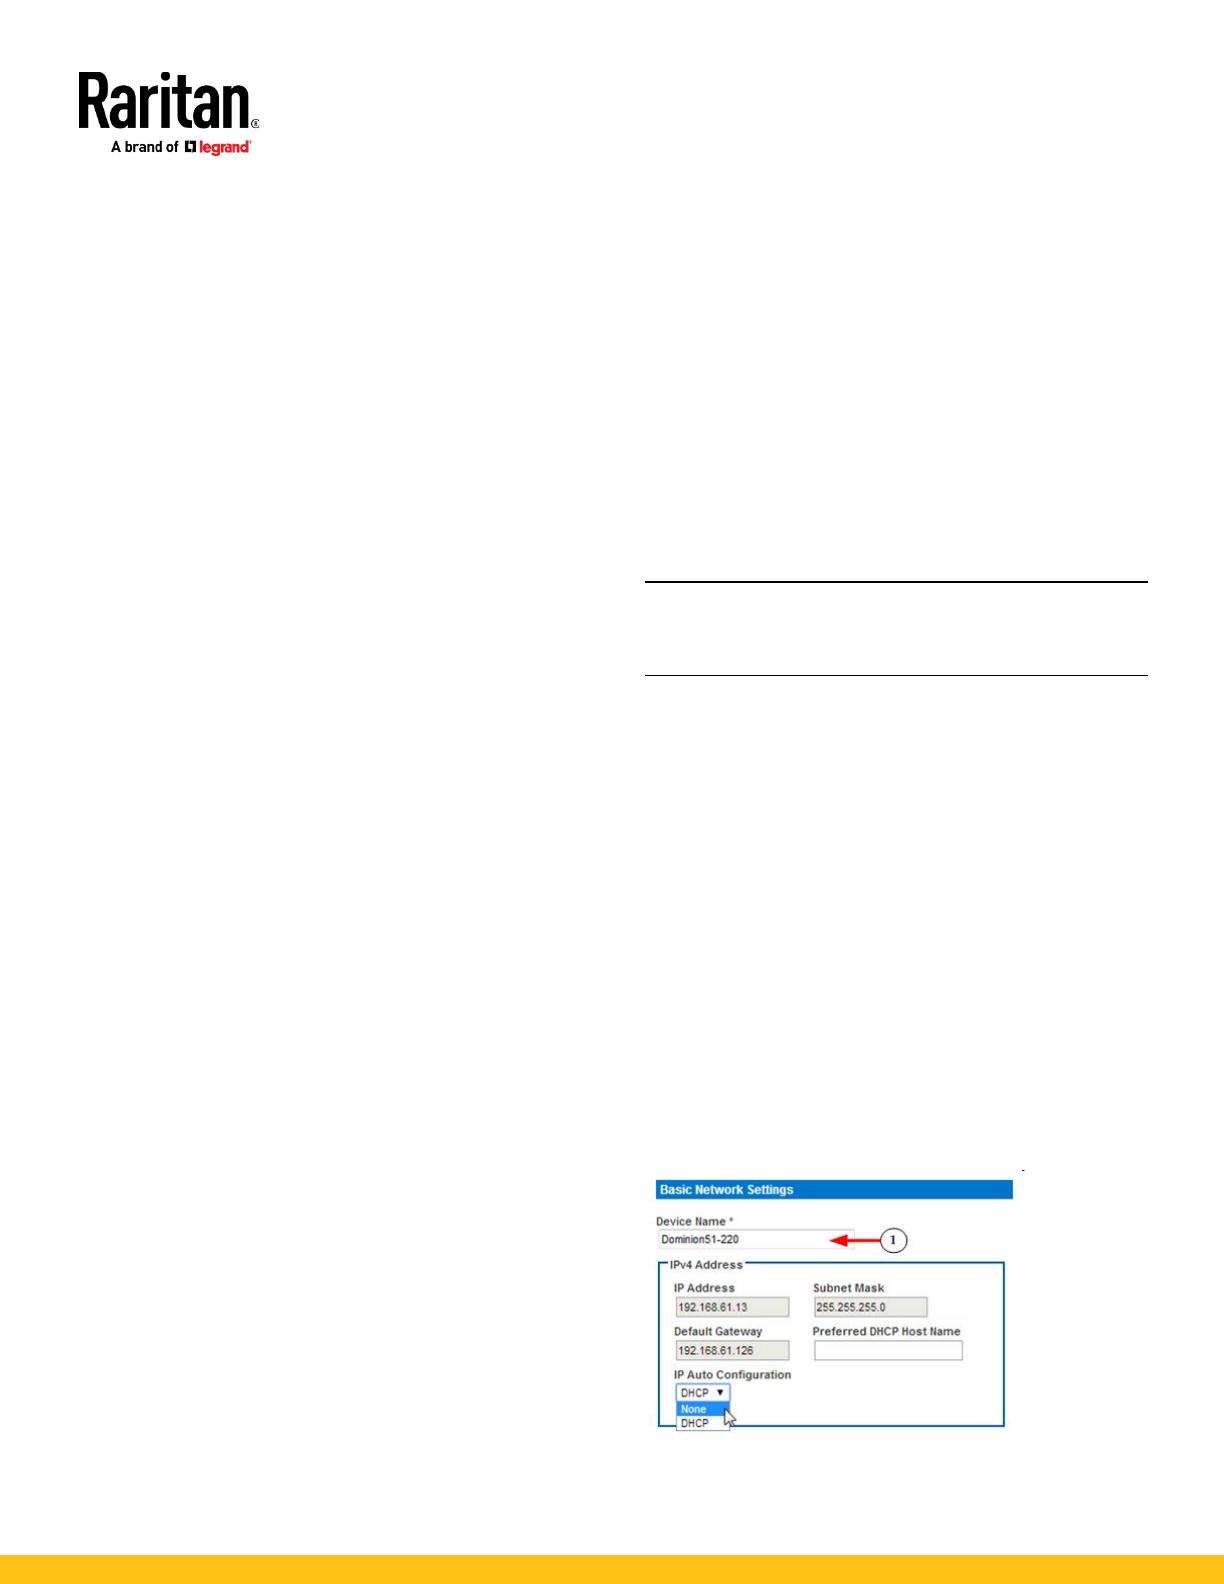
Assign the KX III a Device Name
Open the Device Network Settings page in the KX III Remote
client
1. Specify a meaningful Device Name for your KX III device.
Dominion KX III Quick Setup Guide
4
QSG
-DKX3-v3.5.0-0J-E 255-62-0003-00-RoHS
Up to 32 alphanumeric and valid special characters, no
spaces between characters.
Next, configure the IP address and DNS settings.
Choose Failover or Isolation Mode
Configure KX III for Dual LAN Failover Mode
(on page 4)
Configure KX III for Dual LAN Isolation Mode
(on page 5)
Configure KX III for Dual LAN Failover Mode
LAN1 and LAN2 share the same IP address to support
automatic failover.
LAN1 is the primary port. If LAN1 fails, LAN2 is used to access
KX III.
1. Select Device Settings > Network to open the Device
Network Settings page.
2. Set the IP Auto Configuration to
None
in the IPv4 section.
3. Select the "Enable Automatic Failover" checkbox under
LAN Interface Settings to enable failover.
4. Manually specify the network parameters by entering the
Default Gateway.
5. Enter the IPv4 IP Address, if needed. The default IP
address is 192.168.0.192.
6. Enter the IPv4 Subnet Mask. The default subnet mask is
255.255.255.0.
7. The LAN1 settings are applied to LAN2 if failover occurs.
8. Complete the IPv6 sections, if applicable.
9. Select the IP Auto Configuration.
If
None
is selected, you must manually specify -
Global/Unique IP Address - this is the IP address
assigned to KX III.
Prefix Length - this is the number of bits used in
the IPv6 address.
Gateway IP Address.
Select
Router Discovery
to locate a Global or Unique IPv6
address instead of a Link-Local subnet. Once located, the
address is automatically applied.
Note that the following additional, read-only information
appears in this section -
Link-Local IP Address - this address is automatically
assigned to the device. It is used for neighbor
discovery or when no routers are present.
Zone ID - Identifies the device the address is
associated with. Read-Only
10. Next, select "Use the Following DNS Server Addresses"
and enter the Primary DNS Server IP Address and
Secondary DNS Server IP Address. The secondary address
is used if the primary DNS server connection is lost due to
an outage.
Note: "Obtain DNS Server Address Automatically" and
"Preferred DHCP Host Name" are only enabled when KX
III is configured in DHCP mode
11. When finished, click OK. Your KX III device is now network
accessible.
Dominion KX III Quick Setup Guide
5
QSG
-DKX3-v3.5.0-0J-E 255-62-0003-00-RoHS
Configure KX III for Dual LAN Isolation Mode
Isolation mode allows you to access each LAN port
independently using different IP addresses.
Failover is not supported in this mode.
1. Select Device Settings > Network to open the Device
Network Settings page.
2. Set the IP Auto Configuration to
None
in the IPv4 section.
3. Ensure the "Enable Automatic Failover" checkbox is not
selected.
4. If needed, manually specify the network parameters by
entering the Default Gateway and then complete the steps
that follow.
Alternatively, if you do not want to set a static IP, see
Disable or Enable DHCP in KX III.
5. Enter the IP address you want to use to connect to the KX
III LAN1. The default IP address is 192.168.0.192.
6. Enter the IPv4 Subnet Mask. The default subnet mask is
255.255.255.0.
7. In the LAN2 IPv4 section, set the IP Auto Configuration to
None
.
8. Enter the IP address you want to use to connect to the KX
III LAN2.
9. Enter the LAN2 IPv4 Default Gateway and Subnet Mask.
10. Complete the IPv6 sections, if applicable.
11. Select the IP Auto Configuration.
If
None
is selected, you must manually specify -
Global/Unique IP Address - this is the IP address
assigned to KX III.
Prefix Length - this is the number of bits used in
the IPv6 address.
Gateway IP Address.
Select
Router Discovery
to locate a Global or Unique IPv6
address instead of a Link-Local subnet. Once located, the
address is automatically applied.
Note that the following additional, read-only information
appears in this section -
Link-Local IP Address - this address is automatically
assigned to the device. It is used for neighbor
discovery or when no routers are present.
Zone ID - Identifies the device the address is
associated with. Read-Only
12. Select "Use the Following DNS Server Addresses" and
enter the Primary DNS Server IP Address and Secondary
DNS Server IP Address. The secondary addresse is used if
the primary DNS server connection is lost due to an
outage.
Note: "Obtain DNS Server Address Automatically" and
"Preferred DHCP Host Name" are only enabled when KX
III is configured in DHCP mode
13. When finished, click OK.
Your KX III device is now accessible via the LAN1 IP
address and the LAN2 IP address.
Name Your Target Servers
Connect all of the target servers if you have not already done
so.
Dominion KX III Quick Setup Guide
6
QSG
-DKX3-v3.5.0-0J-E 255-62-0003-00-RoHS
Select Device Settings > Port Configuration, then click the
Port Name of the target server you want to name.
1. Enter a name for the server up to 32 alphanumeric and
special characters. Click OK.
Specify Power Supply Autodetection
KX III provides dual power supplies.
When both power supplies are used, KX III automatically
detects them and notifies you of their status. Additionally,
both the Powerln1 and Powerln2 Auto Detect checkboxes are
automatically selected on the Power Supply Setup page.
If you are using only one power supply, you can enable
automatic detection for only the power supply in use.
When only one power input is connected, the Power LED on
the front of the KX III device is Red when the checkbox is
selected for an unconnected power supply, and Blue when the
checkbox is not selected for an unconnected power supply.
To enable automatic detection for the power supply in
use:
1. Select Device Settings > Power Supply Setup.
Select the Powerln1 Auto Detect option if you are
plugging power input into power supply number one.
(The left-most power supply at the back of the device
when you are facing rear of the device.)
Or
Select the Powerln2 Auto Detect option if you are
plugging power input into power supply number two.
(The right-most power supply at the back of the
device when you are facing rear of the device.)
2. Click OK.
Configure Date/Time Settings
The date and time settings impact SSL certificate validation if
LDAPS is enabled. Configuring the date and time also ensures
your audit logs will be timestamped correctly.
There are two ways to do this:
Manually set the date and time.
Dominion KX III Quick Setup Guide
7
QSG
-DKX3-v3.5.0-0J-E 255-62-0003-00-RoHS
Synchronize the date and time with a Network Time
Protocol (NTP) server.
1. Choose Device Settings > Date/Time to open the
Date/Time Settings page.
2. Choose your time zone from the Time Zone drop-down
list.
3. Adjust for daylight savings time by checking the "Adjust
for daylight savings time" checkbox.
4. Choose the method to use to set the date and time:
User Specified Time - use this option to input the date
and time manually. For the User Specified Time option,
enter the date and time. For the time, use the hh:mm
format (using a 24-hour clock).
Synchronize with NTP Server - use this option to
synchronize the date and time with the Network Time
Protocol (NTP) Server.
For the Synchronize with NTP Server option:
Enter the IP address of the Primary Time server.
Enter the IP address of the Secondary Time server.
Optional
Note: If DHCP is selected for the Network Settings on the
Network page, the NTP server IP address is
automatically retrieved from the DHCP server by default.
Manually enter the NTP server IP address by selecting
the Override DHCP checkbox.
5. Click OK.
QS Rule
Step 5: Launching the KX III Remote Console
1. Launch a supported web browser, and enter the IP
address assigned to the KX III. A default client is launched
based on your pc and browser settings. See the online
help for details about clients.
2. Enter your username and password, then click Login.
3. Accept the user agreement (if applicable).
4. If security warnings appear, click to accept.
Tip: If you have a Dominion KX III User Station, you can use it
to remotely access the KX III target servers. See
Dominion KX
III User Station
(on page 9).
Access and Control Target Servers Remotely
The KX III Port Access page provides a list of all KX III ports.
The page also lists all of the target servers connected to the
KX III along with their status and availability.
Access a Target Server from the KX III
1. On the KX III Port Access page, click the Port Name of the
target you want to access. The Port Action Menu is
displayed.
2. Choose Connect from the Port Action menu.
A KVM window opens with a connection to the target.
Switch between Target Servers
1
While already using a target server, access the KX
III Port Access page.
2
Click the port name of the target you want to
access. The Port Action menu appears.
3
Choose Switch From. The new target server you
selected is displayed.
Dominion KX III Quick Setup Guide
8
QSG
-DKX3-v3.5.0-0J-E 255-62-0003-00-RoHS
Disconnect from a Target Server
To disconnect a target:
On the Port Access page, click the port name of the target
you want to disconnect from, then click Disconnect on the
Port Action menu when it appears.
Or
Close the client window.
QS Rule
Step 6: Configuring the Keyboard Language
(Optional)
Note: This step is not required if you are using the
US/International language keyboard.
If you are using a non-US language, the keyboard must be
configured for the appropriate language.
Additionally, the keyboard language for the client machine
and the KVM target servers must match.
Consult your operating system documentation for additional
information about changing the keyboard layout.
QS Rule
Step 7: Create and Install an SSL Certificate
Raritan strongly recommends you install your own SSL
Certificate in each KX III device.
This security best practice reduces the number of Java
warning messages, and avoids man-in-the-middle attacks.
It also prevents future Java versions and browser versions
from blocking access to your KX III device.
For information creating and installing SSL certificates, see
SSL Certificates
http://www.raritan.com/help/kx-iii/v3.0.0/en/index.htm#1
1942
KX III Online Help.
Converting a Binary Certificate to a Base64-Encoded
DER Certificate (Optional)
KX III requires an SSL certificate in either Base64-Encoded
DER format or PEM format.
If you are using an SSL certificate in binary format, you cannot
install it.
However, you can convert your binary SSL certificate.
1. Locate the DEGHKVM0001.cer binary file on your Windows
machine.
Double-click on the DEGHKVM0001.cer file to open its
Certificate dialog.
2. Click the Detail tab.
3. Click "Copy to File...".
Dominion KX III Quick Setup Guide
9
QSG
-DKX3-v3.5.0-0J-E 255-62-0003-00-RoHS
4. The Certificate Export Wizard opens. Click Next to start
the Wizard.
5. Select "Base-64 encoded X.509" in the second Wizard
dialog.
6. Click Next to save the file as a Base-64 encoded X.509.
You can now install the certificate on your KX III.
QS Rule
Dominion KX III User Station
To use a standalone appliance instead of the KX III Remote
Console to access servers and computer devices connected to
the KX III's, you can purchase the Dominion User Station from
Raritan.
One User Station can access servers connected to multiple KX
III's for easy access and fast switching over your LAN/WAN
networks.
For detailed information, refer to the user documentation
from the User Station's section on the Raritan website's
Support page
(
http://www.raritan.com/support/
).
QS Rule
Additional Information
For more information about KX III and the entire Raritan
product line, see Raritan's website (www.raritan.com). For
technical issues, contact Raritan Technical Support. See the
Contact Support page in the Support section on Raritan's
website for technical support contact information worldwide.
Raritan's products use code licensed under the GPL and LGPL. You can request
a copy of the open source code. For details, see the Open Source Software
Statement at
(http://www.raritan.com/about/legal-statements/open-source-software-statem
ent/) on Raritan's website.
  • Page 1 1
  • Page 2 2
  • Page 3 3
  • Page 4 4
  • Page 5 5
  • Page 6 6
  • Page 7 7
  • Page 8 8
  • Page 9 9

Raritan Dominion KX III Installation guide

Type
Installation guide

Raritan Dominion KX III is an enterprise-class, secure, digital KVM (Keyboard, Video, Mouse) switch that delivers the highest performance and flexibility for managing and controlling multiple servers from a single console. With its advanced features, the KX III enables IT administrators to securely access, monitor, and control physical and virtual servers, regardless of their location. You can use the KX III to:

  • Remotely access and control multiple servers from a single console
  • Manage servers from different locations over a network or the Internet
  • Securely access servers with strong encryption and authentication mechanisms

Ask a question and I''ll find the answer in the document

Finding information in a document is now easier with AI