
THANK YOU
We appreciate the trust and confidence you have placed in Home Decorators Collection through the purchase of this light fixture. We strive to
continually create quality products designed to enhance your home. Visit us online to see our full line of products available for your home
improvement needs. Thank you for choosing Home Decorators Collection!
Item # 1003 158 554
1003 158 558
Model # 7970HDCANDI
7970HDCGIDI
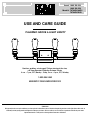
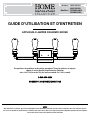
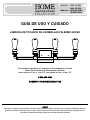
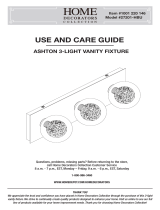
USE AND CARE GUIDE
PALERMO GROVE 4-LIGHT VANITY
Questions, problems, missing parts? Before returning to the store,
call Home Decorators Collection Customer Service
8 a.m. – 7 p.m., EST, Monday – Friday, 9 a.m. – 6 p.m., EST, Saturday
1-800-986-3460
HOMEDEPOT.COM/HOMEDECORATORS

2
Table of Contents
Table of Contents .......................................................... 2
Safety Information ......................................................... 2
Warranty ......................................................................... 2
Pre-Installation .............................................................. 3
Installation ..................................................................... 5
Care and Maintenance ................................................. 7
Troubleshooting ............................................................ 7
Safety Information
Read and understand this entire manual before you attempt to
assemble, install, or operate this product.
WARNING: Read instructions carefully and turn off the
electricity at the main circuit breaker panel before you
begin this installation.
WARNING:
If any special control devices are used with
this fixture, follow the instructions carefully to assure full
compliance with N.E.C. requirements. If there are any
questions, contact a qualified electrical contractor.
WARNING: This product can expose you to chemicals
including lead and lead compounds, which are known to the
State of California to cause cancer and birth defects or
other reproductive harm. For more information, go to
www.P65Warnings.ca.gov.
WARNING: Risk of fire. 90°C supply conductors. Consult
a qualified electrician to ensure the correct branch circuit
conductor.
CAUTION: All glass is fragile. Use care when handling
glass shades and bulbs.
Warranty
The manufacturer warrants this lighting fixture to be free from defects in materials and workmanship for a period of three (3) years from the
date of purchase. This warranty applies only to the original consumer purchaser and only to products used in normal use and service. If this
product is found to be defective, the manufacturer’s only obligation, and your exclusive remedy, is the repair or replacement of the product
at the manufacturer’s discretion, provided that the product has not been damaged through misuse, abuse, accident, modifications,
alterations, neglect, or mishandling. This warranty shall not apply to any product that is found to have been improperly installed, set-up, or
used in any way not in accordance with the instructions supplied with the product. This warranty shall not apply to a failure of material or
workmanship. This warranty shall not apply to the finish on any portion of the product, such as surface and/or weathering, as this is
considered normal wear and tear. The manufacturer does not warrant and specially disclaims any warranty, whether express or implied, of
fitness for a particular purpose, other than the warranty contained herein. The manufacturer specifically disclaims any liability and shall not
be liable for any consequential or incidental loss or damage, including but not limited to any labor / expense costs involved in the
replacement or repair of said product.
Contact the Customer Service Team at 1-800-986-3460 or visit www.HomeDepot.com/HomeDecorators.

3 HOMEDEPOT.COM/HOMEDECORATORS
Please contact 1-800-986-3460 for further assistance.
Pre-Installation
PLANNING INSTALLATION
Before beginning installation, make sure all parts are included using the Hardware Included and Package Contents sections. If any part is
missing or damaged, do not attempt to assemble, install, or operate the product.
To avoid damaging this product, place it on a soft, non-abrasive surface, such as carpet or cardboard.
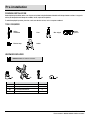
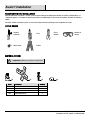
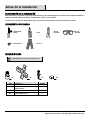
TOOLS REQUIRED
Phillips
screwdriver
Pliers
Wire stripper
Safety
glasses
Electrical tape
Ladder
HARDWARE INCLUDED
NOTE: Hardware not shown to actual size.
Part
Description
Quantity
AA
Wire nut
3
BB
Mounting bracket with ground screw
1
CC
#8-32 Screw with hex nut
2
DD
#8-32 Cylinder nut
2
AA BB
CC DD

4
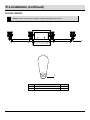
Pre-Installation (continued)
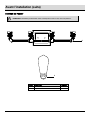
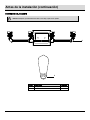
PACKAGE CONTENTS
NOTE: This fixture can be installed as an uplight or downlight, depending upon your preference.
Part
Description
Quantity
A
Light fixture
1
B
60 Watt bulb
4
A
B

5 HOMEDEPOT.COM/HOMEDECORATORS
Please contact 1-800-986-3460 for further assistance.
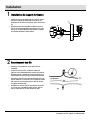
Installation
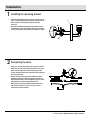
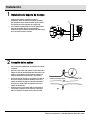
1
Installing the mounting bracket
□ Install the two mounting screws with hex nuts (CC) into the
holes in the mounting bracket (BB). Make sure they line up
with the holes in the back plate portion of the light
fixture (A).
□ Attach the mounting bracket (BB) to the outlet box using
the outlet box screws (not included). Ensure the mounting
screws (CC) protrude away from the junction box as shown.
2
Connecting the wires
□ Strip 3/8 in. of insulation from the wire ends of the fixture.
□ Using wire nuts (AA), connect the white fixture wire to the
white (neutral) supply wire from the junction box. Then
connect the black fixture wire to the black (live) supply wire
from the junction box.
□ Connect the ground wire from the junction box and the
ground wire from the fixture to the ground screw on the
mounting bracket (BB). Tighten the ground screw to secure
both ground wires to the mounting bracket (BB).
□ Wrap electrical tape (not included) around the wire nuts
(AA), and ensure they are secure. Then push all wire
connections into the outlet box.
BB
CC
A

6
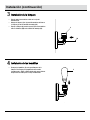
Installation (continued)
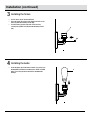
3
Installing the fixture
□ Push all excess wires into the outlet box.
□ Place the fixture (A) on the wall by aligning the holes in the
fixture (A) with the mounting screws (CC).
□ Push the fixture (A) against the wall and secure it by
screwing the cylinder nuts (DD) onto the mounting screws
(CC).
4
Installing the bulb
s
□ Screw the bulbs (B) into the fixture sockets. This fixture uses
60-watt MAX, incandescent, medium-base, SBCFL or SBLED
bulbs. Ensure that you do not exceed the recommended
wattage.
CC
A
DD
B

7 HOMEDEPOT.COM/HOMEDECORATORS
Please contact 1-800-986-3460 for further assistance.
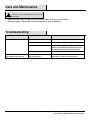
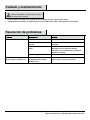
Care and Maintenance
WARNING: Before you perform any cleaning or
maintenance work, turn off the electricity at the main circuit
breaker panel.
□ Wipe the fixture with a damp, soft cloth. Do not use any abrasive cleaners or cleaners that contain alcohol.
□ When replacing bulbs, use 60-watt MAX, incandescent, medium-base, SBCFL or SBLED bulbs.
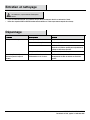
Troubleshooting
Problem
Possible Cause
Solution
The light will not turn on.
A bulb is burned out.
Replace the bulb.
The power is off.
Ensure the power supply is on.
There is a faulty wire connection.
Check the wiring.
Contact a qualified and licensed electrician if you are
not comfortable troubleshooting wiring problems.
There is a faulty switch.
Test or replace the switch.
The fuse blows or the circuit breaker
trips when the light is turned on.
There are crossed wires or the power
wire is grounding out.
Discontinue use of the fixture. Check the wire
connections or contact a qualified electrician.

Questions, problems, missing parts? Before returning to the store,
call Home Decorators Collection Customer Service
8 a.m. – 7 p.m., EST, Monday – Friday, 9 a.m. – 6 p.m., EST, Saturday
1-800-986-3460
HOMEDEPOT.COM/HOMEDECORATORS
Retain this manual for future use.
Page is loading ...
Page is loading ...
Page is loading ...
Page is loading ...
Page is loading ...
Page is loading ...
Page is loading ...
Page is loading ...
Page is loading ...
Page is loading ...
Page is loading ...
Page is loading ...
Page is loading ...
Page is loading ...
Page is loading ...
Page is loading ...
-
 1
1
-
 2
2
-
 3
3
-
 4
4
-
 5
5
-
 6
6
-
 7
7
-
 8
8
-
 9
9
-
 10
10
-
 11
11
-
 12
12
-
 13
13
-
 14
14
-
 15
15
-
 16
16
-
 17
17
-
 18
18
-
 19
19
-
 20
20
-
 21
21
-
 22
22
-
 23
23
-
 24
24


Home Decorators Collection 7970HDCANDI Installation guide
- Type
- Installation guide
- This manual is also suitable for
Ask a question and I''ll find the answer in the document
Finding information in a document is now easier with AI
in other languages
Related papers
-
Home Decorators Collection 7969HDCAN Installation guide
-
-
-
-
-
Home Decorators Collection HD-8003 BN Installation guide
-
Home Decorators Collection XL-19905 User guide
-
-
-
Other documents
-
Kanto 310UDHHBK User manual
-
Maxax YX-450 Operating instructions
-
-
 Hampton Bay 27201-HBU Operating instructions
-
Access Lighting 20149LEDDMGLP-BL User manual
-
 Hampton Bay IHX9115A Operating instructions
-
Cordelia Lighting 2619-07 Installation guide
-
Good Lumens by Madison Avenue 70004 Operating instructions
-
-
Eurotherm California Proposition 65 Owner's manual

