Page is loading ...

HOUSING INSTALLATION TRIM INSTALLATION
TRIM RING INSTALLATION
1. Connect Female and male connector
2. Connect cases of female and male connector by pushing
5" LED SQUARE RECESSED FIXTURE
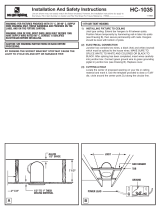
1. FASTENING FIXTURE TO CEILING
• Joist-type ceiling-extend bar hangers to fit between joists.
Position fixture temporarily by hammering “Nail” into joists.
(Drawing2) then secure permanently with nails Hanger should be
level with bottom of joists.
• Suspended (T-bar) ceilings-extend bar hangers 1” past T-bars,
then rest fixture on T-bars, Secure fixture to T-bars with wire
(drawing3)
1
2
3
3. ELECTRICAL CONNECTION
1. Remove spring latched junction box door and connect fixture
wires to building wires in the following sequence White fixture wire
to white neutral wire black fixture
wire to (hot) black wire and green ground wire to bare ground wire
2. Use push-in type wire connectors supplied or white nuts
3. Replace junction box door
2
. CUTTING A HOLE
Locate the center of proposed opening on your tile or celling
material and mark it.
3. Secure square trim into housing by squeezing the ends of
torsion springs together, inserting them into the brackets inside the
housing, then releasing the springs.
* Secure square ring into the trim by squeezing the ends of torsion
springs together, inserting them into square holes, then releasing
the springs.
Push-In connector
5-3/4"
5-3/4"
Female connector
Male connector
Connector case
Torsion
spring
Bracket
Torsion spring
HOUSING INSTALLATION
TRIM INSTALLATION
TRIM RING INSTALLATION
1. Connect Female and male connector
2. Connect cases of female and male connector by pushing
5" LED SQUARE RECESSED FIXTURE
DLQ5
1. FASTENING FIXTURE TO CEILING
• Joist-type ceiling-extend bar hangers to t between joists.
Position xture temporarily by hammering “Nail” into joists.
(Drawing2) then secure permanently with nails Hanger should be
level with bottom of joists.
• Suspended (T-bar) ceilings-extend bar hangers 1” past T-bars,
then rest fixture on T-bars, Secure fixture to T-bars with wire
(drawing3)
1
2
3
3. ELECTRICAL CONNECTION
1. Remove spring latched junction box door and connect fixture
wires to building wires in the following sequence White fixture wire
to white neutral wire black fixture
wire to (hot) black wire and green ground wire to bare ground wire
2. Use push-in type wire connectors supplied or white nuts
3. Replace junction box door
2. CUTTING A HOLE
Locate the center of proposed opening on your tile or celling
material and mark it.
3. Secure square trim into housing by squeezing the ends of
torsion springs together, inserting them into the brackets inside the
housing, then releasing the springs.
* Secure square ring into the trim by squeezing the ends of torsion
springs together, inserting them into square holes, then releasing
the springs.
Push-In connector
5-3/4"
5-3/4"
Female connector
Male connector
Torsion
spring
Bracket
Torsion spring
TURN OFF POWER AT BREAKER PANEL BEFOR WIRING
/