Chicco KeyFit® Caddy User manual
- Category
- Strollers
- Type
- User manual
Chicco KeyFit® Caddy
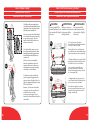
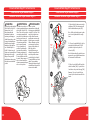
The Chicco KeyFit Caddy is a lightweight and portable stroller frame that can be used with the Chicco KeyFit or KeyFit 30 infant car seat. It allows you to easily transport your baby from the car to the stroller without having to wake them up. The Caddy can be used in 3 different modes: infant car seat carrier, toddler stroller, and shopping cart.
- Infant car seat carrier: The Caddy can be used to transport your infant car seat from the car to the stroller without having to wake your baby up. The car seat simply clicks into the Caddy's frame, and you're ready to go.
Chicco KeyFit® Caddy
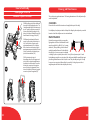
The Chicco KeyFit Caddy is a lightweight and portable stroller frame that can be used with the Chicco KeyFit or KeyFit 30 infant car seat. It allows you to easily transport your baby from the car to the stroller without having to wake them up. The Caddy can be used in 3 different modes: infant car seat carrier, toddler stroller, and shopping cart.
- Infant car seat carrier: The Caddy can be used to transport your infant car seat from the car to the stroller without having to wake your baby up. The car seat simply clicks into the Caddy's frame, and you're ready to go.


-
 1
1
-
 2
2
-
 3
3
-
 4
4
-
 5
5
-
 6
6
-
 7
7
-
 8
8
-
 9
9
-
 10
10
-
 11
11
-
 12
12
-
 13
13
-
 14
14
-
 15
15
-
 16
16
-
 17
17
-
 18
18
-
 19
19
-
 20
20


Chicco KeyFit® Caddy User manual
- Category
- Strollers
- Type
- User manual
Chicco KeyFit® Caddy
The Chicco KeyFit Caddy is a lightweight and portable stroller frame that can be used with the Chicco KeyFit or KeyFit 30 infant car seat. It allows you to easily transport your baby from the car to the stroller without having to wake them up. The Caddy can be used in 3 different modes: infant car seat carrier, toddler stroller, and shopping cart.
- Infant car seat carrier: The Caddy can be used to transport your infant car seat from the car to the stroller without having to wake your baby up. The car seat simply clicks into the Caddy's frame, and you're ready to go.
Ask a question and I''ll find the answer in the document
Finding information in a document is now easier with AI
in other languages
- français: Chicco KeyFit® Caddy Manuel utilisateur
- español: Chicco KeyFit® Caddy Manual de usuario
Related papers
-
Chicco Cortina Together Owner's manual
-
-
Chicco Cortina User manual
-
-
-
-
-
Chicco PACK URBAN PLUS Owner's manual
-
Chicco TRE® Jogging Stroller Owner's manual
-
Other documents
-
Kondator 427-CS02G Datasheet
-
 Cart-Tek GRi-1500Li User manual
-
Joovy Tricycoo LX User manual
-
Volkswagen Caddy 2004 Self-Study Programme
-
 Bat-caddy X3 PRO User manual
-
 Kolcraft KJ002 Product Instruction
-
-
 Contours OPTIONS ZT017 Product Instruction
-
 Kolcraft S75-T-R1 11/10 User manual
-


