BIXOLON SRP-380 Installation guide

Category
Print & Scan
Type
Installation guide

BIXOLON SRP-380 is a compact and efficient thermal receipt printer designed for a wide range of retail and hospitality applications. With its fast print speed of up to 250mm/second and a print resolution of 203dpi, it ensures quick and high-quality receipt printing. The SRP-380 supports various paper widths, including 58mm and 80mm, providing flexibility for different receipt sizes. It features easy paper loading and a user-friendly control panel with indicator lights for power, error, and paper status.

BIXOLON SRP-380 is a compact and efficient thermal receipt printer designed for a wide range of retail and hospitality applications. With its fast print speed of up to 250mm/second and a print resolution of 203dpi, it ensures quick and high-quality receipt printing. The SRP-380 supports various paper widths, including 58mm and 80mm, providing flexibility for different receipt sizes. It features easy paper loading and a user-friendly control panel with indicator lights for power, error, and paper status.

Information
This installation guide contains only simple information required for the installation of
the product. Detailed information of the installation can be found on the "Download"
tab of BIXOLON website (www.bixolon.com) and, it includes the following contents.
1. Manual: User’s Manual, Code Page Manual, Command Manual,
Network Manual, Software Manuals
2. Driver: Windows Driver, OPOS Driver, JPOS Driver,
CUPS (Linux, Mac) Driver, Virtual Port Driver
3. SDK: Windows POS SDK, iOS SDK, Android SDK, Xamarin SDK
We at Bixolon Co., Ltd. constantly strive to improve product functions and quality.
To do this, the specifications of our product and the contents of the manual may
change without prior notice.
Components
- Product
SRP-383
- Standard Components
Cover Cable
Roll Paper
CD
AC/DC Adaptor
Power Cord
Installation Guide
Cable Connection
1. Turn off the printer and POS System (host computer).
2. Separate the COVER like to picture.
3. Connect the power cord to adaptor and connect the adapter to the power
connector of the printer.
4. Check the type interface located at the back of the printer and connect proper
cable.
5. Please plug the cash drawer cable in the DK port at the rear side of the printer.
Do not use an adapter that was not supplied with the printer.
Installing Paper Roll
1. Open the paper roll cover by
push the Cover-Open button.
2. Insert new roll paper in the
correct direction.
3. Pull the paper out slightly and
close the cover.
Note
Hold down the center of the
cover firmly when closing the
cover so that the paper maintains
close contact with the roller.
Printing quality may not be
optimum if recommended paper
is not used.
Paper Jam (Refer to 1-8 in User’s Manual)
1. Turn the printer off and on, open the cover, and remove the paper.
2. If COVER does not open, please contact Customer Service.
Using Control Panel
Power (Indicator Lamp)
The Power light is on whenever the printer is on.
Error (Indicator Lamp)
Red light will be on in various error conditions such as
out of paper, cover open, etc.
Paper (Indicator Lamp)
Red light will be on when there is no paper or paper almost
runs out. If this light keeps blinking, it means that the printer
is in self-test standby tate or waiting for macro execution.
Feed (Button)
Press this button to feed the paper out.
Hold down this button to feed out the paper continuously.
Setting DIP Switches
DIP switch settings should be changed when the printer power is turned off. Any changes
made while printer power is on are not recognized.
1. DIP Switch 1
1) Serial / Dual Serial Interface Settings
Switch
Function
ON
OFF
Default
1-1
Auto Line Feed
Enabled
Disabled
OFF
1-2
Flow Control
XON/XOFF
DTR/DSR
OFF
1-3
Data Length
7-bit
8-bit
OFF
1-4
Parity Check
Yes
No
OFF
1-5
Parity Selection
EVEN
ODD
OFF
1-6
Baud Rate Selection
(bps)
Refer to the following Table 1
OFF
1-7
ON
1-8
OFF
2) USB / Ethernet / Wireless LAN / Bluetooth / Powered USB interface settings
Switch
Function
ON
OFF
Default
1-1
Auto Line Feed
Enabled
Disabled
OFF
1-2
Reserved
-
-
OFF
1-3
Reserved
-
-
OFF
1-4
Reserved
-
-
OFF
1-5
Reserved
-
-
OFF
1-6
Reserved
-
-
OFF
1-7
Reserved
-
-
ON
1-8
Reserved
-
-
OFF
2. DIP Switch 2
1) All Interface Settings
Switch
Function
ON
OFF
Default
2-1
Reserved
-
-
OFF
2-2
Reserved
-
-
OFF
2-3
Internal Bell Control
Disabled
Enabled
OFF
2-4
Auto Cutter Selection
Disabled
Enabled
OFF
2-5
Printing Density
Refer to the following Table 2
OFF
2-6
OFF
2-7
Near End Sensor
Control
Disabled
Enabled
OFF
2-8
Auto External Buzz
Enabled
Disabled
OFF
2) Table 1 Baud rate(bps) selection
Transmission Speed
1-6
1-7
1-8
Default
2400
ON
OFF
OFF
9600
4800
ON
OFF
ON
9600
OFF
ON
OFF
19200
OFF
OFF
OFF
38400
OFF
ON
ON
57600
OFF
OFF
ON
115200
ON
ON
ON
* Please set up 9,600bps for baud rate of the dual serial interface.
3) Table2 Adjusting print density and speed by selecting dip switch
Dip Switch Selection
Print Speed Level
Print Density Level
2 - 5
2 - 6
OFF
OFF
4 (High Speed)
1 (Light)
OFF
ON
3
2
ON
OFF
2
3
ON
ON
1 (Low Speed)
4 (Dark)
* The default value is Dip Switch OFF/OFF (speed 4, density 1).
3. Adjusting print speed and density by vitrtual memory switch setting
Print
Speed
Selection
Printing Density
Selection 1
Selection 2
Selection 3
Selection 4
Selection 1
4 (fast)
1
2
3
4
1 (Light)
~
16 (Dark)
3
5
6
7
8
2
9
10
11
12
1 (slow)
13
14
15
16
Printer Installation Guide & Safety Guide
KN04-00168A (Ver.1.0)
THERMAL RECEIPT PRINTER SRP-383
Power Cord
Drawer
Kick-out
Cable
Interface Cable
(Serial/Dual Serial/Ethernet/Powered USB)
Adaptor
Interface Port
USB
Cable
Drawer Kick-out Port
USB Port
Power Port
Power Cable
Note
- Using the virtual memory switch setting, you can adjust the print speed in four
steps and the print density in 16 steps.
(ex. speed selection 2, density selection 4 outcome density 12)
- Use unified utility or self-test mode to change the virtual memory switch setting.
When adjustingby virtual memory, the speed / density value set by the dip switch
is not applied.
Self-Test
1. Check whether paper is mounted correctly.
2. Turn on the power while holding down the Feed button and the self-test procedure
will begin.
3. Printer will print out the current status of printer including the version of ROM.
4. After printing out the current status of printer, the printer will print following lines
and waits for the next step (paper lamp will keep blinking).
SELF-TEST PRINTING.
SELECT MODES BY PRESSING FEED BUTTON.
Continuous test printing : Less than 1 second
VMSM Selection : 1 second or more
5. To continue printing, press the FEED button for 1 second or longer to set the
memory switch configuration mode.
1) If you select “Continuous SELF-TEST”
(1) Press the FEED button for less than 1 second, and the printer prints the pre-
created character format.
(2) The self-test ends automatically and the printer prints the following text and
then cuts the paper.
*** COMPLETED ***
(3) The printer goes into normal print mode upon completion of the self test.
2) If you select “VMSM Selection”
(1) When entering the memory switch configuration mode, the following
message is printed.
** VMSM Selection **
0: Exit and reboot printer
1: Print current settings
2: Set Print Density
3: Set Print Speed
4: Set Cutting mode
5: Set External Buzzer after cutting
6: Set Internal Buzzer after cutting
7: Print Maintenance Counter
8 or more: None
(2) To execute the above function, operate the FEED button as follows.
Step 1 (selecting desired item): Press the button as many times as the
number displayed before each menu to select the desired setting menu.
Step 2 (entering setting item): Press and hold the button for 1 second to
apply the selected item.
Execute the "0: Save settings and exit" function to apply the changed
settings. When “Save settings and exit” mode is active, the above
message will be displayed and the printer will reboot.
*** COMPLETED ***
Note
- If an item not listed above is selected, the "Memory switch configuration mode"
list is printed again. When the function change is completed, press and hold the
FEED button for one second to save the changed function. After printing the
message, the printer cuts the paper.
- With self-test, you can check that the printer is operating normally, the print
quality, ROM version, and memory switch setting.
Caution
If the "0: Save settings and exit" function is not executed, the setting information is
not stored in the printer.
WEEE(Waste Electrical and Electric Equipment)
This marking shown on the product or its literature, indicates that is should not be
disposed of with other household wastes at the end of its working life. To prevent
possible harm to the environment or human health from uncontrolled waste
disposal, please separate this from other types of wastes and recycle it
responsibly to promote the sustainable reuse of material resources. Household
users should contact either the retailer where they purchased this product, or
their local government office, for details of where and how they can take this item
for environmentally safe recycling. Business users should contact their supplier
and check the terms and conditions of the purchase contract. This product
should not be mixed with other commercial wastes for disposal.
BIXOLON Co., Ltd.
● Website http://www.bixolon.com
● Korea Headquarters
(Add) 7~8F, (Sampyeong-dong), 20, Pangyoyeok-ro241beon-gil, Bundang-gu,
Seongnam-si, Gyeonggi-do, 13494, Korea (ROK)
(Tel.) +82-31-218-5500
● U.S. Office
(Add) BIXOLON America Inc. 13705 Cimarron Ave Gardena, CA 90249
(Tel.) +1-858 764 4580
Europe Office
(Add) BIXOLON Europe GmbH, Tiefenbroicher Weg 35 40472 Düsseldorf
(Tel.) +49 (0)211 68 78 54 0
© BIXOLON Co., Ltd. All rights reserved.
Safety Precautions
In using the present appliance, please keep the following safety regulations in order
to prevent any hazard or material damage.
WARNING
Violating following instructions can cause serious injury or
death.
CAUTION
Violating following instructions can cause slight wound or
damage the appliance.
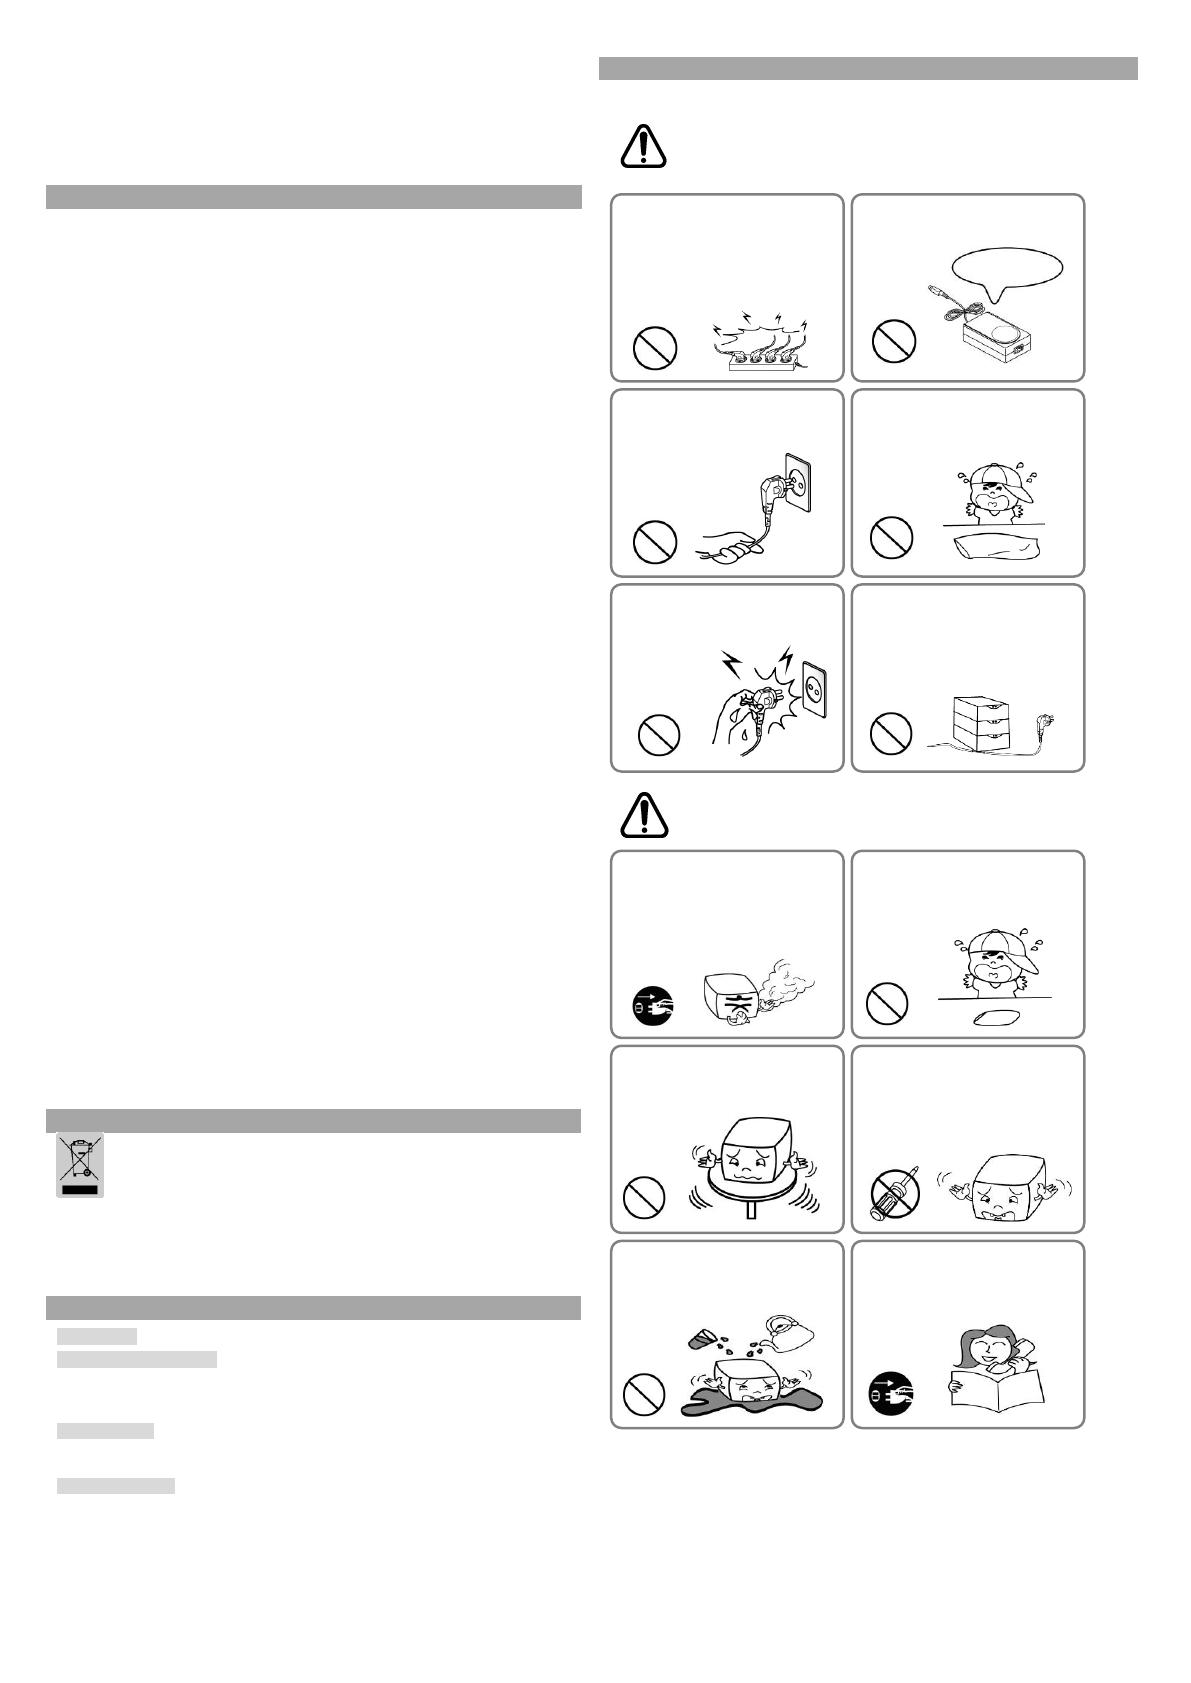
Do not use the printer when it is out
of order. This can cause a fire or an
electrocution.
Switch off and unplug the printer
before calling your dealer.
Do not let water or other foreign
objects in the printer.
• If this happened, switch off and unplug
the printer before calling your dealer.
Use only approved accessories and
do not try to disassemble, repair or
remodel it for yourself.
Call your dealer when you need these services.
• Do not touch the blade of auto cutter.
Install the printer on the stable surface.
• If the printer falls down, it can be
broken and you can hurt yourself.
Keep the desiccant out of children’s
reach.
If not, they may eat it.
If you observe a strange smoke, odor
or noise from the printer, unplug it
before taking following measures.
Switch off the printer and unplug the set from
the mains.
After the disappearance of the smoke, call
your dealer to repair it.
Do not bend the cable by force or
leave it under any heavy object.
• A damaged cable can cause a fire.
Do not plug in or unplug with your
hands wet.
You can be electrocuted.
Keep the plastic bag out of children’s
reach.
If not, a child may put the bag on his
head.
Do not pull the cable to unplug.
This can damage the cable, which is the
origin of a fire or a breakdown of the printer.
You must use only the supplied
adapter.
It is dangerous to use other adapters.
Do not plug several products in one
multi-outlet.
This can provoke over-heating and a fire.
If the plug is wet or dirty, dry or wipe it before
usage.
• If the plug does not fit perfectly with the outlet,
do not plug in.
Be sure to use only standardized multi-outlets.
PROHIBITED
ONLY SUPPLIED ADAPTER
PROHIBITED
PROHIBITED
PROHIBITED
PROHIBITED
PROHIBITED
TO UNPLUG
PRINTER
PROHIBITED
PROHIBITED
PRINTER
DISASSEMBLING
PROHIBITED
PRINTER
PROHIBITED
PRINTER
TO UNPLUG
PRINTER
DEALER
안내
설치 안내서는 제품 설치에 필요한 간단한 정보만 기록하고 있습니다.
설치 방법에 대한 자세한 내용은 빅솔 홈페이지(www.bixolon.co.kr)
다운로드탭에서 확인 가능하며, 아래의 내용을 포함하고 있습니다
1. Manual: 사용자 매뉴얼, 코드페이 매뉴얼, 커멘드 매뉴,
네트워크 매뉴얼, 소프트웨어 매뉴얼
2. Driver: Windows Driver, OPOS Driver, JPOS Driver,
CUPS (Linux, Mac) Driver, Virtual Port Driver
3. SDK: Windows POS SDK, iOS SDK, Android SDK, Xamarin SDK
저희 ()솔론은 제품 기능 품질 향상을 위하여 지속적인 개선을 하고
있습니다. 이로 인하 제품의 사양과 매뉴얼 내용 사전 통보 없이 변경될
있습니다.
내용물 확인
- 제품
SRP-383
- 기본 구성품
커버 이블
용지
CD
AC/DC 어댑
전원코드
설치 안내서
이블 연결
1. 프린터와 POS 시스템(스트 컴퓨터) 끕니다.
2. 커버 그림과 같이 분리합니.
3. 전원 코드를 어댑터에 연결하고, 어댑터를 프린터의 전원 커넥터에
연결합니다.
4. 프린터 뒷면에 있는 인터페이스 종류(USB) 확인하고, 인터페이스 커넥터에
케이블을 연결합니다.
5. 프린터 뒷면의 드로어 킥아웃 포트 드로어 킥아웃 케이블을 연결합니다.
어댑터는 반드시 공급된 제품만을 사용하십시오.
용지 설치
1. 커버열림 버튼을 눌러 커버를
엽니다.
2. 새로운 용지를 올바른
방향으로 삽입합니다.
3. 약간의 용지를 당긴 다음,
커버를 닫습니.
참고
커버를 닫을 때에는 용지가
롤러에 밀착되도록 버의
가운데를 눌러 주십시오.
권장용지를 용하지 않을 경우
인쇄품질이 하될 있습니다.
페이퍼 (사용 매뉴얼 1-8 항목 참조)
1. 커버를 열어 종이를 제거 합니다.
2. 커버가 열리지 않을 경우 고객센터에 문의 하십시오.
조작부 사용
전원 (표시등)
전원 표시 등은 프린터 전원이 켜져 있을 경우 켜집니다.
오류 (표시등)
용지 없음, 커버 열림 오류가 발생하였을 적색 표시등이
켜집니다.
종이 (표시등)
용지가 거의 소모되었거나 용지가 없을 적색 표시등이
켜집니다. 표시등이 깜빡 거리면 SELF-TEST 대기
상태이거나 크로 실행 기중임을 나타냅니다.
이송 (버튼)
용지를 배출하고자 이송버튼을 누릅니다.
이송버튼을 계속 누르고 있으면 용지가 연속적으로 배출
됩니다.
DIP 스위치 설정
DIP 스위치 설정 변경은 프린터 전원을 상태에서 해야 합니다.
상태에서의 변경은 인식되지 습니다.
1. DIP 스위치
1) 리얼 인터페이스 / 듀얼 시리얼 인터페이스 설정
스위치
기능
ON
OFF
기본값
1-1
자동 라인 피딩
동작
해제
OFF
1-2
흐름제어
XON/XOFF
DTR/DSR
OFF
1-3
데이터 길이
7 비트
8 비트
OFF
1-4
패리티 체크여
체크함
체크안함
OFF
1-5
패리티
EVEN
ODD
OFF
1-6
전송속도 (bps)
1 참조
OFF
1-7
ON
1-8
OFF
2) USB / 이더넷 / 무선랜/ 블루투스 / Powered USB 인터페이스 설정
스위치
기능
ON
OFF
기본값
1-1
자동 라인 피딩
동작
해제
OFF
1-2
없음
-
-
OFF
1-3
없음
-
-
OFF
1-4
없음
-
-
OFF
1-5
없음
-
-
OFF
1-6
없음
-
-
OFF
1-7
없음
-
-
ON
1-8
없음
-
-
OFF
2. DIP 스위치 2
1) 모든 인터페이 설정
스위치
기능
ON
OFF
기본값
2-1
없음
-
-
OFF
2-2
없음
-
-
OFF
2-3
내부 제어
해제
동작
OFF
2-4
자동 절단기
해제
동작
OFF
2-5
인쇄 농도
2 참조
OFF
2-6
OFF
2-7
용지 부족 감지
해제
동작
OFF
2-8
외부 부저 제어
동작
해제
OFF
2) 1 전송속(bps) 선택
전송속도
1-6
1-7
1-8
기본값
2400
ON
OFF
OFF
9600
4800
ON
OFF
ON
9600
OFF
ON
OFF
19200
OFF
OFF
OFF
38400
OFF
ON
ON
57600
OFF
OFF
ON
115200
ON
ON
ON
* 듀얼 시리얼 인터페이스의 전송속도는 9,600bps 로만 설정 하십시오.
3) 2 - Dip 위치 택을 통한 인쇄 농도 속도 조정
Dip 스위치 선택
인쇄속도 Level
인쇄농도 Level
2-5
2-6
OFF
OFF
4 (고속)
1 (Light)
OFF
ON
3
2
ON
OFF
2
3
ON
ON
1 (저속)
4 (Dark)
* 공장 기본 출하사양은 Dip 스위치 OFF/OFF (속도 4, 농도 1)입니다.
설치 & 안전 이드
감열식 영수 프린터 SRP-383
전원코드
드로어
킥아웃
케이블
인터페이스 케이블
(시리얼/듀얼 시리얼/이더넷/
Powered USB/Wireless LAN/Bluetooth)
어댑터
전원 포트
인터페이스 포트
USB
케이블
드로어 킥아웃 포트
USB 포트
전원 케이블
3. 가상메모 스위 설정을 통한 인쇄 속도 농도 조정
인쇄속도
선택
인쇄농도
선택 1
선택 2
선택 3
선택 4
비고
4 (고속)
1
2
3
4
1 (Light)
~ 16
(Dark)
3
5
6
7
8
2
9
10
11
12
1 (저속)
13
14
15
16
참고
- 가상메모리 스위치 설정 이용 하시면 4 단계의 기본 속도 조정 더불어
인쇄농도를 16 단계로 세분화하여 조정하실 있습니다.
(: 속도 선택 2, 농도선택 4 결과농도 12)
- 가상메모리 스위치 세팅 변경하고 경우 Unified Utility 또는 Self-Test
모드를 사용하시기 바랍니다. 가상메모리 선택 조정으로 변경하시는 경우
Dip 스위치로 설정한 속도/농도 값은 적용되지 않습니다.
프테스(SELF-TEST)
1. 용지가 제대로 끼워져 있는지 확인하십시오.
2. 이송 버튼을 누른 상태에서 전원을 켜십시. 셀프 테스트가 시작됩니다.
3. 프린터는 ROM 버전과 프린터의 현재 상태를 인쇄하 니다.
4. 프린터의 현재 상태를 인쇄하고 , 음과 같은 구를 인쇄한
멈춥니다. (종이 표시등은 계속 들어옵니다).
SELF-TEST PRINTING.
다음을 실행하려면 버튼으로 선택하시.
테스트 인쇄 계속 수행 : 버튼을 짧게 누름
메모리 스위치 설정모드 : 버튼을 길게 누름
5. 인쇄를 계속 하기 위해서는 이송 버튼을 누르거나 메모 스위치 설정모드
설정을 하기 위해 이송버튼 1 이상 누르십시오.
1) 테스트인쇄 계속 수행 선택할 경우
(1) 이송버튼을 1 이하로 누르면 프린터는 미리 제작된 문자 형식을
인쇄합니.
(2) 셀프 테스트 동으로 끝나고 다음과 같은 문구를 인쇄한 용지를
절단합니다.
*** COMPLETED ***
(3) 프린터 셀프 스트가 끝나면 바로 정상 상태가 됩니다.
2) 메모리 스위치 설정모드 선택할 경우
(1) 메모리 스위 정모드에 진입하면 다음 같은 문구 인쇄 합니다.
** 메모리 스위치 설정모 **
0 : 설정 저장 종료
1 : 현재 메모리 스위치 정보 인쇄
2 : 인쇄농도 설정
3 : 인쇄속도 설정
4 : 용지절단 모드 설정
5 : 외부벨(멜로디)동작 설정
6 : 내부벨 동작 설정
7 : 프린터 유지보수 정보 인쇄
8 or more : None
(2) 위의 기능을 실행하기 해서는 아래와 같이 송버튼을 동작시켜
주십시오.
단계 1(설정 항목 선택): 원하는 설정 메뉴를 선택하기 위해 메뉴
앞에 표시된 숫자와 동일한 횟수만큼 버튼을 짧게 눌러 니다.
단계 2(설정 항목 진입): 1 초동안 버튼을 길게 누르면 선택한 항목이
반영됩니다.
변경된 설정을 반영하기 위해서 “0: 설정 저장 종료기능을
실행하십시오. 설정 저장 종료 모드가 작할 경우 다음과 같은
문구를 출력하며 린터는 재부 니다.
*** 설정 완료 ***
참고
- 상기 설정 목록에 없는 항목을 선택하였을 경우 메모리 스위치 설정모드
목록을 다시 인쇄합니다. 기능 변경이 완료되면 변경된 기능을 저장하기
위해 이송버튼 1 초동안 길게 눌러주세요. 다음과 같은 문구를 인쇄
용지를 절단합니다.
- 셀프 테스트를 통해 프린터가 정상적으로 작동되고 있는지 확인할
있습니다. 셀프 테스트로 인쇄 품질, ROM 버전, 메모리스위치 설정을
확인합니다.
주의
“0: 설정 저장 종료기능 실행되 않으면 설정정보는 프린터에 저장되지
않습니다.
BIXOLON Co., Ltd.
웹사이트 http://www.bixolon.kr
한국 본사
(주소) 13494, 경기도 성남시 분당구 판교역로 241 번길 20 (삼평동) 7~8
(전화) +82-31-218-5500
미주 지사
(주소) BIXOLON America Inc. 13705 Cimarron Ave Gardena, CA 90249
(전화) +1-858 764 4580
유럽 지사
(주소) BIXOLON Europe GmbH, Tiefenbroicher Weg 35 40472 Düsseldorf
(전화) +49 (0)211 68 78 54 0
© BIXOLON Co., Ltd. All rights reserved.
안전상의 경고
제품을 올바르 사용하여 위험이 물적 손해를 미리 지하기 위한
내용이므로 드시 지켜 용해 주세요.
경고
표시사항 위반 심각 상해나 사망이 발생할 가능성이
있습니다.
주의
표시사항 위반시 경미한 상해 제품손상 발생 가능성이
있습니다.
제품을 고장난 상태에서 사용하지
마세요. 화재, 감전의 원인이 됩니다.
바로 본체의 전원스위치를 끄고
전원플러그를 콘센트에서 다음
구입처로 연락해 주세요.
프린 본체 내부에 물이 이물질이
들어가지 않도록 주의하세요.
본체 내부에 물이 물질
에는 먼저 프린 체의 전원스
끄고 원플 콘센
다음 입처 연락해 .
승인된 부품을 사용하고 함부로 분해,
수리, 개조하지 마세요.
제품이 손상될 있으므로
구입처에 문의하세요.
자동 절단기 날은 날카로우므로
손대지 마십시오.
안정된 장소에 .
어지 품이 파손되거나 다칠
니다.
방습제는 어린이의 손에 닿지 않는
곳에 보관하세.
린이 습제 먹으 험합.
냄새 또는
소리 나는 등의 이상 바로
전원을 아래의 조치를 취해 주세요.
제품에 이상이 발생시는 바로 프린터 본체의
전원을 다음 반드시 전원 플러그
콘센트에서 뽑아주세요.
연기 나지 않는 것을 확인하고 구입처로
수리를 뢰해 주세요.
전원코드를
물건을 눌러 파손되지 않도록 하세요.
화재의 원인이 됩니다.
젖은 손으로 전원플러그를 꽂거나
뽑지 마세요.
감전의 위험이 있습니다.
비닐팩은 어린이의 손에 닿지 않는
곳에 보관하세.
어린이가 비닐팩을 머리에 쓰면
위험합니다.
전원플러그를 뺄때는 전원코드를
잡아 당기지 마세요.
코드가 상처를 입어 화재나 고장의
원인이 됩니다.
어댑터는 공급 제품만을 사용.
다른 어댑터를 사용하면 위험합니다.
콘센트에 여러 제품의
전원플러그를 동시에 꽂지 마세요.
발열 발화되어 위험합니다.
전원플러그에서 물질이나 기가
묻어있으면 닦아 용하세요.
전원콘센트의 구멍 헐거울 때는 전원
플러그를 꽂지 마세요.
멀티콘센트는 규격제품을 사용하세요.
금지
반드시 공급품만
금지
금지
금지
금지
금지
플러그 금지
프린터
금지
금지
프린터
분해 금지
프린터
플러그 금지
프린터 구입처
프린터
금지
  • Page 1 1
  • Page 2 2
  • Page 3 3
  • Page 4 4

BIXOLON SRP-380 Installation guide

Category
Print & Scan
Type
Installation guide

BIXOLON SRP-380 is a compact and efficient thermal receipt printer designed for a wide range of retail and hospitality applications. With its fast print speed of up to 250mm/second and a print resolution of 203dpi, it ensures quick and high-quality receipt printing. The SRP-380 supports various paper widths, including 58mm and 80mm, providing flexibility for different receipt sizes. It features easy paper loading and a user-friendly control panel with indicator lights for power, error, and paper status.

Ask a question and I''ll find the answer in the document

Finding information in a document is now easier with AI