Vantec NexStar 3, 2.5" User manual
- Category
- HDD/SSD enclosures
- Type
- User manual
This manual is also suitable for
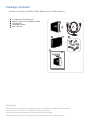
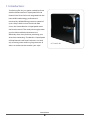
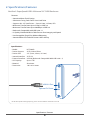
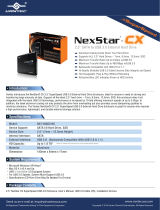
Vantec NexStar 3, 2.5" is an external hard drive enclosure that supports all 2.5" hard drives, including 7mm, 9.5mm, and 12.5mm drives, as well as solid state drives (SSDs). It has a maximum transfer rate of up to 5 Gbps with USB 3.0 and is backwards compatible with USB 2.0 and 1.1. The enclosure has an attractive mirror finish design and an aluminum casing that cools down your hard drive. It is hot-swappable, so you can plug and play without rebooting. The enclosure has a blue LED that indicates power and HDD activity.
Vantec NexStar 3, 2.5" is an external hard drive enclosure that supports all 2.5" hard drives, including 7mm, 9.5mm, and 12.5mm drives, as well as solid state drives (SSDs). It has a maximum transfer rate of up to 5 Gbps with USB 3.0 and is backwards compatible with USB 2.0 and 1.1. The enclosure has an attractive mirror finish design and an aluminum casing that cools down your hard drive. It is hot-swappable, so you can plug and play without rebooting. The enclosure has a blue LED that indicates power and HDD activity.


-
 1
1
-
 2
2
-
 3
3
-
 4
4
-
 5
5
-
 6
6
-
 7
7
-
 8
8
-
 9
9
-
 10
10
-
 11
11
-
 12
12
-
 13
13
-
 14
14
-
 15
15


Vantec NexStar 3, 2.5" User manual
- Category
- HDD/SSD enclosures
- Type
- User manual
- This manual is also suitable for
Vantec NexStar 3, 2.5" is an external hard drive enclosure that supports all 2.5" hard drives, including 7mm, 9.5mm, and 12.5mm drives, as well as solid state drives (SSDs). It has a maximum transfer rate of up to 5 Gbps with USB 3.0 and is backwards compatible with USB 2.0 and 1.1. The enclosure has an attractive mirror finish design and an aluminum casing that cools down your hard drive. It is hot-swappable, so you can plug and play without rebooting. The enclosure has a blue LED that indicates power and HDD activity.
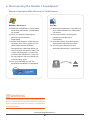
Ask a question and I''ll find the answer in the document
Finding information in a document is now easier with AI
Related papers
-
Vantec NexStar CX, 1TB User manual
-
Vantec NexStar 3, 3.5", 2TB User manual
-
-
Vantec NST-310S3-BK User manual
-
 Nexstar NST-D300S3 User manual
-
-
-
-
-

Other documents
-
 Nexstar CB-SATAU3 User manual
-
 Nexstar NST-200S3-BK User manual
-
Rosewill RX343-S BLK/SLV User manual
-
LC-Power LC-25USB3-II Datasheet
-
-
 Cables Direct USB3-802BL Datasheet
-
 Cables Direct USB3-803BL Datasheet
-
Sabrent EC-3US25 User manual
-
-
 Extrememory EXMEUFD332GXCLB Datasheet


