Seagate 110 User manual
- Category
- NAS & storage servers
- Type
- User manual
This manual is also suitable for

BlackArmor® NAS 110 User Guide

BlackArmor® NAS 110 User Guide
© 2009 Seagate Technology LLC. All rights reserved. Seagate, Seagate Technology, the Wave
logo, and FreeAgent are trademarks or registered trademarks of Seagate Technology LLC, or one
of its affiliates. All other trademarks or registered trademarks are the property of their respective
owners. When referring to hard drive capacity, one gigabyte, or GB, equals one billion bytes and
one terabyte, or TB, equals one thousand billion bytes when referring to hard drive capacity. In
addition, some of the listed capacity is used for formatting and other functions, and thus will not be
available for data storage. Quantitative usage examples for various applications are for illustrative
purposes. Actual quantities will vary based on various factors including file size, file format, features,
and application software. Seagate reserves the right to change, without notice, product offerings or
specifications.
Seagate Technology LLC
920 Disc Drive
Scotts Valley CA 95066 U.S.A.
Open Source and License Source Information
For information about the open source and licenses used with Seagate products, please see the
Seagate Web site at www.seagate.com/support

BlackArmor® NAS 110 User Guide 3
Contents
Contents
1. Preface . . . . . . . . . . . . . . . . . . . . . . . . . . . . . . . . . . . . . . . . . . . . . . . . . 7
About This Guide . . . . . . . . . . . . . . . . . . . . . . . . . . . . . . . . . . . . . . . . . . . . . . 7
Kit Contents . . . . . . . . . . . . . . . . . . . . . . . . . . . . . . . . . . . . . . . . . . . . . . . . . . 7
System Requirements . . . . . . . . . . . . . . . . . . . . . . . . . . . . . . . . . . . . . . . . . . 8
Finding More Information . . . . . . . . . . . . . . . . . . . . . . . . . . . . . . . . . . . . . . . 8
2. All About the Seagate BlackArmor® NAS 110 . . . . . . . . . . . . . . . . . 9
Introduction . . . . . . . . . . . . . . . . . . . . . . . . . . . . . . . . . . . . . . . . . . . . . . . . . . 9
About the BlackArmor NAS 110 Server . . . . . . . . . . . . . . . . . . . . . . . . . . . . 9
Main Components of the BlackArmor NAS 110 Server Kit . . . . . . . . . . . 9
Features of the BlackArmor NAS 110 Server . . . . . . . . . . . . . . . . . . . . 10
What You Can Do With the BlackArmor NAS 110 Server . . . . . . . . . . . . . . 12
The Difference Between a BlackArmor Administrator and User . . . . . . . . . 13
About BlackArmor Administrators . . . . . . . . . . . . . . . . . . . . . . . . . . . . . 13
About BlackArmor Users . . . . . . . . . . . . . . . . . . . . . . . . . . . . . . . . . . . . 13
How to Get Started . . . . . . . . . . . . . . . . . . . . . . . . . . . . . . . . . . . . . . . . . . . 14
BlackArmor Administrators Start Here . . . . . . . . . . . . . . . . . . . . . . . . . . 14
BlackArmor Users Start Here . . . . . . . . . . . . . . . . . . . . . . . . . . . . . . . . 15
3. Getting Started with Your BlackArmor® Server . . . . . . . . . . . . . . . 17
Introduction . . . . . . . . . . . . . . . . . . . . . . . . . . . . . . . . . . . . . . . . . . . . . . . . . 17
Setup Steps for Administrators . . . . . . . . . . . . . . . . . . . . . . . . . . . . . . . . . . 18
Installing the BlackArmor NAS 110 Server and Software . . . . . . . . . . . 18
Connecting to the Server . . . . . . . . . . . . . . . . . . . . . . . . . . . . . . . . . . . . 19
Completing the Initial Setup . . . . . . . . . . . . . . . . . . . . . . . . . . . . . . . . . . 20
Creating Custom Shares . . . . . . . . . . . . . . . . . . . . . . . . . . . . . . . . . . . . 20
Creating User Accounts . . . . . . . . . . . . . . . . . . . . . . . . . . . . . . . . . . . . . 21
Distributing BlackArmor NAS 110 User Information . . . . . . . . . . . . . . . 22
Making BlackArmor Accessible Using Seagate Global Access . . . . . . . 23
Connecting a USB Printer to Your BlackArmor NAS 110 Server . . . . . 24
Setting Your BlackArmor NAS 110 as a Media Server . . . . . . . . . . . . . 24
Next Steps for Administrators . . . . . . . . . . . . . . . . . . . . . . . . . . . . . . . . 25
Getting Started as a BlackArmor User . . . . . . . . . . . . . . . . . . . . . . . . . . . . 26
Optional Steps . . . . . . . . . . . . . . . . . . . . . . . . . . . . . . . . . . . . . . . . . . . . 27
Creating a Seagate Global Access Account . . . . . . . . . . . . . . . . . . . . . 27

BlackArmor® NAS 110 User Guide 4
Contents
4. Getting the Most from Your BlackArmor® Server . . . . . . . . . . . . . 29
Introduction . . . . . . . . . . . . . . . . . . . . . . . . . . . . . . . . . . . . . . . . . . . . . . . . . 29
Your Role as a BlackArmor Administrator . . . . . . . . . . . . . . . . . . . . . . . . . . 30
Your BlackArmor NAS 110 Server’s Default Settings . . . . . . . . . . . . . . . . . 31
Managing Volumes, Shares and Storage . . . . . . . . . . . . . . . . . . . . . . . . . . 32
Understanding Volumes and Shares . . . . . . . . . . . . . . . . . . . . . . . . . . . 32
Working with Volumes . . . . . . . . . . . . . . . . . . . . . . . . . . . . . . . . . . . . . . 33
Working with Shares . . . . . . . . . . . . . . . . . . . . . . . . . . . . . . . . . . . . . . . 33
Setting Storage Space Limits for BlackArmor Users . . . . . . . . . . . . . . . 35
Setting Grace Time for Exceeded Quotas . . . . . . . . . . . . . . . . . . . . . . . 35
Controlling Web File Downloads to the BlackArmor Server . . . . . . . . . 35
Managing BlackArmor Users . . . . . . . . . . . . . . . . . . . . . . . . . . . . . . . . . . . . 36
Working with User Accounts . . . . . . . . . . . . . . . . . . . . . . . . . . . . . . . . . 36
Creating and Modifying User Groups . . . . . . . . . . . . . . . . . . . . . . . . . . 36
Protecting Your Files with Network Backups . . . . . . . . . . . . . . . . . . . . . . . . 37
Setting Your BlackArmor Server as a Media Server . . . . . . . . . . . . . . . . . . 38
Monitoring Your BlackArmor NAS 110 Server . . . . . . . . . . . . . . . . . . . . . . 39
Monitoring Status with the Server’s LEDs . . . . . . . . . . . . . . . . . . . . . . . 39
Using Email Alerts to Monitor Server Status . . . . . . . . . . . . . . . . . . . . . 40
Checking Disk Drive Status Using SMART . . . . . . . . . . . . . . . . . . . . . . 40
Changing the Server’s Advanced Settings . . . . . . . . . . . . . . . . . . . . . . . . . 40
Dynamic Domain Name System (DNS) Settings . . . . . . . . . . . . . . . . . . 41
File Protocol Settings . . . . . . . . . . . . . . . . . . . . . . . . . . . . . . . . . . . . . . . 41
Network Time Protocol (NTP) Settings . . . . . . . . . . . . . . . . . . . . . . . . . 41
Power Saving Settings . . . . . . . . . . . . . . . . . . . . . . . . . . . . . . . . . . . . . 41
Secure Socket Layer (SSL) Settings . . . . . . . . . . . . . . . . . . . . . . . . . . . 42
Uninterruptible Power Supply (UPS) Settings . . . . . . . . . . . . . . . . . . . . 42
Web Access Protocol Settings . . . . . . . . . . . . . . . . . . . . . . . . . . . . . . . 42
Workgroup and Domain Settings . . . . . . . . . . . . . . . . . . . . . . . . . . . . . . 42
Maintaining Your BlackArmor NAS 110 Server . . . . . . . . . . . . . . . . . . . . . . 43
Basic Hardware Safety and Maintenance . . . . . . . . . . . . . . . . . . . . . . . 43
Keeping the Server’s Firmware Current . . . . . . . . . . . . . . . . . . . . . . . . 44
Resetting Your BlackArmor NAS 110 Server . . . . . . . . . . . . . . . . . . . . . . . 44
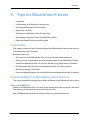
5. Tips for BlackArmor® Users . . . . . . . . . . . . . . . . . . . . . . . . . . . . . . 45
Introduction . . . . . . . . . . . . . . . . . . . . . . . . . . . . . . . . . . . . . . . . . . . . . . . . . 45
Understanding Your BlackArmor User Account . . . . . . . . . . . . . . . . . . . . . 45
Access Limitations . . . . . . . . . . . . . . . . . . . . . . . . . . . . . . . . . . . . . . . . . 45
Storage Space Limitations . . . . . . . . . . . . . . . . . . . . . . . . . . . . . . . . . . . 46

BlackArmor® NAS 110 User Guide 5
Contents
Automatic Sorting for Media Files . . . . . . . . . . . . . . . . . . . . . . . . . . . . . 46
Grace Time Limits for Quotas . . . . . . . . . . . . . . . . . . . . . . . . . . . . . . . . 47
File Protocol Support on Shares . . . . . . . . . . . . . . . . . . . . . . . . . . . . . . 47
Accessing Shares and Files on the Server . . . . . . . . . . . . . . . . . . . . . . . . . 47
Backing Up Your Files . . . . . . . . . . . . . . . . . . . . . . . . . . . . . . . . . . . . . . . . . 48
Backing Up Files with BlackArmor Backup . . . . . . . . . . . . . . . . . . . . . . 48
Backing Up Files Between Servers . . . . . . . . . . . . . . . . . . . . . . . . . . . . 48
Backing Up To or From an External USB Drive . . . . . . . . . . . . . . . . . . 48
Backing up Using the Front USB Port . . . . . . . . . . . . . . . . . . . . . . . . . . 49
Accessing Your BlackArmor Files Over the Web . . . . . . . . . . . . . . . . . . . . 49
Downloading Large Web Files to Your BlackArmor Server . . . . . . . . . . . . . 50
Retrieving Deleted Files from the Recycle Bin . . . . . . . . . . . . . . . . . . . . . . 50
6. Solving Problems . . . . . . . . . . . . . . . . . . . . . . . . . . . . . . . . . . . . . . . 51
General Troubleshooting Tips . . . . . . . . . . . . . . . . . . . . . . . . . . . . . . . . . . . 51
Common Problems and Solutions . . . . . . . . . . . . . . . . . . . . . . . . . . . . . . . . 51
I can’t connect to the server over the local network. . . . . . . . . . . . . . . . 51
I can’t connect to the server over the Web. . . . . . . . . . . . . . . . . . . . . . . 51
I can’t open BlackArmor Manager. . . . . . . . . . . . . . . . . . . . . . . . . . . . . 52
I can’t log in to BlackArmor Manager. . . . . . . . . . . . . . . . . . . . . . . . . . . 52
I can’t access a share. . . . . . . . . . . . . . . . . . . . . . . . . . . . . . . . . . . . . . . 52
I can’t access a file on a share. . . . . . . . . . . . . . . . . . . . . . . . . . . . . . . . 52
I can’t store any more files on a share because its volume is full. . . . . . 52
A firmware upgrade failed. . . . . . . . . . . . . . . . . . . . . . . . . . . . . . . . . . . . 52
A volume is in degraded mode. . . . . . . . . . . . . . . . . . . . . . . . . . . . . . . . 52
I can’t get streaming music from the BlackArmor server. . . . . . . . . . . . 52
7. Technical Specifications . . . . . . . . . . . . . . . . . . . . . . . . . . . . . . . . . 53
8. Glossary . . . . . . . . . . . . . . . . . . . . . . . . . . . . . . . . . . . . . . . . . . . . . . . 55

About This Guide
BlackArmor® NAS 110 User Guide 7
1. Preface
• About This Guide
• Kit Contents
• System Requirements
• Finding More Information
About This Guide
This User Guide provides all the information you need to successfully set up and use your
Seagate BlackArmor® NAS 110 server (BlackArmor NAS 110 server).
This guide contains complete setup instructions, as well as reference information about the
components and features of your BlackArmor NAS 110 server. It also provides an overview of
how you can get the most out of your server as your needs grow and change over time.
Note: Step-by-step instructions for using the software tools are included in the online Help provided
with the software.
Some of the topics in this guide apply to BlackArmor NAS 110 administrators only—users
that have access to the administrative features of your server. Administrators-only
information is clearly identified.
Kit Contents
Your BlackArmor NAS 110 server kit includes:
• BlackArmor NAS 110 server
• Power adapter
• Ethernet cable
• Installation CD, including software, product documentation, and warranty information
• BlackArmor Quick Start Guide

System Requirements
BlackArmor® NAS 110 User Guide 8
System Requirements
Any computer that will be used to access your BlackArmor NAS 110 server must meet these
requirements:
• A Microsoft Windows
®
or Apple Macintosh
®
computer running one of these operating
systems:
• Windows XP or Windows Vista
®
, with the latest Service Pack installed
• Mac OS X 10.4.11 or later
• Ethernet card
• Supported Web browsers:
• Microsoft Internet Explorer 6, 7 or 8 (Windows only)
• Apple Safari 3, 4 or newer (Windows or Mac)
• Mozilla Firefox 2, 3 or newer (Windows or Mac)
Additionally, you need:
• Local area network (LAN) or wireless LAN (WLAN)
• Network switch or router, with at least one available Ethernet port
• Internet connection (for remote access to server and software and firmware updates)
Finding More Information
For more information about your BlackArmor NAS 110 server, see:
• BlackArmor NAS 110 Quick Start Guide (printed)
• BlackArmor Manager Help
• BlackArmor Discovery Help
• BlackArmor Backup User Guide
• BlackArmor Backup Help
• Readme file
For more information, please refer to the Seagate Web site at www.seagate.com.

Introduction
BlackArmor® NAS 110 User Guide 9
2. All About the Seagate
BlackArmor® NAS 110
• Introduction
• About the BlackArmor NAS 110 Server
• What You Can Do With the BlackArmor NAS 110 Server
• The Difference Between a BlackArmor Administrator and User
• How to Get Started
Introduction
This chapter introduces the components and features of your BlackArmor NAS 110® server,
describes what the server can be used for, and introduces the difference between
BlackArmor NAS 110 administrators and general BlackArmor NAS 110 users.
This chapter also provides tips for setting up and getting the most out of your BlackArmor
NAS 110 server. (To find out if you’re an administrator or user, see “The Difference Between a
BlackArmor Administrator and User” on page 13.)
About the BlackArmor NAS 110 Server
The BlackArmor NAS 110 server is a file server, a device that is used for storing and sharing
all types of computer files on a local network.
The server comes with software to help you back up, store, protect, and share your files.
The BlackArmor server is typically used by small business owners and people with home
offices who want to store and protect the computer files that are important to them—client
files, business records, financial information, and so on—and make them available to other
people on their local network or over the Internet.
Main Components of the BlackArmor NAS 110 Server Kit
The BlackArmor NAS 110 server kit has four main components:
• The BlackArmor NAS 110 Server—Hardware that includes the disk drive that stores
and protects your files.
• BlackArmor Discovery—Software that finds and connects your BlackArmor NAS 110
server to your computer.
• BlackArmor Manager—A tool embedded in the server that helps you set up, modify, and
monitor your BlackArmor NAS 110 server from your computer (or even remotely) using a
Web browser.

About the BlackArmor NAS 110 Server
BlackArmor® NAS 110 User Guide 10
• BlackArmor Backup—Software that helps you back up files, applications, and even
operating systems to your BlackArmor NAS 110 server. You can also restore your system
and data using this software. See the BlackArmor Backup User Guide for details.
Features of the BlackArmor NAS 110 Server
The BlackArmor NAS 110 server includes:
•
One Serial ATA (SATA) disk drive.
• One Ethernet, or LAN, port that let you access the server from your local network or over
the Internet.
• Two USB ports:
• The rear port lets you back up data directly to or from a portable USB drive or connect
a USB printer that everyone on your local network can use, or connect an
Uninterruptable Power Supply (UPS).
• The front USB port on the BlackArmor server is used for the OneTouch™ backup
feature. To use this backup feature, connect a USB flash drive to the front USB port,
and then press the OneTouch button when the button lights. The contents from the
USB device is copied to a predefined folder on the server. This folder (named
“OneTouch Backup”) is stored in the Public share. See “Backing up Using the Front
USB Port” on page 49.
• LEDs representing the ports, disk drive, and server that indicate activity and status. See
page 39.
• A Reset button (on the bottom of the server) that lets you reset your BlackArmor NAS 110
server user name and password to their factory default settings.

About the BlackArmor NAS 110 Server
BlackArmor® NAS 110 User Guide 11
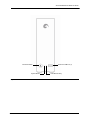
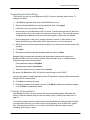
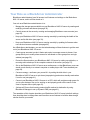
Figure 1: Front of BlackArmor Server
Hard Drive Activity
System Status
OneTouch Button
OneTouch USB Port (1)

What You Can Do With the BlackArmor NAS 110 Server
BlackArmor® NAS 110 User Guide 12
What You Can Do With the BlackArmor NAS 110 Server
In general, you can use your BlackArmor NAS 110 server to:
• Create a central storage place for the files you want to share with other people on your
local network or over the Internet.
• Create and maintain automatic backup copies of all your files—even your operating
systems.
• Share your files—contracts, business presentations, progress reports, and so on—with
other people on your local network or with business clients over the Internet.
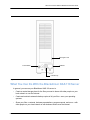
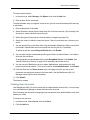
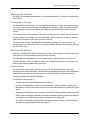
Figure 2: Back of BlackArmor Server
Power Button
Kensington Lock
LAN Port
USB Port (2)

The Difference Between a BlackArmor Administrator and User
BlackArmor® NAS 110 User Guide 13
• Recover quickly from a computer disaster, such as the unintentional deletion of important
files, the failure of a disk drive, or the loss or theft of your computer.
• Access your BlackArmor NAS 110 server over the Internet from anywhere in the world to
download files that you need where you are, or upload files that you want to secure or
share while you’re out of the office.
• Share a USB printer with other people on your local network.
• Create a media server so that everyone on your local network can enjoy downloaded
photos, videos, and music.
• Enable the iTunes® service on the server so that users can stream music directly to a
network computer with iTunes installed.
The Difference Between a BlackArmor Administrator
and User
In addition to the features that can be used by everyone, such as file sharing, your
BlackArmor NAS 110 server has behind-the-scenes, administrative features that should be
accessed by only one or two people who are referred to in this guide as BlackArmor
administrators.
Everyone who accesses the BlackArmor NAS 110 server is referred to in this guide as a
BlackArmor user.
About BlackArmor Administrators
BlackArmor administrators have full access to all features and settings on the BlackArmor
NAS 110 server, and to all files stored on it. A BlackArmor administrator can:
• Change any server setting
• Create and modify user accounts and group accounts
• Set up and modify folders (or shares)
• Update the server’s firmware
• Reset the server’s name and password to the original settings
About BlackArmor Users
All BlackArmor users, including administrators, can:
• Change their login password
• Save and share files on the BlackArmor NAS 110 server
• Back up files to the BlackArmor NAS 110 server
•
Access the server over the Web, using Seagate Global Access

How to Get Started
BlackArmor® NAS 110 User Guide 14
• Download large Web files directly to the server
• Access music, video, and photos (if the BlackArmor NAS 110 server is set up as a media
server)
• Share a USB printer that’s connected to the BlackArmor NAS 110 server (if any)
Note: The administrator can also create a user account that has administrative privileges. See the
BlackArmor Manager help for instructions.
How to Get Started
This section describes the getting-started tasks for BlackArmor administrators and users.
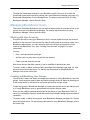
BlackArmor Administrators Start Here
To get started with your BlackArmor NAS 110 server:
1. Install the BlackArmor NAS 110 server and software (see page 18).
2. Connect to the server using BlackArmor Discovery (see page 19).
3. Complete the initial setup of the server using BlackArmor Manager (see page 20.)
4. Create customized folders, or shares, for storing saved files (see page 20).
5. Create individual user accounts for everyone who will be accessing your BlackArmor
NAS 110 server and assign each user access to the folder shares you created, as
required (see page 21).
6. Provide user account information to each BlackArmor user (see page 22).
7. (Optional) Make your server accessible over the Web by enabling Global Access in
BlackArmor Manager (see page 23).
8. (Optional) Make a USB printer available to everyone on your local network by connecting
it to your BlackArmor NAS 110 server (see page 24).
9. (Optional) Connect an Uninterruptable Power Supply to your BlackArmor NAS 110 server
to maintain power to the server in the event of a power failure. (see page 42).
10. (Optional) Turn your server into a media server so that BlackArmor NAS 110 users can
access music, photos and videos (see page 24).
11. Continue with BlackArmor Users Start Here in the next section to begin using your
BlackArmor NAS 110 server to save, protect, and share your own files.

How to Get Started
BlackArmor® NAS 110 User Guide 15
BlackArmor Users Start Here
To get started with your BlackArmor NAS 110 server:
1. Ensure that you have these items from the BlackArmor administrator:
• The BlackArmor Discovery software
• The BlackArmor Backup software
• Your BlackArmor NAS 110 log in name and password
• The names of the folder share(s) that you can access
• A description of any access limitations you have (for instance, read-only access to a
particular folder share)
• A copy of the BlackArmor NAS 110 User Guide
2. Install the BlackArmor software (see page 18).
You don’t need to install BlackArmor Backup if you are already using other software for regular
file backups.
3. Connect to the server and the folder shares you have access to using BlackArmor
Discovery (see page 19).
4. Share your files by saving them to shares that can be accessed by other people on your
local network or over the Web.
5. (Optional) Create a full backup of your important files, or set up recurring backups, using
BlackArmor Backup (see page 48).
6. (Optional) If a USB printer has been connected to the BlackArmor NAS 110 server, add it
to your list of available printers, following your operating system’s instructions.

Introduction
BlackArmor® NAS 110 User Guide 17
3. Getting Started with Your
BlackArmor® Server
• Introduction
• Setup Steps for Administrators
• Getting Started as a BlackArmor User
Introduction
This chapter provides step-by-step instructions for installing and setting up your BlackArmor®
NAS 110 server and software.
If you are not a BlackArmor administrator, skip to page 26.
Note: For an overview of the setup steps, see “How to Get Started” on page 14.
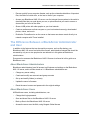
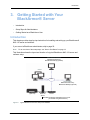
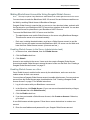
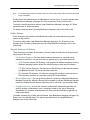
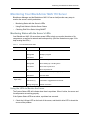
This illustration shows the layout and location of a typical BlackArmor NAS 110 server and
software setup.
Figure 3: Typical BlackArmor NAS 110 Setup and Installation
LAN
BlackArmor
NAS 110
Server
Switch or
Router
USB Printer
(Optional)
Administrator Installs:
BlackArmor Discovery
BlackArmor Backup (optional)
Users Install:
BlackArmor Discovery
BlackArmor Backup (optional)
Users
BlackArmor Manager embedded on the server
(accessible using Web browser)

Setup Steps for Administrators
BlackArmor® NAS 110 User Guide 18
Setup Steps for Administrators
If you are not a BlackArmor administrator, skip to page 26.
Installing the BlackArmor NAS 110 Server and Software
Before you begin:
• Ensure that your computer meets the requirements listed on page 8.
• Ensure that you have a solid, flat, stable surface for the server to sit on in an area with
reliable ventilation. Ensure that the server’s vents will not be covered or blocked and that
the server is not placed near a heat source. Ensure that the server won’t be in an area
where liquids may be spilled on it.
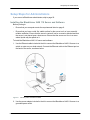
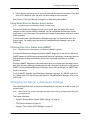
To install the BlackArmor NAS 110 server and software:
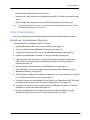
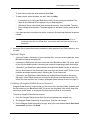
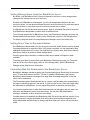
1. Use the Ethernet cable included in the kit to connect the BlackArmor NAS 110 server to a
switch or router on your local network. Connect the Ethernet cable to the Ethernet port on
the back of the server, as shown below.
2. Use the power adapter included in the kit to connect the BlackArmor NAS 110 server to a
grounded power outlet.
Figure 4: Connect power and network cables
Step 1
Step 2

Setup Steps for Administrators
BlackArmor® NAS 110 User Guide 19
The server powers on automatically and the LED lights on the front panel of the server
illuminate.
3. Insert the installation CD into your computer.
The installation wizard opens automatically. Install both BlackArmor Discovery and
BlackArmor Backup unless you are already using another backup software program.
4. Click Next.
5. Click Next to accept the default installation location; or, click Browse to select a custom
location, then click Next.
6. Click Next to accept the default program folder name; or, enter a custom name, then click
Next.
BlackArmor Discovery is installed.
7. Click Finish.
Connecting to the Server
To connect to your BlackArmor NAS 110 server:
1. Double-click the BlackArmor Discovery icon on your desktop (Windows) or in your
Applications folder (Mac).
When BlackArmor Discovery opens, it automatically searches for all BlackArmor NAS 110
servers on your network and displays them in a list.
2. Select your new BlackArmor NAS 110 server.
3. (Windows) Click View Drive Details then click Manage. (Mac) Click Manage Server.
BlackArmor Manager opens.
Note: BlackArmor Discovery remains open, unless you choose to close it. If you do close it, you
can open it again at any time by double-clicking the icon on your desktop (Windows) or in
your Applications folder (Mac).
4. Log in using the default settings. (The user name and password are case-sensitive.)
user name: admin
password: admin
Note: Your BlackArmor NAS 110 server comes with other default settings to help you get started
storing, sharing, and protecting your files right away. For more information, see page 31.

Setup Steps for Administrators
BlackArmor® NAS 110 User Guide 20
Completing the Initial Setup
The first time you log in to your BlackArmor NAS 110 server, the setup wizard opens. To
complete the setup:
1. Click Next to begin the initial setup of the BlackArmor server.
2. Read the Seagate BlackArmor license agreement, then click I Agree.
3. Customize your server’s basic settings:
• Enter a name for your BlackArmor NAS 110 server. To make the server easy to identify on
your local network, give it a unique and easy-to-remember name. The name can be up to
16 alphanumeric characters long and can include hyphens. Spaces are not allowed.
• Enter a description for the server, using the location, content, or other feature of the
server that will help you differentiate it from other servers on your local network.
4. Select the time zone that represents the location of your server, then set the current date
and time.
5. Click Next.
6. Enter and re-enter the new administrator password, then click Next.
Seagate highly recommends customizing the administrator password to protect your
BlackArmor NAS 110 server and its contents. Passwords can be up to 16 alpha-numeric
characters long and are case-sensitive.
Good password example: LEag29ue
Bad password example: blackarmor
7. Select the network mode you want, then click Next.
By default, the BlackArmor NAS 110 server’s network mode is set to DHCP.
Unless you are part of a large corporation with an IT department, Seagate highly recommends
using the DHCP network mode.
8. Click Next to complete the setup.
9. Review the contents of the setup summary. Click Back to make any necessary changes,
or click Finish to complete the setup.
Creating Custom Shares
Your BlackArmor NAS 110 server comes with two preconfigured shares: Download and
Public. If these two shares meet your current needs, skip to “Creating User Accounts” on
page 21.
You can also create your own custom shares using the BlackArmor Manager Web interface.
You might want to do this if you want to store files by category, such as client files, project
files, or financial archive files; or if you want to store files by business team, such as
marketing, accounting, or sales.

Setup Steps for Administrators
BlackArmor® NAS 110 User Guide 21
To create custom shares:
1. In the menu bar, select Storage, click Shares, then click the Add icon.
2. Enter a name for the new share.
To make the share easy to recognize on the server, give it a name that’s descriptive and easy
to remember.
3. Enter a description of the share.
4. Select the share’s owner from the drop-down list of all user accounts. (See Creating User
Accounts to create individual user accounts.)
5. Select the types of protocols you want the share to support (see page 34).
6. Select the volume in which to create the share, if there is more than one volume on your
server.
7. You can protect files on the share from being accidentally deleted by adding a recycle bin
to the share. Deleted files can be recovered from the recycle bin, if necessary.
To add a recycle bin, beside Recycle Bin Service, click Enable.
8. You can set the share to download specific types of files into default folders—for instance,
all music files into Music.
To automatically sort downloaded files, beside Drag&Sort Service, click Enable. See
“Special Features of Shares” on page 34 for information about this service.
9. You can use your BlackArmor server to share digital photos, videos and music with
people on your local network. To set up this service, beside Media Service, click Enable.
10. Click the check box for Share Access to go to the page on which you set up and
customize user and group access to this new share. See the BlackArmor NAS 110
Manager online Help for more information.
11. Click Submit.
The share is created.
Creating User Accounts
Your BlackArmor NAS 110 server comes with one administrator account only. Your next step
is to use BlackArmor Manager to create individual user accounts.
Part of creating user accounts is assigning each user access to the default shares or the new
shares you create.
To create a user account:
1. In the menu bar, select Access, then click Users.
2. Click the Add icon.

Setup Steps for Administrators
BlackArmor® NAS 110 User Guide 22
3. Customize the account as required:
• User Name: Name user enters when logging in
• Admin Rights: Sets the user as a BlackArmor administrator
• Full Name: User’s name
• Password and Confirm Password: Up to 15 alphanumeric characters that user enters
when logging in
• Group: Group of users to which this account belongs, if any
• Create User Private Share: Whether or not BlackArmor Manager should create a new
private share for this account
• Volume: Which volume (if there is more than one) the private share should be created in
• Services: Which type(s) of file service should be supported by the private share
4. Click Submit.
The new account appears in the list of user accounts.
Note: You can make it faster and easier to manage access to shares by sorting users into user
groups. User groups allow you to modify share access for individuals or entire groups from a
single window. See “Creating and Modifying User Groups” on page 36 for more information.
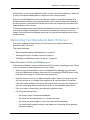
Distributing BlackArmor NAS 110 User Information
Once you have created user accounts, provide these items to each BlackArmor user so they
can get started using your BlackArmor NAS 110 server:
• The BlackArmor Discovery software
• The BlackArmor Backup software (optional)
• The user’s BlackArmor NAS 110 log in name and password
• The names of the shares that the user has access to, and the limitations of their
access—read-only, for instance—if any
• A copy of this guide and the section the user should read to get started with the
BlackArmor NAS 110 server (“BlackArmor Users Start Here” on page 15)
You can create copies of the software for each BlackArmor user from the supplied CD or
download what you need from www.seagate.com/support
Page is loading ...
Page is loading ...
Page is loading ...
Page is loading ...
Page is loading ...
Page is loading ...
Page is loading ...
Page is loading ...
Page is loading ...
Page is loading ...
Page is loading ...
Page is loading ...
Page is loading ...
Page is loading ...
Page is loading ...
Page is loading ...
Page is loading ...
Page is loading ...
Page is loading ...
Page is loading ...
Page is loading ...
Page is loading ...
Page is loading ...
Page is loading ...
Page is loading ...
Page is loading ...
Page is loading ...
Page is loading ...
Page is loading ...
Page is loading ...
Page is loading ...
Page is loading ...
Page is loading ...
Page is loading ...
Page is loading ...
Page is loading ...
Page is loading ...
Page is loading ...
-
 1
1
-
 2
2
-
 3
3
-
 4
4
-
 5
5
-
 6
6
-
 7
7
-
 8
8
-
 9
9
-
 10
10
-
 11
11
-
 12
12
-
 13
13
-
 14
14
-
 15
15
-
 16
16
-
 17
17
-
 18
18
-
 19
19
-
 20
20
-
 21
21
-
 22
22
-
 23
23
-
 24
24
-
 25
25
-
 26
26
-
 27
27
-
 28
28
-
 29
29
-
 30
30
-
 31
31
-
 32
32
-
 33
33
-
 34
34
-
 35
35
-
 36
36
-
 37
37
-
 38
38
-
 39
39
-
 40
40
-
 41
41
-
 42
42
-
 43
43
-
 44
44
-
 45
45
-
 46
46
-
 47
47
-
 48
48
-
 49
49
-
 50
50
-
 51
51
-
 52
52
-
 53
53
-
 54
54
-
 55
55
-
 56
56
-
 57
57
-
 58
58


Seagate 110 User manual
- Category
- NAS & storage servers
- Type
- User manual
- This manual is also suitable for
Ask a question and I''ll find the answer in the document
Finding information in a document is now easier with AI
Related papers
-
Seagate 440 User manual
-
-
Seagate BlackArmor NAS 420 User manual
-
Seagate Business Storage 4-Bay NAS User manual
-
Seagate BlackArmor PS 110 User manual
-
-
-
-
-
Other documents
-
LaCie 9000320 Datasheet
-
Williams Sound Digi-Wave 400 Firmware User manual
-
Sherwood LAD-500R - USB DOWNLOADER User manual
-
ANCEL 8542040184 User guide
-
Interlogix TruVision NVR 21 (SP) User manual
-
Aritech TruVision TVN-2208S-4T User manual
-
-
-
-