CHV-TSTAT & CHV-THSTAT
1: Mounting
Heating/Cooling (and Humidity) Thermostats
quickstart guide
www.crestron.com
800.237.2041
©2005 Specifications subject to
change without notice
201.767.3400
For details, check the latest revision of the CHV-TSTAT & CHV-THSTAT
Operations and Installation Guide, Doc. 8163.
QUICKSTART DOC. 6145B (2008085) 11.05
CHV-TSTAT & CHV-THSTAT
Mount the thermostat directly to drywall or to a single-gang box in
accordance with accepted building codes and practices. If using the
single-gang box, be sure to fill it with thermal insulation material.
For additional details and installation options, refer to the latest
version of the Crestron CHV-TSTAT & CHV-THSTAT Operations and
Installation Guide, Doc. 8163.
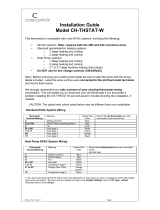
2: Connections
TOP
HUM
RHU
RSR
RSR
RS1
RS2
24(C)
24(R)
24V
Y
Z
G
NETWORK
RH
RC
G
Y/Y1
Y2
O
B
W/W1
W2
C
G
R
W
Y
Backplate
Integrated
Control
Unit
Add
Jumper
RH to RC
RH G
Y/Y1
W/W1
24(C)
This is a typical
5-wire connection
for a single-stage
heating and cool
-
ing system. In this
configuration, the
P4 jumper (far
right) on the circuit
board (reverse of
backplate) must be
on 1 and 2.
1
2
3
4
P4
3: Setup
Heat/Cool ( H/C), Heat Pump
(Hpump), or SLAB system
One or Two Stages
Forced Air or Radiant
system choice
HP/Aux or D.Fuel (Dual
Fuel) choice for Heat Pump
Press and hold MODE and VIEW to enter Setup.
Press VIEW to select a different parameter.
Press the Arrow keys to view the next value.
Press MODE to advance to the next screen.
SETUP: SYSTEM
Heat Sys Type:
# Heat Stags:
# Cool Stags:
Radiant /
Forced Air:
H/C
1
1
F.Air
Temperature Units
0
F or
0
C (1 degree steps in F)
Offset (-6 to +6
0
F) Allows the user to adjust the displayed temperature
Dual Setpoint Automatic Yes shows both heat and cool.
A No selection shows only Auto Setpoint.
Main Screen Lower Object (Under the Temperature Display)
HM -Displays Humidity NA - No Display OD - Outdoor temperature SB- Slab
Choice of 1 or 0.5 (half steps) in
0
C
SETUP: DISP OPTIONS
Temperature Units:
Temp Display Offset:
Dual Setpoint Auto:
Main Scn Lwr Obj:
Use 0.5 Deg C Step:
F
0
0
Y
SB
Y
Press MODE until this screen appears.
Press MODE until this screen appears.
SETUP: SENSORS
Sensor
Internal:
Remote 1:
Remote 2:
>TEMP HUM
USE OMIT
SLAB
DETECTED: 1 x T
USE (use in calculations - one sensor must be set to USE to exit Setup)
OMIT (do not use in calculations, but use in display)
OD (Outdoors)
SLAB (Remote Sensors Only)
NOTE: Remote 1 and Remote 2 options do not appear
on this screen if these sensors are not connected.
Auto-detects connected remote sensors.
Press and hold MODE
and VIEW to exit Setup.
Press MODE to return to beginning.
4: Operation
MODE
VIEW
C R E S T R O N
Main Screen
76
o
F
43
%
76
o
F
HEATING
HEAT ONLY
NET FAULT
H1 H2 AX
F
o
76
H C
Fan Mode
AUTO ON
Humidifier
ENABLED DISABLED
Crestron Sys
ONLINE HOLD
Global Update
SEND
Humidity
30
%
24
%
Outdoor
o
F
32
Messages
Emergency Gen in Use
<CLR
Use the up and down arrow buttons
to make a selection.
Press MODE to step to the next screen.
The displayed Mode screens depend on
the type of system.
Press MODE
Press MODE
Press MODE
Press VIEW
Press VIEW
System Mode
HEAT COOL AUTO OFF
AUX HEAT ONLY
*
* Jumper position
for this configuration
only.
Press MODE to
return to the Main Screen.
Press VIEW to set humidity setpoint, see
outdoor temp, and system messages.
Note: To enable changes, proceed to System Mode
as shown in 4: Operation and select HEAT, COOL or AUTO.