Page is loading ...

1
WEST BEND
4- CUP QUIK DRIP® COFFEEMAKER
Register this and other West Bend® products through our website: www.westbend.com
Care and Use Instructions
TO PREVENT PERSONAL INJURY OR PROPERTY DAMAGE, READ AND FOLLOW THE
INSTRUCTIONS AND WARNINGS IN THIS CARE AND USE INSTRUCTION MANUAL.
This booklet contains important and helpful information on your new product. Please file it for handy reference to
instructions for proper use and care, warranty and service information.
For your personal reference, attach dated sales receipt for warranty proof of purchase and record the following
information:
Date purchased or received as a gift: ___________________________________________________
Where purchased and price, if known: __________________________________________________
L-5227
IMPORTANT SAFEGUARDS
When using electrical appliances, basic safety precautions should always be followed, including the following:
• Read all instructions before using.
• Do not touch hot surfaces. Use handles or knobs.
• To protect against electrical shock, do not place cord, plugs or appliance in water or other liquid.
• Close supervision is necessary when any appliance is used by or near children.
• Unplug from outlet when not in use and before cleaning. Allow to cool before putting on or taking off parts, and
before cleaning the appliance.
• Do not operate any appliance with a damaged cord or plug or after the appliance malfunctions, or has been
damaged in any manner. Return appliance to The West Bend Company for examination, repair or adjustment.
• The use of accessory attachments not recommended by The West Company may result in fire, electric shock or
personal injury.
• Do not use outdoors.
• Do not let cord touch hot surfaces or hang over the edge of a counter, table or surface area.
• Do not place on or near a hot gas or electric burner, or in a heated oven.
• Do not use appliance for other than intended use.
• Make sure carafe lid is securely in place during brew cycle and when pouring coffee. Do not use force when
placing or removing lid from carafe.
• Do not remove any part of coffeemaker, other than the carafe, during the brew cycle as scalding could occur.
• Coffeemaker must be plugged into wall outlet before pressing switch to ON position. After brewing and
serving, press switch to OFF position, then unplug cord from wall outlet.
• Appliance with Glass Container:
a. The glass carafe container is designed for use with this appliance only. It must never be used on a
rangetop or in a microwave oven.
b. Do not set hot carafe on a wet or cold surface.
c. Do not use a cracked carafe or a carafe having a loose or weakened handle.
d. Do not clean carafe with cleansers, nylon or steel wool pads, or other abrasive materials.
SAVE THESE INSTRUCTIONS
Your coffeemaker needs no special care other than cleaning. If servicing becomes necessary, please return your
coffeemaker to The West Bend Company. See Warranty section in this booklet for service details. Do not attempt
to repair it yourself.

2
WARNING: To prevent personal injury or electric shock, do not remove cover from underside of coffeemaker
base. There are no user serviceable parts inside base. Repair should be done by authorized service personnel only.
For Household Use Only
IMPORTANT SAFETY
INSTRUCTIONS
This item has a polarized plug (one blade
is wider than the other). As a safety
feature, this plug will fit in a polarized
outlet only one way. If the plug does not
fit fully in the outlet, reverse the plug. If it
still does not fit, contact a qualified
electrician. Never use with an extension
cord unless plug can be fully inserted. Do
not attempt to defeat this safety feature.
SPECIAL NOTES:
• Do not attempt to reheat cold coffee in
carafe on warming plate.
• Add only water to the water reservoir.
Never add other liquids or cold coffee
to reservoir for heating.
• Never operate coffeemaker without
the coffee basket and covered carafe
in position.
• Do not allow coffee to boil dry in
carafe.
• Do not use carafe on a rangetop unit,
in a heated oven or in a microwave
oven.
• Do not heat empty carafe.
• Do not place hot carafe on a wet or cold surface.
• Always allow carafe to cool before washing.
• Use only wooden, plastic or rubber utensils when stirring in carafe.
• Never use abrasive nylon or metal souring pads or abrasive cleansers on carafe as scratching can occur.
• Do not place hands inside carafe while wearing any hand jewelry, particularly diamond rings.
• Never use carafe if is cracked, scratched, allowed to boil dry or damaged in any way. Discard carafe
immediately.
• The glass carafe, like all glass pieces, is fragile and subject to breakage, so always handle it with care. Do not
bump or scratch it. Be careful when filling from faucet.
• Before Using Drip Coffeemaker
Before using your coffeemaker for the first time, it is recommended that a carafe of cold water be cycled through the
unit to remove any impurities that could affect the flavor of coffee.
Follow the guidelines for making coffee, except do not add ground coffee to the basket. Fill carafe with cold water
to the 4 cup level and pour water into the reservoir. Place covered carafe on warming plate. Plug coffeemaker in
and turn ON. After water cycles through coffeemaker into carafe, turn coffeemaker OFF and unplug cord from
electric outlet. Wash carafe, cover and basket in hot soapy water, rinse and dry. Your coffeemaker is now ready to
use.

3
CAUTION: To prevent personal injury or electric shock, do not immerse coffeemaker base, its cord or plug in
water or other liquid.
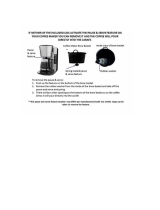
How to Remove and Attach Coffee Basket
Swing-Out Basket: To remove basket, swing open,
then lift basket up while sliding bottom out of attachment
hole. See Diagram 1. To attach basket, first open
reservoir cover to locate hole on top side of coffeemaker.
Then insert top pin of basket into this hole and align
bottom pin into hole below. Basket will drop in
place and swing freely when attached.
Slide-Out Basket: To remove basket, pull forward
using handle. To attach basket, slide edge into guides
at top until basket stops. See Diagram 2.
Making Coffee
1. Always use coffeemaker on a dry , level, heat-resistant surface away from any edge.
2. Place correct shaped paper filter into basket: a #2 size cone filter into swing-out basket; a fluted cupcake shaped
filter into slide-out basket.
Add 1 tablespoon automatic drip or “all grind” coffee into basket for each cup being made. Shake basket gently to
level grounds. Attach basket. Amount of coffee may be adjusted to suit your personal taste preference, but do not
use more than 2 tablespoons per cup.
CAUTION: To prevent personal injury or property damage due to overflow of basket, ALWAYS use a paper filter
when brewing coffee and clean the basket, drain hole in bottom of the basket and pause ‘n serve before each use. If
basket overflows, to prevent personal injury and/or property damage, unplug coffeemaker and allow it to cool before
removing basket.
SPECIAL NOTE ON GRINDING COFFEE BEANS
If grinding your own coffee beans, grind to medium coarseness for best results. DO NOT grind to fine (powder-
like) as this can cause basket to flood.
3. Fill carafe with COLD water to desired cup level as indicated by cup markings on carafe. Do not make less than
2 or more than 4 cups of coffee at one time. Pour water into reservoir and close cover. Attach cover to carafe.
Place covered carafe on warming plate.
CAUTION: To prevent personal injury or property damage, always keep cover on carafe during brewing as cover
opens pause lever on bottom of basket which allows coffee to flow into carafe. If cover is not used, basket will
flood.
4. Plug cord into a 120 volt AC electrical outlet ONLY. Turn on. Red area on control will be visible when
coffeemaker is on.
CAUTION: Your coffee maker has a short cord as a safety precaution to prevent personal injury or property
damage resulting from pulling, tripping or becoming entangled with the cord. Do not allow children to be near or
use this coffeemaker without close adult supervision. If you must use a longer cord set or an extension cord when
using this coffeemaker, the cord must be arranged so it will not drape or hang over the edge of a countertop, tabletop
or surface are where it can be pulled on by children or tripped over. To prevent electrical shock, personal injury, or
fire, the electrical rating of the extension cord you use must be the same or more than the wattage of the coffeemaker
(wattage is stamped on the underside of coffeemaker).

4
5. Allow coffeemaker to complete brew cycle. When coffee stops dripping from basket, coffee is ready. Four cups
of coffee takes about 8 minutes to brew. The amount of coffee obtained will be slightly less than the amount of
water used (5 ounces) as some water is absorbed by the coffee grounds. Remove carafe from base to serve. Coffee
will stay hot as long as coffeemaker remains on. After serving, turn coffee maker off and unplug cord from
electrical outlet.
6. Remove basket and discard grounds and paper filter.
7. If brewing another carafe of coffee immediately, allow coffeemaker to cool about 2 minutes after being turned
OFF. Rinse carafe and basket, then repeat Steps 1 through 6 above for brewing coffee. Remember to use COLD
water for brewing to reset the thermostat.
• Using Pause ‘n Serve Feature
Your coffeemaker includes a built-in Pause’n Serve feature which allows you to pour a cup of coffee while it is
being brewed. For optimum flavor, allow at least half the quantity of coffee to finish brewing before removing the
carafe to pour a cup. When the carafe is removed, coffee will automatically stop flowing from the basket. Return
the carafe to the warming plate immediately (within 15 seconds) after the carafe is removed to prevent possible
flooding of the basket. Do not remove any part of coffeemaker, other than the carafe, during the brewing cycle as
scalding could occur.
• Heating Water For Instant Beverages
Water may be heated in coffeemaker for use with instant beverages. Simply place empty coffee basket in place and
add cold water to carafe to desired cup level. Pour water into reservoir and place covered carafe on warming plate.
Plug coffeemaker in and turn ON. Allow hot water to cycle into carafe,. Pour hot water into cups containing
recommended amount of instant mix. Mix may also be added to hot water in carafe if desired. Based on 5-ounce
servings, follow package directions for amount of instant mix to use. Stir mix with a wooden spoon to dissolve.
Turn coffee maker OFF and unplug cord from outlet after serving.
• Brewing Tea
Tea may be brewed in coffeemaker using tea bags (with strings removed) or loose tea leaves. Place correct shaped
paper filter into basket. Add tea to basket using recommended amount for each 5-ounce cup being prepared. Attach
basket. Fill carafe with cold water to the desired cup level and pour into water reservoir. Place covered carafe on
warming plate. Plug coffeemaker into electrical outlet and turn ON. After tea is served, turn coffeemaker OFF and
unplug cord from outlet.
• Cleaning Coffeemaker
Always turn coffeemaker OFF, unplug cord from electrical outlet and allow to cool before cleaning.
1. Wash carafe, cover and basket in hot soapy water with a dishcloth or sponge, rinse and dry. To remove cover
from carafe, open cover and gently twist cover off handle. To replace cover onto carafe, place pivot lever tab over
pin on top of carafe handle. Push down gently until cover is secured onto carafe handle. See Diagrams below.
Never use nylon or metal scouring pads or abrasive cleansers on carafe as scratching can occur which can cause
glass to break.
2. Wipe plastic outside of coffeemaker, warming plate and underside of water spreader with a damp soapy cloth,
wipe clean with a damp cloth and dry.

5
CAUTION: To prevent personal injury or electric shock, do not immerse coffeemaker base, its cord or plug in
water or other liquid.
If coffeemaker is turned upside down when cleaning, use caution as hot water may flow from the reservoir or
spreader area.
• Dishwasher Cleaning
The carafe, cover and basket can be cleaned in an automatic dishwasher, TOP RACK ONLY. To prevent
scratching, place pieces into dishwasher rack so they do not touch one another or other objects being cleaned.
• Special Cleaning of Carafe
Normal washing of carafe by hand or in a dishwasher will remove most coffee stains. However, if stubborn stains
form, remove by scouring with a damp soft cloth and Bon Ami® non-abrasive cleanser to prevent scratching. After
cleaning, wash in hot soapy water, rinse and dry.
Never use nylon or metal scouring pads or abrasive cleansers on carafe as scratching can occur which can
cause glass to break.
• Special Cleaning of Coffeemaker To Remove Mineral Deposits
Minerals in water will naturally build up in the heating unit, pump and water spreader during use. These deposits
must be removed every 30 days (if coffeemaker is used daily) to prevent clogging of these parts which can affect
performance of coffeemaker. More frequent cleaning may be necessary if the water in your area is very hard.
Follow these steps for special cleaning of your coffeemaker.
1. Place correct shaped paper filter into coffee basket, then attach basket to coffeemaker.
2. Pour white distilled vinegar into carafe to the 3-cup level. Slowly pour vinegar into water reservoir. Place
covered carafe onto warming plate. Plug coffeemaker into outlet and turn ON. Allow vinegar to cycle into carafe.
Turn coffeemaker OFF and unplug cord from outlet. Pour vinegar back into water reservoir. Allow to cool 15 to 20
minutes. Repeat above procedure 4 to 5 times to thoroughly clean parts. If coffeemaker does not turn back on
between cleanings, allow to cool longer to reset the thermostat.
3. Discard vinegar after cleaning. Fill carafe with cold water to the 4-cup level and cycle through assembled
coffeemaker to rinse the parts.
4. Turn coffeemaker OFF, unplug cord from outlet and allow to cool. Wash carafe, cover and basket in hot soapy
water, rinse and dry. Wipe outside of coffeemaker with a damp cloth and dry.
CAUTION: To prevent personal injury or electric shock, do not immerse coffeemaker base, its cord or plug in
water or other liquid.
Exercise caution if coffeemaker base is turned upside down when wiping as hot water may flow from the reservoir
or spreader area.
REPLACEMENT PARTS:
Replacement parts for Quik Drip® Coffeemaker may be obtained directly from the company’s Customer Service
Department. Order online at www.westbend.com, or write or call:
The West Bend Company
Attn: Customer Service Department
PO Box 2780
West Bend, WI 53095
(262) 334-6949
Be sure to include the model number of your coffeemaker, a description of the part you want and the quantity.
Along with this information please include your name, mailing address and your Visa, MasterCard or Discover
credit card number for the billing of the part(s) to you. Your state’s sales tax and a handling fee will be added to

6
your total charge. Or, to send a check or money order, call (262) 334-6949 to obtain purchase amount. Please allow
2 weeks for delivery.
90 DAY WARRANTY
Your West Bend® Warranty covers failures in the materials and workmanship of this Quik Drip® Coffeemaker will
be repaired or replace without charge.
This warranty gives you specific legal rights and you may also have other rights which vary from state to state. This
warranty does not cover alleged damage caused by misuse, abuse, accidents or alterations to the Quik Drip®.
If you think the Quik Drip® has failed or requires service within it’s warranty period, please carefully package and
return the Quik Drip® prepaid and insured with a description of the difficulty to:
The West Bend Company
Attn: Housewares Returned Goods
1100 Schmidt Road
West Bend, WI 53090-1961
(262) 334-6949
Please ensure that you enclose the sales slip or proof of date of purchase in order to assure warranty coverage.
NOT VALID IN MEXICO
©The West Bend Company L5227
/