Garmin StreetPilot III User manual

Category
Navigators
Type
User manual

This manual is also suitable for

quick
reference
guide
portable GPS with
auto-routing and voice
StreetPilot
III
190-00256-11_0A.indd 3/5/02, 10:09 AM1
2
StreetPilot III Unit Features
Thank you for purchasing the GARMIN StreetPilot III—the result of our continuing effort to provide
quality, user-friendly automotive navigation systems to suit all your needs. This Quick Start Guide
is designed to introduce the basic functions of the unit. Please take a few moments now to review
the features of your StreetPilot III, as illustrated below. After reading through this guide, if you have
additional questions regarding a particular feature, please refer to the Owner’s Manual.
Quick Start
Unit Features
Power/Data Connector
(Back Side) Connections for
Power, Ground, Serial Data In
and Serial Data Out.
16-Color LCD Display
On-screen information is
referred to as a “page”.
Press PAGE key to select a
different screen.
Detachable Antenna
Rotate upright for best
satellite reception.
Power/Backlight Key
Press and hold to turn
on/off. Press momentarily
to adjust screen backlight
and contrast.
Battery Door
(Back Side) To open, turn metal D-ring
counterclockwise 1/4 turn and pull
battery door away from unit.
Cartridge Door
(Bottom) Insert programmed card
for increased map detail and
information lookup capability.
Rocker Keypad
Moves the cursor, pans
the Map Page and
enters data.
190-00256-11_0A.indd 3/5/02, 10:09 AM2
3
Quick Start
Keypad Usage
Keypad Usage
POWER (Red Bulb Symbol) – Press and hold to turn the StreetPilot III on and off. Press momentarily while
power is on to display the backlight/contrast adjustment window.
PAGE – Switches between main pages and returns display from an option window back to a main page.
QUIT – Returns display to a previous page. When entering data, restores the previous value (cancels
data entry).
ENTER/MARK – Confi rms a selected menu option. When entering data, it allows you to initiate entry, and
then to accept the selected value(s). Press and hold to capture your present position and save it as a
waypoint. ENTER/MARK can also capture the location of the panning arrow on the Map Page.
ROCKER KEYPAD – Selects menu options and enters data. Also controls movement of the panning cursor
on the Map Page.
Zoom IN and OUT – Adjusts map scale to show a smaller area (more detail) or a larger area (less detail).
FIND – Searches the database for Cities, Interstate Exits, Waypoints, and Recently Found Places. If a data
card is installed containing MapSource City Navigator or MetroGuide map data, it also searches for Points
of Interest, Addresses, and Intersections. The listed items may be saved as waypoints, viewed on a map
or selected as destinations.
MENU – Displays a menu of options for the current page. Press twice to display System Setup options.
ROUTE – Displays a pop-up window of route navigation features.
VOL/SPEAK – Adjusts the speaker volume. Press and hold until the controller appears on the left side
of the screen. To hear the volume count (i.e. 1, 2, 3, 4, 5, 6, 7, 8) press up or down on the rocker
keypad. Each press will activate the audio number. Pressing VOL/SPEAK also triggers the voice repeat
function when navigating.
NOTE: When the external speaker is connected, your
StreetPilot III provides audible prompts during route
navigation. These ‘spoken’ prompts include approaching
turn notifi cation (direction of turn and distance), off
course notifi cation, and arrival at destination. Spoken
messages are also provided for poor GPS coverage and
low battery power. Automatic voice prompting can be
turned off via a system setup option (but can always be
triggered by pressing the VOL/SPEAK key).
190-00256-11_0A.indd 3/5/02, 10:09 AM3
4
Quick Start
Features/Data Entry
Features and Entering Data
Cursor— A highlighted area on the screen which can be moved up/down/left/right with the
ROCKER KEYPAD to select individual fi elds on the display. Moving the cursor to a given location allows
you to begin data entry or scroll through a list.
Default— A system-selected format, built into the operating software or the unit’s memory, that will
be followed unless the user chooses a different setting. For example, the default setting for speed readings
is ‘miles per hour’ but can be changed to ‘kilometers per hour’. Once a setting is changed, the new setting
is retained until another change is made or the ‘Restore Original Settings’ menu option is selected.
Field—
The location on a page where a group of characters or an option is entered and displayed.
The cursor is placed on a fi eld (using the ROCKER KEYPAD) to begin data entry or select options.
To enter data in a data fi eld:
1. Use the ROCKER KEYPAD to highlight the desired data fi eld. Press ENTER to begin data entry.
2. Use the ROCKER KEYPAD to enter the desired data. UP/DOWN to select the desired character and
RIGHT to move to the next character fi eld. LEFT allows you to back up to the previous character fi eld
or, when at the left-most character fi eld, to clear the entire data fi eld.
3. Once the desired data has been entered, press ENTER to confi rm.
On-Screen Button— Similar to “Field”. Place the cursor on a button and press ENTER to select
the action corresponding to that button. An example of an on-screen button is the ‘Route to It’ button
appearing at the bottom of the Waypoint Marked Page (see example at left).
Scroll Bar— When viewing a list of items too long to display on a single page, a scroll bar will appear
along the right-hand side of the list (see example at left). The position of the scroll bar indicates which
portion of the list is currently being displayed. The height of the scroll bar indicates the number of items
in the list. To scroll through a list of items, use the UP/DOWN portion of the ROCKER KEYPAD.
An example of an on-screen button—the ‘Route to It’ button
on the Waypoint Marked Page.
When viewing a list of items too long to display on a
single page, a scroll bar will appear along the right-hand
side of the list. Also, using the Left/Right portion of the
Rocker Keypad will scroll information one full screen at
a time.
190-00256-11_0A.indd 3/5/02, 10:09 AM4
5
Quick Start
Power, Backlighting,
Contrast and Volume
Turning the StreetPilot III On and Off
Press and hold the POWER key to turn the unit on (a power tone will momentarily sound). The
Welcome Page appears briefl y, followed by the MapSource Copyright Page. Press ENTER to acknowledge
the copyright, or wait briefl y until the Safe Driving Warning Message appears. Once again, press ENTER
to acknowledge the warning or wait until the Warning Page is replaced by the Map Page. When the Map
Page appears, the unit is ready for operation.
When you are ready to turn the unit off, press and hold the POWER key.
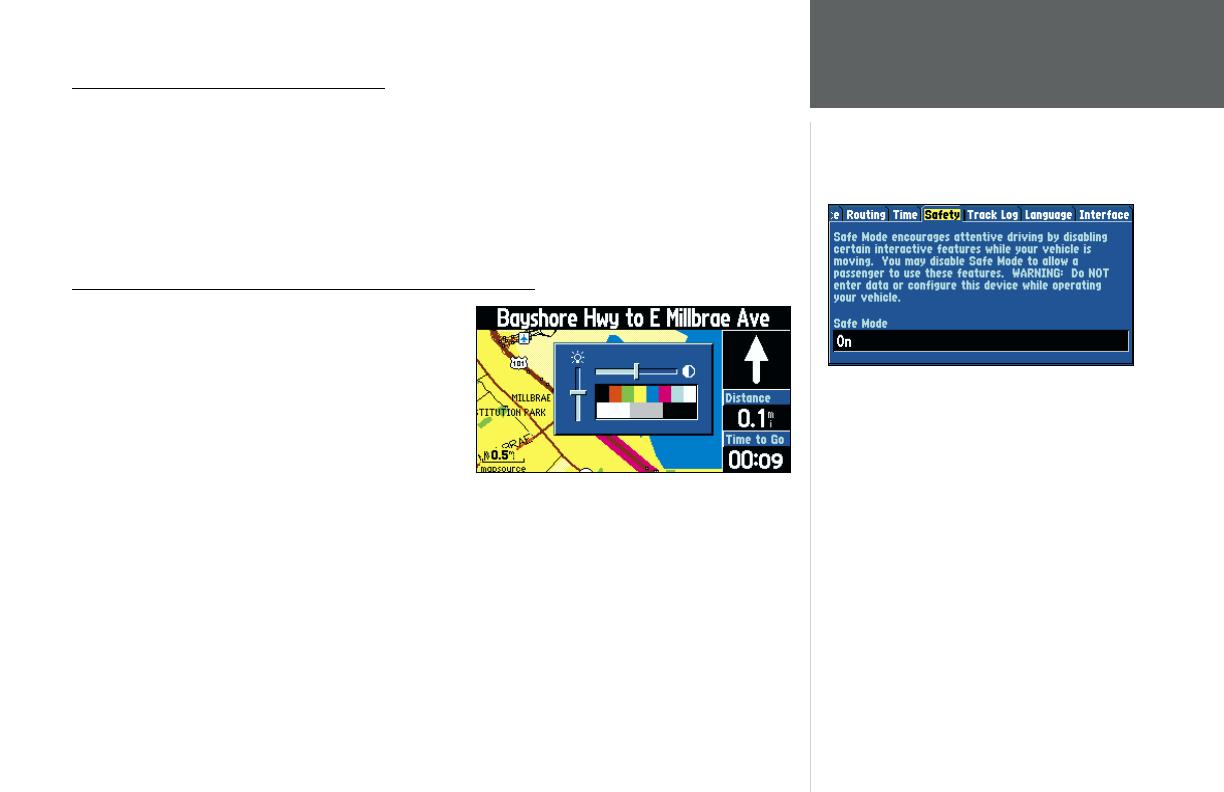
Adjusting the Backlight, Contrast, and Speaker Volume
The StreetPilot III display and keys can be illuminated
for operation at night or in bright sunlight. Backlight
intensity and screen contrast are adjustable. When oper-
ating the StreetPilot III at extreme temperatures, you may
nd that minor adjustments are needed to obtain the
clearest screen.
To adjust screen backlighting and contrast:
1. Press the red POWER key momentarily. An on-screen window appears allowing you to adjust the
backlight and contrast levels.
2. Use the ROCKER KEYPAD to adjust the backlight and the contrast to the desired level. (Alternatively,
backlighting can be cycled between three settings by repeatedly pressing the red POWER key.) The
backlight and contrast window will disappear after a few seconds of inactivity.
To adjust the external speaker volume:
1. Press and hold the VOL/SPEAK key. A slider adjustment window appears.
2. Adjust the speaker volume by using the ROCKER KEYPAD. The loudest setting is eight, the softest is
one. (Alternatively, volume can be cycled between three settings by repeatedly pressing VOL/SPEAK.)
Your StreetPilot III is equipped with a ‘Safe Mode’
feature to improve driver safety. By default, this
feature is enabled, but can be turned off to
allow a passenger to operate the unit. When
your vehicle is moving, Safe Mode disables
StreetPilot III functions which require signifi cant
operator attention and may become a distraction to use
while driving. Disabled functions include:
• Map Panning
• All FIND key functions (except Recent List)
• All MENU key functions
• Creating new routes
When you come to a complete stop, these features are
automatically re-enabled.
190-00256-11_0A.indd 3/5/02, 10:09 AM5
6
Main Page Sequence
Unit Pages at a Glance
There are three main pages on the StreetPilot III: the Map Page, Trip Information Page, and Current
Route Page. Press the PAGE or QUIT key to sequence through these pages.
Virtual Tour
Let’s use the StreetPilot III’s built-in simulator to select a destination, plan a route, and see how the
unit would operate in actual use. This simulated trip will involve the use of the FIND key to show you
how the StreetPilot III guides you through every turn with audible directions. First, if you haven’t already
done so, take the StreetPilot III outside and let it determine your current location.
To determine your current position:
1. Turn the StreetPilot III on by pressing the red POWER key. Make sure the antenna is pointing upward
and you are located in an area with a clear view of the sky.
2. Press ENTER to acknowledge the power-on pages. The power-on process is complete when the Map
Page appears (see page 8).
3.
Observe the message banner at the top of the Map Page. When the message changes from Acquiring
Satellites” to “Ready to Navigate” your StreetPilot III has determined your current position.
You may now continue the remainder of the Virtual Tour indoors. Find a comfortable chair, sit
back and enjoy the trip!
The fi rst time you use your new StreetPilot III, it will
need to search for GPS satellites and determine its
location. This process may take several minutes.
StreetPilot III is ready to guide you when the “Ready to
Navigate” message appears.
Map Page
Trip Information Page
Current Route Page
Appears only when a destination is selected.
PAGE
QUIT
Quick Start
190-00256-11_0A.indd 3/5/02, 10:09 AM6
7
Finding a Destination
Quick Start
To use the StreetPilot III indoors or simulate a trip:
1. With the StreetPilot III turned on, press the MENU Key.
2. Select ‘Use Indoors’ using the ROCKER KEYPAD and press ENTER.
3. Press ENTER again to acknowledge the “GPS turned off” message banner. The StreetPilot III is now
in a simulated operation mode.
NOTE: In normal use you WILL NOT follow the steps above to enable the built-in simula-
tor. Simply turn the StreetPilot III on, select a destination (see steps below) and drive!
Finding a Destination
Your StreetPilot III includes a built-in database of cities and interstate highway exits. If you’ve
already programmed the data card using your City Navigator CD, or if your StreetPilot III came with a
preprogrammed data card, you’ll also have access to a second database that includes Points of Interest,
Address lookup and road Intersections (the data card must be in the unit in order to search for
addresses, points of interest, and some intersections). In this Virtual Tour we’ll use examples for cities
(built-in) and points of interest (data card). Once you’ve read through these examples feel free to
experiment on your own with other categories.
To nd a destination location:
1. Press the FIND key. The Find window appears asking what type of location you are looking for.
2. Use the ROCKER KEYPAD to select the desired location type (in this case, Cities) and press
ENTER.
3. The StreetPilot III will search its internal database and present a list of nearby cities.
4. Use the ROCKER KEYPAD to highlight a nearby city on the list and press ENTER. An information
page will appear showing the city name, size, direction and distance to the city (from present
position) and several buttons at the bottom of the page.
(continued on next page)
NOTE: You can fi nd cities by name or from the nearest list. We’ll use the nearest list in this
demonstration, but experiment on your own later (see Owners Manual page 27).
F
F
Select ‘Use Indoors’ when you want to use simulate
navigation.
Press FIND and select ‘Cities’ to display a list of nearby
cities and select a destination.
190-00256-11_0A.indd 3/5/02, 10:09 AM7
8
Quick Start
5. To select this city as a destination, use the ROCKER KEYPAD to highlight the ‘Route To It’ button and
press ENTER. (Otherwise, press QUIT to return to the nearest city list and repeat step #4.)
6. A pop-up window will appear for you to indicate a route preference. Use the ROCKER KEYPAD to
select ‘Faster Time’ (higher speed roads) or ‘Shorter Distance’ according to your driving preferences and
press ENTER (‘Off Road’ will create a straight-line route instead of a turn-by-turn automatic route).
7. SIMULATED OPERATION ONLY: A second pop-up window will appear asking “Do you want to simulate
driving this route?” Use the ROCKER KEYPAD to highlight the ‘Yes’ button and press ENTER.
Map Page
Your current position is symbolized on the Map Page by a pointer arrow moving along the route
(a magenta line).
The Map Page displays turn-by-turn directions as you “drive”. Along the right-hand side of the page
you’ll fi nd your speed, distance travelled or distance to next turn, and the time remaining to the next
turn. The map display also shows the map scale (bottom left corner) and geographic details such as
lakes, rivers, highways and towns. You can use the IN and OUT keys to change the map scale.
To change the map scale:
1. Press the IN zoom key to display more detail for a smaller area.
2. Press the OUT zoom key to display a larger area.
The map can be displayed in a square, wide or full
screen confi guration for custom viewing. The square con-
guration is shown to the right, the wide confi guration is
shown above. Both square and wide confi gurations show
navigation information along the right side of the page.
If you just want to view the route on the map without
the unit simulating navigation, select “No” and press
ENTER.
Map Page
Map Scale
Vehicle Speed
Route Line
Your Current
Position
Vehicle Direction
Distance to Go
Time to Go
Driving Instructions
190-00256-11_0A.indd 3/5/02, 10:09 AM8
9
Quick Start
Current Route Page
Current Route Page
When the StreetPilot III is navigating a route, the Current Route Page is displayed between the Map
Page and the Trip Information Page. The Current Route Page shows pointers which indicate the next
three turns, and the destination (turn direction arrow, turn description, distance and time for each).
If the Current Route Page is not currently displayed, press PAGE (repeatedly) until the
Current Route Page appears.
The time displayed on the Current Route Page can be time to reach each turn or arrival time at
each turn.
To change the time displayed on the Current Route Page:
1. With the Current Route Page displayed, press MENU.
2. Either ‘Show Times to Go’ or ‘Show Arrival Time’ is displayed. Press ENTER.
NOTE: The Current Route Page only appears when a destination has been selected.
F
You can change the displayed time to show arrival times
or time to reach each turn.
Scroll Bar
Distance to Go
Time to GoDriving Instructions
Direction of Turn
190-00256-11_0A.indd 3/5/02, 10:09 AM9
10
Quick Start
Trip Information Page
If the Trip Information Page is not currently displayed, press PAGE (repeatedly) until
the Trip Information Page appears.
The last of the main pages is the Trip Information Page. On long trips, you will fi nd the Trip
Information Page very useful. This page indicates your current speed and many helpful statistics about
your trip including:
Driving Status Information— Displayed at the top of the page. Shows the next intersection (the
crossroad name) or interstate exit if one is approaching. Otherwise, it shows the road you are on.
Speed— This is the current vehicle speed.
Odometer— A running total of distance traveled, based upon the distance between second-by-
second location readings, since the Trip Computer was last reset.
Current Direction and Time— Displayed to the right of the speed and odometer.
Power/Battery— Displayed to the left of the odometer. If the StreetPilot III is using internal AA
batteries, a battery strength bar is shown (and labeled “Battery Power”). Notice the shaded area of the bar.
The farther right the shading extends, the more battery power remains. When operating on batteries, the
bar and the label turn red when power is low (20% or less). When operating from an external power
source, a power plug symbol is shown in place of the bar (and labeled “External Power”).
Battery power is shown in the upper left corner of the
Trip Information Page. When it turns red, its time to
replace the batteries.
Trip Speed
Figures
Trip Timer Figures
Current Driving
Direction and Time
Driving Instructions
Battery Level Indicator
You can reset the trip information by pressing MENU
and selecting ‘Reset Trip Computer’.
Trip Information Page
Speed Odometer
190-00256-11_0A.indd 3/5/02, 10:09 AM10
11
Quick Start
Points of Interest
Be certain to reset the Trip Computer before beginning your trip. Instructions can be found in the
Owners Manual on page 25. If you make frequent stops, leave the StreetPilot III powered on and
receiving satellites. This will allow the unit to accurately measure elapsed time during the trip. Some
vehicles disconnect power to the cigarette lighter when the ignition is turned off. In such cases, leave a
fresh set of batteries in the StreetPilot III. When external power is lost, a pop-up window will appear
asking if you wish to continue operating from battery power.
Once you have reached your destination city, a checkered fl ag replaces the directional arrow telling
you that the destination has been reached. With the external speaker connected, there is also a voice
confi rmation that the you have arrived at the destination.
Searching for Points of Interest
The Virtual Tour thus far has relied on built-in StreetPilot III data. If you’ve programmed the data
card using the City Navigator CD, or if your StreetPilot III came with a preprogrammed data card, you
can explore your area in more detail—searching for nearby restaurants, lodging, entertainment, shopping,
etc. Let’s take a brief look at how this works.
To search nearby Points of Interest and fi nd a destination:
1. Press the FIND key. The Find Window appears asking what type of location you are looking for.
2. Use the ROCKER KEYPAD to select the desired
location type (in this case, Points of Interest) and
press ENTER.
3. The StreetPilot III will ask for a Points of Interest
category. For this tour select ‘Food & Drink’ and
press ENTER.
4. StreetPilot III even lets you defi ne the type of
restaurant you’re looking for! For this example, select All Types’ and press ENTER.
5. The StreetPilot III will search its internal database and present a list of nearby restaurants.
(continued)
Both fl ag and voice (below) confi rm that you have arrived.
With the City Navigator CD-ROM, you can program the
data card and search for Points of Interest.
190-00256-11_0A.indd 3/5/02, 10:09 AM11
© Copyright 2002 GARMIN Ltd. or its subsidiaries
GARMIN International, Inc. 1200 East 151
st
Street, Olathe, Kansas 66062, U.S.A.
GARMIN (Europe) Ltd. Unit 5, The Quadrangle, Abbey Park Industrial Estate, Romsey, SO51 9AQ, U.K.
GARMIN Corporation No. 68, Jangshu 2
nd
Road, Shijr, Taipei County, Taiwan
Part Number 190-00256-11 Rev. A
6. Use the ROCKER KEYPAD to highlight a nearby restaurant on the list and press ENTER. An information
page will appear showing the restaurant name, address, phone number and several buttons at the bottom
of the page.
)
7. To select this restaurant as a destination, use the ROCKER KEYPAD to highlight ‘Route To It’ and press
ENTER. (Otherwise, press QUIT to return to the nearby restaurant list and repeat step #6.)
8. A pop-up window will appear for you to indicate a route preference. Use the ROCKER KEYPAD to select
‘Faster Time’ (higher speed roads) or ‘Shorter Distance’ according to your driving preferences. Press ENTER.
9. SIMULATED OPERATION ONLY: A second pop-up window will appear asking “Do you want to simulate
driving this route?” Use the ROCKER KEYPAD to highlight the ‘Yes’ button and press ENTER.
With your destination restaurant selected, take a few moments to again explore the main pages of your
StreetPilot III and watch as the simulator drives the selected route.
We’ve covered just some of the most important features of your StreetPilot III in this Quick Start Guide.
To learn more, be sure to read the information in the Owner’s Manual. Some suggested additional reading
topics include: Searching for cities or points of interest by name (page 27), Searching for a particular
address (page 31), Using the Next Turn Page (page 21), setting speed/distance measurements to metric units
(page 41).
If you need more help with any of the features of the StreetPilot III, visit the GARMIN web site (www.garmin.com), where you’ll fi nd answers to many
frequently-asked questions, or talk to a GARMIN dealer or technical support representative.
190-00256-11_0A.indd 3/5/02, 10:09 AM12
  • Page 1 1
  • Page 2 2
  • Page 3 3
  • Page 4 4
  • Page 5 5
  • Page 6 6
  • Page 7 7
  • Page 8 8
  • Page 9 9
  • Page 10 10
  • Page 11 11
  • Page 12 12

Garmin StreetPilot III User manual

Category
Navigators
Type
User manual
This manual is also suitable for

Ask a question and I''ll find the answer in the document

Finding information in a document is now easier with AI