Page is loading ...

ON
DAYSAV MAN AUTO RANDCLOCK
YEARDATE
MONTH
SKIP
EVENT
MO TU WE TH FR SA SU AM PM
OFF LOC DUSK DAWN
OK MODE PROG ON/OFF
ON
DAYSAV MAN AUTO RAND CLOCK
YEARDATE
MONTH
SKIP
EVENT
MO TU WE TH FR SA SU AM PM
OFF LOC DUSK DAWN
OK MODEPROG ON/OFF
ON
DAYSAVMAN AUTO RAND CLOCK
YEARDATE
MONTH
SKIP
EVENT
MO TU WE TH FR SA SU AM PM
OFF LOC DUSKDAWN
OK MODEPROG ON/OFF
ON
DAYSAVMAN AUTO RAND CLOCK
YEARDATE
MONTH
SKIP
EVENT
MO TU WE TH FR SA SU AM PM
OFF LOC DUSK DAWN
OK MODEPROG ON/OFF
ON
DAYSAVMAN AUTO RAND CLOCK
YEARDATE
MONTH
SKIP
EVENT
MO TU WE TH FR SA SU AM PM
OFF LOC DUSK DAWN
OK MODEPROG ON/OFF
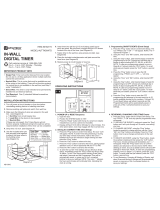
Programming Dusk ON/Dawn OFF
1. From the MAN, AUTO,or RAND screen, press PROG.
The screen displays a flashing 01. (Fig. 7)
2. Press PROG again.
3. Turn the selector knob until a flashing ON and DUSK appears at the
top of the screen then press PROG.
4. Turn the knob to select the required days of the week
that you want the DUSK ON event to occur. (Fig. 8)
5. Press PROG twice. The screen displays EVENT 02 and
flashing text at top.
6. Turn the knob until a flashing OFF and DAWN appears
on the screen and press PROG.
7. Turn the knob to select the required days of the week for the DAWN OFF to
occur and press PROG.
8. Press OK to save the programming and return to the AUTO screen.
To Set a Dusk ON and Fixed Time OFF Program:
1. From the MAN, AUTO or RAND screen, press PROG. The screen displays a
flashing 01. Press PROG again.
2. Turn selector knob until a flashing ON and DUSK appears. Press PROG.
3. Turn the knob to select the required days for the DUSK ON event and press
PROG. The screen displays a flashing 02. Press PROG.
4. Turn the knob until OFF flashes and 12:00 AM appears then press PROG.
5. Turn the knob to select the desired days of the week for the Fixed Time
OFF event and press PROG.
6. Turn the knob to select the desired OFF hour and press PROG.
7 Turn the knob to select the desired OFF minute and press PROG.
8. Press OK to return to the AUTO screen.
To Set a Fixed Time ON and Fixed Time OFF Program
1. From the MAN, AUTO or RAND screen, press PROG. The screen displays a
flashing 01. Press PROG.
2. Turn the knob until ON flashes and 12:00 AM appears. Press PROG.
3. Turn the knob to select the required days for the fixed time ON and press PROG.
4. Turn the knob to select the desired ON hour and press PROG.
5. Turn the knob to select the desired ON minute and press PROG. The
screen displays a flashing 02. Press PROG again.
6. Turn the knob until OFF flashes and 12:00 AM appears and press PROG.
7. Turn the knob to select the desired days of the week for the fixed time OFF
to occur and press PROG.
8. Turn the knob to select the desired OFF hour and press PROG.
9. Turn the knob to select the desired OFF minute and press PROG.
10. Repeat steps 2-12 for additional (higher numbered) ON/OFF events or
press OK to return to the AUTO screen.
To Review/Revise Calendar Settings
1. Press MODE repeatedly until CLOCK is displayed.
2. Press OK repeatedly to step through all settings until Time of Day and MAN
is displayed.
3. Use selector knob to revise and OK button to save changes.
4. Use MODE button to select MAN, AUTO or RAND operation.
To Review/Revise ON/OFF Settings
1. Press PROG button.
2. Turn selected knob to view all 28 possible settings.
3. Revise per setting procedure.
4. Press OK to return to AUTO mode.
5. Use MODE button to select MAN, AUTO,or RAND operation.
Select Operating Mode
1. PRESS MODE button to select:
a. AUTO (Timer follows your program)
b. RAND (Timer follows your program with daily RANDOM variations in
ON/OFF times.
c. MAN (Timer saves but ignores your program. Use ON/OFF to switch the load).
About the Batteries
The battery voltage is continuously monitored. If a low
voltage is detected, the low battery indicator will be dis-
played. (Fig. 9).
•ThetimerrequirestwoLR44batteriestokeeptime
up to three months without power.
•Replacethebatteriesassoonpossibleafterthelowbatteryindicatorappears.
•Changethebatterieswithinoneminuteofunplugginginordertokeepthetime
and date settings. Afterwards, if the display is wrong or flashes “12:00 AM”,
reset the time and date. All other settings (your ON and OFF programming) remain
in memoryindenitelywithoutbatteryorACpower.
•Whilethebatteriesareremoved,thetimerwillturnoffthedisplaytoconserve
power.
•Disposeoftheusedbatteriespromptlyaccordingtolocal
regulations. Keep batteries away from children.
Replacing the Batteries
•Unplugtimerbeforereplacingbatteries.
To remove the batteries, carefully pry the battery holder up
with a small flat screwdriver. Install the new batteries as
shown in Fig. 10. Firmly place the battery holder into
the switch.
Fig. 2
Fig. 4
Fig. 5
Fig. 6
Digital Timer
Installation and User Instructions
MODEL DT620 Series
• Input:102-132VAC60Hz,2.5Wmax.
• Output:15Aoutput,1800Wresistiveand12Ainductive,8.3A,1000Wtungsten,1/2HP
Ratings
• Risk of injury or death. Always plug three-prong plug into a properly grounded
outlet. Never attempt to defeat this safety feature.
• Do not use timer to control devices that could have dangerous consequences due
to inaccurate timing, such as sun lamps, sauna, heaters, crock pots, etc.
• Unplug timer before replacing batteries.
WARNING
• Follow local electrical codes during use.
• Dispose of used batteries promptly per local regulations.
Risk of FIre or Electrical Shock
NOTICE
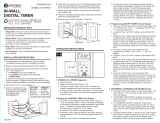
Timer Overview
ON
DAYSAV MAN AUTO RAND CLOCK
YEARDATE
MONTH
SKIP
EVENT
MO TU WE TH FR SA SU AM PM
OFF LOC DUSK DAWN
OK MODE PROG ON/OFF
B
C
F
G
H
I
J
D
Item Description
A Battery Holder
B Low battery indicator
C Time of Day display
D Control buttons (4)
E Grounded outlet (2)
F Selector knob
G Reset button
H Day of Week display
I Event display
J Mode display
K ON/OFF indicator light
L Battery Pull Tab
L
Fig. 1
Fig. 3
ON
DAYSAV MAN AUTO RAND CLOCK
YEARDATE
MONTH
SKIP
EVENT
MO TU WE TH FR SA SU AM PM
OFF LOC DUSK DAWN
Enable Battery
1. RemovePullTab(L)(Fig.1)frombatteryholderifpresent.
2. Display shows 12:00. If no display see troubleshooting guide.
3. For your convenience timer may be set while unplugged. Display
turns OFF after 1 minute to save battery. Press any button to turn display back ON.
Clear Out Old Settings
1. Press and hold the ON/OFF button.
2. WhileholdingON/OFF, press and hold the reset button (G)
for five seconds with a blunt object, until display shows “CLR”.
3. Release ON/OFF and RESET buttons. The screen displays 12:00 AM,
with 12 flashing. (Fig. 2) Proceed to step 2 below.
Set The Time, Date and Location
1. If necessary, press MODE to display CLOCK in the top right corner
of the screen, then press OK.Hoursdigitsash.
2. Turn the selector knob to set the current hour and press OK.
3. Turn the selector knob to set the current minute and press OK.
4. Turn the knob to set the desired year and press OK. (Fig. 3)
5. Turn the knob to set the desired month and press OK.
6. Turn the knob to set the correct date and press OK. The screen displays DAY SAV and
flashing AUTO (Meaning AUTOmatic DAYlight SAVing Time adjustment is enabled).
7. To accept AUTO Daylight Saving Time adjustment press OK and proceed to step 8.
TodisableDaylightSavingAdjustment(Forexample,inArizonaorHawaii)turnknobto
display flashing MAN then press OK. LOC will show on top of display.
(Fig. 4) Proceed to step 13.
8. Steps 8-10 allow you to change the Daylight Saving Time (DST)
adjustment dates. The timer is factory-set to the US Daylight
Saving rules effective from the year 2007 forward. The display will
show ON DAY SAV, flashing 03, and WK 02, meaning timer will adjust
forward on 2nd Sunday in March. Proceed to step 9 if you need to change the factory
settings or press OK repeatedly to accept the factory settings until LOC appears on
top of display and proceed to step 13. (Fig. 4)
9. Turn the knob to change the flashing 03 to the required new month (01-06) for the
spring adjustment, then press OK.
10. Turn the knob to change the flashing 02 to the required new week (01-02-03-04-L)
for the spring adjustment, then press OK. (“L”meansLastweekofmonth).
11. Turn the knob to change the flashing 11 to the required new month (07-12) for the
autumn adjustment, then press OK.
12. Turn the knob to change the flashing 01 to the required new week (01-02-03-04-L)
for the autumn adjustment, then press OK. LOC shows at top of display. (Fig. 3)
13. Turntheknobtoselectthedesiredstateorprovince(ifinCanada)or
MEX for Mexico and press OK.
14. Turn the knob to select the region of the state or province and press OK.
15. TurntheknobtoselectthetimezoneandpressOK. The Dawn time
flashes.
16. Turn the knob to adjust the Dawn Time, (Fig. 5) if necessary and
press OK.
17. Turn the knob to adjust the Dusk Time, (Fig. 6) if necessary and
press Ok. Display shows MAN, and Time of Day.
Fig. 7
ON
DAYSAV MAN AUTO RANDCLOCK
YEARDATE
MONTH
SKIP
EVENT
MO TU WE TH FR SA SU AM PM
OFF LOC DUSK DAWN
OK MODE PROG ON/OFF
Fig. 9
ON
DAYSAV MAN AUTO RANDCLOCK
YEARDATE
MONTH
SKIP
EVENT
MO TU WE TH FR SA SU AM PM
OFF LOC DUSK DAWN
OK MODE PROG ON/OFF
Fig. 8
Fig. 10
K
A
E
E

Observed Problem Possible Cause What to Do
Battery symbol always shows in the upper
right of display when plugged in or no
display at all when unplugged and buttons
are pressed. (Note: battery display takes 1
minute to recognize installed or removed
batteries.)
Low, missing, or backwards batteries, pull tab
not removed, or poor contact in battery holder.
Remove pull tab. Verify correct battery direction
per outline on inside or “+/-” on outside of
holder. Bend contacts of battery holder to touch
the batteries firmly. Replace both batteries. Use 2
type LR44 or A76.
Digital timer does not switch on/off but
display looks normal.
Digital timer is not set in AUTO, RANDom, or
MANual mode.
Press MODE to select the operational mode you
want to use; or make sure an ON/OFF schedule
is set.
Digital timer won’t enter AUTO or
RANDom mode when you press MODE.
The time of day or timer settings have not
been set.
Make sure the time of day and at least one
scheduled activity have been set.
Digital timer switches at incorrect times or
skips some of the programmed times.
Programmed schedule(s) are incorrect.
Press PROG to review the settings and revise
them as necessary. See instructions.
Digital timer is in RANDom mode, which
varies switching times up to ±30 minutes (to
give your home a “lived-in” look).
If you don’t want to keep the timer in RANDom
mode, press MODE to change to AUTO mode.
The Astronomic and exact switching times
are in conflict. For example, you’ve set on to
DUSK and off at 8 pm, and due to seasonal
changes, DUSK has advanced to 8:30 pm.
NOTE: Your timer automatically skips any
conflicting ON event as summer approaches
to prevent unwanted operation of lights or
other controlled devices. See “What to Do” if
you want to identify and remove conflicting
settings.
1.
Complete the steps for setting the Time and
Date, then temporarily change the date to
June 21st.
2.
Review the DAWN and DUSK settings by
pushing the PROG button.
3.
Make sure the specific ON or OFF time
settings won’t interfere with these DAWN and
DUSK times. Make changes as necessary.
4.
When finished, change the Date setting back
to today’s date.
The lights or controlled devices don’t
match the programmed on/off status
immediately after setting the time or
programming a schedule.
Digital timer does not “catch up” automatically
to the programmed load state. The status of
the timer will remain as is until it comes to the
next programmed on/off time.
After programming your events or the time, then
returning to the AUTO mode, push the ON/OFF
button to change the load state if necessary.
Timer shows ON but the light or other
controlled device is off.
The light or controlled device itself may be
switched off or the light bulb may be burned
out.
Make sure the light or controlled device is
switched on and plugged in or replace the light
bulb.
Troubleshooting Guide
158--01302
INTERMATIC INCORPORATED
Spring Grove, Illinois 60081-9698
LIMITED ONE-YEAR WARRANTY
If within the warranty period specified, this product fails due to a defect in material or
workmanship, Intermatic Incorporated will repair or replace it, at its sole option, free
of charge. This warranty is extended to the original household purchaser only and is
not transferable. This warranty does not apply to: (a) damage to units caused by
accident, dropping or abuse in handling, acts of God or any negligent use; (b) units
whichhavebeensubjecttounauthorizedrepair,opened,takenapartorotherwise
modified; (c) units not used in accordance with instructions; (d) damages exceeding
thecostoftheproduct;(e)sealedlampsand/orlampbulbs,LED’sandbatteries;(f)
thenishonanyportionoftheproduct,suchassurfaceand/orweathering,asthisis
considered normal wear and tear; (g) transit damage, initial installation costs, removal
costs, or reinstallation costs.
INTERMATICINCORPORATEDWILLNOTBELIABLEFORINCIDENTALOR
CONSEQUENTIALDAMAGES.SOMESTATESDONOTALLOWTHEEXCLUSIONOR
LIMITATIONOFINCIDENTALORCONSEQUENTIALDAMAGES,SOTHEABOVE
LIMITATIONOREXCLUSIONMAYNOTAPPLYTOYOU.THISWARRANTYISINLIEU
OFALLOTHEREXPRESSORIMPLIEDWARRANTIES.ALLIMPLIEDWARRANTIES,
INCLUDINGTHEWARRANTYOFMERCHANTABILITYANDTHEWARRANTYOF
FITNESSFORAPARTICULARPURPOSE,AREHEREBYMODIFIEDTOEXISTONLYAS
CONTAINEDINTHISLIMITEDWARRANTY,ANDSHALLBEOFTHESAMEDURATION
ASTHEWARRANTYPERIODSTATEDABOVE.SOMESTATESDONOTALLOW
LIMITATIONSONTHEDURATIONOFANIMPLIEDWARRANTY,SOTHEABOVE
LIMITATIONMAYNOTAPPLYTOYOU.
This warranty service is available by either (a) returning the product to the dealer
from whom the unit was purchased or (b) completing a warranty claim online at
www.intermatic.com. This warranty is made by: Intermatic Incorporated,
CustomerService7777WinnRd.,SpringGrove,Illinois60081-9698.For
warrantyservicegoto:http://www.Intermatic.comorcall815-675-7000
Problema observado Causa posible Qué hacer
El símbolo de la batería se muestra siempre
en la parte superior derecha de la pantalla
cuando está enchufado o no se muestra
en lo absoluto cuando se desenchufa y se
presionan los botones. (Nota: la pantalla de
la batería tarda 1 minuto en reconocer que
se ha instalado o retirado baterías).
Baterías bajas, faltantes o al revés; no se retiró
la lengüeta o existe un contacto deficiente en el
soporte de la batería.
Retire la lengüeta. Verifique la dirección correcta
de la batería según la descripción en el interior
o “+/-” en el exterior del soporte. Doble los
contactos del soporte para que toquen firmemente
la batería. Reemplace ambas baterías. Use 2 de
tipo LR44 o A76.
El temporizador digital no se enciente ni se
apaga, pero la pantalla se ve normal.
El temporizador digital no está ajustado en los
modos AUTO, RAND o MAN.
Presione MODE para seleccionar el modo de
funcionamiento que desea usar, o bien, asegúrese
de que se haya ajustado la programación de
ENCENDIDO/APAGADO.
El temporizador no entra en modo AUTO o
RAND cuando presiona MODE.
No se ha establecido la hora del día ni los
ajustes del temporizador.
Asegúrese de haber establecido la hora del día y,
al menos, una actividad programada.
El temporizador digital cambia a las horas
incorrectas o pasa por alto algunas de las
horas programadas.
Los horarios programados están incorrectos. Presione PROG para revisar los ajustes y
modificarlos, según sea necesario. Consulte las
instrucciones.
El temporizador digital están en modo RAND,
el cual varía las horas de cambio en hasta
±30minutos (para darle una apariencia
“habitada” a su hogar).
Si no desea mantener el temporizador en modo
RAND, presione MODE para cambiar al modo
AUTO.
Las horas astronómicas y de cambio exacto
están en conflicto. Por ejemplo, ajustó DUSK
y apagado a las 8 p.m. y, debido a los cambios
de estación, DUSK se ha movido hasta las
8:30p.m.
NOTA: El temporizador pasa por alto
automáticamente cualquier evento de
ENCENDIDO contradictorio a medida que se
acerca el verano, para evitar el funcionamiento
no deseado de las luces u otros dispositivos
controlados. Consulte “Qué hacer” si desea
identificar y eliminar los ajustes contradictorios.
1. Complete los pasos para ajustar la hora y la
fecha, luego cambie temporalmente la fecha al
21 de julio.
2. Revise los ajustes de DAWN y DUSK; para esto,
presione el botón PROG.
3. Asegúrese de que los ajustes específicos de
ENCENDIDO o APAGADO no interfieran con los
horarios de DAWN y DUSK. Realice cambios
según sea necesario.
4. Cuando termine, cambie el ajuste de fecha de
vuelta a la fecha de hoy.
Las luces o los dispositivos controlados
no coinciden con el estado de encendido/
apagado programado, inmediatamente
después de ajustar la hora o programar
un horario.
El temporizador digital no se “actualiza”
automáticamente con el estado de la carga
programada. El estado del temporizador
permanecerá como está hasta que ocurra
el siguiente horario de encendido/apagado
programado.
Después de programar los eventos o la hora,
luego, vuelva al modo AUTO y presione el botón
ON/OFF para cambiar el estado de la carga si es
necesario.
El temporizador muestra ON pero la luz u
otro dispositivo controlado están apagados.
Es posible que la luz o el dispositivo controlado
estén apagados o que la bombilla se haya
quemado.
Asegúrese de que la luz o el dispositivo controlado
esté encendido y enchufado, o bien, reemplace
la bombilla.
Guía de solución de problemas
Problème observé Cause possible Solution
Le symbole des piles s’affiche toujours en
haut à droite de l’écran quand l’appareil
est branché ou ne s’affiche pas du tout
lorsqu’il est débranché et que des touches
sont enfoncées. (Remarque: l’affichage
prend 1 minute pour reconnaitre le mise
en place ou l’enlèvement des piles.)
Piles faibles, absentes ou à l’envers, languette
pas retirée ou mauvais contact dans le porte-
piles.
Retirer la languette. Vérifier l’orientation des
piles par rapport au schéma à l’intérieur ou aux
symboles «+/-» sur l’extérieur du porte-piles.
Courber les contacts du porte-piles pour qu’ils
appuient fermement sur les piles. Changer les
deux piles. Utiliser 2 piles LR44 ou A76.
La minuterie numérique ne commute pas
mais l’affichage semble normal.
La minuterie numérique n’est pas en mode
AUTO, RAND ou MAN.
Appuyer sur MODE pour sélectionner le mode
de fonctionnement souhaité ou vérifier qu’un
calendrier de marche/arrêt est programmé.
La minuterie numérique ne passe pas en
mode AUTO ou RAND lorsqu’on appuie
sur MODE.
L’heure courante ou les paramètre de la
minuterie n’ont pas été réglés.
Vérifier que l’heure courante et au moins une
activité programmée ont été réglées.
La minuterie numérique commute à des
heures incorrectes ou saute certaines des
heures programmées.
Les horaires programmés sont incorrects. Appuyer sur PROG pour vérifier les réglages et le
corriger le cas échéant. Voir les instructions.
La minuterie numérique est en mode RAND,
qui fait varier les horaires de commutation
jusqu’à ±30 minutes (pour donner au domicile
une apparence «habitée»).
Pour ne pas maintenir la minuterie en mode
RAND, appuyer sur MODE pour passer en mode
AUTO.
Les heures de commutation astronomique
et à heure exacte sont contradictoires. Par
exemple, la marche est réglée sur DUSK
(crépuscule) et l’arrêt sur 20h00 et, en raison
des variations saisonnières, l’heure DUSK a
atteint 20h30.
REMARQUE : La minuterie ignore
automatiquement tout évènement ON
contradictoire à l’approche de l’été afin
d’éviter toute activation indésirable de
l’éclairage ou autre dispositif. Voir comment
identifier et supprimer les réglages
contradictoires dans la colonne «Solution».
1.
Suivre les instructions de réglage de l’heure et
de la date, puis régler provisoirement la date
sur le 21 juin.
2.
Examiner les réglages de DAWN et DUSK en
appuyant sur la touche PROG.
3.
Vérifier que les réglages d’heure ON ou OFF
ne sont pas incompatibles avec les heures
DAWN et DUSK. Effectuer les changements
nécessaires.
4.
Pour finir, ramener le réglage de date à la date
courante.
L’état des lampes ou dispositifs
commandés ne correspond pas à l’état
ON/OFF programmé immédiatement
après avoir le réglage de l’heure ou de la
programmation d’un calendrier.
La minuterie numérique ne s’ajuste pas
automatiquement sur l’état de charge
programmé. L’état de minuterie reste inchangé
jusqu’au prochain évènement marche/arrêt
programmé.
Après avoir programmé des évènements ou
réglé l’heure puis être revenu en mode AUTO,
appuyer sur la touche ON/OFF pour changer l’état
de la charge le cas échéant.
La minuterie affiche ON mais la lampe ou
autre dispositif commandé est éteint.
Il est possible que la lampe ou le dispositif
commandé ait un interrupteur ouvert ou que
l’ampoule soit grillée.
S’assurer que la lampe ou le dispositif
commandé est activé et branché ou changer
l’ampoule.
Guide de dépannage
GARANTÍA LIMITADA DE UN AÑO
Si dentro del período de garantía especificado este producto falla debido a un
defecto de material o de mano de obra, Intermatic Incorporated lo reparará o
reemplazará,asuenteradiscreción,sincargoalguno.Estagarantíasólose
otorga al comprador original y no es transferible. Esta garantía no se aplica en
los siguientes casos: (a) daños en las unidades causados por accidentes, caídas
omanejoindebido,causasdefuerzamayorousonegligente;(b)unidadesque
hayansidosometidasaunareparaciónnoautorizada,abiertas,desmontadas
omodicadasdealgunamanera;c)unidadesnoutilizadasdeacuerdoconlas
instrucciones; (d) daños que excedan el costo del producto; (e)
lámparasy/obombillasdelámparasselladas,diodosemisoresdeluz(LED)y
baterías;(f)elacabadodecualquierpartedelproducto,comosusuperciey/opor
exposición a la intemperie, ya que esto se considera un desgaste y uso normal;
g) daños durante el transporte, costos de instalación inicial, costos de remoción
o costos de reinstalación.
INTERMATICINCORPORATEDNOASUMERESPONSABILIDADALGUNAPORDAÑOS
INCIDENTALESOCONSECUENCIALES.ALGUNOSESTADOSNOPERMITENEXCLUIR
OLIMITARLOSDAÑOSINCIDENTALESOCONSECUENCIALES,PORLOQUELA
LIMITACIÓNOEXCLUSIÓNANTERIORPUDIERANOSERVÁLIDAENSUCASO.ESTA
GARANTÍASUSTITUYEACUALQUIEROTRAGARANTÍAEXPRESAOIMPLÍCITA.
TODASLASGARANTÍASIMPLÍCITAS,INCLUIDALAGARANTÍADE
IDONEIDADCOMERCIALODEIDONEIDADPARAUNDETERMINADOFIN,SE
MODIFICANPARAQUEDARINCLUIDASÚNICAMENTEENLAPRESENTEGARANTÍA
LIMITADA,YTENDRÁNLAMISMADURACIÓNQUEELPERIODODEGARANTÍA
MENCIONADOANTES.ALGUNOSESTADOSNOPERMITENLIMITARLADURACIÓN
DEUNAGARANTÍAIMPLÍCITA,PORLOQUELALIMITACIÓNANTERIORPUDIERANO
SERAPLICABLEENSUCASO.
Este servicio de garantía está disponible (a) devolviendo el producto al distribuidor
donde se compró la unidad o (b) completando un reclamo de garantía en
Internet en www.intermatic.com. Esta garantía es concedida por: Intermatic
IncorporatedCustomerService/7777WinnRd.,SpringGrove,Illinois60081-
9698/815-675-7000http://www.intermatic.com
GARANTIE LIMITÉE UN AN
Si, dans la période de garantie spécifiée, ce produit tombait en panne dû à
un vice de matériau ou de fabrication, Intermatic Incorporated le réparera ou
lechangera,àsaseulediscrétion,etcegratuitement.Laprésentegarantie
s’étendàl’acheteurfinalinitialuniquementetn’estpastransférable.Cette
garantie ne s’applique pas : (a) aux dommages au dispositif causés par un
accident, une chute ou une mauvaise manipulation, une catastrophe naturelle
ou une utilisation négligente; (b) aux dispositifs soumis à des réparations non
autorisées, qui ont été ouverts, démontés ou modifiés de quelconque manière;
(c) aux dispositifs qui n’ont pas été utilisés conformément aux instructions; (d)
auxdommagesdépassantlecoûtduproduit;(e)auxlampesscelléeset/ouaux
ampoules,auxDELetauxpiles;(f)àlafinitiondel’unedespartiesdudispositif,
telle que la surface ou les caractéristiques de résistance aux intempéries, ce
qui est considéré comme de l’usure normale; (g) aux dommages causés par
le transport, aux coûts d’installation initiale, aux coûts de démontage ou de
remontage.
INTERMATICINCORPORATEDNEPOURRAÊTRETENUERESPONSABLE
DEDOMMAGESINDIRECTSOUCONSÉCUTIFS.CERTAINESJURIDICTIONS
N’AUTORISENTPASL’EXCLUSIONOULALIMITATIONDESDOMMAGES
INDIRECTSOUCONSÉCUTIFS.DANSCECAS,LESLIMITESCI-DESSUSNE
S’APPLIQUENTPAS.LAPRÉSENTEGARANTIEREMPLACETOUTESLESAUTRES
GARANTIESEXPRESSESOUIMPLICITES.TOUTESLESGARANTIESIMPLICITES,
NOTAMMENTGARANTIEDEQUALITÉMARCHANDEETGARANTIED’ADAPTATION
ÀUNEFINPARTICULIÈRE,SONTMODIFIÉESAUXPRÉSENTESPOUREXISTER
UNIQUEMENTTELLESQUECOMPRISESDANSLAGARANTIELIMITÉE,ET
AURONTLAMÊMEDURÉEQUELAPÉRIODEDEGARANTIEINDIQUÉECI-DESSUS.
CERTAINES JURIDICTIONS N’AUTORISENT PASLESLIMITESDE
DURÉED’UNEGARANTIEIMPLICITE.DANSCECAS,LESLIMITESCI-DESSUSNE
S’APPLIQUENTPAS.
Le recours à la présente garantie se fait soit (a) par renvoi du produit
au vendeur auprès duquel il a été acheté, soit (b) en remplissant le
formulaire de réclamation sur le site Web www.intermatic.com. La
présente garantie est offerte par : Intermatic Incorporated, Customer
Service 7777 Winn Rd., Spring Grove, Illinois 60081-9698. Pour
recourir à la garantie, aller à : http://www.Intermatic.com ou
composer le 815-675-7000.
/