Kohler 3391-H-NA Installation guide

Category
Kitchen sinks
Type
Installation guide
1021992-2-A
Installation Guide
K-3387
Beveled Stainless Steel Sinks
K-3388
K-3389
K-3391
1021992-2-A
1021992-2-A
2
Kohler Co.
Tools and Materials
Pencil and
Marker
Measuring Tape
Drill
Scissors
Sealant
Safety Glasses
Keyhole/Compass
or Saber Saw
Putty Knife
Thank You For Choosing Kohler Company
We appreciate your commitment to Kohler quality. Please take a few
minutes to review this manual before you start installation. If you
encounter any installation or performance problems, please don’t
hesitate to contact us. Our phone numbers and website are listed on
the back cover. Thanks again for choosing Kohler Company.
Before You Begin
- Refer to the Homeowners Guide to determine all necessary
components for your installation.
- The Kohler K-5806 or K-5807 Undermountert Kit is appropriate for
use with this installation.
- Remove the sink from its carton and inspect for damage.
- During installation, store the sink in the protective carton whenever
possible.
- Observe all local plumbing and building codes.
- When installing multiple sinks, there should be a minimum 2-3/16”
(5.6cm) distance between them.
1021992-2-A
3
Kohler Co.
(A)
(B)
Front
(C)
Side
SINGLE BASIN SIN
K
-OVER
A
LL DIMENSIONS
Model (A) (B) Depth (C) No. of
Brackets
K-3387 33” (83.8cm) 18” (45.7cm) 9-7/16” (24cm) 16
K-3187 33” (83.8cm) 18” (45.7cm) 9-7/16” (24cm) 16
K-3188 33” (83.8cm) 18” (45.7cm) 9-7/16” (24cm) 16
K-3189 18” (45.7cm) 18” (45.7cm) 9-7/16” (24cm) 12
1. Roughing-In Dimensions
1021992-2-A
4
Kohler Co.
Faucet
Centerline
Cutting Line
2-3/8”
(6cm)
MIN.
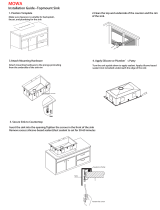
2. Position the Template
- Cut the template following the lines marked “Cut on this line”.
- Determine your desired installation location. Use the center lines
provided on the template to assist in positioning.
- Position the template on the countertop in the desired location. Make
sure the template is secured firmly in place so it cannot move.
- Check for adequate clearance between the sink, faucet and
backsplash. Verify that the sink will not interfere with the cabinet
during installation.
- Tracetheoutsideedgesofthetemplatewithapencil.
NOTE
: For multiple sink installations, a minimum distance of 2-3/16”
(5.6cm) is required between the sinks.
- Locate the faucet hole center lines on the countertop. The faucet hole
clearance from the top of the cutout must be 2-3/8” (3cm) minimum.
3. Cut the Sink Mounting Holes
CAUTION: Risk of product damage. To avoid damage to the sink,
do not cut , drill, or sand the countertop while it is positioned over
the sink.
- Beforecutting,measurethecut-outlineandcompareittothe
overall s ink dimension. The cut-out should be 1-1/2” (3.8cm)
smaller than the overall sink dimensions.
- Drill a pilot hole inside the cut-out line.
- Using a saber or keyhole saw, cut along the inside of the cut-out line.
- Drill the required faucet holes and install the faucet to the
countertop according to the faucet manufacturer’s instructions.
1021992-2-A
5
Kohler Co.
Countertop Opening
Bottom View
Edge
Countertop
Opening
Mounting
Bracket
Fastener
(Not Furnished)
1-3/8” (3.5cm)
± 1/4” (6mm)
Insert (Not Furnished)
4. Install the Mounting Brackets
- Forlaminatetypecountertops,makesurethatallexposed
non-laminated surfaces located near the cut-out area are finished
and sealed in order to prevent damage from water absorption.
- Equally space the required number of mounting brackets (see chart
on roughing-in page) and locate the mounting holes on the
underside of the countertop 1-3/8” (3.5cm) from the edge of the
countertop opening.
- The type of fastener needed is dependant upon the countertop
material and should be recommended by the countertop supplier.
- Loosely install the mounting brackets to the countertop.
- Turn the brackets parallel to the opening to a llow for easy
installation of the sink.
1021992-2-A
6
Kohler Co.
Countertop
Sealant
Sink
Fastener
Mounting
Bracket
5. Apply the Sealant
- Clean all residue from the top rim of the sink.
- Clean the underside of the countertop around the cut-out area and
make sure the surface is smooth and free of defects.
- Apply a generous bead of silicone or latex sealant to the rim of the
sink near the inside edge.
6. Finish the Installation
- Position and align the sink with the opening in the countertop. The
cornerofthesinkshouldbeflushwiththeinsideedgeofthe
countertop.
- Rotate the mounting brackets over the sink rim.
- Tighten each bracket until snug while maintaining proper alignment.
- Wipe away any excess sealant with a dry cloth.
- Allow the sealant to cure f or a minimum of 30 minutes. Follow the
instructions provided with the sealant.
- Connect the drain fitting and faucet supply fittings.
- Turn on the water and check for leaks at all connections.
- Tighten any connections that leak.
1021992-2-A
7
Kohler Co.
1021992-2-A
8
Kohler Co.
E 2003 Kohler Co.
1021992-2-
A
USA: 1-800-4-KOHLER
Canada: 1-800-964-5590
Mexico: 001-877-680-1310
kohler.com
1 / 1

Kohler 3391-H-NA Installation guide

Category
Kitchen sinks
Type
Installation guide

Ask a question and I''ll find the answer in the document

Finding information in a document is now easier with AI

Ask the document