Pulsar ADS MINI Operating Instructions Manual
- Category
- Smoke detectors
- Type
- Operating Instructions Manual
Page is loading ...

ENgLISh
OPERATION MANUAL
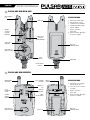
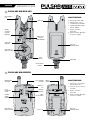
PULSAR ADS MINI MAIN UNIT:
VOLUME
CONTROL
LAST
RECORDED
ALERT
VIBRO&
SOUND
CONTROL
TONE
ADJUSTMENT
ON/OFF
SWITCH
LONG RANGE
ANTENNA
LONG LIFE
LED
HIGH QUALITY
CONE SPEAKER BELT CLIP
EASY SYNCRO
BUTTON
BATTERY
COMPARTMENT
PULSAR ADS MINI REcEIvER:
SPEcIfIcATIONS:
1. Battery Type: PP3 / 6LR61
Battery Voltage: 9V*1
2. Power off current consump-
tion: 0mA
3. Wireless Transition
Mode: AM
4. Radio Transmitter Operating
Frequency: 433MHz
HIGH QUALITY
CONE SPEAKER
BATTERY
COMPARTMENT
EXTRA TOUGH
SCREW
LOCK RING
ROD SEAT
ON/OFF
SWITCH &
VOLUME
CONTROL
NIGHT-LIGHT
SWITCH &
TONE CONTROL
JACK
SOCKET
SENSITIVITY
CONTROL
MULTICOLOR
LED
1. Battery Type: AAA / LR03
2. Battery Voltage: 1.5V*2
3. Standby Current: 0.040mA
4. Standby (with Night- Light)
Current: 100mA
5. Wireless Transition
Mode: AM
6. Radio Transmitter Operating
Frequency: 433MHz
SPEcIfIcATIONS:

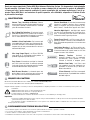
fEATURES:
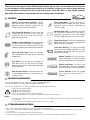
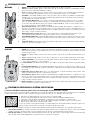
fITTINg/REPLAcINg BATTERIES:
1. Make sure to turn off both the unit and the receiver prior to fitting or replacing batteries.
2. Take in care to gently slide downward the battery compartment to access the battery compartment. Insert the new batteries and ensure of the
correct polarity.
3. First ensure of the correct polarity and then insert the new batteries.
4. Gently slide the battery compartment cover upward and ensure it has a good seal by firmly pushing the edging of the battery cover.
BATTERIES REQUIREMENTS:
The Pulsars ADS Mini Alarms require 2xAAA (1.5V – Alkaline LR03/MN2400) batteries.
The Pulsars ADS Mini Receiver requires 1x9V PP3 (Alkaline 6LR61) battery.
The use of good quality batteries is essential for maximum battery life and optimum performance.
To reduce the risk of battery leakage:
• DO NOT mix old and new batteries
• DO NOT mix different battery types
• The use of rechargeable batteries is NOT recommended
• Please ensure the batteries are removed from the Pulsars during long periods without use.
Notice:
• The max. battery voltage should no more than 5V for Unit and no more 10V for Receiver, otherwise, may have the internal electronics
parts damaged.
• To save energy, the Pulsar ADS Mini should be powered off in case no usage.
Thank you for purchasing the Pulsar ADS Mini Bite Detection System. Since it was introduced, the Pulsar has
set new standards for bite indication and reliability in all conditions and we are sure your purchase will prove
to be a worthwhile investment that will last you several years. Pulsar ADS Mini is a ultra-reliable, compact,
high quality, bite indicator set packed with the latest cutting edges technologies.
Volume, Tone, Sensitivity & Wireless. Volume,
tone and sensitivity can be adjusted by pressing
dedicated controls, familiarise yourself with the
controls before connecting the batteries.
Ultra Long Range Signal. Pulsar ADS Mini con-
tains and advanced transmitter device, capable of
long distances.
Run ‘N Drop Bite Detection. The alarms are able
to detect running or drop back bites, whilst the
receiver will alert you for a drop back bite with a
dedicated led and sound.
Audible & Visual Replication. Each sound pulse
and led flash from the bite alarm is replicated exact-
ly at the receiver, thus to eliminate strikes on false
triggering caused by the wind and water movement.
Multi-Channel Receiver. The receiver works with
up to four different channels, so up to four units can
be used at once.
Easy Syncro. Sync the units on the receiver has
never been so easy, just with the push of Syncro
button on the receiver the unique identification code
will be registered.
Silent & Vibro Mode. The units can be set to si-
lent mode without the need to switch-off, while the
receiver can be set to “Sound”, “Sound+Vibro” or
“Vibration” mode.
Low Battery Warning. The Pulsars continuously
monitor the battery voltage and detects its failing
with audible/visual warnings which are also trans-
mitted where specified.
Induction Night-Light. The led Night-Light glim-
mer continuously confirming that the alarm is
switched on, the function can be easily switched
On/Off by a dedicated button in front of the alarm.
Energy Saver Circuit. The Pulsars are designed to
reduce at minimum the battery consumption with
advanced energy saver devices.
Memory Function. The units and the re-
ceivers remembers all personal settings
when changing batteries or turning them off.
Weather-Proof Body. The Pulsars have
been designed to be totally weatherproof
and withstand to the most rigor conditions.
2 Years Warranty. Pulsars are supplied
with a two years warranty terms as a
standard.
WARRANT
YEARS
Y

OPERATINg INSTRUcTION:
1. Make sure all the units and the receivers are correctly switched ON
2. Push the “S” button on the receiver then release it, the first channel led will illuminate continuously.
3. Select the desired channel* to register by a short pressure of S button on the receiver.
4. Once you’ve selected desired channel, trigger the unit to register it. The receiver and the unit will be now paired.
5. Repeat the above process to sync other units with the receiver.
* In case the selected channel is already paired to another unit, the led will be lighting weaker than others. In this case you
may choose to completely erase the saved settings and re-sync all the units.
The complete Pulsar ADS Mini set is supplied already paired as a standard.
In case the receiver is not paired to the alarms, it’s necesarry to pair the bite alarms that it will be used, so that the receiver can register their unique
identification code. Before starting this procedure, ensure all your bite alarms are switched ON, then proceed as follows:
Note: The registration process can be disrupted if attempted in close proximity to other radio signals such as wireless routers
1. Reset the paired code: to erase the paired code in the receiver, press the “S” button in standby mode, select LED indicator to choose the channel
you need erase, then press and hold “S” button till the light change from low light to high light.
2. Reset all the paired code: to erase all the paired code in the receiver, press and hold “S” button till the 4 LED indicators flash at the same time,
then release the button. All the paired codes will be erased and the receiver is now completely reset.
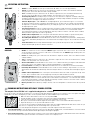
ENcODINg INSTRUcTIONS WITh EASY SYNcRO SYSTEM:
1. ON/OFF: To activate the receiver switch the ON/OFF toggle on the back side of the receiver. The receiver will
check all channels and omit a sound. To switch the receiver OFF, move the ON/OFF toggle in OFF position, the
receiver will omit a short sound.
2. Volume: In standby mode, press and release the “V” button to adjust the volume. There are 6 different volume
settings available.
3. Tone: In standby mode press and release the “T” button to adjust the tone. There are 6 different tone settings
available. The “Drop Back” tone can’t be varied.
4. Silent & Vibro Mode: Pulsar ADS Mini receiver can be set to 3 different mode by pressing the dedicated button
on the front of the receiver (Light & Sound – Light & Sound & Vibration – Light & Vibration)
5. Last Record Alert: in standby, press “M” button will indicate the last recorded alert received from transmitter.
6. Run‘N Drop Bite Detection: Pulsar ADS Mini receiver is able to detect running or drop back bites, in case of a
drop back bite the dedicated led will flash up. After detecting the bite the receiver will omit a fixed light for approx.
20”
7. Audible & Visual Replication: Each sound pulse and led flash from the bite alarm is replicated exactly at the
receiver, thus to eliminate strikes on false triggering caused by the wind and water movement.
8. Low Battery Warning: the Pulsars continuously monitor the battery voltage and detects its failing with audible/
visual warnings, when it occurs the unit will emit a sound and the red led flash for 1 second and it will continue
every minute till the battery is replaced. Although the unit may continue to work for some time in this condition,
battery should be replaced at the earliest opportunity.
9. Memory Function: Pulsar will keep setting in memory. The last setting will be recalled even the unit is powered
OFF.
REcEIvER
1. ON/OFF: To switch ON/OFF the units press and hold the “V” button for 2 seconds approximately.
2. Volume: In standby mode press and release the “V” button to adjust the volume, the led indicator will flash
every pressure. There are 6 different volume settings available.
3. Tone: In standby mode press and release the “T” button to adjust the tone, the led indicator will flash every
pressure. There are 6 different tone settings available. The “Drop Back” tone can’t be varied.
4. Sensitivity Adjustment: In standby mode press and release the “S” button to adjust the sensitivity setting, the
led indicator will flash every pressure. There are 4 different sensitivity settings available, the highest sensitivity
level will make the unit trigger every small line movement.
5. Induction Night-Light: to Switch ON/OFF the led night-light mode, press and hold for approx. 3 seconds the
“T” button. A long life and low consumption diode will help you to position your rod centrally onto alarm during
the night time. To switch off the Night-Light mode, just simply keep press the “T” button, this will turn off only
the night-light mode option.
6. Low Battery Warning: the Pulsars continuously monitor the battery voltage and detects its failing with audible/
visual warnings, when it occurs the unit will emit a sound and the led flash for 1 second and it will continue
every minute till the battery is replaced. Although the unit may continue to work for some time in this condition,
battery should be replaced at the earliest opportunity.
7. Audible & Visual Replication: Each sound pulse and led flash from the bite alarm is replicated exactly at the
receiver, thus to eliminate strikes on false triggering caused by the wind and water movement.
8. Run‘N Drop Bite Detection: Pulsar ADS Mini units are able to detect running or drop back bites, omitting differ-
ent sounds to immediately identify the bite. The unit will omit a fixed light for approx. 20 seconds after detecting
a bite.
9. Power Out Socket: Allows K-Karp illuminated hangers to be powered directly from the unit. The Illuminated
hangers will then light up when the Pulsar is activated.
MAIN UNIT

ITALIANO
MANUALE D’USO
PULSAR ADS MINI MAIN UNIT:
VOLUME
CONTROL
LAST
RECORDED
ALERT
VIBRO&
SOUND
CONTROL
TONE
ADJUSTMENT
ON/OFF
SWITCH
LONG RANGE
ANTENNA
LONG LIFE
LED
HIGH QUALITY
CONE SPEAKER BELT CLIP
EASY SYNCRO
BUTTON
BATTERY
COMPARTMENT
PULSAR ADS MINI REcEIvER:
cARATTERISTIchE:
1. Battery Type: PP3 / 6LR61
Battery voltage: 9V*1
2. Power off current consump-
tion: 0mA
3. Wireless Transition
Mode: AM
4. Radio Transmitter Operating
Frequency: 433MHz
HIGH QUALITY
CONE SPEAKER
BATTERY
COMPARTMENT
EXTRA TOUGH
SCREW
LOCK RING
ROD SEAT
ON/OFF
SWITCH &
VOLUME
CONTROL
NIGHT-LIGHT
SWITCH &
TONE CONTROL
JACK
SOCKET
SENSITIVITY
CONTROL
MULTICOLOR
LED
1. Battery Type: AAA / LR03
2. Battery voltage: 1.5V*2
3. Standby Current: 0.040mA
4. Standby (with Night- Light)
Current: 100mA
5. Wireless Transition
Mode: AM
6. Radio Transmitter Operating
Frequency: 433MHz
cARATTERISTIchE:
Page is loading ...
Page is loading ...

ATTENZIONE:
• Non accendere i led o gli altoparlanti in prossimità di occhi e/o orecchie di uomini e/o animali.
• Riponete questa attrezzatura fuori dalla portata dei bambini.
• Evitate di sbattere violentemente o fare cadere i vostri Pulsar.
• Usare solo le batterie e gli accessori consigliati.
• Nonostante gli avvisatori siano progettati per funzionare in qualsiasi condizione atmosferica, NON immergeteli in acqua.
• NON avvitate le unità su buzzer bar o bank stick in modo troppo stretto per non danneggiarli.
• Sebbene il range operativo del segnale sia vastissimo, restate in prossimità delle vostre canne.
ASCIUGATURA DOPO INTENSE PIOGGE:
I Pulsar sono stati progettati per essere impermeabili, ma se vengono esposti a forti piogge è importante dare il tempo alle
unità di asciugarsi per bene prima di riporle al chiuso, rimuovendo le coperture per una rapida asciugatura.
AVVISO
PRIMA DI UTILIZZARE IL PRODOTTO LA PRIMA VOLTA, LEGGERE ATTENTAMENTE LE ISTRUZIONI.
DRYING OUT AFTER USE IN HEAVY RAIN:
The Pulsars receiver have been designed to be weatherproof. However, if exposed to heavy rain, it is important to allow the
unit to dry out properly by bringing the unit indoors, moving the covers and allowing to dry fully.
WARNINGS:
• Do NOT trigger LED or speaker in close proximity to human or animal eyes and ears.
• Store this equipment out of reach of children and infants.
• Avoid dropping or subjecting the Pulsar to severe impacts.
• Use only recommended batteries and accessories.
• Although the alarms are designed to function in all weather conditions do NOT put them into the water.
• Do NOT screw the alarms on the buzzer bar or bank stick too tight to prevent the alarm from damaging.
• Although the signal range of the alarms is very big, please stay near your rods at all times.
WARNING
BEFORE USING THE PRODUCT FOR THE FIRST TIME, PLEASE READ THIS USER MANUAL CAREFULLY.
K-Karp is a Registered Trade Mark.
We reserve the right to alter or modify the contents of this manual.
Pulsar ADS MINI is in compliance with the essential require-
ments and other relevant provisions
of Directive 1999/5/EC.
K-Karp è un Marchio Registrato.
K-Karp si riserva il diritto di apportare modifiche senza preav-
viso al contenuto di questo manuale.
Pulsar ADS MINI è conforme ai requisiti essenziali e alle altre
disposizioni della Direttiva 1999/5/EC.
http://www.facebook.com/KKarpInspirethenext
http://www.youtube.com/KKarpfishing
WWW.K-KARP.COMWWW.K-KARP.COM
-
 1
1
-
 2
2
-
 3
3
-
 4
4
-
 5
5
-
 6
6
-
 7
7
-
 8
8


Pulsar ADS MINI Operating Instructions Manual
- Category
- Smoke detectors
- Type
- Operating Instructions Manual
Ask a question and I''ll find the answer in the document
Finding information in a document is now easier with AI
in other languages
- italiano: Pulsar ADS MINI
Other documents
-
 Vibro Shape MC0138 User manual
-
Fender 212 User manual
-
RIPPTON Bite Keeper User manual
-
Hasbro Sound Bites Pop Radio Operating instructions
-
Bowens Pulsar User manual
-
NightSearcher Sequential Pulsar Max User manual
-
 Suritel SEL SP-55 Operating instructions
-
 mibeTec Bite Away Operating instructions
-
-
 ravioli JPB06 User manual


