Page is loading ...


Federal Communication Commission Interference Statement
This equipment has been tested and found to comply with the limits for a Class B
digital device, pursuant to Part 15 of the FCC Rules. These limits are designed to
provide reasonable protection against harmful interference in a residential installation.
This equipment generates uses and can radiate radio frequency energy and, if not
installed and used in accordance with the instructions, may cause harmful interference
to radio communications. However, there is no guarantee that interference will not occur
in a particular installation. If this equipment does cause harmful interference to radio or
television reception, which can be determined by turning the equipment off and on, the
user is encouraged to try to correct the interference by one of the following measures:
- Reorient or relocate the receiving antenna.
- Increase the separation between the equipment and receiver.
- Connect the equipment into an outlet on a circuit different from that to which the
receiver is connected.
- Consult the dealer or an experienced radio/TV technician for help.
FCC Caution: Any changes or modifications not expressly approved by the party
responsible for compliance could void the user's authority to operate this equipment.
This device complies with Part 15 of the FCC Rules. Operation is subject to the following
two conditions: (1) This device may not cause harmful interference, and (2) this device
must accept any interference received, including interference that may cause undesired
operation.
IMPORTANT NOTE:
Radiation Exposure Statement:
This equipment complies with FCC radiation exposure limits set forth for an uncontrolled
environment. End users must follow the specific operating instructions for satisfying RF
exposure compliance. To maintain compliance with FCC RF exposure compliance
requirements, please follow operation instruction as documented in this manual.
This transmitter must not be co-located or operating in conjunction with any other antenna
or transmitter.
SAR compliance has been established in typical laptop computer(s) with USB slot, and
product could be used in typical laptop computer with USB slot. Other application like
handheld PC or similar device has not been verified and may not compliance with related
RF exposure rule and such use shall be prohibited.
The availability of some specific channels and/or operational frequency bands are country
dependent and are firmware programmed at the factory to match the intended destination.
The firmware setting is not accessible by the end user.
CE Mark Warning
This is a Class B product. In a domestic environment, this product may cause radio interference,
in which case the user may be required to take adequate measures.
This transmitter must not be co-located or operation in conjunction with any other antenna or
transmitter.
2

Table of Contents
Federal Communications Commission (FCC) Interference statement 2
CE Mark Warning 2
Chapter 1 – Wireless LAN Networking
Transmission Rate 4
Type of Wireless Networks 4
Ad-Hoc (IBSS) Network 4
Infrastructure (BSS) Network 7
Wireless LAN Security 9
Data Encryption with WEP 10
Chapter 2 - Getting Started
About Your 802.11n/b/g WLAN USB2.0 Adapter 11
Package Content 11
System Requirement 11
LED Definition 11
Wireless Utility and Adapter Hardware Installation 12
Using the Utility to Configure Your Network 16
Link Information 16
Site Survey 17
Profile 19
Chapter 3 – Maintenance
Uninstalling the Driver 24
Uninstall the Client Utility 24
Upgrading the Wireless Utility 24
Glossary 25
3

Chapter 1- Wireless LAN Networking
This section provides background information on wireless LAN networking technology.
T
HE INFORMATION IN THIS SECTION IS FOR YOUR REFERENCE. CHANGING
NETWORK SETTINGS AND PARTICULARLY SECURITY SETTTINGS SHOULD ONLY
BE DONE BY AN AUTHORIZED ADMINISTRATOR.
Transmission Rate (Transfer Rate)
The adapter provides various transmission (data) rate options for you to select. Options include
Fully Auto, 1 Mbps, 2 Mbps, 5.5 Mbps, 11 Mbps, 6 Mbps, 9 Mbps, 12 Mbps, 18 Mbps, 22 Mbps, 24
Mbps, 36 Mbps, 48 Mbps, 54 Mbps and up to 300Mbps. In most networking scenarios, the
factory default Fully Auto setting proves the most efficient. This setting allows your adapter to
operate at the maximum transmission (data) rate. When the communication quality drops below a
certain level, the adapter automatically switches to a lower transmission (data) rate. Transmission
at lower data speeds is usually more reliable. However, when the communication quality
improves again, the adapter gradually increases the transmission (data) rate again until it reaches
the highest available transmission rate.
Types of Wireless Networks
Wireless LAN networking works in either of the two modes: ad-hoc and infrastructure. In infra-
structure mode, wireless devices communicate to a wired LAN via access points. Each access
point and its wireless devices are known as a Basic Service Set (BSS). An Extended Service Set
(ESS) is two or more BSS in the same subnet. In ad hoc mode (also known as peer-to-peer
mode), wireless devices communicate with each other directly and do not use an access point.
This is an Independent BSS (IBSS).
To connect to a wired network within a coverage area using access points, set the adapter operation
mode to Infrastructure (BSS). To set up an independent wireless workgroup without an access point,
use Ad-hoc (IBSS) mode.
AD-HOC (IBSS) NETWORK
Ad-hoc mode does not require an access point or a wired network. Two or more wireless stations
communicate directly to each other. An ad-hoc network may sometimes be referred to as an
Independent Basic Service Set (IBSS).
To set up an ad-hoc network, configure all the stations in ad-hoc mode. Use the same SSID and
channel for each.
4

When a number of wireless stations are connected using a single access point, you have a
Basic Service Set (BSS).
6

In the ESS diagram below, communication is done through the access points, which relay
data packets to other wireless stations or devices connected to the wired network. Wireless
stations can then access resources, such as a printer, on the wired network.
7

In an ESS environment, users are able to move from one access point to another without
losing the connection. In the diagram below, when the user moves from BSS (1) to BSS (2)
the adapter automatically switches to the channel used in BSS (2).
Roaming in an ESS network diagram
8


WIRELESS LAN SECURITY
Because wireless networks are not as secure as wired networks, it’s vital that security
settings are clearly understood and applied.
The list below shows the possible wireless security levels on your adapter starting with the
most secure. EAP (Extensible Authentication Protocol) is used for authentication and utilizes
dynamic WEP key exchange. EAP requires interaction with a RADIUS (Remote
Authentication Dial-In User Service) server either on the WAN or the LAN to provide
authentication service for wireless stations.
1.
2.
3.
4.
Wi-Fi Protected Access (WPA)
IEEE802.1X EAP with RADIUS Server authentication
WEP Encryption
Unique ESSID
9

DATA ENCRYPTION WITH WEP
The WEP (Wired Equivalent Privacy) security protocol is an encryption method designed to try
to make wireless networks as secure as wired networks. WEP encryption scrambles all data
packets transmitted between the adapter and the access point or other wireless stations to
keep network communications private. Both the wireless stations and the access points must
use the same WEP key for data encryption and decryption.
DO NOT ATTEMPT TO CONFIGURE OR CHANGE SECURITY SETTTINGS FOR A
NETWORK WITHOUT AUTHORIZATION AND WITHOUT CLEARLY UNDERSTANDING
THE SETTINGS YOU ARE APPLING. WITH POOR SECURITY SETTINGS, SENSITIVE
DATA YOU SEND CAN BE SEEN BY OTHERS.
There are two ways to create WEP keys in your adapter.
Automatic WEP key generation based on a password phrase called a passphrase.
The passphrase is case sensitive. You must use the same passphrase for all WLAN
adapters with this feature in the same WLAN.
•
• For WLAN adapters without the passphrase feature, you can still take advantage of
this feature by writing down the four automatically generated WEP keys from the
Security Settings screen of the wireless utility and entering them manually as the WEP
keys in the other WLAN adapter(s).
The adapter allows you to configure up to four WEP keys and only one key is used as the
default transmit key at any one time.
The adapter supports up to four 64-BIT & 128-BIT WEP KEYS.
10

Chapter 2 - Getting Started
This chapter introduces the Adapter and prepares you to use the Wireless Utility.
2.1 About Your 802.11 n/b/g WLAN USB2.0 Adapter
The Adapter is an 802.11n, 802.11b, and 802.11g compliant wireless LAN adapter. With the
Adapter, you can enjoy wireless mobility within almost any wireless networking environment.
The following lists the main features of your Adapter.
Your Adapter can communicate with other IEEE 802.11n/b/g compliant wireless
devices.
Wire-free access to networked resources from anywhere beyond the PC with any
USB host interface.
Support Infrastructure & Ad-Hoc mode
Delivers receiving data rate up to 300 Mbps in 11n mode.
For 802.11b/g, date rate dynamically shifts based on signal strength, for maximum
availability and reliability of connection.
Support both 20MHz & 40MHz bandwidth
Support WEP 64/128, WPA, WPA2 encryption
Support QoS – WMM
Multi-path (1x2) design and two PCB antennas built-in design guarantee best
transmitting / receiving quality.
Support Windows-base wireless LAN GUI
Support WPS enable on S/W utility
2.2 Package Content
802.11n/b/g WLAN USB2.0 Adapter
USB Cradle
Installation and Manual CD
Quick Start Guide
Warranty/Registration Card
2.3 System Requirement
Pentium class notebook computers with at least one available USB slot
Microsoft Windows Vista, XP and 2K
CD-ROM drive
2.4 Wireless Utility & Adapter Hardware Installation
NOTE: If you have connected the USB Adapter to your computer, please
remove it first.
Follow the instructions below to install the USB Adapter and Utility.
STEP 1
Insert the Driver and Utility CD into CD drive
11

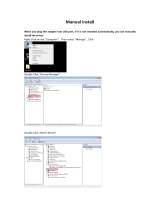
STEP 2
If your CD Autorun is enabled, the installation procedures will be started. (Otherwise open
your CD folder and double-click on the “setup.exe” file)
STEP 3
The InstallShield Wizard prepares for installation.
STEP 4
The InstallShield Wizard prompts you for confirmation. Click Next on the following menu.
12

STEP 5
In the destination Folder screen you are asked to confirm the Destination Folder for the
application software. If you would like, you may change the destination folder to another
location. Click Next
STEP 6
The wizard is ready to begin installation. Click Install on it.
13

STEP 7
The Install shield Wizard setup for installation.
STEP 8
Click Finish to complete the client utility installation.
14

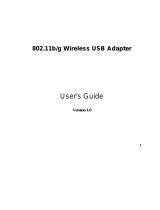
STEP 9
At this moment please insert your USB Adapter to your Laptop through the cradle. After the
following window pop up, click Next on the Fund New Hardware Wizard
STEP 10
Choose “Install the software automatically” , and click Next.
15

STEP 11
Click Finish to complete the installation.
16

2.6 Using the Utility to Configure Your Network
The following are explanations on how to configure and use the Utility program. After
completing the installation procedure, a new icon as shown below will automatically appear
in the lower right tray bar.
Hold your mouse pointer over the icon, and press the right mouse button to open the
Wireless Client Utility.
The Wireless Client Utility window as shown below will appear.
The user can now use any of the management functions available in the IEEE 802.11
Wireless Client Utility.
17

2.6.1 Link Information
Click the Link Information tab to see general information about the program and its
operations. The Link Information tab does not require any configuration.
18

The following table describes the items found on the Link Information screen.
Wireless Network Status
Profile Name
The name of the current selected configuration profile. Set up the
configuration name on the Profile tab.
SSID Displays the wireless network name.
Link Status Shows whether the station is associated to the wireless network.
Network Type
The type of network the station is connected to. The options
include:
Wireless Mode Displays the wireless mode. 802.11g, 11b or 11n
Channel
Shows the currently connected channel.
Transmit Rate Displays the current transmit rate in Mbps.
BSSID
Displays the BSSID of the wireless network that the wireless
adapter is associated to.
Signal Strength Shows the strength of the signal.
Security Status
Security
Shows the security type – Disable, WEP, WPA/WPA2,
WAP-PSK/WAP2-PSK or 802.1X
Authentication Displays the authentication mode.
TCP/IP Status
IP Address Displays the computer's IP address.
Subnet Mask Displays subnet mask
Gateway Displays gateway address
19

2.6.2 Site Survey
Click the Site Survey tab to see available infrastructure and ad hoc networks. On this screen,
click Refresh to refresh the list at any time.
20
/