Epson TM-m30 for Uber Eats Installation guide
- Category
- Software manuals
- Type
- Installation guide
This manual is also suitable for

EPSON JavaPOS ADK
Installation Guide
Version 1.14.1 Sep. 2015

Notes
(1) Reproduction of any part of this documentation by any means is prohibited.
(2) The contents of this documentation are subject to change without notice.
(3) Comments and notification of any mistakes in this documentation are gratefully
accepted.
(4) This software cannot be used with other equipment that the specified.
(5) EPSON will not be responsible for any consequences resulting from the use of any
information in this documentation.
Trademarks
Microsoft®, Windows®, Windows Server® and Windows Vista® are trademarks or
registered trademarks of Microsoft Corporation in the United States and/or other countries.
Linux is a trademark or registered trademark of Linus Torvalds in the U.S.A. and/or other
countries.
Red Hat is a registered trademark of Red Hat, Inc.
SUSE is a registered trademark of SuSE Linux AG, a Novell business.
JBuilder is a trademark of Borland Software Corporation in the United States and other
countries.
EPSON and ESC/POS are registered trademarks of Seiko Epson Corporation.
Java and all Java-based trademarks are registered trademarks of Oracle Corporation,it’s
subsidiaries, and/or affiliates in the U.S. and other countries.
Other product and company names used herein are for identification purposes only and
may be trademarks or registered trademarks of their respective companies.
Epson disclaims any and all rights in those marks.
The Bluetooth® word mark and logos are registered trademarks owned by Bluetooth SIG,
Inc. and any use of such marks by Seiko Epson is under license. Other trademarks and
trade names are those of their respective owners..
Copyright (c) 2005-2015 Seiko Epson Corporation

Version 1.14.1 Sep. 2015
Installation Guide
iii
Contents
Chapter 1 Introduction ......................................................................................................1
Chapter 2 Installation ........................................................................................................3
2.1 Install Java
.................................................................................................................3
2.2 Install Java Advanced Imaging (JAI)
..........................................................................3
2.3 Configure your environment
.......................................................................................4
2.4 Start the Installer........................................................................................................4
2.5 Select the Language ..................................................................................................5
2.6 Pre-Installation checks
...............................................................................................5
2.7 Introduction ................................................................................................................
6
2.8 License Agreement ....................................................................................................7
2.9 Select a Jav
a Virtual Machine....................................................................................8
2.10 Selecting the Type of Installation .............................................................................9
2.11 Selecting Components to Install.............................................................................10
2.12 Selecting Shortcut Folders.....................................................................................11
2.13 Selecting the User Classpath.................................................................................12
2.14 Selecting the Communication method....................................................................13
2.15 Location for jpos.x
ml ..............................................................................................14
2.16 Upgrading...............................................................................................................15
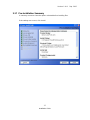
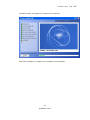
2.17 Pre-Installation Summary
.......................................................................................17
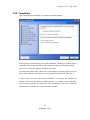
2.18 Completion.............................................................................................................19
Chapter 3 Uninstalling.....................................................................................................20
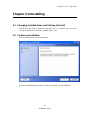
3.1 Changing Installed Items and Starting Uninstall.......................................................20
3.2 Confirm uninstallation...............................................................................................20
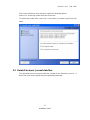
3.3 Delete Electronic Journal data files..........................................................................21
Chapter 4 Silent Installation/Uninstallation...................................................................22
4.1 Silent Installation Process........................................................................................22
4.2 Preparing Device Registration Information...............................................................22
4.3 Creating an Installation Script ..................................................................................23
4.4 Running Installation..................................................................................................25
4.5 Running Uninstallation .............................................................................................25
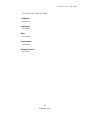
Chapter 5 Forced Uninstall.............................................................................................26
5.1 Using the Forced Uninstall option ............................................................................26


Version 1.14.1 Sep. 2015
Installation Guide
1
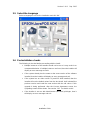
Chapter 1 Introduction
The following hardware and software configuration is required when installing EPSON
JavaPOS ADK. Please refer to the “EPSON JavaPOS ADK Installation Guide for Linux.txt”
for downloads and detailed installation instructions.
Computer
IBM PC/AT compatible
• Please follow the specifications recommended by your OS for system
requirements (CPU, RAM, etc.).
• A minimum of 10 MB of available hard disk space is required.
Supported Operating systems
Windows XP Professional Service Pack 3
Windows Vista (Business/Enterprise/Ultimate) Service Pack 2
Windows Server 2008 Service Pack 2
Windows Server 2008 R2 Service Pack 1
Windows 7 (Professional/Enterprise/Ultimate) Service Pack 1
Windows Embedded Standard
Windows Embedded Standard 7
Windows 8
Windows 8.1
Windows 10
Windows Server 2012
Windows Server 2012 R2
Red Hat Enterprise Linux 6.6
Red Hat Enterprise Linux 7.0
SuSE Linux Enterprise 11.3
SuSE Linux Enterprise 12.0
CentOS Linux6.6
CentOS Linux7.0
Ubuntu 14.04
Java Virtual Machine
Java Standard Edition 7 Update 75

Version 1.14.1 Sep. 2015
Installation Guide
2
Java Standard Edition 8 Update 40
See “2.1 Install Java”

Version 1.14.1 Sep. 2015
Installation Guide
3
Chapter 2 Installation
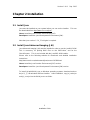
2.1 Install Java
Java must be installed on your system before you can run the installer. This can
be downloaded from http://www.sun.com/java/
.
Users: Install the Java Runtime Environment (JRE).
Developers: Install the Java Development Environment (JDK).
Note that Java version 1.7.0_75 or higher is required.
2.2 Install Java Advanced Imaging (JAI)
Java Advanced Imaging (JAI) must be installed in order to use the JavaPOS ADK.
This is necessary for printing BMP files on the POSPrinter, and for the
CheckScanner. This is not included with the JavaPOS ADK installer.
Please refer to the following website for downloads and detailed installation
instructions:
http://www.oracle.com/technetwork/java/current-142188.html
Users: Install the Java Runtime Environment (JRE) version.
Developers: Install the Java Development Environment (JDK) version.
To install JAI with 64-bit Java on Windows operating systems, download and run
the jai-1_1_3-lib-windows-i586.exe installer. After installation, copy jai_codec.jar
and jai_core.jar into the 64-bit Java’s ext folder.

Version 1.14.1 Sep. 2015
Installation Guide
4
2.3 Configure your environment
Configuring the environment on Windows is only necessary for application
developers.
Windows: For more information, refer to: Chapter 6 Windows Information
2.4 Start the Installer
The installer for Windows is “Epson_JavaPOS_ADK_1141.exe”.
Windows: To run the installer, double-click on it.
Note: The installer should be run with Administrator (Windows) privileges. Failure
to do so may result in unexpected behavior and the installation may not be
successful.
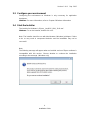
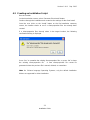
Note:
The following message will appear when an installed version of Epson software is
incompatible with this version. Choose whether to continue the installation
according to the message. (Windows only)

Version 1.14.1 Sep. 2015
Installation Guide
5
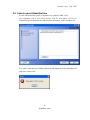
2.5 Select the Language
Select a language to use for the installation and click ‘OK’.
2.6 Pre-Installation checks
The following is checked before proceeding with the install:
• Multiple instances of the Installer should not be run as it may result in an
unexpected behavior. If multiple instances are found, then the installer will
display an error message and exit.
• If the system already has the newer or the same version of the software
installed, then the installer will display an error message and exit.
• If the system has an older version of JavaPOS ADK installed, then the
installer will use the default values from the last install. It will uninstall the
previous version and install the new version with the old values. If this
upgrade is being performed, after the License Agreement screen, the
Upgrading screen will be shown. See section 2.16
for details on this.
• If the installer is not run with Administrator (Windows) privileges, then it
will display an error message and exit.

Version 1.14.1 Sep. 2015
Installation Guide
6
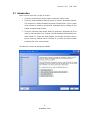
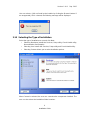
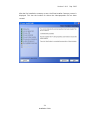
2.7 Introduction
At this screen, there are a couple of choices.
• Click the ‘View Release Notes’ button to view the release notes.
• Click the ‘View Installation Manual’ button to view the Installation manual.
This manual is in Adobe Portable Document Format (PDF). If your system
does not have a reader to view that file, download one by clicking on ‘Get
Adobe Acrobat Reader’ button.
• Click the ‘Generate silent install’ button to generate a properties file to be
used by silent installer. See Chapter 4 Silent Installation/Uninstallation for
more details. To create the silent installer,
the installer should not be run
from a read-only medium like a CD-ROM as it creates the silent installer
properties file in the same location.
Click Next to continue installing the software.

Version 1.14.1 Sep. 2015
Installation Guide
7
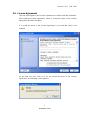
2.8 License Agreement
The user must agree to the License Agreement to continue with the installation.
After reading the entire agreement, select “I accept the terms of the License
Agreement” and then click Next.
If “I accept the terms of the License Agreement” is not selected, Next is not
enabled.
At any time, the user clicks on “I do not accept the terms of the License
Agreement”, the following screen appears.

Version 1.14.1 Sep. 2015
Installation Guide
8
2.9 Select a Java Virtual Machine
A Java Virtual Machine (JVM) is required to run JavaPOS ADK 1.14.1.
The supported JVM is Sun JVM version 1.7.0_75 and higher. This list is
automatically populated with the JVM found on the system. Select a JVM to use.
If no JVM is selected, the following message will appear and the installation will
stay at the JVM screen.

Version 1.14.1 Sep. 2015
Installation Guide
9
User can select a JVM not found by the installer by clicking the ‘Browse’ button. If
an unsupported JVM is selected, the following message will be displayed.
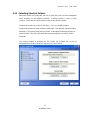
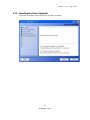
2.10 Selecting the Type of Installation
Select the type of installation to run and click Next.
• Selecting Developer installs the Services, Setup utility, Check Health utility,
Documentation and Samples.
• Selecting User installs the Services, Setup utility and Check Health utility.
• Selecting Custom allows you to select installation options.
When Custom is selected, the user can customize the components installed. The
user can also select the installation folder locations.

Version 1.14.1 Sep. 2015
Installation Guide
10
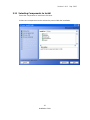
2.11 Selecting Components to Install
Select the components to install and click Next.
At least one component must be selected to proceed with the installation.

Version 1.14.1 Sep. 2015
Installation Guide
11
2.12 Selecting Shortcut Folders
When the custom set is selected, the user is given the choice to select installation
folder locations for the different modules. A default location is given in each
scenario. The ‘Restore Default’ button resets to the default location.
The default location for JavaPOS Services is ‘%JAVA_HOME%\lib\ext’.
The default location for other modules (SetupPOS, CheckHealth, Documentation,
Samples) is ‘Program Files\Epson\JavaPOS’ in WindowsThe default location for
shortcut folder is the ‘All Users\Start Menu\Programs\Epson JavaPOS ADK’ in
Windows
The shortcut folders in Windows do not include the Uninstall link. It can be
uninstalled from “Add or Remove Programs” in Control Panel.

Version 1.14.1 Sep. 2015
Installation Guide
12
2.13 Selecting the User Classpath
Select the Classpath for the service files and then click Next.

Version 1.14.1 Sep. 2015
Installation Guide
13
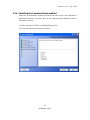
2.14 Selecting the Communication method
Select the communication method used by POSPrinter (Serial, USB, Ethernet or
Bluetooth) and then click Next. One of the communication methods must be
selected to continue.
If USB is selected, TMUSB is installed.(Windows only)
You can select multiple connection methods.

Version 1.14.1 Sep. 2015
Installation Guide
14
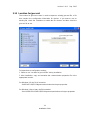
2.15 Location for jpos.xml
The location for jpos.xml screen is used to import an existing jpos.xml file, a file
that contains the configuration information for devices. If you want to use an
existing file, check the Checkbox to enable the file chooser and then select the
jpos.xml file to use.
To import device configuration settings
1. Select to use "Location for jpos.xml file” during installation.
2. After installation, copy and overwrite the communication properties file in the
appropriate location.
For Windows XP, the file is located at
%APPDATA%\EPSON\portcommunicationservice\pcs.properties
For Windows Vista or later, the file located at
%ALLUSERSPROFILE%\EPSON\portcommunicationservice\pcs.properties

Version 1.14.1 Sep. 2015
Installation Guide
15
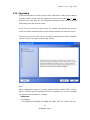
2.16 Upgrading
If the installer detects an older version of this application, it will copy the settings
from the previous install. It will not display the screens from section 2.9
to 2.15 .
After the user clicks Next, the Pre-Installation Summary screen will be displayed
with settings from the previous install.
If the user clicks Install on that screen, the installer will uninstall the previous
install. It will then install the latest version with the settings from previous version.
The user can choose to click cancel, un-install the application and then install this
version. The user can then customize the settings.
Note:
When installing this version on a system where EPSON JavaPOS ADK 1.13.20 or
older is installed and the following devices are registered, be sure to re-register
the devices after installation is complete.
POSPrinter
For Windows:
TM-H6000II, TM-H6000III, TM-T88III, TM-T88IV, TM-T70, TM-T90, TM-L90,

Version 1.14.1 Sep. 2015
Installation Guide
16
TM-U220A, TM-U220B, TM-U220D
LineDisplay
All Devices
CashDrawer
All Devices
MICR
All Devices
Checkscanner
All Devices
ElectronicJournal
All Devices
Page is loading ...
Page is loading ...
Page is loading ...
Page is loading ...
Page is loading ...
Page is loading ...
Page is loading ...
Page is loading ...
Page is loading ...
Page is loading ...
Page is loading ...
-
 1
1
-
 2
2
-
 3
3
-
 4
4
-
 5
5
-
 6
6
-
 7
7
-
 8
8
-
 9
9
-
 10
10
-
 11
11
-
 12
12
-
 13
13
-
 14
14
-
 15
15
-
 16
16
-
 17
17
-
 18
18
-
 19
19
-
 20
20
-
 21
21
-
 22
22
-
 23
23
-
 24
24
-
 25
25
-
 26
26
-
 27
27
-
 28
28
-
 29
29
-
 30
30
-
 31
31


Epson TM-m30 for Uber Eats Installation guide
- Category
- Software manuals
- Type
- Installation guide
- This manual is also suitable for
Ask a question and I''ll find the answer in the document
Finding information in a document is now easier with AI
Related papers
-
Epson TM-P20 Series User manual
-
Epson TM-T20II Series User manual
-
Epson TM-T88V User manual
-
Epson C31C636084 Datasheet
-
-
-
-
-
-
Other documents
-
 Borland Software JBUILDER 2005 User manual
-
OKI PT390 Parallel User guide
-
OKI PT341 Dual User guide
-
Wincor Nixdorf BEETLE /moPOS User guide
-
Novell Identity Manager 4.0.1 Installation guide
-
Star Micronics TSP100IIIW Software Manual
-
-
Huawei Y625 FAQ
-
-
Diebold Nixdorf UDM Runtime 17 Installation guide
