BOA PENDANT INSTALLATION INSTRUCTIONS
Thank you for buying RAB lighting xtures. Our goal is to design the best quality products to get the job done right. We’d like to hear your comments.
Call the Marketing Department at 888-RAB-1000 or email: marketing@rabweb.com
SAFETY INSTRUCTIONS
WARNING: Risk of re or electric shock. Suitable for Damp locations. Do not handle energized xture when hands are
wet, when standing on wet or damp surfaces, or in water. Minimum 75° supply conductors. Fixture to be independently
supported to building structure. Fixture to be mounted horizontal to the floor with 2 or 3 cable ties as recommended
below.
IMPORTANT
READ CAREFULLY BEFORE INSTALLING FIXTURE. RETAIN THESE INSTRUCTIONS FOR FUTURE REFERENCE.
RAB xtures must be wired in accordance with the National Electrical Code and all applicable local codes. Proper grounding
is required for safety. THIS PRODUCT MUST BE INSTALLED IN ACCORDANCE WITH THE APPLICABLE INSTALLATION CODE BY A
PERSON FAMILIAR WITH THE CONSTRUCTION AND OPERATION OF THE PRODUCT AND THE HAZARDS INVOLVED.
Make certain power is OFF before installing or maintaining xture.
CANOPY TO SURFACE MOUNTING
1. Orient the xture so the Canopy with Power Cord is
aligned with supply wires access.
2. Connect wires as shown in wiring diagram. Push all wires
back into the Junction Box. Be careful not to pinch wires.
Mount the Cross Bar on Junction Box.
3. Slide Power Cord through the hole on Canopy and
tighten it with Strain Relief.
4. Place the Canopy on the mounting surface. Push Cable
coupler on the Stud and tighten the xture.
5. Canopy without power cord can be mounted with 1/4 -20
stud and hardware appropriate to mounting surface.
CANOPY TO FIXTURE MOUNTING
1. Place the Canopy with Power Cord on the Fixture such
that it is aligned with supply wires access.
2. Loosen the Locknut on Cable Coupler on the Fixture.
3. Insert the Cable in the Cable Coupler. Adjust the length
of the cable. Insert the excess Cable in Fixture or trim it.
4. Rotate the Locknut and tighten the Cable.
5. Pass the Power Cord through the Canopy Rings. Adjust
the length of the Power Cord and tighten it on the
Canopy with Strain Relief.
6. Mount all Canopies to the Fixture with appropriate Cable
length.
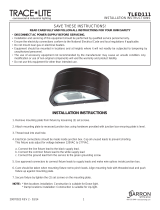
Cable
Junction Box
(sold separately)
Cross bar
Locknut
Canopy
with Power
Cord
1/4- 20 Stud
Strain
Relief
Canopy
Rings
Power Cord
Fixture
Cable coupler