Haier L26F6 User manual

Category
LCD TVs
Type
User manual

This manual is also suitable for

L32F6/L42F6
(2674
使
A
0090509808F
1. 182*257
2. 70g
图中版面按照 尺寸;合计28页。
材质要求: 双胶
符合集团绿色环保标准
按照集团说明书的标准 执行。
3. Q/HR 091 054
4. Q/HR 0903 002
A4
A
01
1:1
5
000003 7 2 8 1 9
部 结
0090509808F
38
MO DE L: L 4 2 T 1
L4 7 T 1
L5 2 T 1
TFT - L C D TEL E V ISI O N
OWN E R ` S MAN U A L
Pl e as e R EA D t hi s m an ual c are ful ly b e fo r e
op e ra t in g y ou r T V, a nd re tai n it fo r fu t ur e
re f er e nc e .
0090509121
01
L26F6/L32F6/L42F6
Contents
2 LCD television Owners Manual
Contents
Warning 3
Important Safety Instructions 4
Panel Control and Rear Terminals
Control 6
Panel Control .......................................................6
Rear Terminals Control ........................................6
Remote Control 7
Battery loading ....................................................7
Precautions ..........................................................7
Remote Control Function 8
Function introduction .........................................8
External Equipment Connections 9
Antenna Connection ...........................................9
Choose Your Connection ...................................10
VCR Connection .................................................................. 10
DVD Setup ............................................................................ 10
HDMI or DVI Setup ............................................................. 10
PC Setup ................................................................................ 11
Monitor Out Setup ............................................................. 11
Power source ......................................................12
Basic Receiving and Playing
Operations 12
Switching ON/OFF the TV set
...........................12
Switching ON/OFF the TV set ........................................ 12
Choose the Menu Language .......................................... 12
Choose the Input source ................................................. 12
Searching Channel ............................................13
Channel Type ....................................................................... 13
Channel Edit ......................................................................... 13
Auto search ........................................................................... 14
Close Caption ....................................................................... 14
Watching TV Program .......................................14
How to select the desired program ............................. 14
How to select the desired sound .................................. 14
Mute Setting ........................................................................ 14
Quick program view .......................................................... 14
Picture Control Functions .................................15
How to select the picture mode ................................... 15
How to customize your own picture status .............. 15
Sound Control Functions ..................................16
How to choose Digital tone mode ............................... 16
How to customize your own sound status................ 16
Timer Functions .................................................17
Setting of Current Time .................................................... 17
Setting of ON/OFF Time ................................................... 17
Setting of On Channel ...................................................... 18
Setting of Remind Time and Remind Channel ........ 18
Function Menu ...................................................18
Function Menu Set ............................................................ 18
Adjust Menu .......................................................20
Lock Setup ..........................................................20
How to use the password function .............................. 20
USB Mode ...........................................................21
Maintenance 24
Troubleshooting 24
Specification 25
Format 25
Warning
LCD television Owners Manual 3
WARNING
!
WARNING:
TO REDUCE THE RISK OF ELECTRIC SHOCK DO NOT REMOVE COVER (OR BACK). NO USER SERVICEABLE PARTS
INSIDE. REFER TO QUALIFIED SERVICE PERSONNEL.
*
To avoid electric hazards, it is strongly suggested that the back cover not be opened, as there is no any
accessory inside the casing.
*
lf necessary, please contact authorized after-sales services.
*
A lighting ash mark in a triangle: A potentially hazardous situation, which, if not avoided, could result in
serious injury by high voltage.
*
An exclamation mark in a triangle: Major part or accessory of which technical specications must be followed if
it is to be replaced.
RISK ELECTRIC SHOCK
DO NOT OPEN
WARNING: To avoid fire or electric hazards, never place your television receiver in an area with heavy
moisture. Attention should be paid to avoid accidental scratches or impacts onto the screen.
CAUTION: Please read this manual carefully before using your television and keep this manual in a
good place for future reference.
To achieve the best performance of your television, read this Users Manual carefully and
properly store it for future reference.
Information of screen displays and figures in the Users Manual may vary due to technical
innovations.
CAUTION:
Unauthorized disassembly of this product is prohibited.
Warning
Important Safety Instructions
4 LCD television Owners Manual
Important Safety Instructions
LCD television Owners Manual 5
Panel Control and Rear Terminals Control
6 LCD television Owners Manual
Panel Control and Rear Terminals Control
- This is a simplified representation of front panel.
- Here shown may be somewhat dierent from your TV.
Panel Control
Rear Terminals Control
VIDEO
VIDEO
ANT
L AUDIO R
VIDEO
PC
L AUDIOR
AV 2IN
AV
OUT
YPbPrLR
PCAUDIO
GOMPONENY
1
2
3
4
5
6
L
R
Y
Pb
Pr
PC/DVI AUDIO
AV OUT
VIDEO
ANT.
AUDIO
PC
AV2 IN
VIDEO
AUDIO
L
R
VIDEO
AUDIO
LR
COMPONENT IN
7
1
COMPONENT In
Connect a component Video/Audio device to
these jacks
2
PC/DVI AUDIO Connect a PC/DVI Audio device to these jacks
3
PC
Connect a
VGA cable from a computer to this
jack
4
AV2 IN
Connect Video/Audio out from an Video/Audio
device to these jacks
5
Earphone Earphone audio output terminal.
6
AV OUT Video/Audio output terminal
7
ANT IN
Connect cable or antenna signal to the TV, either
directly or through your cable box
8
AV1 IN
Connect Video/Audio out from an Video/Audio
device to these jacks
9
USB jack Connect USB storage device to this jack
0
HDMI jack
Connect a HDMI device to receive digital Audio
and un compressed digital video
Remote Control
LCD television Owners Manual 7
Remote Control
Battery loading
1. Slide open the cover of the battery compartment on
the back of the remote controller.
2. Load two 7# (AAA) alkaline batteries in the
compartment, (plus and minus poles to respective mark)
3. Replace the cover of the battery compartment.
Precautions
As strong light may interfere the signals, change your
position to operate the remote controller if the television
cannot be turned on or o as you expect.
Keep the remote controller away from heat source or
humid area to ensure eective performance of the
remote controller.
Make sure that two AAA alkaline batteries are loaded.
The batteries must be of the same type. The batteries
must be located properly. The batteries are not
rechargeable.
Make sure that there is no obstacle between the remote
controller and television set.
Remote Control Function
8 LCD television Owners Manual
- The remote control cannot be operated unless the batteries are properly loaded.
- When using the remote control, aim it at the remote control sensor on the TV.
Function introduction
1
Picture Mode Press this key continuously to select the picture mode.
2
P.SIZE Press to change the aspect ratio.
3
CC Select a closed caption option.
4
INPUT Press this key to open/close signal source option menu.
5
MENU Press this key to display or exit the main menu.
6
CH+/-,VOL+/-
THUMBSTICK,allow you to navigate the on-screen menus.
7
H.LOCK
Hotel Lock button.
8
REV
Fast Reverse in USB function.
9
0
C
P
THUMBSTICK(Up/
Down/Left/Right)
Allows you to navigate the on-screen items and
0
for Previous,
P
for Next in
USB function.
A
PLAY/PAUSE
Press this key to play or pause in USB function.
B
Freeze
Press once to display a frozen image of the current program, but audio continus.
Press again to return to the program.
D
POWER
Press this key to start TV from standby mode, press it again to return to standby
mode.
E
Sound Mode
Press this key continuously to select the sound mode.
F
Display Press to display the TV status information on the top of the TV screen.
G
MTS/SAP Select MONE,STEREO,SAP.
H
0-9 This keys are used to select a channel.
I
Recall
Press to jump back and forth between two channels.
J
MUTE
Press this key to mute the sound, press it again to activate the sound. The sound may
be activated by turning the TV on again or increasing the volume.
K
OK
Press this key to conrm the selection.
L
SLEEP
Displaying the sleep time.
M
STOP
Allows you to stop playing a music in USB function.
N
FWD
Fast forward in USB function.
O
BACK
Press to return to the previous menu.
Q
Favorite Open the favorite channel list in TV.
R
Zoom Picture zoom function.
Remote Control Function
External Equipment Connections
LCD television Owners Manual 9
Antenna Connection
- Antenna or Cable Service without a Cable Box Connections.
- For optimum picture quality, adjust antenna direction if needed.
Note:
* It is recommended that you'd better use 75 coaxial cable to remove
the disturbance caused by airwave.
* Don't bind antenna cable and electric wire together.
To improve picture quality in a poor signal area,
purchase and install a signal amplifier.
If the antenna needs to be split for two Tv’s, install a
"2-WaySignal Splitter" in the connections.
If the antenna is not installed properly, contact your
dealer for assistance.
Note
All cables shown are not included with the TV. R
External Equipment Connections
10 LCD television Owners Manual
Choose Your Connection
There are several ways to connect your television,
depending on the components you want to connect and
the quality of the signal you want to achieve.
The following are examples of someways to connect
your TV. Choose the connection which is best for you.
VCR Connection
To avoid picture noise (interference), leave an adequate
distance between the VCR and TV.
button to select the source, press the
VOL+
button to
confirm.
DVD Setup
How to connect
Connect the DVD video outputs (Y, PA
b
/C
b
, P
r
/C
r
)
to the COMPONENT (Y, P
b
/C
b
, P
r
/C
r
) input jacks on
the TV and connect the DVD audio outputs to the
AUDIO jacks on the TV as shown in the figure.
L
R
Y
Pb
Pr
PC/DVI AUDIO
AV OUT
VIDEO
AUDIO
PC
AV2 IN
VIDEO
AUDIO
L
R
VIDEO
AUDIO
LR
COMPONENT IN
How to use
Turn on the DVD player, insert a DVD.A
Use the B
INPUT
button on the remote control,
and
then press
CH+ /CH-
button to
to select COMPONENT
mode
, press the
VOL+
button to confirm.
PressC Play button on external equipment for
program play.
Refer to the DVD players manual for operating
D
instructions.
HDMI or DVI Setup
To watch digitally broadcast programs, purchase and
connect a digital set-top box.
How to connect
When using an HDMI/DVI cable connection, you
L
R
Y
Pb
Pr
PC/DVI AUDIO
AV OUT
VIDEO
ANT.
AUDIO
PC
AV2 IN
VIDEO
AUDIO
L
R
VIDEO
AUDIO
LR
COMPONENT IN
Connection Option 1
Set VCR output switch to channel 3 or 4 and then tune
the TV to the same channel number.
Connection Option 2
Connect the audio and video cables from the VCR’s A
output jacks to the TV input jacks, as shown in the
figure. When connecting the TV to VCR, match the
jack colors (Video = yellow, Audio Left = white, and
Audio Right = red).
Insert a video tape into the VCR and press
B PLAY on
the VCR. (Refer to the VCR owner’s manual.)
Select the input source with using the C INPUT button
on the remote control, and then press
CH+ /CH-
External Equipment Connections
LCD television Owners Manual 11
must use the HDMI IN(DVI) jack for video. A DVD,
Blu-ray player, HD cable box,or HD STB satellite
receiver may require a DVI-HDMI(DVI to HDMI) cable
or DVI-HDMI(DVI to HDMI) adapter. The PC/DVI
AUDIO IN jack is required for audio.
How to use
Turn on the digital set-top box. A
(Refer to the owner’s manual for the digital set-top box.)
Use B INPUT on the remote control to select HDMI
mode.
Press
C Play button on external equipment for
program play.
USB
/
L
R
PC/DVI AUDIO
AV OUT
AUDIO
PC
VIDEO
AUDIO
LR
Device
HDMI OUT
Device
HDMI Cable
PC Setup
How to connect
Use the TV’s PC IN port for video connections.A
Then, make the corresponding audio connection. If B
using a sound card, adjust the PC sound as required.
How to use
Turn on the PC and the TV.A
Turn on the display by pressing the B POWER button
on the TVs remote control.
Use C
INPUT
on the remote control to select PC source.
Check the image on your TV. There may be noise D
associated with the resolution, vertical pattern,
contrast or brightness in PC mode. If noise is
present, change the PC mode to another resolution,
change the refresh rate to another rate or adjust the
brightness and contrast on the menu until the picture
is clear. If the refresh rate of the PC graphic card
can not be changed, change the PC graphic card or
consult the manufacturer of the PC graphic card.
L
R
Y
Pb
Pr
PC/DVI AUDIO
AV OUT
VIDEO
AUDIO
PC
AV2 IN
VIDEO
AUDIO
L
R
VIDEO
AUDIO
LR
COMPONENT IN
VGA
Note
Avoid keeping a fixed image on the TVs screen for R
along period of Time. The fixed image may become
permanently imprinted on the screen.
The synchronization input form for Horizontal and R
Vertical frequencies is separate.
To obtain the best picture, do not play the USB, R
YP
b
P
r
, HDMI or PC source at the same time.
Monitor Out Setup
The TV has a special signal output capability which
allows you to hook up a second TV or monitor.
Connect the second TV or monitor to the TVs AV OUT.
See the Operating Manual of the second TV or monitor
for further details regarding that devices input settings.
External Equipment Connections
12 LCD television Owners Manual
Note
Component, PC, HDMI input sources cannot be R
used for Monitor out.
When connecting with external audio equipments, R
such as amplifiers or speakers, please turn the TV
speakers o.
Power source
TO USE AC POWER SOURCE
Use the AC polarized line cord provided for operation on
AC. Insert the AC cord plug into a standard polarized AC
outlet.
Note
Never connect the AC line cord plug to other than R
the specified voltage. Use the attached power cord
only.
If the polarized AC cord does not fit into a non R
polarized AC outlet, do not attempt to file or cut
the blade. It is the users responsibility to have an
electrician replace the obsolete outlet.
If you cause a static discharge when touching the R
unit and the unit fails to function, simply unplug
the unit from the AC outlet and plug it back in. The
unit should return to normal operation. Polarized
AC Cord Plug.
Basic Receiving and
Playing Operations
Switching ON/OFF the TV set
In the manual, the OSD (on screen display) may be
dierent from your TVs because it is just an example to
help you with the TV operation.
Switching ON/OFF the TV set
First, connect power cord correctly and the power A
indicator will light.
Press
B POWER on the remote control again.
If you want to exchange to standing by status,
C
please press down POWER on the remote control
Disconnect the power supply or unplug the
D
television if it is intended to completely cease the
television performance.
Choose the Menu Language
When you satisfied with your set for the first time,
you must select the language which will be used for
displaying menus and indications.
Press
A MENU and CH+ /CH- to select Function menu.
Press
B OK/VOL+ to enter, Press CH+ /CH- button to
select language.
Select a particular language by pressing C
CH+ /CH-
repeatedly, and then press OK to conrm.
When you satisfied with your choice, press
D MENU to
return to normal viewing.
Choose the Input source
If the TV is not in TV mode, press INPUT on the remote
control unit, and signal source menu will be displayed
on the TV screen (as shown in the below figure). Press
CH+ /CH- to select the TV option, and press VOL+or
External Equipment Connections / Basic Receiving and Playing Operations
Basic Receiving and Playing Operations
LCD television Owners Manual 13
OK to confirm the switching to TV input terminal. After
switching, the signal source menu disappears, and at the
upper right corner of screen displays the information of
current signal source.
Pressing this key repeatedly can exit from the signal
source menu.
In case of no other operation, the signal source menu
will automatically disappear upon reaching the OSD
disappearance time preset in the main menu.
Searching Channel
In this section, how to use the remote control to set
channel is explained. You can also use buttons on the TV
set to set channel.
Channel Type
Press A MENU on the remote control unit or MENU on
the TVs front panel to display main menu, and then
press CH+ /CH- to select Tuning menu,Press OK/
VOL+ to enter.
Press
B CH+ /CH- to select the Channel Type option,
Press OK/VOL+ to enter, and then press VOL-
/
VOL+
to select Air or Cable.
Channel Edit
Note: Only available in the source of TV and Tuning lock
in the H.Lock menu is o.
Press
A MENU on the remote control unit or MENU on
the TVs front panel to display main menu, and then
press CH+ /CH- to select Tuning menu.Press OK/
VOL+to enter.
Press
B CH+ /CH- to select the Channel Edit
option, and then press OK to enter submenu.
Fine Tune 112.25MHz
Color system NTSC
Skip OFF
Menu
OK
Return Move OK
Channel Edit
Fine Tune
Press CH+ /CH- to select the Fine Tune option,
and
then press
VOL-
/
VOL+
to start UP or DOWN
fine tuning
until obtaining a relatively good
picture effect. The fine tuning function is for the
purpose of improving picture effect through fine
tuning when that of a certain program is not good
enough. Normally, the optimal picture effect can
be obtained without fine tuning when watching TV
programs, and fine tuning is to meet the need of
adjusting a certain program.
Color system
Press CH+ /CH- to select the Color Systems option,
and then press VOL-
/
VOL+ to select correct color
system.
The TV is designed with four systems for your
choice, i.e. Auto, NTSC ,PAL-M, PAL-N, the system
is set as Auto and it is not necessary to make an
adjustment. The system is normally set as Auto
during auto search.
Skip
When the skip is set ON, the channel will be
skipped when pressing CH+
or CH- and only can be
selected by pressing 0-9 numerical keys.
If you want to recover the skipped channel
Basic Receiving and Playing Operations
14 LCD television Owners Manual
1. Use Direct-digit Choosing button to select the
number of the channel to be recovered.
2. Do the above steps again.
3. Press VOL-
/
VOL+ to set Skip as Off.
Auto search
Press A MENU on the remote control to display main
menu, and then press CH+ /CH- to select Tuning
menu.
press B
CH+ /CH-
to select the Auto Search option,
press OK or
VOL+
to enter the auto search menu,
afterwards press
VOL-
/
VOL+
to select the Confirm
option,
and finally press OK to confirm the starting of
auto search.
Tuning
Menu
OK
Return Move OK
Channel Type Air
Channel Edit
Auto Search
Close Caption
Auto Seaching...
Channel 8
Frequency: 152.25MHz
40%
During auto search, the scale value on the progress C
bar is continually increasing, indicating the auto
search is in progress. After finishing the auto search,
the TV will play the channel starting the auto search.
To stop the search in halfway, just press MENU/OK,
and the TV will play the first searched channel.
Close Caption
Press A MENU on the remote control unit or MENU on
the TVs front panel to display main menu, and then
press CH+ /CH-
to select Tuning menu,
press OK or
VOL+
to enter.
Press B CH+ /CH-
to select the close caption option.
Press C
VOL-
/
VOL+
to select CC1,CC2,CC3,CC4,Text1,T
ext2,Text3,Text4 or OFF.
Watching TV Program
You can watch TV program in a presetting channel.
How to select the desired program
Using Program number buttons A
Directly enter the channel number with the numeric
keypad on the remote control. If to select channel
numbers of double-digital or three-figure, press
continuously the numeric buttons in three second.
Using
B CH+ /CH- buttons
Press CH+ to select a channel number in number
increasing direction. Press CH- to select a channel
number in number decreasing direction.
How to select the desired sound
Press VOL-/+ buttons on the remote or the front of
the TV set to adjust the volume level. The range is
0~100. When the volume buttons are pressed the
volume level is displayed automatically on the TV
screen.
Mute Setting
Press A MUTE button on the remote control and a icon
will display on the screen. At this time, the sound of
the TV set is turned o.
If you want to recover the sound, press
B MUTE
button again or directly press VOL+ button.
Quick program view
Suppose that you previously watched a TV program A
on Channel 8, but now you are watching a TV
program on Channel 18 (as shown in the below
figure).
Basic Receiving and Playing Operations
LCD television Owners Manual 15
If you want to return to Channel 8, just press B
"RECALL (Flashback)" once.
If you want to return to Channel 18 again, just press
C
"RECALL (Flashback)" once again.
Note
This function is only available in TV mode. R
Picture Control Functions
This means the adjustment of specific contents in the
picture, if already in normal condition, it is not necessary
to make any adjustment.
Due to dierent TV signal inputs, some items may need
to be adjusted. The following makes a description by
only taking TV signal as an example.
How to select the picture mode
Press A MENU to display main menu on the screen,
and then press CH+ /CH- to select the Picture menu,
afterwards press OK/
VOL+
to enter the option to be
adjusted.
Press
B CH+ /CH- to move the Picture mode option
to be adjusted, and then press CH+ /CH- to select
Standard/Soft/User/Vivid.
You can also press P.MODE on the remote control to
select Standard/Vivid/Soft/ User mode.
Standard
The picture brightness and hue are moderate.
Soft
The picture is soft and in light color.
User
The picture eect is set by yourself to your preference.
Vivid
The picture is vivid, bright and dynamic.
How to customize your own picture status
Press A MENU button to display main menu on the screen,
and then press
CH+ /CH- to select the Picture menu,
press OK/VOL+ to enter .
Press
B CH+ /CH- button to select the item
requires adjusting, press VOL-
/
VOL+
button.
Contrast
This will adjust the intensity of bright parts in the
picture but keep the dark parts unchanged.
Brightness
This will adjust the light output of the complete
picture, which will mainly aect the darker areas of
the picture.
Color
This will adjust the saturation level of the colors to suit
your personal preference.
Sharpness
This will adjust the sharpness of fine details in the picture.
Tint
Allows you to select the color mix (Tine) of the picture.
Picture Mode
Select the mode of picture(Standard/Vivid/Soft/User).
Basic Receiving and Playing Operations
16 LCD television Owners Manual
Aspect Ratio
Select the mode of Aspect Ratio(Full screen/4:3/
Zoom/Cinema/Panorama/Dot By Dot).
Palette:
Press CH+ /CH- to select the Palette option, and then
press OK or VOL+to enter its submenu, and finally
press CH+ /CH-
to select a toner pattern from six
patterns (Cool2/Cool1/Standard/Warm1/Warm2/User)
to your color preference. Normally, the Standard mode
is selected.
If the User mode is selected, press VOL-
/
VOL+ to enter the palette menu, (as shown
in the below figure), and then press VOL-
/
VOL+ to select a benchmark in the range of
2500K~15000K from warm color to cold color,
afterwards press CH+ /CH- to adjust; if a dierent
benchmark is selected for adjustment, the original
adjustment data will be automatically cleared
Reset
Return to factory default settings. Press VOL-
/
VOL+
to select OK or Cancel, Press OK to armance.
Sound Control Functions
How to choose Digital tone mode
Press A MENU to display main menu on the screen,
and then press CH+ /CH- to select the Sound menu,
afterwards press OK/VOL+ to enter the option to be
adjusted.
Press
B CH+ /CH- to move the cursor to the Digital
tone, Press OK/VOL+ to enter and then press CH+ /
CH- to select Standard/Music/Theater/User mode.
Standard
Normal sound with moderate bass and treble setting.
Music
Designed the sound to best suit music programs.
Theater
Enables extra bass and treble to enhance the movie
experience.
User
A spare setting that can be adjusted to personal tastes
You can also press S.MODE button on the remote control
to select Standard / Music / Theater/User mode.
How to customize your own Sound
status
Press A MENU to display main menu on the screen,
and then press CH+ /CH- to select the Sound menu,
afterwards press OK/VOL+ to enter the option to
be adjusted.
Press
B CH+ /CH- to select the option to be adjust. and
then press VOL-
/
VOL+ to adjust it.
Bass High
Volume
Press VOL-
/
VOL+ to adjust the volume of a TV
program.
Balance
This will adjust the output of the right and left
speakers to obtain the best stereo reproduction for
your listening position.
Picture
Palette Standard
Reset
Reset
Do you want to reset
picture values?
OK Cancel
Menu
OK
Return Move OK
Basic Receiving and Playing Operations
LCD television Owners Manual 17
The intermediate value is 0. When indication value
of Balance increases toward +10, sound of the right
and left speakers becomes stronger and weaker,
respectively. When indication value of Balance
decreases toward -10, sound of the right and left
speakers becomes weaker and stronger.
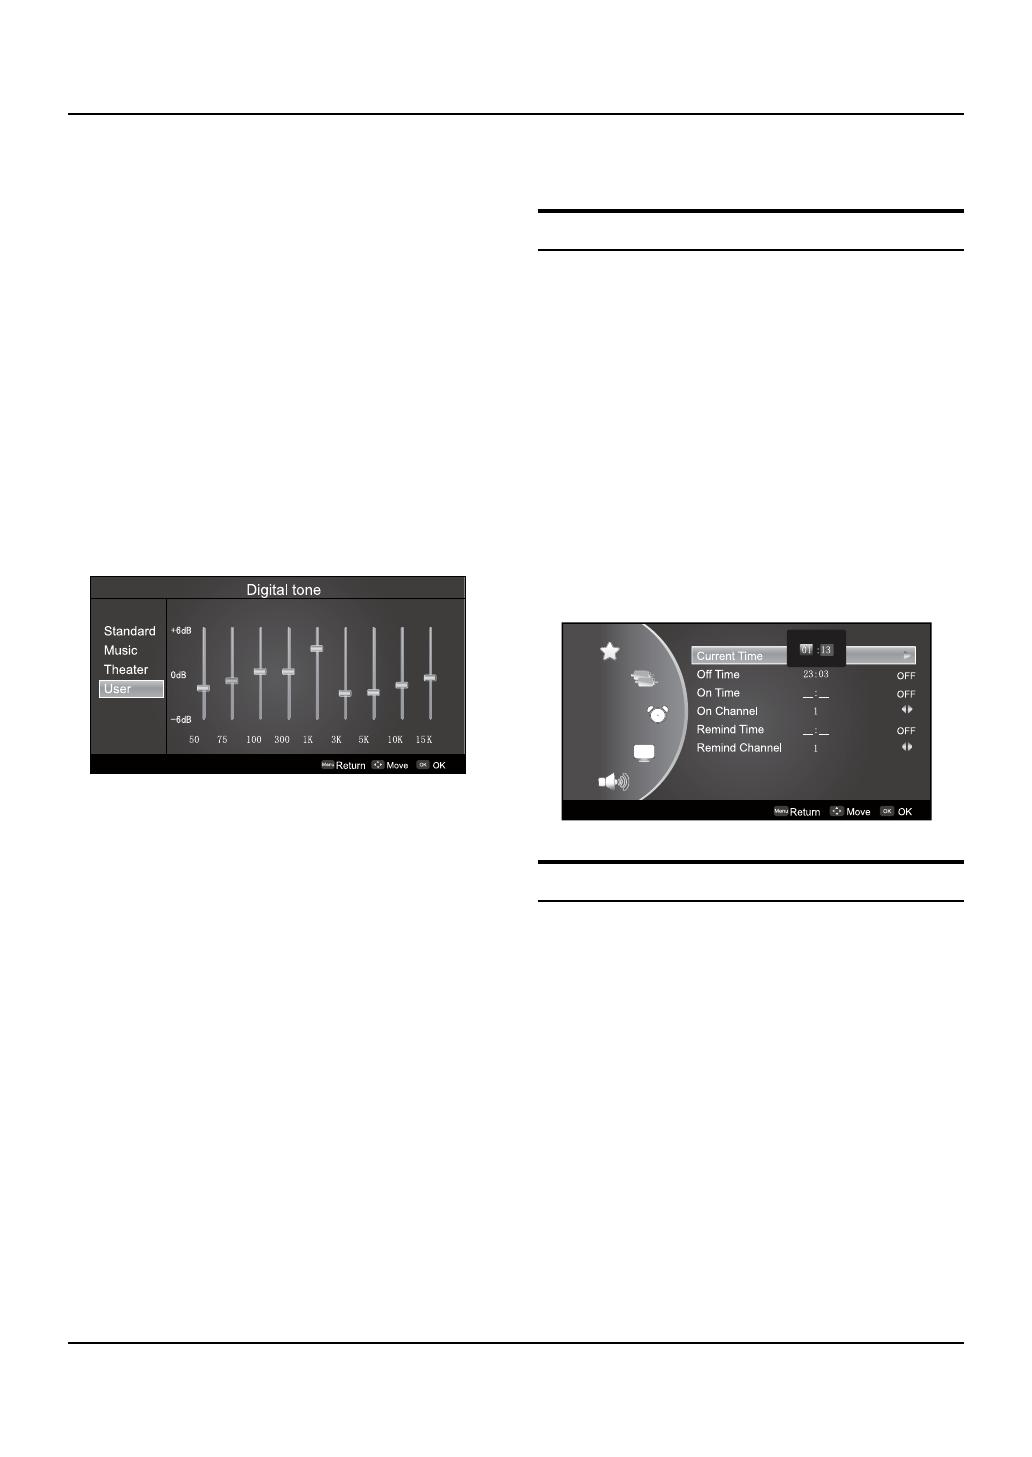
Digital tone
This select the modes for sound reproduction dependent
on the broadcast signals or signals from external inputs
received.
Select the mode of sound (Standard/Music/Theater/User).
If the
User
mode is selected, press OK to enter the
digital tone menu,(as shown in the below figure),
and then press VOL-
/
VOL+ to select a benchmark in
the range of 50~15K from bass to treble, afterwards
press CH+ /CH- to adjust, if a dierent benchmark is
selected for adjustment, the original adjustment data
will be automatically cleared.
Surround
The surround sound feature expands the audio
listening field wider and deeper to create exceptional
sound quality from the TVs speakers. Press VOL-
/
VOL+ to select On or O.
AVL (Automatic Volume Limit)
This will reduces the dierences in volume level
among broadcasters.
Bass
To adjust the super bass. Press VOL-
/
VOL+ to select
super bass O/Low/High.
Spatial
Select the sound mode adapt to your space. press
OK/VOL+ to enter the menu bar. Press CH+ /CH- to
select Stereo/1M/2M/4M.
Reset
Return to factory default settings. Press VOL-
/
VOL+to
select OK or Cancel, Press OK to armance.
Timer Functions
Setting of Current Time
The current time is calculated from the moment upon
turning the TV on. At first, check whether the time
indicated on the TV's clock is consistent with the standard
time of your time zone; if not, adjust the clock as follows:
Press A MENU on the remote control unit or MENU
on the TVs front panel to display the main menu, and
then press
CH+ /CH-
to select the Timer menu, Press
OK/VOL+
to enter, afterwards press
CH+ /CH-
to
select the Current Time option.
PressB VOL-
/
VOL+to set hour and minute.
Press
C CH+ /CH- to adjust the time.
After finishing time setting, press D OK or MENU to confirm.
Setting of ON/OFF Time
This function allows the TV to automatically turn on or
enter standby mode upon reaching the preset time.
Press A MENU on the remote control unit or MENU on
the TV's front panel to display the main menu, and
then press CH+ /CH- to select the Timer menu,
press
OK or
VOL+
to enter,
afterwards press CH+ /CH- to
select the On Time or O Time option.
Press OK to enter the setting screen, and then press
B
CH+ /CH- to select ON or OFF, if you select ON, press
VOL-
/
VOL+ to set hour and minute. ON indicates
the On/O Time function is enabled while OFF
indicates the function is disabled.
Timer
Basic Receiving and Playing Operations
18 LCD television Owners Manual
After finishing time setting, press C OK or MENU to confirm.
Note
After setting the On/O Time function, if the TV R
is AC o or forcible DC o, the function will be
automatically cleared.
Setting of On Channel
This function is used in combination with the On/O Time
function. When the TV turns on upon reaching the On
time, it automatically enters the preset channel.
Press A MENU on the remote control unit or MENU on
the TV's front panel to display the main menu, and
then press CH+ /CH- to select the Timer menu,
press
OK or
VOL+
to enter,
afterwards press CH+ /CH- to
select the On Channel option.
Press
B VOL-
/
VOL+ to set the On Channel .
Setting of Remind Time and Remind
Channel
The remind time and remind channel functions allow the
TV to automatically enter the preset channel at preset
time. If the TV is AC o or forcible DC o, the preset time
will be cleared.
Press A MENU on the remote control unit or MENU on
the TV's front panel to display the main menu, and
then press CH+ /CH- to select the Timer menu,
press
OK or
VOL+
to enter,
afterwards press CH+ /CH- to
select the Remind Time option.
Press OK to enter the setting screen, and then press B
CH+ /CH- to select ON or OFF, if you select ON, press
VOL-
/
VOL+ to set hour and minute, and then press
CH+ /CH- to adjust time.
After finishing time setting, press
C OK or MENU to
confirm.
Press
D CH+ /CH- to select the Remind Channel
option, and press VOL-
/
VOL+ to set the found
.
Function Menu
Function Menu Set
Press A MENU on the remote control unit or MENU
on the TVs front panel to display the main menu, and
then press
CH+ /CH-
to select the Function menu and
press OK/
VOL+
to enter.
Press B CH+ /CH- to select the option to be adjusted,
and then press VOL-
/
VOL+ to adjust it.
Language
Basic Receiving and Playing Operations
LCD television Owners Manual 19
Two languages (i.e.English and Spanish) are available
for your choice.
OSD Menu
Press CH+ /CH-
to select the OSD Menu option.
Press OK/VOL+ to enter the submenu.
Press CH+ /CH- to select the option to be
adjusted, and then press VOL-
/
VOL+ toadjust it.
PIP
Press CH+ /CH-
to select the PIP Menu option.
Press OK/VOL+ to enter the submenu.
Press CH+ /CH- to select PIP Mode/PIP Source/PIP
Position/PIP Swap, and then press VOL-
/
VOL+ to
adjust it.
Return
Picture Optimize
Press CH+ /CH-
to select the Picture Optimize option.
Press OK/VOL+ to enter the submenu.
Press CH+ /CH- to select theDCDI/Color
Management /DNR to be adjusted,
and then press
OK/
VOL+
to enter.
If you select DCDI or Color Management optipn,
You can press VOL-
/
VOL+ to select ON or OFF, If
you select DNR option, you can press VOL-
/
VOL+
to select Low/Medium/High/ O.
Return
DSM
Press VOL-
/
VOL+ to set Demo O/Demo I/Demo II.
Background
Press VOL-
/
VOL+ to set ON or OFF, if you select ON,
the TV screen will be blue background if no signals
are available.
Black Stretch
Press VOL-
/
VOL+ to set ON or OFF, if you select ON,
the TV picture in black area will be enhanced.
OPC
Press CH+ /CH-
to select the OPC Menu option.
Press OK/VOL+ to enter the submenu.
Press CH+ /CH- to select OPC Mode/Adjust, and
then press VOL-
/
VOL+ to adjust it.
OPC
OPC Mode User
Adjust 10
Return
Eect
Press CH+ /CH-
to select the Eect option.
Press OK/VOL+ to enter the submenu.
Press CH+ /CH- to select O/Eect1/Eect2/
Eect3.
Calendar
Press CH+ /CH-
to select the Calendar option.
Press OK/VOL+ to enter the submenu.
Press VOL-
/
VOL+ to select year/month/day, and
then press CH+ /CH- to adjust it. After nishing
time setting, press OK or MENU to conrm.
  • Page 1 1
  • Page 2 2
  • Page 3 3
  • Page 4 4
  • Page 5 5
  • Page 6 6
  • Page 7 7
  • Page 8 8
  • Page 9 9
  • Page 10 10
  • Page 11 11
  • Page 12 12
  • Page 13 13
  • Page 14 14
  • Page 15 15
  • Page 16 16
  • Page 17 17
  • Page 18 18
  • Page 19 19
  • Page 20 20
  • Page 21 21
  • Page 22 22
  • Page 23 23
  • Page 24 24
  • Page 25 25
  • Page 26 26
  • Page 27 27
  • Page 28 28
  • Page 29 29
  • Page 30 30
  • Page 31 31
  • Page 32 32
  • Page 33 33
  • Page 34 34
  • Page 35 35
  • Page 36 36
  • Page 37 37
  • Page 38 38
  • Page 39 39
  • Page 40 40
  • Page 41 41
  • Page 42 42
  • Page 43 43
  • Page 44 44
  • Page 45 45
  • Page 46 46
  • Page 47 47
  • Page 48 48
  • Page 49 49
  • Page 50 50
  • Page 51 51
  • Page 52 52
  • Page 53 53
  • Page 54 54
  • Page 55 55

Haier L26F6 User manual

Category
LCD TVs
Type
User manual
This manual is also suitable for

Ask a question and I''ll find the answer in the document

Finding information in a document is now easier with AI

in other languages