Page is loading ...

1
IMPORTANT
Installer: This manual is the property of the customer and
must be retained with the product for
maintenance and operational purposes.
PRODUCT MANUAL
HAND HELD PROGRAMMER

2
TABLE OF CONTENTS
page
INTRODUCTION 3
DESCRIPTION 3
SPECIFICATION 3
PACK CONTENTS 4
DIMENSIONS 4
INSTALLATION 5
MAINTENANCE 5
OPERATION 6
NOTES 22
CONTACTS 23
CUSTOMER CARE Back Cover

3
INTRODUCTION
DESCRIPTION
The Rada Pulse range of electronic products combine together to produce a controlled
washroom environment offering a high degree of energy and water conservation.
The Rada Pulse Hand Held Programmer is a hand held unit which enables you to
program the Rada Pulse Control Box. The programmer has an extendable lead which
plugs into a socket in the top of the Control Box.
The programmer has a two line (alpha numeric) backlit display and push buttons
which allow the user to navigate through the menu choices and set the configuration
data. This will allow the user to set the parameters such as activation time, delay
time and post flush waiting time etc. for each outlet.
The controller is multilingual and the user can select the appropriate language via
the menu system.
SPECIFICATION
Rada Pulse Hand Held Controller
Material - ABS plastic.
Operating voltage -12V D.C (power supplied from the Rada Pulse Control Box).

4
DIMENSIONS
PACK CONTENTS
Tick the appropriate boxes to familiarize yourself with the part names and to confirm that
the parts are included.
2. Documentation
1 x Product Manual
9
1 x Hand Held Programmer
1. Rada Pulse Hand Held Programmer
95 mm
30 mm
120 mm

5
INSTALLATION
Rada Pulse Hand Held Programmer
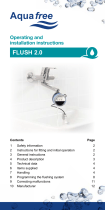
1. Remove the blanking plug from the top of the Rada Pulse Control Box.
2. Connect the pin plug on the extendable lead to the connection point (care must
be taken not to force the pin plug into the socket).
3. From a suitable position, program the control box (refer to OPERATION).
MAINTENANCE
Clean surface with damp cloth, or with mild detergents or soap solutions.
Warning! Many household and industrial cleaning products contain mild abrasives
and chemical concentrates. These products should not be used on polished or chrome
plated surfaces.
Blanking Plug
Control Box
Pin Plug
Extendable Lead
Connection of the Hand Held Programmer to the Control Box
Note! The arrow
should face you
when you plug the
pin plug in.

6
OPERATION
The control unit has a two line (alpha numeric) backlit display and four push buttons
allow the user to navigate through the menu choices and set the configuration data.
The four control unit push buttons are as follows:
Back
Pressing the back key at any time
during the procedure will take you
back to the previous menu.
Enter
Pressing the enter key will select the
menu option and save the settings.
Select
Pressing the select key will enable you to change
your option, if more than one option is available.
Increase
Pressing the increase key will increase the
time period in increments of seconds, minutes
or hours depending on the option selected.
Two Line Alpha Numeric Display

7
With the hand held programmer plugged in to the control box you can set the following
options.
1. Language - The hand held controller is multilingual and you have the option to
set the following languages; Deutsch, Netherlands, Francais, Svenska, Novege,
Espanol, Polski, Chechoslovakia and English.
2. System Information - By selecting system information you can get an overview
of the system and find out what auxiliary functions are active or not active, what
channels are active or not active and whether or not there are any errors in the
system (e.g. valves or channels).
3. Program a Channel - Using this function you can program channels 1 to 10 to
one of the following; W.C, washbasin *, shower, urinal or not in use. Other options
available when you get into the programming sequence are; flush times, duty
flushes, overrun times, flow times etc. All of the programming is explained in
greater detail on the flow charts that follow.
Note! * For Bathfill applications use the washbasin function.
4. Read a Channel and Write a Channel - With this facility you can copy what you
have programmed into one channel and write it to another channel.
For example; If you have programmed channel 1 as a shower and set all of the
other options and you wish to copy all of this information to another channel,
say channel 3, then this function is useful.
5. Program an Auxiliary - Using this function you can program the auxiliary
functions of the control unit such as fan, light and disinfection.
WARNING!
High water temperatures used during the disinfection process can be
discharged from the shower heads or taps during this process. Suitable
safety precautions MUST be taken to ensure that persons are not exposed
to the risk of scolding.
6. Read the Unit and Write the Unit - With this facility you can copy what you
have programmed into one control box and write it to another control box. This
function is particularly useful where more that one control box is installed.
Note! If while operating the controller the display shows "communication error",
this indicates a connection problem either on the control box connector, the pin
plug or the hand held controller.

8
Main Menu
Language
To Select Language
>>
>>
>
Language
English
>>
>>
>
Main Menu
Language
>>
>>
>
Are you sure ?
No
>>
>>
>
Are you sure ?
Yes
>>
>>
>
Main Menu Screen
Language Should
Now Be Selected
Pressing the > key will enable you
to select 3 different options;
Language, System info or Program
options.
Pressing the back key at any time
during the procedure will take you
back to the previous menu.
Note!
Pressing the > key will enable you
to select one of the following other
languages:
Deutsch, Netherlands, Francais,
Svenska, Novege, Espanol, Polski,
Chechoslovakia

9
Main Menu
System info
>>
>>
>
Error Valve
Channel # 3
>>
>>
>
Error Sensor
Channel # 3
>>
>>
>
Channel #1
Active
>>
>>
>
Main Menu Screen
To Select System Information
System info
Error
>>
>>
>
Channel #2
Not in use
>>
>>
>
Pressing the back key at any time
during the procedure will take you
back to the previous menu.
Note!
Pressing the > key will enable you
to select 3 different options;
Language, System info or Program
options.
System info
Channel
>>
>>
>
System info
Auxiliary
>>
>>
>
>>
>>
>
Light
Not Active
>>
>>
>
Pump
Not active
>>
>>
>
Fan
Not in use
>>
>>
>
Disinfection
Not in use
>>
>>
>
Disable systems
Not active
etc. through to
channel 10

10
Main Menu
Program Options
>>
>>
>
Program Options
Program Channel
Program Channel
Channel # 1
>>
>>
>
Main Menu Screen
To Program a Channel for a W.C
Channel # 1
W.C
>>
>>
>
Flush time
00:00 (MM:SS)
> +> +
> +> +
> +
Pressing the + key will
increase the flush time in
increments of 1 second
Flush time
00:00 (MM:SS)
SMinutes Selected
Pressing the + key will
increase the flush time in
increments of 1 minute
Duty flush 1st
000 (HH)
++
++
+
Pressing the + key will
increase the duty flush time
in increments of 12 hours
>>
>>
>
Fan
No
>>
>>
>
Fan
Yes
>>
>>
>
Save Settings
No
>>
>>
>
Save Settings
Yes
Pressing the > key will
enable you to program
Channel # 1 as a washbasin,
W.C, shower, urinal or not in
use
Pressing the back key at any
time during the procedure will
take you back to the previous
menu.
Note!
Channel # 1
Programmed
as a W.C
Pressing the > key will enable you
to select 3 different options;
Language, System info or Program
options.
> +> +
> +> +
> +
Duty flush next
000 (HH)
++
++
+
Pressing the + key will
increase the duty flush time
in increments of 12 hours
SSeconds Selected
>>
>>
>

11
Main Menu
Program Options
>>
>>
>
Program Options
Program Channel
>>
>>
>
Program Channel
Channel # 1
>>
>>
>
Main Menu Screen
To Program a Channel for a Washbasin
Channel # 1
washbasin
>>
>>
>
Overrun time
00:00 (MM:SS)
SSeconds Selected
Overrun time
00:00 (MM:SS)
SMinutes Selected
>>
>>
>
Pump
No
>>
>>
>
Pump
Yes
>>
>>
>
Save Settings
No
>>
>>
>
Save Settings
Yes
Pressing the > key will
enable you to program
Channel # 1 as a washbasin,
W.C, shower, urinal or not in
use
Pressing the back key at any
time during the procedure will
take you back to the previous
menu.
Notes !
Channel # 1
Programmed
as a Washbasin
Pressing the > key will enable you
to select 3 different options;
Language, System info or Program
options.
Type of washb.
Automatic
>>
>>
>
Type of washb.
Manual
>>
>>
>
Disinfection
Yes
>>
>>
>
Flow time
00:00 (MM:SS)
SSeconds Selected
Flow time
00:00 (MM:SS)
SMinutes Selected
Disinfection
No
>>
>>
>
Pressing the + key will
increase the overrun time or
flow time in increments of 1
second or 1 minute
> +> +
> +> +
> +
> +> +
> +> +
> +
> +> +
> +> +
> +
> +> +
> +> +
> +
Make sure that you record the
position of the programmed
sensor on the record sheet on
the reverse side of the cover

12
Main Menu
Program Options
>>
>>
>
Program Options
Program Channel
>>
>>
>
Program Channel
Channel # 1
>>
>>
>
Main Menu Screen
To Program a Channel for a Shower
Channel # 1
Shower
>>
>>
>
Pressing the > key will
enable you to program
Channel # 1 as a washbasin,
W.C, shower, urinal or not in
use
Pressing the back key at any
time during the procedure will
take you back to the previous
menu.
Pressing the > key will enable you
to select 3 different options;
Language, System info or Program
options.
Shower options
Fixed time
>>
>>
>
Shower options
Blocking on
>>
>>
>
Flow time
00:00 (MM:SS)
>>
>>
>
SSeconds Selected
Flow time
00:00 (MM:SS)
>>
>>
>
SMinutes Selected
Pressing the + key will
increase the flow time in
increments of 1 second
or 1 minute
Shower options
on/off control
>>
>>
>
Flow time
00:00 (MM:SS)
>>
>>
>
SSeconds Selected
Flow time
00:00 (MM:SS)
>>
>>
>
SMinutes Selected
A
C
B
Flow time
00:00 (MM:SS)
>>
>>
>
SSeconds Selected
Flow time
00:00 (MM:SS)
>>
>>
>
SMinutes Selected
Notes !

13
>>
>>
>
Pump
No
>>
>>
>
Pump
Yes
>>
>>
>
Save Settings
No
>>
>>
>
Save Settings
Yes
A
C
B
SMinutes Selected
Blocking time
00:00 (MM:SS)
>>
>>
>
SSeconds Selected
Blocking time
00:00 (MM:SS)
>>
>>
>
>>
>>
>
Fan
No
>>
>>
>
Fan
Yes
>>
>>
>
Disinfection
No
>>
>>
>
Disinfection
Yes
Channel # 1
Programmed
as a Shower

14
Main Menu
Program Options
>>
>>
>
Program Options
Program Channel
>>
>>
>
Program Channel
Channel # 1
>>
>>
>
Main Menu Screen
To Program a Channel for a Urinal
Channel # 1
Urinal
>>
>>
>
Pressing the > key will
enable you to program
Channel # 1 as a washbasin,
W.C, shower, urinal or not in
use
Pressing the back key at any
time during the procedure will
take you back to the previous
menu.
Pressing the > key will enable you
to select 3 different options;
Language, System info or Program
options.
Type of urinal
Group
>>
>>
>
Type of urinal
Single auto.
>>
>>
>
Flush delay time
00:00 (MM:SS)
SSeconds Selected
Flush delay time
00:00 (MM:SS)
SMinutes Selected
Pressing the + key will
increase the flush delay time
and flush time in increments
of 1 second or 1 minute
Type of urinal
Single manual
>>
>>
>
Flush delay time
00:00 (MM:SS)
SSeconds Selected
Flush delay time
00:00 (MM:SS)
SMinutes Selected
A
C
B
Notes !
Preflush time
00 (SS)
> +> +
> +> +
> +
> +> +
> +> +
> +
+ +
+ +
+
> +> +
> +> +
> +
> +> +
> +> +
> +

15
>>
>>
>
Save Settings
No
>>
>>
>
Save Settings
Yes
A
C
B
Channel
Programmed
as a Urinal
Flush time
00:00 (MM:SS)
SSeconds Selected
Flush time
00:00 (MM:SS)
SMinutes Selected
Duty flush 1st
000 (HH)
++
++
+
Pressing the + key will
increase the duty flush time
in increments of 12 hours
> +> +
> +> +
> +
> +> +
> +> +
> +
Duty flush next
000 (HH)
++
++
+
Pressing the + key will
increase the duty flush time
in increments of 12 hours

16
Main Menu
Program Options
>>
>>
>
Program Options
Program Channel
>>
>>
>
Program Channel
Channel # 1
>>
>>
>
Main Menu Screen
To Program a Channel that is Not in Use
Channel # 1
Not in use
>>
>>
>
Pressing the > key will
enable you to program
Channel # 1 as a washbasin,
W.C, shower, urinal or not in
use
Pressing the back key at any
time during the procedure will
take you back to the previous
menu.
Pressing the > key will enable you
to select 3 different options;
Language, System info or Program
options.
Notes !
>>
>>
>
Save Settings
No
>>
>>
>
Save Settings
Yes
Channel # 1
Programmed
Not in use

17
Main Menu
Program Options
>>
>>
>
Program Options
Read channel
>>
>>
>
Read channel
Channel # 1
>>
>>
>
Main Menu Screen
To Read a Channel (Copy Program)
Pressing the back key at any
time during the procedure will
take you back to the previous
menu.
Pressing the > key will enable you
to select 3 different options;
Language, System info or Program
options.
Notes !
>>
>>
>
Are you sure
No
>>
>>
>
Are you sure
Yes
Channel # 1
Copied
Main Menu
Program Options
>>
>>
>
Program Options
Write channel
>>
>>
>
Write channel
Channel # 2
>>
>>
>
Main Menu Screen
To Write a Channel
Pressing the back key at any
time during the procedure will
take you back to the previous
menu.
Pressing the > key will enable you
to select Language, System info or
Program options.
Notes !
>>
>>
>
Are you sure
No
>>
>>
>
Are you sure
Yes
Channel # 1
Copied
Copied program can
be written into
selected channel or
channels
To transfer the read data (above) to other channels follow the write channel procedure (below)

18
Main Menu
Program Options
>>
>>
>
Program Options
Program aux.
>>
>>
>
Program aux.
Fan
>>
>>
>
Main Menu Screen
To Program an Auxiliary
Run on time
00 (MM)
++
++
+
No. of outlets
01 (1-10)
++
++
+
Pressing the > key will enable you
to select Language, System info or
Program options.
>>
>>
>
>>
>>
>
Program aux.
Light
Program aux.
Disinfection
Run on time
00 (MM)
++
++
+
Disinf. type
open
>>
>>
>
Disinf. type
closed
>>
>>
>
Delay time
00 (MM)
++
++
+
Disinf. type
not in use
>>
>>
>
Flow time
00 (MM)
++
++
+
ACB D

19
Pressing the back key at any
time during the procedure will
take you back to the previous
menu.
>>
>>
>
Save Settings
No
>>
>>
>
Save Settings
Yes
Auxiliary
Programmed
Blocking time
00 (MM)
++
++
+
CB
Pressing the + key will
increase the run on time or
delay time in increments of
1 minute
DA
WARNING!
High water temperatures used during the disinfection process can be
discharged from the shower heads or taps during this process. Suitable
safety precautions MUST be taken to ensure that persons are not exposed
to the risk of scolding.

20
Main Menu
Program Options
>>
>>
>
Program Options
Read unit
>>
>>
>
Main Menu Screen
To Read the Unit
Pressing the back key at any
time during the procedure will
take you back to the previous
menu.
Pressing the > key will enable you
to select Language, System info or
Program options.
Notes !
>>
>>
>
Are you sure
No
>>
>>
>
Are you sure
Yes
Unit Read
Main Menu
Program Options
>>
>>
>
Program Options
Write unit
>>
>>
>
Main Menu Screen
To Write the Unit
Pressing the back key at any
time during the procedure will
take you back to the previous
menu.
Pressing the > key will enable you
to select Language, System info or
Program options.
Notes !
>>
>>
>
Are you sure
No
>>
>>
>
Are you sure
Yes
Unit Written
/