
®
CONVERTIBLE NOTEBOOK
REFERENCEGUIDE


i
Chapter 1: About This Reference . . . . . . . . . . . 1
About this guide . . . . . . . . . . . . . . . . . . . . . . . . . . . . . . . . . . . . . . . .2
Accessing your online User Guide . . . . . . . . . . . . . . . . . . . . . . . .2
Gateway contact information . . . . . . . . . . . . . . . . . . . . . . . . . . . .2
Gateway model and serial number . . . . . . . . . . . . . . . . . . . .3
Microsoft Certificate of Authenticity . . . . . . . . . . . . . . . . . . . . . .3
For more information . . . . . . . . . . . . . . . . . . . . . . . . . . . . . . . . . . .4
Chapter 2: Checking Out Your Notebook . . . . . 5
Top . . . . . . . . . . . . . . . . . . . . . . . . . . . . . . . . . . . . . . . . . . . . . . . . . . .6
Front . . . . . . . . . . . . . . . . . . . . . . . . . . . . . . . . . . . . . . . . . . . . . . . . . .7
Left . . . . . . . . . . . . . . . . . . . . . . . . . . . . . . . . . . . . . . . . . . . . . . . . . . .8
Right . . . . . . . . . . . . . . . . . . . . . . . . . . . . . . . . . . . . . . . . . . . . . . . . . .9
Back . . . . . . . . . . . . . . . . . . . . . . . . . . . . . . . . . . . . . . . . . . . . . . . . . .10
Bottom . . . . . . . . . . . . . . . . . . . . . . . . . . . . . . . . . . . . . . . . . . . . . . .11
Keyboard area . . . . . . . . . . . . . . . . . . . . . . . . . . . . . . . . . . . . . . . .12
Chapter 3: Setting Up and Getting Started . . 15
Working safely and comfortably . . . . . . . . . . . . . . . . . . . . . . . .16
Reducing eye strain . . . . . . . . . . . . . . . . . . . . . . . . . . . . . . . .16
Setting up your computer desk and chair . . . . . . . . . . . . .17
Sitting at your convertible notebook . . . . . . . . . . . . . . . . .17
Avoiding discomfort and injury from repetitive strain . .18
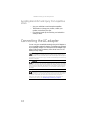
Connecting the AC adapter . . . . . . . . . . . . . . . . . . . . . . . . . . . . .18
Protecting from power source problems . . . . . . . . . . . . .20
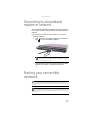
Connecting the dial-up modem . . . . . . . . . . . . . . . . . . . . . . . . .20
Connecting to a broadband modem or network . . . . . . . . . .21
Starting your convertible notebook . . . . . . . . . . . . . . . . . . . . .21
Waking up your convertible notebook . . . . . . . . . . . . . . . .23
Turning off your convertible notebook . . . . . . . . . . . . . . . . . .23
Restarting (rebooting) your convertible notebook . . . . . . . . .24
Using the status indicators . . . . . . . . . . . . . . . . . . . . . . . . . . . . .25
Using the keyboard . . . . . . . . . . . . . . . . . . . . . . . . . . . . . . . . . . . .26
Key types . . . . . . . . . . . . . . . . . . . . . . . . . . . . . . . . . . . . . . . . .27
Contents

Contents
ii
System key combinations . . . . . . . . . . . . . . . . . . . . . . . . . . 28
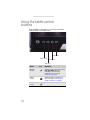
Using the tablet control buttons . . . . . . . . . . . . . . . . . . . . . . . . 30
Programming the Windows Journal button . . . . . . . . . . . 31
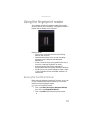
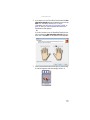
Using the fingerprint reader . . . . . . . . . . . . . . . . . . . . . . . . . . . 33
Running the TouchStrip Tutorial . . . . . . . . . . . . . . . . . . . . . 33
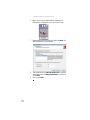
Enrolling your fingerprints . . . . . . . . . . . . . . . . . . . . . . . . . 34
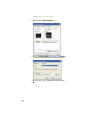
Using the Fingerprint Control Center . . . . . . . . . . . . . . . . 37
Using the password bank . . . . . . . . . . . . . . . . . . . . . . . . . . 37
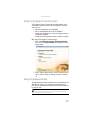
Using the fingerprint reader features . . . . . . . . . . . . . . . . 38
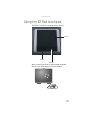
Using the EZ Pad touchpad . . . . . . . . . . . . . . . . . . . . . . . . . . . . . 39
Using the fingerprint reader as a touchpad . . . . . . . . . . 41
Using the display . . . . . . . . . . . . . . . . . . . . . . . . . . . . . . . . . . . . . 42
Converting from notebook to tablet mode . . . . . . . . . . . 42
Changing display orientation . . . . . . . . . . . . . . . . . . . . . . . 44
Adjusting brightness . . . . . . . . . . . . . . . . . . . . . . . . . . . . . . . 44
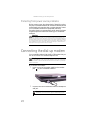
Using the digital pen . . . . . . . . . . . . . . . . . . . . . . . . . . . . . . . . . . 45
Storing and removing the digital pen . . . . . . . . . . . . . . . . 46
Pen alarm . . . . . . . . . . . . . . . . . . . . . . . . . . . . . . . . . . . . . . . . . 46
Using the touch sensitive screen . . . . . . . . . . . . . . . . . . . . . . . 47
Adjusting the volume . . . . . . . . . . . . . . . . . . . . . . . . . . . . . . . . . 48
Turning your wireless radio on or off . . . . . . . . . . . . . . . . . . . 49
IEEE 802.11 wireless network radio . . . . . . . . . . . . . . . . . . 49
Bluetooth radio . . . . . . . . . . . . . . . . . . . . . . . . . . . . . . . . . . . . 50
Chapter 4: Using Drives and Accessories . . . . 51
Using the DVD drive . . . . . . . . . . . . . . . . . . . . . . . . . . . . . . . . . . . 52
Identifying drive types . . . . . . . . . . . . . . . . . . . . . . . . . . . . . 52
Using a CD or DVD . . . . . . . . . . . . . . . . . . . . . . . . . . . . . . . . . 53
Using the memory card reader . . . . . . . . . . . . . . . . . . . . . . . . . 54
Memory card types . . . . . . . . . . . . . . . . . . . . . . . . . . . . . . . . 54
Inserting a memory card . . . . . . . . . . . . . . . . . . . . . . . . . . . 54
Using a memory card . . . . . . . . . . . . . . . . . . . . . . . . . . . . . . 54
Removing a memory card . . . . . . . . . . . . . . . . . . . . . . . . . . 55
Adding and removing a PC Card . . . . . . . . . . . . . . . . . . . . . . . . 55
Using a port replicator . . . . . . . . . . . . . . . . . . . . . . . . . . . . . . . . 56
Installing a printer or other peripheral device . . . . . . . . . . . . 57
Connecting a USB device . . . . . . . . . . . . . . . . . . . . . . . . . . . 57

www.gateway.com
iii
Connecting an IEEE 1394 device . . . . . . . . . . . . . . . . . . . . .58
Viewing the display on a projector or monitor . . . . . . . . . . . .59
Ordering accessories . . . . . . . . . . . . . . . . . . . . . . . . . . . . . . . . . . .60
Chapter 5: Managing Power . . . . . . . . . . . . . . 63
Monitoring the battery charge . . . . . . . . . . . . . . . . . . . . . . . . . .64
Recharging the battery . . . . . . . . . . . . . . . . . . . . . . . . . . . . . . . . .64
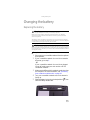
Changing the battery . . . . . . . . . . . . . . . . . . . . . . . . . . . . . . . . . .65
Replacing the battery . . . . . . . . . . . . . . . . . . . . . . . . . . . . . . .65
Recalibrating the battery . . . . . . . . . . . . . . . . . . . . . . . . . . . . . . .66
Getting the most from your battery . . . . . . . . . . . . . . . . . . . . .67
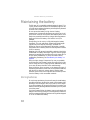
Maximizing battery performance . . . . . . . . . . . . . . . . . . . .67
Conserving battery power . . . . . . . . . . . . . . . . . . . . . . . . . .67
Using alternate power sources . . . . . . . . . . . . . . . . . . . . . .68
Changing power modes . . . . . . . . . . . . . . . . . . . . . . . . . . . . .69
Changing convertible notebook power settings . . . . . . . . . . .70
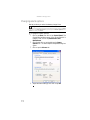
Changing the power scheme . . . . . . . . . . . . . . . . . . . . . . . .70
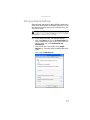
Changing alarm options . . . . . . . . . . . . . . . . . . . . . . . . . . . .72
Changing advanced settings . . . . . . . . . . . . . . . . . . . . . . . .73
Activating and using Hibernate mode . . . . . . . . . . . . . . . .74
Chapter 6: Traveling with Your Notebook . . . 77
Packing your convertible notebook . . . . . . . . . . . . . . . . . . . . . .78
Traveling by air . . . . . . . . . . . . . . . . . . . . . . . . . . . . . . . . . . . . . . .78
Dial-up modem . . . . . . . . . . . . . . . . . . . . . . . . . . . . . . . . . . . . . . . .78
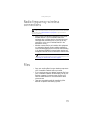
Radio frequency wireless connections . . . . . . . . . . . . . . . . . . .79
Files . . . . . . . . . . . . . . . . . . . . . . . . . . . . . . . . . . . . . . . . . . . . . . . . . .79
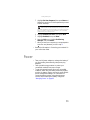
Security . . . . . . . . . . . . . . . . . . . . . . . . . . . . . . . . . . . . . . . . . . . . . .80
Power . . . . . . . . . . . . . . . . . . . . . . . . . . . . . . . . . . . . . . . . . . . . . . . .81
Additional tips . . . . . . . . . . . . . . . . . . . . . . . . . . . . . . . . . . . . . . . . .82
Chapter 7: Maintaining Your Notebook . . . . . 83
Caring for your convertible notebook . . . . . . . . . . . . . . . . . . . .84
Display screen . . . . . . . . . . . . . . . . . . . . . . . . . . . . . . . . . . . . .85
Digital pen . . . . . . . . . . . . . . . . . . . . . . . . . . . . . . . . . . . . . . . . .85
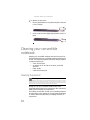
Cleaning your convertible notebook . . . . . . . . . . . . . . . . . . . . .86
Cleaning the exterior . . . . . . . . . . . . . . . . . . . . . . . . . . . . . . .86
Cleaning the keyboard . . . . . . . . . . . . . . . . . . . . . . . . . . . . . .87

Contents
iv
Cleaning the convertible notebook screen . . . . . . . . . . . . 87
Maintaining the battery . . . . . . . . . . . . . . . . . . . . . . . . . . . . . . . 88
Storing batteries . . . . . . . . . . . . . . . . . . . . . . . . . . . . . . . . . . . 88
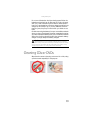
Cleaning CDs or DVDs . . . . . . . . . . . . . . . . . . . . . . . . . . . . . . . . . 89
Chapter 8: Upgrading Your Notebook. . . . . . . 91
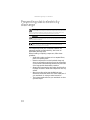
Preventing static electricity discharge . . . . . . . . . . . . . . . . . . . 92
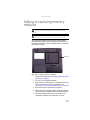
Adding or replacing memory modules . . . . . . . . . . . . . . . . . . 93
Replacing the hard drive kit . . . . . . . . . . . . . . . . . . . . . . . . . . . . 96
Chapter 9: Troubleshooting . . . . . . . . . . . . . . 101
Safety guidelines . . . . . . . . . . . . . . . . . . . . . . . . . . . . . . . . . . . . 102
First steps . . . . . . . . . . . . . . . . . . . . . . . . . . . . . . . . . . . . . . . . . . . 102
Troubleshooting . . . . . . . . . . . . . . . . . . . . . . . . . . . . . . . . . . . . . 103
Audio . . . . . . . . . . . . . . . . . . . . . . . . . . . . . . . . . . . . . . . . . . . . 103
Batteries . . . . . . . . . . . . . . . . . . . . . . . . . . . . . . . . . . . . . . . . . 103
Digital pen . . . . . . . . . . . . . . . . . . . . . . . . . . . . . . . . . . . . . . . 103
Diskette drive (external) . . . . . . . . . . . . . . . . . . . . . . . . . . . 104
Display . . . . . . . . . . . . . . . . . . . . . . . . . . . . . . . . . . . . . . . . . . 105
DVD drives . . . . . . . . . . . . . . . . . . . . . . . . . . . . . . . . . . . . . . . 106
Ethernet . . . . . . . . . . . . . . . . . . . . . . . . . . . . . . . . . . . . . . . . . 107
File management . . . . . . . . . . . . . . . . . . . . . . . . . . . . . . . . . 107
Fingerprint reader . . . . . . . . . . . . . . . . . . . . . . . . . . . . . . . . 108
Hard drive . . . . . . . . . . . . . . . . . . . . . . . . . . . . . . . . . . . . . . . 108
Internet . . . . . . . . . . . . . . . . . . . . . . . . . . . . . . . . . . . . . . . . . . 109
Keyboard . . . . . . . . . . . . . . . . . . . . . . . . . . . . . . . . . . . . . . . . 110
Memory . . . . . . . . . . . . . . . . . . . . . . . . . . . . . . . . . . . . . . . . . 111
Memory card reader . . . . . . . . . . . . . . . . . . . . . . . . . . . . . . 111
Modem (cable or DSL) . . . . . . . . . . . . . . . . . . . . . . . . . . . . . 112
Modem (dial-up) . . . . . . . . . . . . . . . . . . . . . . . . . . . . . . . . . . 112
Mouse . . . . . . . . . . . . . . . . . . . . . . . . . . . . . . . . . . . . . . . . . . . 116
Networks (wired) . . . . . . . . . . . . . . . . . . . . . . . . . . . . . . . . . 116
Networks (wireless) . . . . . . . . . . . . . . . . . . . . . . . . . . . . . . . 118
Passwords . . . . . . . . . . . . . . . . . . . . . . . . . . . . . . . . . . . . . . . 121
PC Cards . . . . . . . . . . . . . . . . . . . . . . . . . . . . . . . . . . . . . . . . . 121
Pointing device . . . . . . . . . . . . . . . . . . . . . . . . . . . . . . . . . . . 121
Power . . . . . . . . . . . . . . . . . . . . . . . . . . . . . . . . . . . . . . . . . . . 121
Printer . . . . . . . . . . . . . . . . . . . . . . . . . . . . . . . . . . . . . . . . . . . 122

www.gateway.com
v
Sound . . . . . . . . . . . . . . . . . . . . . . . . . . . . . . . . . . . . . . . . . . . .124
Status indicators . . . . . . . . . . . . . . . . . . . . . . . . . . . . . . . . . .124
Touchpad or pointing device . . . . . . . . . . . . . . . . . . . . . . .124
Video . . . . . . . . . . . . . . . . . . . . . . . . . . . . . . . . . . . . . . . . . . . .125
Telephone support . . . . . . . . . . . . . . . . . . . . . . . . . . . . . . . . . . . .125
Before calling Gateway Customer Care . . . . . . . . . . . . . .125
Appendix A: Legal Information. . . . . . . . . . . 127
Index. . . . . . . . . . . . . . . . . . . . . . . . . . . . . . . . 137

Contents
vi


CHAPTER1: About This Reference
2
About this guide
This guide includes information and maintenance instructions
that are specific to your model of Gateway convertible
notebook. For all other notebook information, see your online
User Guide.
Accessing your online User
Guide
In addition to this guide, the online User Guide has been
included on your hard drive. The User Guide is an in-depth,
easy-to-read manual that includes information on the
following topics:
• Help and technical support
• Using and customizing Windows and other software
• Controlling audio and video settings
• Using the Internet
• Protecting your files
• Playing and recording media
• Networking
• Maintenance and troubleshooting
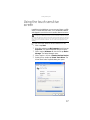
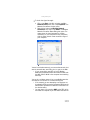
To access your online User Guide:
• Click or tap Start, All Programs, then click or tap
Gateway Documentation.
Gateway contact information
Important
The labels shown in this section are for informational purposes only. Label
information varies by model, features ordered, and location.

www.gateway.com
3
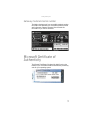
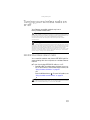
Gateway model and serial number
The label on the bottom of your convertible notebook contains
information that identifies your convertible notebook model
and its features. Gateway Customer Care will need this
information if you call for assistance.
Microsoft Certificate of
Authenticity
The Microsoft Certificate of Authenticity label found on the
bottom of your convertible notebook includes the product key
code for your operating system.

CHAPTER1: About This Reference
4
For more information
For more information about your convertible notebook, visit
Gateway’s Support page at www.gateway.com
or the Web
address shown on your convertible notebook’s label. The
Support page also has links to additional Gateway
documentation and detailed specifications.


CHAPTER2: Checking Out Your Notebook
6
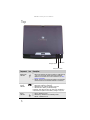
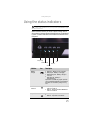
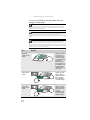
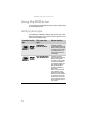
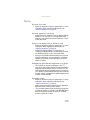
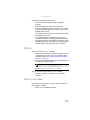
Top
Component Icon Description
Missing pen
indicator
■
LED on and missing pen alarm sounding or LED blinking
- Pen is not in the pen holder while the convertible
notebook is turned off. For more information, see “Pen
alarm” on page 46.
■
LED off - Pen is in place in the pen holder or pen has been
removed while the convertible notebook is turned on.
Battery
charge
indicator
■
LED blue - Battery is fully charged.
■
LED purple - Battery is charging.
■
LED blinking red - Battery charge is very low.
■
LED solid red - Battery is malfunctioning.
Important: This LED only lights up when your notebook is
connected to AC power or the battery charge is very low.
Power
indicator
■
LED on - Notebook is on.
■
LED blinking - Notebook is in Standby mode.
■
LED off - Notebook is off.
Battery charge indicator
Power indicator
Missing pen indicator

www.gateway.com
7
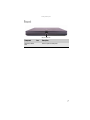
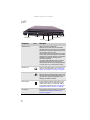
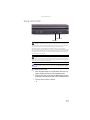
Front
Component Icon Description
LCD panel release
latch
Press to open the LCD panel.
LCD panel release latch

CHAPTER2: Checking Out Your Notebook
8
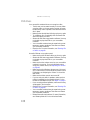
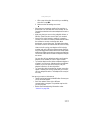
Left
Component Icon Description
Ventilation fan Helps cool internal components.
Warning: Do not work with the convertible
notebook resting on your lap. If the air vents are
blocked, the convertible notebook may become
hot enough to harm your skin.
Caution: Do not block or insert objects into these
slots. If these slots are blocked, your convertible
notebook may overheat resulting in unexpected
shutdown or permanent damage to the
convertible notebook.
Caution: Provide adequate space around your
convertible notebook so air vents are not
obstructed. Do not use the convertible notebook
on a bed, sofa, rug, or other similar surface.
Monitor port Plug an analog VGA monitor or projector into this
port. For more information, see “Viewing the
display on a projector or monitor” on page59.
Docking port Connect the optional port replicator to this port.
Warning: Power is passed through this port. This
docking connection is certified to UL 1950 for use
only with port replicators designed for your
Gateway convertible notebook.
Ethernet jack Plug an Ethernet network cable into this jack.
Plug the other end of the cable into a cable
modem, DSL modem, or an Ethernet network
jack. For more information, see “Connecting to a
broadband modem or network” on page 21.
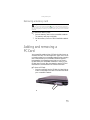
PCCard slot Insert one Type II PC Card into this slot. For more
information, see “Adding and removing a
PCCard” on page 55.
Docking port
Monitor port
Ethernet jack
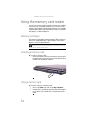
Memory card reader
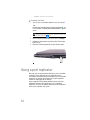
Digital pen
PCCard slot
Ventilation fan

www.gateway.com
9
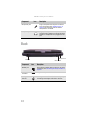
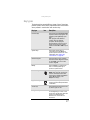
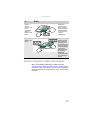
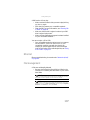
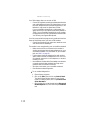
Right
Memory card
reader
Insert a memory card from a digital camera,
MP3 player, PDA, or cellular telephone into the
memory card reader. For more information, see
“Using the memory card reader” on page 54.
The memory card reader supports Memory
Stick®, Memory Stick Pro®, Mini Secure
Digital®, MultiMediaCard™,
RS-MultiMediaCard™, and Secure Digital™ cards.
Digital pen Write, tap, and input directly on your convertible
notebook’s display using the digital pen.
Component Icon Description
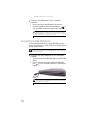
IEEE 1394 port Plug an IEEE1394 (also known as Firewire
®
or
i.Link
®
) device (such as a digital camcorder or
MP3 player) into this 4-pin IEEE1394 port.
USB ports Plug USB devices (such as a diskette drive, flash
drive, printer, scanner, camera, keyboard, or
mouse) into these ports.
DVD drive Insert CDs or DVDs into this drive. For more
information, see “Using the DVD drive” on
page 52. To determine the type of drive in your
notebook, examine the drive tray’s plastic cover
and compare the logo to those listed in
“Identifying drive types” on page 52.
Component Icon Description
USB ports
DVD drive
IEEE 1394 port
Microphone jack
Headphone jack

CHAPTER2: Checking Out Your Notebook
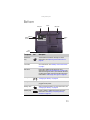
10
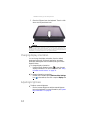
Back
Microphone jack Plug a microphone into this jack. The built-in
array microphones (see “Keyboard area” on
page 12) are turned off while an external
microphone is connected.
Headphone jack Plug amplified speakers or headphones into this
jack. The built-in speakers are turned off when
speakers or headphones are plugged into this
jack.
Component Icon Description
Modem jack Plug a dial-up modem cable into this jack. For more
information, see “Connecting the dial-up modem” on
page 20.
Power
connector
Plug the ACadapter cable into this connector.
Kensington™
lockslot
Secure your convertible notebook to an object by
connecting a Kensington cable lock to this slot.
Component Icon Description
Power connector
Kensington lock slot
Modem jack

www.gateway.com
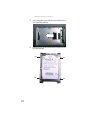
11
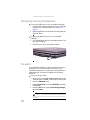
Bottom
Component Icon Description
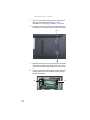
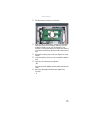
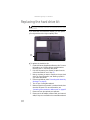
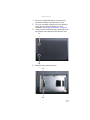
Hard drive
bay
The hard drive is located in this bay. For more
information, see “Replacing the hard drive kit” on
page 96.
Customer
Care label
Includes the Customer Care contact information. For
more information, see “Gateway contact information”
on page2.
DVD drive Insert CDs or DVDs into this drive. For more
information, see “Using the DVD drive” on page 52. To
determine the type of drive in your notebook, examine
the drive tray’s plastic cover and compare the logo to
those listed in “Identifying drive types” on page52.
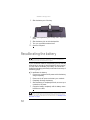
Battery lock Slide to unlock the battery. For more information, see
“Changing the battery” on page 65.
Battery Provides power when the convertible notebook is not
plugged into AC power.
Battery latch Slide to release the battery. For more information, see
“Changing the battery” on page 65.
Memory bay Install a memory module into this bay. For more
information, see “Adding or replacing memory
modules” on page93.
Battery
Battery lock Battery latch
Hard
drive bay
Memory
bay
DVD drive
Customer
care label

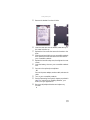
CHAPTER2: Checking Out Your Notebook
12
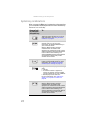
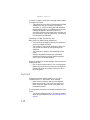
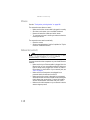
Keyboard area
Component Icon Description
Keyboard Provides all the features of a full-sized, computer
keyboard. For more information, see “Using the
keyboard” on page 26.
Speakers Provide audio output when headphones or amplified
speakers are not plugged in.
Power button Press to turn the power on or off. You can also configure
the power button for Standby/Resume mode. For more
information on configuring the power button mode,
see “Changing advanced settings” on page73.
Tablet control
buttons
See “Using the tablet control buttons” on page 30 for
a description of each button.
Status
indicators
Inform you when a drive is in use or when a button has
been pressed that affects how the keyboard is used. For
more information, see “Using the status indicators” on
page 25.
Speaker
Tablet control buttons/
Status indicators
Keyboard
Touchpad
Power button
Ambient light sensor
Microphone
Tablet control buttons
Fingerprint
reader
Speaker
Microphone
Page is loading ...
Page is loading ...
Page is loading ...
Page is loading ...
Page is loading ...
Page is loading ...
Page is loading ...
Page is loading ...
Page is loading ...
Page is loading ...
Page is loading ...
Page is loading ...
Page is loading ...
Page is loading ...
Page is loading ...
Page is loading ...
Page is loading ...
Page is loading ...
Page is loading ...
Page is loading ...
Page is loading ...
Page is loading ...
Page is loading ...
Page is loading ...
Page is loading ...
Page is loading ...
Page is loading ...
Page is loading ...
Page is loading ...
Page is loading ...
Page is loading ...
Page is loading ...
Page is loading ...
Page is loading ...
Page is loading ...
Page is loading ...
Page is loading ...
Page is loading ...
Page is loading ...
Page is loading ...
Page is loading ...
Page is loading ...
Page is loading ...
Page is loading ...
Page is loading ...
Page is loading ...
Page is loading ...
Page is loading ...
Page is loading ...
Page is loading ...
Page is loading ...
Page is loading ...
Page is loading ...
Page is loading ...
Page is loading ...
Page is loading ...
Page is loading ...
Page is loading ...
Page is loading ...
Page is loading ...
Page is loading ...
Page is loading ...
Page is loading ...
Page is loading ...
Page is loading ...
Page is loading ...
Page is loading ...
Page is loading ...
Page is loading ...
Page is loading ...
Page is loading ...
Page is loading ...
Page is loading ...
Page is loading ...
Page is loading ...
Page is loading ...
Page is loading ...
Page is loading ...
Page is loading ...
Page is loading ...
Page is loading ...
Page is loading ...
Page is loading ...
Page is loading ...
Page is loading ...
Page is loading ...
Page is loading ...
Page is loading ...
Page is loading ...
Page is loading ...
Page is loading ...
Page is loading ...
Page is loading ...
Page is loading ...
Page is loading ...
Page is loading ...
Page is loading ...
Page is loading ...
Page is loading ...
Page is loading ...
Page is loading ...
Page is loading ...
Page is loading ...
Page is loading ...
Page is loading ...
Page is loading ...
Page is loading ...
Page is loading ...
Page is loading ...
Page is loading ...
Page is loading ...
Page is loading ...
Page is loading ...
Page is loading ...
Page is loading ...
Page is loading ...
Page is loading ...
Page is loading ...
Page is loading ...
Page is loading ...
Page is loading ...
Page is loading ...
Page is loading ...
Page is loading ...
Page is loading ...
Page is loading ...
Page is loading ...
Page is loading ...
Page is loading ...
Page is loading ...
Page is loading ...
Page is loading ...
Page is loading ...
Page is loading ...
Page is loading ...
Page is loading ...
-
 1
1
-
 2
2
-
 3
3
-
 4
4
-
 5
5
-
 6
6
-
 7
7
-
 8
8
-
 9
9
-
 10
10
-
 11
11
-
 12
12
-
 13
13
-
 14
14
-
 15
15
-
 16
16
-
 17
17
-
 18
18
-
 19
19
-
 20
20
-
 21
21
-
 22
22
-
 23
23
-
 24
24
-
 25
25
-
 26
26
-
 27
27
-
 28
28
-
 29
29
-
 30
30
-
 31
31
-
 32
32
-
 33
33
-
 34
34
-
 35
35
-
 36
36
-
 37
37
-
 38
38
-
 39
39
-
 40
40
-
 41
41
-
 42
42
-
 43
43
-
 44
44
-
 45
45
-
 46
46
-
 47
47
-
 48
48
-
 49
49
-
 50
50
-
 51
51
-
 52
52
-
 53
53
-
 54
54
-
 55
55
-
 56
56
-
 57
57
-
 58
58
-
 59
59
-
 60
60
-
 61
61
-
 62
62
-
 63
63
-
 64
64
-
 65
65
-
 66
66
-
 67
67
-
 68
68
-
 69
69
-
 70
70
-
 71
71
-
 72
72
-
 73
73
-
 74
74
-
 75
75
-
 76
76
-
 77
77
-
 78
78
-
 79
79
-
 80
80
-
 81
81
-
 82
82
-
 83
83
-
 84
84
-
 85
85
-
 86
86
-
 87
87
-
 88
88
-
 89
89
-
 90
90
-
 91
91
-
 92
92
-
 93
93
-
 94
94
-
 95
95
-
 96
96
-
 97
97
-
 98
98
-
 99
99
-
 100
100
-
 101
101
-
 102
102
-
 103
103
-
 104
104
-
 105
105
-
 106
106
-
 107
107
-
 108
108
-
 109
109
-
 110
110
-
 111
111
-
 112
112
-
 113
113
-
 114
114
-
 115
115
-
 116
116
-
 117
117
-
 118
118
-
 119
119
-
 120
120
-
 121
121
-
 122
122
-
 123
123
-
 124
124
-
 125
125
-
 126
126
-
 127
127
-
 128
128
-
 129
129
-
 130
130
-
 131
131
-
 132
132
-
 133
133
-
 134
134
-
 135
135
-
 136
136
-
 137
137
-
 138
138
-
 139
139
-
 140
140
-
 141
141
-
 142
142
-
 143
143
-
 144
144
-
 145
145
-
 146
146
-
 147
147
-
 148
148
-
 149
149
-
 150
150
-
 151
151
-
 152
152
-
 153
153
-
 154
154
-
 155
155
-
 156
156


Ask a question and I''ll find the answer in the document
Finding information in a document is now easier with AI
Related papers
-
Gateway C-140X Reference guide
-
Gateway Convertible notebook Reference guide
-
-
-
-
Gateway AJ6 Reference guide
-
Gateway MX7525 Quick Start
-
-
-
Other documents
-
Samsung NP-X06 User manual
-
-
Adata 120GB S510 Installation guide
-
Compaq Compaq Presario,Presario 2200 User manual
-
Sharper Image Rechargable Vanity Light User manual
-
Sitecom CN-103 Datasheet
-
HP Notebook User manual
-
eMachines EL1358G User manual
-
IKEA CH-WLF5AUS Owner's manual
-
Micro Innovations NB460SP User manual