Page is loading ...

POWER REGENERATION CONVERTER
FR-RC
– INSTRUCTION MANUAL –

A - 1
Thank you for choosing the Mitsubishi Transistorized inverter option unit.
This instruction manual gives handling information and precautions for use of this
equipment.
Incorrect handling might cause an unexpected fault. Before using the inverter,
please read this manual carefully to use the equipment to its optimum.
Please forward this manual to the end user.
This section is specifically about safety matters
Do not attempt to install, operate, maintain or inspect the inverter until you have read
through this instruction manual and appended documents carefully and can use the
equipment correctly.
Do not use the inverter until you have a full knowledge of the equipment, safety
information and instructions.
In this manual, the safety instruction levels are classified into "WARNING" and
"CAUTION".
Assumes that incorrect handling may cause hazardous
conditions, resulting in death or severe injury.
Assumes that incorrect handling may cause hazardous
conditions, resulting in medium or slight injury, or may
cause physical damage only.
Note that even the CAUTION level may lead to a serious consequence according to
conditions. Please follow the instructions of both levels because they are important
to personnel safety.
WARNING
CAUTION

A - 2
SAFETY INSTRUCTIONS
1. Electric Shock Prevention
WARNING
!
While power is on or when the inverter is running, do not open the front cover.
You may get an electric shock.
!
Do not run the inverter option with the front cover removed. Otherwise, you may
access the exposed high-voltage terminals or the charging part of the circuitry
and get an electric shock.
!
Before starting wiring or inspection, switch power off, wait for more than 10
minutes, and check for residual voltage with a meter (refer to chapter 4 for
further details) etc.
!
Earth the 200V class regenerative converter unit in a class D or higher protective
grounding method, and the 400V class in a class C or higher method.
!
Any person who is involved in the wiring or inspection of this equipment should
be fully competent to do the work.
!
Always install the inverter option before wiring. Otherwise, you may get an
electric shock or be injured.
!
Operate the switches and potentiometers with dry hands to prevent an electric
shock.
!
Do not subject the cables to scratches, excessive stress, heavy loads or
pinching. Otherwise, you may get an electric shock.
2. Fire Prevention
CAUTION
!
Mount the regenerative converter unit to incombustible material. Mounting it
directly to or near combustible material can cause a fire.
!
Do not connect a resistor directly to the DC terminals P/
+
, N/
-
. This could cause
a fire.

A - 3
3. Injury Prevention
CAUTION
!
Apply only the voltage specified in the instruction manual to each terminal to
prevent damage etc.
!
Ensure that the cables are connected to the correct terminals. Otherwise,
damage etc. may occur.
!
Always make sure that polarity is correct to prevent damage etc.
!
While power is on or for some time after power-off, do not touch the power
regeneration converter as it is hot. Doing so can cause you to get burnt.
4. Additional instructions
Also note the following points to prevent an accidental failure, injury, electric shock, etc.
(
1
)
Transportation and installation
CAUTION
!
When carrying products, use correct lifting gear to prevent injury.
!
Do not stack the inverter boxes higher than the number recommended.
!
Ensure that installation position and material can withstand the weight of the
inverter option. Install according to the information in the Instruction Manual.
!
Do not install or operate the regenerative converter unit if it is damaged or any of
its parts are missing.
!
Do not hold the inverter option by the front cover or operation panel; it may fall
off.
!
Do not stand or rest heavy objects on the inverter option.
!
Check the inverter option mounting orientation is correct.
!
Prevent screws, wire fragments or other conductive bodies or oil or other
flammable substance from entering the regenerative converter unit.
!
The regenerative converter unit is precision equipment. Do not drop it or subject
it to impact.
!
Use the inverter option under the following environmental conditions:
Ambient
temperature
-10
°
C to +50
°
C (non-freezing)
Ambient humidity 90%RH or less (non-condensing)
Storage
temperature
-20
°
C to +65
°
C *
Ambience
Indoors (free from corrosive gas, flammable gas, oil mist, dust
and dirt)
Environment
Altitude, vibration
Maximum 1000m above sea level for standard operation. After
that derate by 3% for every extra 500m up to 2500m (91%).
5.9m/s
2
or less (conforming to JIS C 0040)
*Temperatures applicable for a short time, e.g. in transit.

A - 4
(
2
)
Operation
WARNING
!
Do not modify the equipment.
(
3
)
Maintenance, inspection and parts replacement
CAUTION
!
Do not perform a me
gg
er test
(
insulation resistance measurement
)
on the
control circuit of the regenerative converter unit.
(
4
)
Disposing of the inverter option
CAUTION
!
Treat as industrial waste.
(
5
)
General instructions
Man
y
of the dia
g
rams and drawin
g
s in this instruction manual show the inverter
option without a cover, or partially open. Never operate the inverter option like this.
Alwa
y
s replace the cover and follow this instruction manual when operatin
g
the
inverter option.

CONTENTS
EXPLANATION OF HANDLING
................................................................................................................. 1
1. Construction
.......................................................................................................................................... 2
1-1 External view and name of each part................................................................................................. 2
2. Unpacking
.............................................................................................................................................. 3
3. Installation
............................................................................................................................................. 4
3-1 Transportation.................................................................................................................................... 4
3-2 Installation place................................................................................................................................. 4
3-3 Installation direction and spacing....................................................................................................... 4
3-4 When the heat sink is placed outside the containing box .................................................................. 5
4. Wiring
..................................................................................................................................................... 6
4-1 Main circuit......................................................................................................................................... 7
4-2 Control circuit ................................................................................................................................... 11
5. Operation
............................................................................................................................................. 12
5-1 Inspection before operation.............................................................................................................. 12
5-2 Setting before operation................................................................................................................... 12
5-3 Example of operation <In the case where acceleration and constant speed operation are
driving mode and deceleration operation is regeneration mode> .................................................... 13
6. Maintenance and Inspection
.............................................................................................................. 14
6-1 Suggestions for maintenance and inspection ..................................................................................14
6-2 Inspection items ............................................................................................................................... 14
7. Problems and countermeasures
....................................................................................................... 15
7-1 Inspection according to the alarm indicator...................................................................................... 15
7-2 Problem phenomena and their countermeasures............................................................................ 15
8. Specifications
...................................................................................................................................... 16
8-1 Block diagram .................................................................................................................................. 16
8-2 Explanation of the terminals............................................................................................................. 17
8-3 Layout of terminals........................................................................................................................... 17
8-4 Outline dimensions........................................................................................................................... 18
8-5 Standard specifications.................................................................................................................... 20
8-6 Selection of peripheral devices ........................................................................................................ 21
8-7 Selection guide................................................................................................................................. 21

EXPLANATION OF HANDLlNG
1
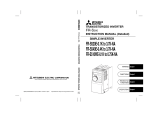
EXPLANATION OF HANDLING
Incorrect handling might cause the inverter option to operate improperly, its life to be reduced considerably, or
at the worst, the inverter option to be damaged. Handle the inverter option properly in accordance with the
information in each section as well as the precautions and instructions of this manual to use it correctly.
Power source
No-fuse
breaker
(NFB)
AC reactor for
power-factor
improvement
(FR-BAL)
Magnetic
contactor
(MC)
DC reactor for
power-factor
improvement
(FR-BEL)
Inverter,
Servo
Regenerative
converter unit
To motor
Line noise
filter (FR-BLF)
Line noise
filter
(FR-BLF)
Radio
noise
filter
(FR-BIF)
Wiring .... see page 7
Wrong wiring of the main circuit
will cause the inverter to fail.
Please keep the wires for control
signals as far from the main circuit
wiring so they do not suffer from
noise effects.
Installation .... see page 4
Since environmental temperature
has a significant effect on the
converter life span, please
decrease the temperature as low
as possible so that it is not beyond
the allowed temperature.
Setting .... see page 12
If a suitable converter for an
operated motor is not used,
good braking performance is not
obtained or overheat of the motor
is caused. Before its operation,
set the motor capacity by using
the setting dial.
Installation of the reactor
.... see page 10
For power coordination, always install an AC reactor for
power-factor improvement.
A wrong connection can disable the capabilities or
cause the regenerative converter unit to be damaged.
Installation of the no-fuse breaker (NFB)
.... see page 6
Install the NFB to connect it with both the inverter/servo
and regenerative converter unit.
Power source specifications
Use the power supply within the permissible power supply
specifications of the regenerative converter unit (page 20).

1. Construction
2
1. Construction
1-1 External view and name of each part
Fixture (two at the top and the bottom,
removable)
Rating name plate
Indicator panel window
Front cover
Fixing screw for the cover
Fig. 1 External view of the converter
Detail of the indicator panel
CHARGE
POWER
Indication of charging
capacitor circuit
Indication of a power source
SW1
ALARM
OCT UVT
FIN NGV ERR
Setting dial for
motor capacity
REG
0%
50% 100% 150%
Indication of regenerated power or alarm indication
Also lit (flickers) when the protective function (OCT, UVT, FIN) is activated.
(green) (green) (green) (green) (red) (red) (red)
Indication of an
alarm
Light on at operation
of protection function
Indicated regenerative power (%). The power is given by a percentage of
the motor capacity set by the setting dial.

2. Unpacking
3
2. Unpacking
After unpacking, please make sure of the following.
(1)Check the rating plate on the power regeneration converter to make sure that this converter is the type
you ordered.
(2)Please make sure that there is no damage due to the transportation.
If you have any questions or the converter has a damage, please contact to either the purchasing shop, our
company branch or the nearest Mitsubishi sales representative.
Meaning of symbols
Symbol
Nothing
H 400V class
200V class
Power source
voltage
Applicable motor
capacity
Indicating the
maximum applicable
motor capacity (kW) for
150% braking torque.
15
30
55
Symbol
FR RC K
Applicable motor capacity depends on the braking capacity and %ED. (see page 21)

3. Installation
4
3. Installation
3-1 Transportation
Since the power regeneration converter generates heat, leave adequate clearances around it to dissipate
heat.
3-2 Installation place
(1)Do not install the converter in the following places:
A place directly exposed to the sunlight. A hot and humid place. A place where oil mist, cotton dust, and
dust are floating. A place sprinkled with water, oil, and polishing liquid.
A place sprinkled with iron powder. A place exposed to a corrosive gas. A place exposed to inflammable
gas. A place where vibration is applied.
(2)When the power regeneration converter is contained in an enclosed box, make sure that generation of its
own heat is fully considered to determine the cooling system and box dimensions.
It is very important to check that not only the ambient temperature of the power regeneration converter but
also that of the inverter contained together in the same box fall within their permissible ranges.
(3)When the unit is used in a containing box for continuous regenerative operation, it is recommended to
install it in the method given in Section 3-4.
3-3 Installation direction and spacing
(1)Vertically attach the converter on a flat base without any step so that the letter "FR-RC" on the name plate
is visible from the front and tightly fix it by bolts.
(2)Since the power regeneration converter generates heat, leave sufficient space around it to dissipate heat.
more than
5cm
more than 10cm
more than
5cm
more than 10cm
FR-RC
FR-RC
Cooling
air
Originally
attached
cooling fan
Wire duct
Wire duct
Space
Space
Leave clearances
(more than 10cm)
so that wire ducts
will not obstruct
cooling air.
Room for the converter
FR-RC
5cm
5cm
5cm
The life span of the converter greatly depends on
the environmental temperature. Please make
sure that the temperature at the positions
indicated in the figure at the right side are not
beyond the allowed ambient temperature (50°C).
Suggestion of environmental temperature
Measurement position

5
3-4 When the heat sink is placed outside the containing box
The power regeneration converter generates more heat in applications where a regenerative status lasts
long, e.g. winding or long-time, negative-torque lifting operation.
If the unit is used in a containing box to perform such operation, the temperature in the box will rise
significantly. To prevent this, it is recommended to place the heat sink of the power regeneration converter
outside the box as shown in Fig. 3.
The FR-RC power regeneration converter is compatible with this mounting method by changing the setting
position of its fixtures.
Preparation
Panel cutout of the enclosure..............................see page 19 for size of the hole
Changing position of fixtures (two for upper and lower sides) .........see Fig. 4
Inside
of the
enclosure
Heat sink
Fixture
Fixture
Regenerative
converter unit
Outside
of the
enclosure
Containing
box
Setting position of a fixture
on the converter when
shipped from the manufacturer
Cooling fan
Fig. 3 Fixing method of heat sink
outside the enclosure
Fig. 4 Exchange of fixtures

4. Wiring
6
4. Wiring
Suggestions for wiring
(1)Connect the terminals P/+ and N/- with the inverter/servo terminals P and N correctly. If the connection
is wrong, the power regeneration converter will display an alarm and will not operate properly.
FR-RC
P/+
N/-
P
N
Inverter,
Servo
Inverter,
Servo
FR-RC
P/+
N/-
P
N
[Correct connection] [Wrong connection]
(2)Always connect the FR-BAL AC reactor for power-factor improvement on the power source side of the
inverter. (see page 7)
(3)The wiring distance from the inverter/servo terminals P and N should be within 5m.
Please use the wire of which the cross section is larger than the recommended one (see page 21).
(4)The controlling circuit terminals common 5, SD, and SE are insulated between each other. Do not
ground them.
(5)A shielded wire or a twisted wire must be used for the connecting wire to the controlling circuit. It must
be away from the main circuit (High voltage circuit, 200V sequence circuit etc.).
(6)Pay attention not to fall cutting pieces of the wires into inside of the converter during work of wiring.
Please work covering the ventilating hole of the converter.
(7)Securely ground using the grounding terminal.
Check list for design of wiring
(1)Install the NFB and MC so that the power regeneration converter and the inverter or servo may be
powered on/off at the same time.
NFB MC
NFB MC
Inverter,
Servo
Inverter,
Servo
NFB
FR-BAL
MC
Power
source
FR-RC
FR-RC
Power
source
[Correct connection] [Wrong connection]
(2)Do not apply a voltage to the RES terminal of the controlling circuit.
(3)Do not apply a voltage to the alarm output terminals A, B, and C without a load (relay coil, lamp etc.).
(4)Since the input signals to the control circuit are on a low level, use two parallel micro signal contacts or a
twin contact for contact inputs to prevent a contact fault.

7
4-1 Main circuit
(1)Connection of the power source and the inverter or servo
Regenerative converter unit FR-RC
lnput terminals of AC power source
AC reactor for
power-factor
improvement
(FR-BAL)
(Note 3)
No-fuse
breaker
(NFB)
Power source
P
N
R
S
T
U
V
W
IM
Grounding
R/L1 S/L2 T/L3 N/- P/+
Inverter, Servo (Note 1)
Motor
Magnetic
contactor
(MC)
Note 1: When using the 7.5K inverter and FR-RC, always remove the brake resistor wiring.
(For the FR-A500 series, remove the jumper across terminals PR-PX.)
Note 2: If power is not applied to the inverter (the electromagnetic contactor is not ON),
the RDY (ready output) signal of the power regeneration converter is not output.
Always apply power to the inverter.
Note 3: For power coordination, always install the FR-BAL AC reactor for power-factor
improvement (option).
(Refer to page 9 to select the FR-BAL.)
Magnetic
contactor
(MC) (Note 2)
(2)In the case where the controlling circuit is connected to another power source
When a protection circuit operates and the MC of the power source is switched off, power is not supplied to
the controlling circuit. So, an alarm signal (relay) and an alarm indication cannot be maintained. If their
maintenance is required, please provide another power source or connect the controlling circuit input R1/L11-
R/L1 and S1/L12-S/L2 to the primary side of the MC.
R/L1 S/L2 T/L3
R1/L11
S1/L12
MC
Power source
AC reactor for
power-factor
improvement
(FR-BAL)

8
(3) To prevent overcurrent due to distortion
If a current of about 180% of the rated current flows in the power regeneration converter, the distortion of the
voltage waveform may increase, activating the overcurrent protection (OCT).
Remove the jumpers across the phase detection terminals R-RX, S-SX, T-TX of the power regeneration
converter, and wire the phase detection terminals RX, SX, TX to the primary side (power supply line) of the
power factor improving reactor (FR-BAL). Keep the phase detection terminals R, S, T open.
P
ower
s
ource
P
N
IM
Phase detection terminals
Power regeneration converter (FR-RC)
(Note) (Note)(Note)
No-fuse breaker
(NFB)
AC reactor for power-factor
improvement (FR-BAL)
Magnetic
contactor
(MC)
Inverter, Servo
R
S
T
R/L1
S/L2
T/L3
RX S SX TRTXR/L1S/L2
T/L3
N/- P/+
R1
S1
When using the power source for the control circuit directly
Do not input main circuit power.
Note: When not using the phase detection terminals, fit jumpers across R-RX, S-SX, T-TX.
The FR-RC will not operate if the jumpers are removed.

9
(4) Connecting multiple units in parallel
PN
R
S
T
U
V
W
IM
Grounding
Inverter, Servo
R/L1
S/L2
T/L3
PN
R
S
T
U
V
W
IM
Grounding
R/L1
S/L2
T/L3
Power
source
AC reactor for
power-factor
improvement
(FR-BAL)
Motor
FR-RC
P/+
N/-
Motor
Inverter, Servo
FR-RC
P/+ N/-
AC reactor for
power-factor
improvement
(FR-BAL)
[Correct connection]
PN
R
S
T
U
V
W
IM
Grounding
Inverter, Servo
R/L1
S/L2
T/L3
P
N
R
S
T
U
V
W
IM
Grounding
R/L1
S/L2
T/L3
Power
source
Motor
FR-RC
P/+ N/-
Motor
Inverter, Servo
FR-RC
P/+
N/-
[Wrong connection]

10
(5)In the case of connecting an AC reactor for power-factor improvement (FR-BAL (option))
(The FR-BAL must be connected for power coordination.)
When using the power regeneration converter, always install the power factor improving AC reactor (FR-BAL)
for power coordination. Connect it to both the inverter and power regeneration converter and install it on the
power supply side of these units.
Inverter
NFB
FR-BAL
R/L1
S/L2
T/L3
FR-RC
Power
source
R
S
T
Inverter
NFB FR-BAL
R/L1
S/L2
T/L3
FR-RC
P
ower
s
ource
R
S
T
[Correct connection] [Wrong connection]
Selection of the reactor for power-factor improvement (FR-BAL)
When applying the AC reactor for power-factor improvement to the power regeneration converter, make
selection in accordance with the following selection table. Note that the reactor for area A should be selected
if the power source equipment capacity is more than 100kVA and the wiring length is within 100m.
Applicable AC reactor
Power
regeneration
converter type
For other than area A For area A
FR-RC-15K FR-BAL-22K FR-BAL-15K
FR-RC-30K FR-BAL-37K FR-BAL-30K
FR-RC-55K FR-BAL-55K FR-BAL-55K
FR-RC-H15K FR-BAL-H22K FR-BAL-H15K
FR-RC-H30K FR-BAL-H37K FR-BAL-H37K
FR-RC-H55K FR-BAL-H55K FR-BAL-H55K
Power source
equipment
capacity
100kVA
100m Wiring length
0
Stipulation chart by power source
equipment capacity vs. wiring length
Area A
When using the power regeneration converter, select the AC reactor for power-factor improvement to meet
the capacity of the power regeneration converter. (It does not depend on the inverter capacity, motor capacity
and the number of units operated in parallel.)
(6)In the case of connecting a DC reactor for power-factor improvement FR-BEL (option)
Always connect the power regeneration converter terminal P/+ to the inverter terminal P.
FR-RC
N/- P/+
Inverter
N
P
P1
FR-BEL
FR-RC
N/- P/+
Inverter
N
P
P1
FR-BEL
[Correct connection] [Wrong connection]

11
4-2 Control circuit
(1)Input signal (2)Output signal
A B C RDY SE RES SD
Output of alarm
(1 contact output)
Output of stand-by (Note)
(open collector output)
Reset
A B C RDY SE RES SD
Note: When the voltages across P-N of the inverter and power regeneration converter are both equal to or
more than the specified value, the output of the stand-by signal causes the open collector output
transistor to turn ON (conduct) 1 second after the condition has held.
Photo
coupler
P.L.C.
12/24VDC
Diode for
countermeasure
External power
source
Y00
0V
FR-RC
RES
Controlling
power source
(+24V)
Photo
coupler
SD
Countermeasures
(1) Insert a diode for prevention of the reverse current.
(2) Use independent type of output units for all terminals.
(Example AY40A, etc.)
Suggestions for connecting the converter to a PLC
(3) Make the external power source higher than the
regenerative converter unit control power source.
When the converter FR-RC is connected to a
P.L.C.'s output unit (open collector output) and the
controlling power voltage inside the FR-RC is
higher than the external power voltage of the P.L.C.,
a current flows in the FR-RC as a command signal
even if a transistor is not turned on as shown by a
dotted line in the figure below.

5. Operation
12
5. Operation
5-1 Inspection before operation
After finishing the installation and the wiring, please inspect the following items before switching the power
source on.
(1)Mistakes in wiring. Especially, connection of the main circuit terminals P/+ and N/-.
(2)A short circuit made by the cutting pieces of wire etc.
(3)Loosening of a terminal screw.
Insulation resistance test.
Do not carry out a insulation resistance test of the power source power regeneration
converter. (see P.14)
5-2 Setting before operation
Do not forget to adjust the setting dial of the motor capacity on the printed circuit board to the capacity of the
motor to be operated.
If the adjustment is not correct, the rated ability of the regenerative is not obtained or overheat of the motor is
caused.
Table 1 Dial figure and motor capacity
Dial figure to set motor capacity
Type 1 2 3 4 5 6
FR-RC-15K 7.5kW 11kW
15kW
18.5kW 22kW —
FR-RC-30K 15kW 18.5kW 22kW
30kW
37kW 45kW
200V
FR-RC-55K 30kW 37kW 45kW
55kW
——
FR-RC-H15K 7.5kW 11kW
15kW
18.5kW 22kW —
FR-RC-H30K 15kW 18.5kW 22kW
30kW
37kW 45kW
400V
FR-RC-H55K 30kW 37kW 45kW
55kW
——
SW1
Setting dial
for motor
capacity
Note: The value marked by a double circle indicates the capacity set at the time of
shipping.

13
5-3 Example of operation <In the case where acceleration and constant
speed operation are driving mode and deceleration operation is
regeneration mode>
Preparation
The start signal of the inverter is turned off.
The frequency (rate) command signal of the inverter is adjusted to zero. If a
potentiometer is used, turn it fully to counterclockwise.
Switch the
power
source on
Switch NFB and MC on
Start the
inverter
Switch the start signal of the
inverter on
Acceleration
Constant
rate
Slowly turn the frequency
setter fully cloockwise
Switch the start signal off
The power lamp and the charge lamp on the
indicator panel are lit
The rotation rate of the motor increases to
become constant
The rotation rate of the motor decreases to a stop.
The indicator LED of power regeneration on the
indicator panel is lit with an intensity corresponding
to the amount of regeneration energy.
Check point
Lighting of the indicator LED of the
power regeneration unit
......
When the LED is not lit although the deceleration
operation is made normally, check if setting of the
motor section switch is too large. It is natural that the
LED is not lit when the regenerated power is small.
......
When this condition is continued for a long time, the
converter may trip due to over-work.
......
Investigate the cause referring to the information on
the protection functions.
Deceleration
The power regeneration indicator
beyond 150%
Lighting of alarm indicator LED
Note: 1. When the regenerated power is less than 12.5% of the setting motor capacity (see Table 1, page
12), the power regeneration indicator LED is not lit.
2. When the power regeneration converter has operated, the built-in reactor may beep but this is not
a fault.

6. Maintenance and Inspection
14
6. Maintenance and Inspection
The power regeneration converter is static equipment consisting mainly of semiconductor devices. Sufficient
maintenance and inspection must be done to prevent trouble caused by environmental effects, aging and
endurance life of the components.
6-1 Suggestions for maintenance and inspection
After the power source has been switched off, electrolytic capacitors in the converter are charged by a high
voltage for a while. The inspection must be done after the change lamp on the indicator panel has been off
and it has been assured by use of a voltmeter or another instrument that a DC voltage between the
terminals P/+ and N/- is less than DC30V.
6-2 Inspection items
(1)Daily inspection
Please check for the following points during
operation of the converter.
Demonstration of the expected controlling
ability
Generation of abnormal vibration or sound
Overheat or discoloration
Cleaning of a filter or ventilator of the
enclosure
Trouble with the environment surrounding
the installation place
(2)Periodic inspection
Please check the components which can be
inspected only after stopping the converter and
are required to be inspected periodically.
Tightening of the fixing bolts again
Corrosion and failure of conductors and
insulators
Checking and exchanging cooling fan,
smoothing capacitor, and relay
Trouble with the cooling system
(3)How to perform the insulation resistance test
When making an insulation resistance test on the power source system, remove the connection
cables to the power regeneration converter so that the test voltage is not applied.
Perform an insulation resistance test on the power regeneration converter itself with the main circuit
terminal block shorted as shown in Fig. 5. Note that the insulation resistance test should not be
done on the control circuit.
Note: For the conduction test of the controlling circuit, please use a tester (meter) (for low and high
ranges), not the insulation resistance tester nor a buzzer.
Power
source
Insulation
resistance
tester
FR-RC
R/L1
S/L2
T/L3
P/+
N/-
P
N
Inverter,
Servo
Fig. 5 Outline of a megger test
/