Page is loading ...

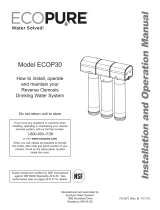
3. Install the new filter cartridges.
• Insert the “A” cartridge with the
nipple-end first. Then, press and
rotate to seat properly.
• Install the “B” cartridge by inserting the
nipple into the “B” cap
4. Tighten the threaded filter caps
firmly in the opposite direction of the
arrows shown on the caps
• The “A” cap will tighten by turning it
to the left
• The “B” cap will tighten by turning it
to the right
• Ensure O-ring is in place
5. Turn on the cold water and check for
leaks with the filter still lying flat
• If leaks are noticed, repeat step 3 and 4
• If no leaks are noticed, return the filter to the upright position
and allow the water to run for 10 minutes until all cloudiness and
discoloration have disappeared
6. Enjoy the benefits of drinking clean, healthy water!
A
B
Important: cartridges are
inserted opposite of each other.
Tested and certified by NSF International against NSF/
ANSI Standards 42, 53 and 401 in Models AQ-4000,
AQ-4600 and AQ-4601 for the reduction of the claims
specified on the Performance Data Sheet and at www.
REPLACEMENT
ELEMENT
Do not use with water that is microbiologically unsafe or of unknown
quality without adequate disinfection before or after the system.
• Conforms to NSF/ANSI Standard 53 for VOC reduction. See
performance data sheet for individual contaminants and reduction
performance: aquasana.com/performance.
• Systems certified of cyst reduction may be used on disinfected waters
that may contain filterable cysts.
• Rated capacity: 450 Gallons
• Flow Rate: 0.5 GPM
Replacement Cartridge Instructions
for use with AQ, AQW, AQB, AQP,
AQ*, AQ*, AQ, and AQ
*Not covered by NSF certification
Aquasana, Inc.
6310 Midway Road
Haltom City, TX 76117
866.662.6885 USA
877.332.7873 Canada
aquasana.com
aq4035_install_20151028
Model AQ-4035

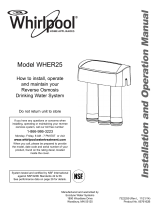
1. Place unit in sink when changing
filters to catch any spills. Remove
the threaded filter caps by turning
in the direction of the arrows. To
loosen, turn A cap to the right
and B cap to the left.
2. Remove old filter cartridges and
dispose of them in the trash.
Reuse existing large O-rings as
they have a 10-year lifecycle.
Tip: to assist with “A” cartridge
removal, you may use the old “B”
cartridge ribs to twist “A” so it will
release from the housing.
1. Remove the hoses by pressing and
holding down the gray collet ring
while pulling the hose out. Place
unit in sink to catch spills. Remove
the threaded filter caps by turning
the white A knob to the right and
the blue B knob to the left.
2. Remove old filter cartridges and
dispose of them in the trash.
Reuse existing large O-rings as
they have a 10-year lifecycle.
Tip: to assist with “A” cartridge
removal, you may use the old “B”
cartridge ribs to twist “A” so it will
release from the housing.
Tighten
A Cartridge
(White Netting)
B Cartridge
(Blue Netting)
Tighten
A Cartridge
(White Netting)
B Cartridge
(Blue Netting)
Countertop Under Counter
17mm
proceed to step 3
proceed to step 3
For Countertop filters (AQ-4000 series) For Under Counter filters (AQ-4600 & AQ-4601)
/