
IN230300120V01_US_CA
370-276V00
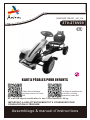
WARNING: Certification Age:3+ years old; Max weight: 50 kg.
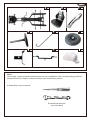
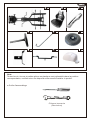
CHILDREN'S Pedal GO KART
ASSEMBLY INSTRUCTION
IMPORTANT, RETAIN FOR FUTURE REFERENCE: READ CAREFULLY
Assembly video please
scan the QR code.
The chain maintain
video please scan the
QR code.
EN

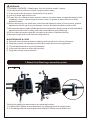
Note:
All screws, nuts and small plastic parts are pre-installed in the corresponding position,
please follow the steps to remove before you install the product.
● Assembly tools required:
Screwdriver wrench
(not included)

WARNING:
1.CHOKING HAZARD—Small parts. Not for children under 3 years.
2.Only allowed for adults to install, keep children away.
3.To be used under the direct supervision of an adult.
4.Just only allow one child to use.
5.Please use on a flat and clean surface. Never use near steps, sloped driveways, hills
roadways, alleys, swimming pool areas, road, on grass or wet surfaces or other
bodies of water.
6.Before driving toy car each time, adult should inspect screws of every parts, please
tighten the screw cap if any looseness. secure all fasteners before every ride.
7.Always wear shoes and suitable protective equipment. always wear a local standard
approved helmet while riding, with the chinstrap securely fastened.
8.Do not ride the product at dusk, at night or at times of limited visibility.
9.Always comply with local laws and regulations.
MAINTENANCE & CARE
A. Keep all instructions and parts relating to this product for future reference.
B. Regularly check for damage and that all screws are securely tightened.
C. Check that the seat is securely fastened.
D. Lubricate the chain as often as required.
E. Regularly check tyre pressures.
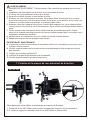
1.Attach the Steering connection plate
Cutting the cable ties and remove the steering bracket
1.Loosing M10*90mm screw then place the steering bracket on the body.
2-3. Screwing with the steering bracket with M10*90mm screw & M10 nut.
3

2
31
4
5
6
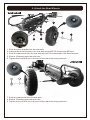
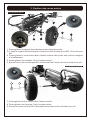
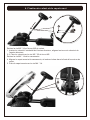
2. Attach the Rear Wheels
1. Slide the drive bracket into the rear axle.
2-3.attach the drive bracket to the rear axle using M5*25 screws and M5 nuts.
4. Slide the rear wheel into the rear axle so that it is connected to the drive bracket.
5. Slide a 10 washer onto the rear axle.
6. Tighten the lock M10 nut to the end of the rear axle using a wrench.
7. Slide the rear wheel into the rear axle .
8. Slide a 10 washer onto the rear axle.
9. Tighten the lock M10 nut to the end of the rear axle using a wrench.

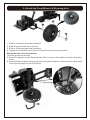
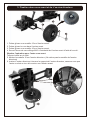
3. Attach the Front Wheels & Steering Axle
1. Slide a 12 washer onto the front axle.
2. Slide the wheel into the front axle.
3. Slide a 10 washer onto the front axle.
4. Tighten the lock M10 nut to the end of the front axle using a wrench.
Repeat for the other front wheel.
Turn the go cart on its side.
5.Put the 10 washer on the Steering Axle.(Don’t remove the washer from the Steering
Axle)
6.Insert the Steering Axle through the steering Axle Support, make sure the other hook
to the opening hole on the Front Axle.

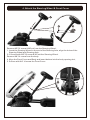
4. Attach the Steering Wheel & Front Cover
Remove M5*32 screw & M5 nut from the Steering Wheel.
1. Insert the Steering Wheel to the end of the Steering Axle, align the holes of the
Steering Wheel and Steering Axle,
2-3.Secure with M5*32 screw & M5 nut the Steering Wheel.
Remove M4*14 screw from the body.
4. Align the Front Cover and Body and insert bottom into the body opening slot,
5. Secure with M4*14 screw the Front Cover.

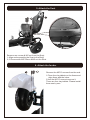
5. Attach the Seat
Remove M5*55mm & M5 nut from the Body.
1.Align and assemble the Seat to the Body
2-3.Secure with M5*55mm & M5 nut the Seat.
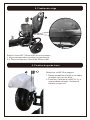
6. Attach the fender
Remove the M5*10 screws from the rack.
1.Place the clay tablets on the frame and
align them with the holes.
2.Use the M5*10 screw to secure it.
There are four clay tablets. Please install
them one by one.
3

2
1. Brake: Press to slow or brake down the vehicle.
2. Pedals: To move the vehicle forward and reverse.
3. Steering wheel: Controls the direction of the vehicle.
Use your New bicycle
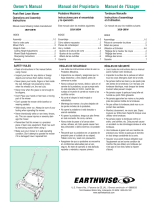
Chain Adjustment
2
1
34
5
78
910
6
2
1
34
5
78
910
6
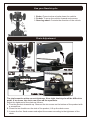
The chain must be at the correct tightness. If too tight, the bicycle will be difficult to
pedal. If too loose, the chain can come off the sprockets.
Adjust the tightness of the chain as follows:
A. Turn the product downside up. Remove the six screws on the bottom of the product with
a screwdriver.
B. Press the two buckles on the side of the product, Lift up the chain cover.
C. Loosen the four fixed screws and adjust the screws according to the tightness of the
chain.
2
1
3
2

ATTENTION: Âge de certification:3+ ans; Poids maximum : 50 kg.
Assemblage & manuel d’instructions
IMPORTANT: A LIRE ATTENTIVEMENT ET À CONSERVER POUR
CONSULTATION ULTÉRIEURE.
KART A PÉDALES POUR ENFANTS
Vidéo d'assemblage,
veuillez scanner le code
QR.
La vidéo du maintien de
la chaîne, veuillez
scanner le code QR.
370-276V00
FR
IN230300120V01_US_CA

Note:
Toutes les vis, écrous et petites pièces en plastique sont préinstallés dans la position
correspondante, veuillez suivre les étapes à retirer avant d'installer le produit.
● Outils d'assemblage
Clé pour tournevis
(Non inclus)

1. Fixation de la plaque de raccordement de direction
Découpage des serre-câbles et démontage du support de direction
1. Desserrer la vis M10*90mm puis monter le support de direction sur la carrosserie.
2-3. Visser le support de direction avec la vis M10*90mm et l'écrou M10.
AVERTISSEMENT :
1. DANGER D'ÉTOUFFEMENT - Petites pièces. Pas conseillé aux enfants de moins de 3
ans.
2. Installation par des adultes uniquement, tenir les enfants à l'écart.
3. À utiliser sous la surveillance directe d'un adulte.
4. Ne doit être utilisé que par un seul enfant à la fois.
5. À utiliser sur une surface plane et propre. Ne jamais utiliser à proximité d'un escalier,
d'une entrée en pente, d'une route en pente, d'une allée, d'une piscine, d'une route, sur
l'herbe ou sur des surfaces mouillées ou d'autres plans d'eau.
6. Avant de conduire à chaque fois le jouet, l'adulte doit inspecter les vis de chaque pièce,
veuillez serrer le bouchon à vis s'il est desserré. Fixez toutes les attaches avant chaque
trajet.
7. Portez toujours des chaussures et un équipement de protection approprié. Portez
toujours un casque homologué selon les normes locales pendant que vous roulez, avec
la jugulaire solidement attachée.
8. Ne pas rouler au crépuscule, la nuit ou à des heures de visibilité réduite.
9. Respectez toujours les lois et règlements locaux.
ENTRETIEN ET MAINTENANCE
A. Conservez toutes les instructions et les pièces relatives à ce produit pour pouvoir vous
y référer ultérieurement.
B. Vérifiez régulièrement que le produit n'est pas endommagé et que toutes les vis sont
bien serrées.
C. Vérifier que le siège est bien fixé.
D. Lubrifiez la chaîne aussi souvent que nécessaire.
E. Vérifiez régulièrement la pression des pneus.
3
Vue du bas

2
31
4
5
6
2. Fixation des roues arrière
1. Faites glisser le support d'entraînement dans l'essieu arrière.
2-3. fixez le support d'entraînement à l'essieu arrière à l'aide de vis M5 * 25 et d'écrous
M5.
4. Faites glisser la roue arrière dans l'essieu arrière afin qu'elle soit reliée au support
d'entraînement.
5. Faites glisser une rondelle 10 sur l'essieu arrière.
6. Serrez l'écrou de verrouillage M10 à l'extrémité de l'essieu arrière à l'aide d'une clé.
7. Faites glisser la roue arrière dans l'essieu arrière.
8. Faites glisser une laveuse 10 sur l'essieu arrière.
9. Serrez le contre-écrou M10 à l'extrémité de l'essieu arrière à l'aide d'une clé.
Vue arrière droite
Vue arrière gauche

3. Fixation des roues avant et de L'essieu directeur
1. Faites glisser une rondelle 12 sur l'essieu avant.
2. Faites glisser la roue dans l'essieu avant.
3. Faites glisser une rondelle 10 sur l'essieu avant.
4. Serrez l'écrou de verrouillage M10 à l'extrémité de l'essieu avant à l'aide d'une clé.
Répétez l'opération pour l'autre roue avant.
Tournez le kart sur le côté.
5. Mettez la rondelle 10 sur l'essieu directeur. (Ne retirez pas la rondelle de l'essieu
directeur)
6. Insérez l'essieu directeur à travers le support de l'essieu directeur, assurez-vous que
l'autre crochet au trou d'ouverture sur l'essieu avant.

4. Fixation du volant et du capot avant
Retirez la vis M5 * 32 et l'écrou M5 du volant.
1. Insérez le volant à l'extrémité de l'essieu directeur, alignez les trous du volant et de
l'essieu directeur,
2-3. Fixez le volant avec la vis M5 * 32 et écrou M5.
Retirez la vis M4 * 14 de la carrosserie.
4. Alignez le capot avant et la carrosserie, et insérez le bas dans la fente d'ouverture du
corps,
5. Fixez le capot avant avec la vis M4 * 14 .

1
2
3
5. Fixation du siège
Retirez l'écrou M5 * 55mm et M5 de la carrosserie.
1. Alignez et assemblez le siège à la carrosserie
2-3. Fixez le siège avec l'écrou M5*55mm et M5.
6. Fixation du garde-boue
Retirez les vis M5*10 du support.
1. Placez les tablettes d'argile sur le cadre
et alignez -les avec les trous.
2. Fixez-les à l’aide de la vis M5*10. Il y a
quatre tablettes d'argile. Veuillez les
installer une par une.

2
1.Frein: appuyez pour ralentir ou freiner le véhicule.
2. Pédales: pour faire avancer et reculer le véhicule.
3. Volant: Contrôle la direction du véhicule.
Utilisation de votre nouveau kart
2
1
3
2
Ajustement de la chaîne
2
1
34
5
78
910
6
2
1
34
5
78
910
6
La chaîne doit être à la bonne étanchéité. Si elle est trop serrée, il sera difficile de
pédaler. Si elle est trop desserrée, la chaîne peut se détacher des pignons.
Régler le serrage de la chaîne comme suit :
A. Retournez le produit à l'envers. Retirez les six vis situées au bas du produit à l'aide d'un
tournevis.
B. Appuyez sur les deux boucles sur le côté du produit, soulevez le couvercle de la
chaîne.
C. Desserrez les quatre vis fixes et ajustez les vis en fonction du serrage de la chaîne.
Vue du bas
Vis de réglage
Vue latérale
Vue de l'intérieur
Vue de l'intérieur
Relâcher
Serrer


-
 1
1
-
 2
2
-
 3
3
-
 4
4
-
 5
5
-
 6
6
-
 7
7
-
 8
8
-
 9
9
-
 10
10
-
 11
11
-
 12
12
-
 13
13
-
 14
14
-
 15
15
-
 16
16
-
 17
17
-
 18
18


Aosom 370-276V00BK User guide
- Type
- User guide
- This manual is also suitable for
Ask a question and I''ll find the answer in the document
Finding information in a document is now easier with AI
in other languages
- français: Aosom 370-276V00BK Mode d'emploi


Other documents
-
Power Fist 8641078 User manual
-
Wacker Neuson 9503 User manual
-
 EarthWise 1819-18EW Owner's manual
-
 EarthWise 1816-18EW Owner's manual
-
 Reely 1976297 Operating instructions
-
Scotts 2010-20SG User manual
-
Invacare Patriot Owner's Operator And Maintenance Manual
-
 Kolcraft S088-R3 User manual
-
Invacare Patriot User manual
-


