Page is loading ...

STUDER XTENDER SINGLE PHASE QUICK GUIDE
STUDER
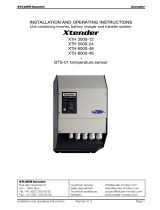
XTENDER INVERTER
+ XCOM & RCC-02
Whole Power Range
Studer Single Phase Inverter Configuration
Studer Xtender Hybrid 220Vac Single Phase Inverter
Quick Configuration Guide

STUDER XTENDER SINGLE PHASE QUICK GUIDE
Preparations:
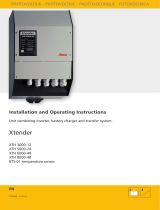
Open the connection lid to access the connection board of the inverter, CAN port, Grid and Battery Power
Connection Terminal are all located here.
INVERTER CAN
PORTS
CAN PORT-1 TO
BATTERY (A)
XCOM CAN
DEVICE

STUDER XTENDER SINGLE PHASE QUICK GUIDE
Step 1. Safety Preparation
For Safety reason it is forbidden to install any power inputs such as PV, GRID or BATTERY before having completed
all the data wiring connection as explained below.
• The PV cables cannot be conneted at this stage
• Grid and Generator wires cannot be conencted at this stage
• Baery must kept OFF while performing the connecon operaons, power cables to be connected at last.
• Ground the Inverter immediately aer xing it on the wall
KEEP THE INVERTER OFF

STUDER XTENDER SINGLE PHASE QUICK GUIDE
Step 2. Communication Settings
Before connecting the battery to the Xcom-CAN, you need to set the terminations of the communication devices.
Xcom-CAN internal:
Step 1.1 CAN Connection
Xcom-CAN external:
Change the DIP switch settings match
the picture and the image below
Jumper position as per below scheme
(3 are used on a total of 4 jumpers kit)
ON
DIP
1
ON
4
OFF
2
ON
3
ON
5
OFF
6
ON
7
OFF
8
ON
O
T
Termination Switch to the
right of the two RJ45 Ports
Set Switch to the left.
LED GREEN
● Make sure the LED blinks 2 times- interval and repeats.
● If the LED blinks Green + RED check the connection again
because the communication is not correct.
● If the LED is RED the connection is wrong.

STUDER XTENDER SINGLE PHASE QUICK GUIDE
RCC-02 internal:
Xtender external:
The battery Can Port-A connect to the CAN PORT-1 of the XCom device.
Then XCom-CAN Com Port-1 (B) connect to the Inverter CAN Port 2 (C), and CAN Port 1 (D) of the inverter connect
to RCC-02 Port-1 (E).
O
T
Termination switches are set to
the left
T
O
Termination Switch to the
right of the two RJ45 Ports
A
E
B
C
D

STUDER XTENDER SINGLE PHASE QUICK GUIDE
Step 3. Battery Preparation
Keep the BMS switch on “0” OFF.
Set the DIP Switch of the battery in accordance with the relevant manual.
Connect the provided CAN cable RJ45 to the CAN A port.
The RJ45 Terminal on the other side needs to be crimped to match inverter PIN OUT.
Do not connect the power cables at this stage.
5K3 XP EXAMPLE
DIP switched are set all OFF (00000000). Only DIP of last slave must be set differently (00000100).
4K4 LT EXAMPLE
DIP switched are set all OFF (00000000). Only DIP of last slave must be set differently (00000100).

STUDER XTENDER SINGLE PHASE QUICK GUIDE
Step 4. Battery Power Connection
Keep Inverter and Battery OFF.
Connecting the power Cables from the battery to the Inverter.
Use a Torque Wrench to secure the cables bolt.
KEEP THE BATTERY OFF
Battery Torque: 9.5 Nm
Inverter Torque: 11 Nm
INVERTER OFF
BATTERY OFF
Same configuration applies to the 4k4 LT model.
5K3 XP
model

STUDER XTENDER SINGLE PHASE QUICK GUIDE
Step 5. Battery FW Upgrade and Protocol Set
Download the WeCo Bluetooth APP from Google Play of from APP Store.
The Bluetooth APP will allow you to inspect the battery, set the battery and monitor the BMS functions during the
commissioning phase.
As good practice, it is always required to search for the latest FW for the battery.
The 5K3 XP Model has a built in WiFi/BT device and it is possible to find the battery Bluetooth Signal (in the form
of battery Serial Number) directly from the in-APP list.
• Open the BT APP
• Turn On the Battery
• Access the APP using the password 1010.
• Select Battery Module.
• Scroll Down and tap on the Serial Number of your battery.
• Once the main page will display your battery info, scroll down and tap on the FW upgrade button if
available (if not displayed means the battery is UP to Date).
APP STEPS
01
02
03
04
05
06
Same procedure applies to the 4k4 LT model, with the exception that an external WiFi/BT dongle is
needed. In this case, in the step of screen 04 you will have to select the dongle’s MAC Address.

STUDER XTENDER SINGLE PHASE QUICK GUIDE
Protocol Set Up
Wait until pop up confirms that the update process is successful, then proceed to set the inverter protocol.
ATTENTION
Turn Off the battery to proceed with the remaining operations.
Keeping the battery ON will damage the BMS an potentially the inverter power protection circuit.
Step 5. Inverter Wiring
Now it is possible to wire the GRID cables into the inverter and reinstall the protection cover.
Then press the battery ON/OFF button to start the inverter.
Now the inverter will Initiate the Start Up process and the Battery can be turned ON.
Swipe UP to
reach the bottom
of the page.
SET StuderCAN

STUDER XTENDER SINGLE PHASE QUICK GUIDE
Step 6. Inverter Protocol Set up
If all the previous steps have been done correctly, the RCC-02 Device must show the information as per
picture below.
ATTENTION, IMPORTANT
To ensure that all the information are properly displayed and received by the inverter it is necessary to
make a double control.
In case of wrong terminations or connections the RCC-02 will show partial to no battery info and the Error
(225) may be displayed.
Please check all settings and once the communication is correct try to disconnect the CAN cable from the
battery to the XCom, then reconnect the CAN cable and the RCC-02 Display must show the info (226):
Communication restored.

/