Page is loading ...

VersaOven™ Installation
Manual
BV400G ML-132527 NATURAL GAS, 10-PAN RACK
ML-132528 PROPANE, 10-PAN RACK
ML-132575 NATURAL GAS, 5-PAN RACK
- NOTICE -
This Manual is prepared for the use of trained Baxter Service
Technicians and should not be used by those not properly
qualified.
This manual is not intended to be all encompassing. If you have
not attended a Baxter Service School for this product, you should
read, in its entirety, the repair procedure you wish to perform to
determine if you have the necessary tools, instruments and skills
required to perform the procedure. Procedures for which you do
not have the necessary tools, instruments and skills should be
performed by a trained Baxter Service Technician.
The reproduction, transfer, sale or other use of this Manual,
without the express written consent of Baxter, is prohibited.
This manual has been provided to you by ITW Food Equipment
Group LLC ("ITW FEG") without charge and remains the property
of ITW FEG, and by accepting this manual you agree that you will
return it to ITW FEG promptly upon its request for such return at
any time in the future.
SERVICE MANUAL
A product of Baxter MFG. Co., Inc 19220 State Route 162 East Orting, WA 98360
F45645 (0219)

TABLE OF CONTENTS
SAFETY .................................................................................................... 3
IMPORTANT FOR YOUR SAFETY ..................................................................... 3
SERVICE UPDATES ....................................................................................... 4
SERVICE UPDATES ................................................................................... 4
GENERAL .................................................................................................. 5
INTRODUCTION ....................................................................................... 5
UNPACKING ........................................................................................... 5
LOCATION ............................................................................................. 5
CLEARANCE DIMENSIONS ............................................................................ 5
TESTING GAS SUPPLY PIPING SYSTEM .............................................................. 5
INSTALLATION CODES AND STANDARDS ............................................................ 5
TOOLS ................................................................................................. 6
SPECIFICATIONS ...................................................................................... 6
UNCRATING OVEN ........................................................................................ 9
UNCRATING / STANDING OVEN UP ................................................................... 9
INSTALLING OVEN ....................................................................................... 12
LEVELING OVEN ..................................................................................... 12
VENTILATION ........................................................................................ 12
INITIAL START-UP .................................................................................... 12
GAS PRESSURE ADJUSTMENT (GAS OVENS ONLY) ................................................ 13
DOOR SWITCH ADJUSTMENT ....................................................................... 14
RACK STOPPING POSITION ADJUSTMENT .......................................................... 14
RACK POSITION SWITCH ADJUSTMENT ............................................................. 15
TOUCH SCREEN INTERFACE OPERATIONS VERIFICATION ......................................... 15
VERSA OVEN WASH CHECK ......................................................................... 16
COMBUSTION ANALYSIS ............................................................................ 18
TEMPERATURE CALIBRATION ....................................................................... 18
FINAL CHECKS ....................................................................................... 18
VersaOven(TM) Installation Manual
© BAXTER 2019
F45645 (0219) Page 2 of 19

SAFETY
IMPORTANT FOR YOUR SAFETY
THIS MANUAL HAS BEEN PREPARED FOR PERSONNEL QUALIFIED TO INSTALL GAS EQUIPMENT, WHO
SHOULD PERFORM THE INITIAL FIELD START-UP AND ADJUSTMENTS OF THE EQUIPMENT COVERED
BY THIS MANUAL
POST IN A PROMINENT LOCATION THE INSTRUCTIONS TO BE FOLLOWED IN THE EVENT THE SMELL OF
GAS IS DETECTED. THIS INFORMATION CAN BE OBTAINED FROM THE LOCAL GAS SUPPLIER
IMPORTANT
IN THE EVENT A GAS ODOR IS DETECTED, SHUT DOWN UNITS AT MAIN SHUTOFF VALVE AND CONTACT
THE LOCAL GAS COMPANY OR GAS SUPPLIER FOR SERVICE.
FOR YOUR SAFETY
DO NOT STORE OR USE GASOLINE OR OTHER FLAMMABLE VAPORS OR LIQUIDS IN THE VICINITY OF
THIS OR ANY OTHER APPLIANCE
WARNING
IMPROPER INSTALLATION, ADJUSTMENT, ALTERATION, SERVICE OR MAINTENANCE CAN CAUSE
PROPERTY DAMAGE, INJURY OR DEATH. READ THE INSTALLATION, OPERATING AND MAINTENANCE
INSTRUCTIONS THOROUGHLY BEFORE INSTALLING OR SERVICING THIS EQUIPMENT.
IN THE EVENT OF A POWER FAILURE, DO NOT ATTEMPT TO OPERATE THIS DEVICE.
KEEP AREA AROUND OVEN CLEAR OF COMBUSTIBLES.
DO NOT OBSTRUCT COMBUSTION AND VENTILATION OPENING ON THE OVEN.
VersaOven(TM) Installation Manual - SAFETY
Page 3 of 19 F45645 (0219)


GENERAL
INTRODUCTION
These instructions are for VersaOven™. The
VersaOven™ is shipped assembled requiring minimal
field assembly. All VersaOvens™ will require leveling
and connection to utilities. All information, illustrations
and specifications contained in this manual are based
on the latest product information available at the time
indicated on the cover of the manual.
UNPACKING
Remove the crating from oven and check for possible
shipping damage. If the oven is found to be damaged
after unpacking, save packaging material and contact
the carrier within 15 days of delivery.
Prior to starting oven remove retainer blocks used to
secure removable oven rack during shipment. There
may also be zip ties securing the rack sides and the
bottom rack retainer. Failure to remove shipping
materials located between bake chamber ceiling and
top of rack will cause damage to oven.
LOCATION
Level floor or noncombustible surface within 1/8" per
foot up to 3/4" in all directions.
VersaOven™ can only be mounted on a stand.
Do not obstruct the flow of combustion and ventilation
air. Keep the appliance area free and clear from
combustibles.
Make sure there is an adequate supply of make up air
in the room to allow for combustion.
The electrical diagram is located on the inside of the
right side panel.
CLEARANCE DIMENSIONS
The VersaOven™ requires a minimum of 1" of
clearance on LEFT side of the oven.
A 1" to 4" back clearance is recommended for rear
utility connections.
Top of oven requires adequate clearance for servicing
accessibility.
NOTE: Provisions must be made to provide adequate
clearance on the right side for servicing oven.
TESTING GAS SUPPLY PIPING
SYSTEM
When test pressures exceed ½ psig (14" W.C.)
(3.45kPa), the oven and its individual shutoff valve
must be disconnected from the gas supply piping.
When test pressures are ½ psig (14" W.C.) (3.45kPa)
or less, the oven must be isolated from the gas supply
piping system by closing its individual shutoff valve.
INSTALLATION CODES AND
STANDARDS
VersaOven™ must be installed in accordance with:
United States
1. State and local codes.
2. National Fuel Gas Codes, ANSI-Z223.1 (latest
edition), available from American Gas
Association, 1515 Wilson Boulevard, Arlington,
VA 22209 and 400 North Capitol Street, NW,
Suite 450, Washington, DC 20001, (202)
824-7000.
3. ANSI/NFPA 96, Vapor Removal from Cooking
Equipment (latest edition), available from
National Fire Protection Association, 1
Batterymarch Park, Quincy, MA 02269.
4. National Electrical Code, ANSI/NFPA-70 (latest
edition).
Canada
1. Local codes.
2. CAN/CGA-B149-1, Installation for Natural Gas
Burning Appliances and Equipment (latest
edition).
3. CAN/CGA-B149-2, Installation for Propane
Burning Appliances and Equipment (latest
edition).
4. Canadian Electrical Code, Part 2, CSA Standard
C22.1 (latest edition).
Oven Mounted on Casters
A. The installation shall be made with a
connector that complies with the Standard
for Connectors for Moveable Gas
Appliances ANSI Z21.69 or Connectors for
Moveable Gas Appliances CAN/CGA-6.16,
VersaOven(TM) Installation Manual - GENERAL
Page 5 of 19 F45645 (0219)

and a quick-disconnect device that complies
with the Standard for Quick- Disconnect
Devices for Use with Gas Fuel ANSI Z21.41
or Quick Disconnect Devices for Use with
Gas Fuel CAN1-6.9.
B. Adequate means must be provided to limit
the movement of the appliance (Safety
Lanyard).
TOOLS
Standard Tools
1. Standard set of hand tools.
2. ESD (Electrostatic discharge) Protection Kit.
TEST EQUIPMENT
1. VOM with minimum of NFPA-70E CATIII 600V,
UL/CSA/TUV listed. Sensitivity of at least 20,000
ohms per volt. Meter leads must also be rated at
CAT III 600V.
2. Clamp on type amp meter with minimum of
NFPA-70E CAT III 600V, UL/CSA/TUV listed.
3. Bacharach combustion analyzer No. 125 Fyrite,
Insight Pro (Order from Bakery Support).
4. U tube manometer or equivalent.
5. Digital thermometer with 6' probe Grainger No.
4YV88 (Hobart PN: 00-538454).
6. Dwyer incline manometer Grainger No. 3T294.
SPECIAL TOOLS
1. Mini laser level self-leveling with tripod Harbor
Freight No. 92703-OVGA.
2. Screwdriver set (Jeweler's).
3. 2 Ton Foldable Shop Crane with 8 Ton Ram
having an 42" to 63-1/2" length boom, maximum
height 103-1/2" Harbor Freight No. 35915-4VGA.
4. 3/8" Chain 20 Ft. Long with a 4700 lbs. Load
rating. Harbor Freight No. 40461-7VGA.
5. 7/16" X 5-1/2" Bolts.
6. Machinist's ruler.
7. 7/16" Nuts.
8. 7/16" Fender Washers.
9. Tension / pulling tool (force gauge), Grainger No.
4VG64. Used for rack adjustment.
SPECIFICATIONS
Plumbing connections, water and waste piping, and
connections shall comply with the International
Plumbing Code 2003, International Code Council
(ICC), or to the Uniform Plumbing Code 2003,
International Association of Plumbing and Mechanical
Officials (IAPMO).
NOTE: Plumbing connections must comply with
applicable sanitary, safety and plumbing codes, and
provide adequate backflow protection to comply with
applicable federal, state and local codes.
Water connection:
• 3/8" NPTF water line connection.
• Water connection 30 - 80 psi flow (1.2 G.P.M.),
max temperature 100ºF.
• Recommended hardness: 2 - 4 grains per gallon.
• TDS less than 60 ppm: Undissolved solids less
than 5 ppm.
• Recommended range for silica: 0 - 13 ppm.
• Recommended pH: 7.0 - 8.0.
• Acceptable range for alkalinity: 0 - 20 ppm.
• Acceptable chloride concentration: 0 - 30 ppm.
• 0 ppm acceptable for chlorine and chloramine.
Drain connection:
• 1.5" Flex hose drain connection.
Gas connection (Gas Oven):
• ½" NPT pipe size 95,000 BTU/Hr.
SUPPLY GAS PRESSURE INPUT BTU/HR
Natural Propane
5" to 14" w.c. 11" to 14" w.c. 95,000
VersaOven(TM) Installation Manual - GENERAL
F45645 (0219) Page 6 of 19

Electrical Grounding Instructions - This appliance is equipped with a three-prong (grounding) plug for your
protection against shock hazard and should be plugged directly into a properly grounded three-prong
receptacle. Do not cut or remove tie grounding prong from this plug.
Electrical connection:
• 120V 60Hz 1 Phase 15 Amp maximum dedicated for control circuit.
** CONTROL CIRCUIT ALL OVENS
Volts Amps Phase HZ
120 12** 1 60
** Includes auxiliary external output.
AUXILIARY EXTERNAL OUTPUT CIRCUIT ALL OVENS
Volts Amps Phase
120 5 1
VersaOven(TM) Installation Manual - GENERAL
Page 7 of 19 F45645 (0219)

Indirect vent standard:
• Oven is located under an exhaust hood with adequate overhangs and exhaust rates to completely capture
byproducts of combustion from flue. A minimum clearance of 18" must be maintained from the termination of
the oven flue to the filters of the hood venting system. The hood exhaust fan must be electrically interlocked
with the oven (if applicable). All services must comply with all federal, state and local codes.
NOTE:
• Oven start-up must be performed by an Authorized Servicer.
• Customer is responsible to finish installing all utilities to and from oven.
• All services must comply with all Federal, State and Local codes.
• Manufacturer reserves the right to make changes in sizes and specifications.
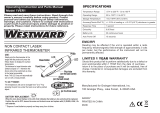
Fig. 1
1 - Water Connection
2 - Electrical Connection
3 - Gas Connection
4 - Vent
5 - Drain
VersaOven(TM) Installation Manual - GENERAL
F45645 (0219) Page 8 of 19

UNCRATING OVEN
UNCRATING / STANDING OVEN UP
NOTE: Inspect crate for shipping damage. If there is
any damage, take pictures before crating is removed.
Remove the crating from oven and check for possible
shipping damage. If the oven is found to be damaged
after unpacking, save packaging material and contact
the carrier within 15 days of delivery.
Prior to starting oven, remove the retainer blocks used
to secure oven grease cart in place during shipment.
There may also be zip ties securing the rack sides and
the bottom rack retainer. Failure to remove shipping
materials located in lower base area may cause
damage to oven.
Uncrating
1. Remove top panel and all four side panels of
crate.
Fig. 2
2. Remove plastic covering from oven.
Fig. 3
3. At bottom of stand, remove box of loose
components (Fig. 4, 1) and grease cart with
containers (Fig. 4, 2).
Fig. 4
4. At bottom of stand, remove metal bracket (Fig.
5, 1) (DO NOT discard) and wooden support
block (Fig. 5, 2).
VersaOven(TM) Installation Manual - UNCRATING OVEN
Page 9 of 19 F45645 (0219)

Fig. 5
5. Remove clamp at bottom of stand that is securing
oven to crate.
Fig. 6
Standing oven up
1. Secure lifting chains to bottom of crate using
bolts, washers, and nuts.
Fig. 7
NOTE: A minimum of 10" of chain needs to be at top
of crate for the lift to connect to.
Fig. 8
2. Carefully lift the crate, near top of oven, using a
Johnson bar.
3. Prop the crate up, using wooden blocks, to allow
space for lift to fit under crate.
Fig. 9
4. Move lift under crate, and connect chain to lifting
hook.
VersaOven(TM) Installation Manual - UNCRATING OVEN
F45645 (0219) Page 10 of 19

Fig. 10
5. Begin lifting crate into upright position.
Fig. 11
6. While lifting crate, allow the lift to follow the oven
up to the highest position that the lift will allow.
7. Using two people, gently lower oven into upright
position.
Fig. 12
Fig. 13
8. Remove lift and chains from crate.
Separating crate from oven
1. Remove brackets securing top of oven to the
crate.
NOTE: There are two brackets on top of oven, one
on each side. Be sure to remove both of them.
Fig. 14
2. While holding crate in upright position, nudge
bottom of crate away from oven, on both sides.
NOTE: Do not try to pull top of crate down to separate
it from the oven, as there is a metal bracket connected
to bottom of oven stand. Doing so could cause oven
to tip over.
3. When crate is separated from oven, and enough
clearance is given, lay down crate in a safe
location.
VersaOven(TM) Installation Manual - UNCRATING OVEN
Page 11 of 19 F45645 (0219)

INSTALLING OVEN
This manual is written for the VersaOven™. Before installing oven, compare parts to packing list to ensure all parts
were received. Wait as long as possible before removing plastic protective covering from panels and doors. Prior to
installing oven, check facility floor or noncombustible surface ensuring it is level within 1/8" per foot, up to 3/4"
maximum in all directions.
LEVELING OVEN
NOTE: Oven is preinstalled on a stand. Position oven
into final location prior to leveling.
1. Check oven to be level front to back and side to
side by placing level on oven rack, shim if
necessary.
A. If oven is installed on a stand with adjustable
legs, rotate the foot clockwise or
counterclockwise to level oven front to back
and side to side.
B. If oven is installed on casters, determine
which caster needs to be adjusted.
1) Ensure locks on casters are locked.
2) Use a block of wood to support
equipment near caster that needs
adjustment.
3) Loosen the bolt on the caster needing
adjustment and insert shim(s) between
the caster plate and bottom of stand.
4) Retighten caster bolt and verify oven is
level.
VENTILATION
Ventilation requirements will vary with each
installation and must comply with applicable portions
of the National Fire Protection Association Standards
#96, #94 and with local codes.
Exhaust Fan Interlock
• A connection point (maximum 5-amps) is
provided for Indirect Vent (Exhaust Hood). It is
located behind the right side service panel
adjacent to the 120 V power connection. Consult
local codes for vent interlock requirements.
Indirect Vent (Under Exhaust Hood)
• Position the oven under an exhaust hood with
adequate overhangs and exhaust rates to
completely capture the by-products of
combustion discharged from the flue. From the
termination of the flue to the filters of the hood
venting system, a minimum clearance of 18"
must be maintained. The hood exhaust fan must
be electrically interlocked with the oven.
INITIAL START-UP
Disconnect the electrical power to
the machine and follow lockout /
tagout procedures. There may be
multiple circuits. Be sure all circuits
are disconnected.
NOTE: Remove all protective plastic sheeting from
oven surfaces and wipe down to remove all
fingerprints, prior to heating oven.
NOTE: Remove all retaining materials and ties from
inside of oven.
NOTE: Check all utility connections made by others.
Verify the following
• Lanyard is installed and located properly for all
gas connected equipment (only for ovens
mounted on casters).
• Gas supply line shut-off valve is in the OFF
position.
• Gas supplied matches data plate and gas valve
on oven.
• Gas valve is in the OFF position.
• Electrical connections have been made by
electrician. 120V control circuit, and powered
exhaust fan interlock (external device maximum
5 amp).
• Drain connected by plumber at right rear corner
of oven.
• Water line is connected by plumber located at
right rear corner of oven.
• Water shut off is installed in supply line.
VersaOven(TM) Installation Manual - INSTALLING OVEN
F45645 (0219) Page 12 of 19

NOTE: If a water filtration unit is installed in water
supply line, verify that a filter cartridge (supplied by
customer) is installed in unit (performed by a plumber).
NOTE: Refer to oven installation checklist and
complete during initial start-up.
Ignition Sequence Check.
1. Turn gas valve off to test ignition sequence
check.
NOTE: Baking compartment circulation fan will
run continuously and will heat to set temp when
unit is powered on.
NOTE: Ignition module makes three attempts
to light burner before locking out.
NOTE: Remove power from ignition control
module by opening the loading doors for a
minimum of 5 seconds or by turning circuit
breaker off and on.
2. Set oven to call for heat by entering a
temperature higher than current oven temp.
3. Draft inducer energizes for 15 seconds for pre-
purge cycle.
4. Igniter will spark indicating that it is energized.
5. Immediately when igniter energizes, gas valve
solenoid is energized.
6. After igniter has been energized for 4 seconds,
if flame sensor does not recognize a flame,
power is removed from igniter and gas valve.
7. After initial try for ignition, if the burner has not
lit, there will be an additional 15 second purge
time.
8. LED on ignition control will flash in a three-flash
sequence, if all three attempts to ignite fail. That
indicates a flame recognition failure and that the
control is in lock-out mode.
9. This indicates the safety lock-out circuit is
functioning properly.
Fig. 15
GAS PRESSURE ADJUSTMENT
(GAS OVENS ONLY)
NOTE: Remove all protective plastic sheeting from
oven surfaces and wipe down to remove all
fingerprints, prior to heating oven.
NOTE: Check all utility connections made by others.
NOTE: Refer to oven installation checklist and
complete during initial start-up.
Shut off the gas before servicing the
unit and follow lockout / tagout
procedures.
Gas Pressure Adjustment (Gas Ovens Only).
1. Turn off all gas supply.
NOTE: Turn off gas while attaching manometer.
2. Open control panel to access the gas valve
pressure taps.
A. Remove screws securing control panel.
(Right side of oven)
B. Slide control panel to the left about ½".
C. Open control panel door.
3. Attach a manometer to the 1/8" NPT outlet
pressure tap, and one to the 1/8" NPT inlet
pressure tap on the gas valve.
4. Remove the pressure regulator adjustment cap
screw from the main gas valve to access the
adjustment screws.
5. Turn main gas supply on, turn oven on, then set
the temperature to call for heat.
VersaOven(TM) Installation Manual - INSTALLING OVEN
Page 13 of 19 F45645 (0219)

6. With the burner flame established, ensure the
proper line pressure (adjust supply regulator if
necessary) and adjust the outlet manifold
pressure regulator to 3.5" W.C. (Natural Gas) or
10" W.C. (Propane Gas).
Fig. 16
Fig. 17
DOOR SWITCH ADJUSTMENT
Door switch adjustment.
1. Apply power to machine.
NOTE: If the rack does not rotate and the circulation
fan does not come on, then the door switch may be
out of adjustment. The door switch is located on top
of oven.
2. Access door switch on top of oven.
NOTE: Door switch cover does not need to be
removed to be adjusted. Access adjustment screw
through hole in cover (1, Fig. 18).
3. With the oven door closed, loosen screw
securing door switch.
4. Move switch with handle located to left of cover.
5. Position door switch bracket until door switch
closes.
6. Tighten adjustment screw to secure door switch.
NOTE: If unable to determine if switch is closing,
adjust switches inward until switch is activated while
the door is completely closed, and deactivates when
door is opened no more than 2". The diagnostic
screen can be used to determine state change if
needed.
Fig. 18
RACK STOPPING POSITION
ADJUSTMENT
NOTE: Remove all protective plastic sheeting from
oven surfaces and wipe down to remove all
fingerprints, prior to heating oven.
NOTE: Check all utility connections made by others.
NOTE: Refer to oven installation checklist and
complete during initial start-up.
Rack stopping position adjustment.
1. Put oven into operation and perform rack
operation test with customer's typical bake
product load weight on rack. If rack does not stop
in the proper rack load/unload position, perform
RACK POSITION SWITCH ADJUSTMENT.
NOTE: If rack is adjusted without customer's typical
bake product load weight on it, position rack
approximately 5° prior to being square with the loading
doors. Some under or over travel of rack positioning
should be expected depending on product load. The
rack rotation components are located on top of the
oven.
VersaOven(TM) Installation Manual - INSTALLING OVEN
F45645 (0219) Page 14 of 19

RACK POSITION SWITCH
ADJUSTMENT
Certain procedures in this section
require electrical test or
measurements while power is
applied to the machine. Exercise
extreme caution at all times and
follow Arc Flash procedures. If test
points are not easily accessible,
disconnect power and follow
Lockout/Tagout procedures, attach
test equipment and reapply power to
test.
1. Remove screws and cover on top of rack position
switch.
2. Put oven into operation and check for proper rack
load/unload positioning.
3. Loosen bolt (1, Fig. 19) securing switch.
• If rack stops too late, move switch clockwise
(A, Fig. 19).
• If rack stops too early, move switch counter
clockwise (B, Fig. 19).
4. Repeat procedure until proper load/unload rack
position is achieved.
5. Tighten bolt to secure switch, once proper rack
position is acquired.
Fig. 19
TOUCH SCREEN INTERFACE
OPERATIONS VERIFICATION
Certain procedures in this section
require electrical test or
measurements while power is
applied to the machine. Exercise
extreme caution at all times and
follow Arc Flash procedures. If test
points are not easily accessible,
disconnect power and follow
Lockout/Tagout procedures, attach
test equipment and reapply power to
test.
NOTE: Before any verification of oven's firmware,
make sure the latest software is installed on both
the I/O computer and the User Interface computer.
Refer to Hobart Service Resource Center (https://
my.itwfeg.com/resourcecenter/Service/Bakery/
Forms/AllItems.aspx) for firmware version
available.
NOTE: Oven will only be able to use USB flash
drives that use FAT or FAT32 file systems.
NOTE: This section is for checking the functionality
of the oven. Use a Tee to connect a pressure meter
to the Draft Inducer pressure switch line. Connect a
Clamp Type Amp meter to wire number 21, the
Circulation Fan Motor power wire. Attach the Grease
Containers to the Grease Valve and route the Main
Drain connection to a floor drain. Drain buckets may
be used instead of a floor drain.
NOTE: Test functionality of each function by pressing
appropriate button on screen. The oven will toggle
function for 30 seconds automatically. If a problem
occurs with the function, pressing the button again
before the 30 seconds is over will cancel the function.
If an error occurs, check relay by verifying relay LED
(red) light is illuminated (Fig. 20), indicating relay is
closed and power output is being sent to the load side
of the relay.
Functionality Test Toggle Diagnostics Screen
1. Ensure power is supplied to oven.
2. Turn oven on.
3. Press Settings button on the controller.
4. On the number keypad, enter Service Access
Code (3344) and press the green enter button.
5. Press “Maintenance” button on the controller.
VersaOven(TM) Installation Manual - INSTALLING OVEN
Page 15 of 19 F45645 (0219)

6. Press “Diagnostics” button on the controller.
Cooking Function Check
1. Press the “Vent” button on the controller and
ensure the Vent opens then closes after the 30
seconds.
2. Press the “Buzzer” button on the controller and
ensure the Buzzer sounds.
3. Press the “Lights” button on the controller and
ensure the Lights turn on.
4. Press the “Fan” button on the controller. The
circulation fan has a 10 second delay before
starting.
NOTE: Door must be closed for Fan to run.
5. Press the “Steam” button on the controller and
ensure the Steam Solenoid operates and there
are no leaks in the water supply system.
6. Press the “Hood Fan” button on the controller and
ensure the red light by the Hood Fan relay turns
on for 30 seconds then shuts off.
7. Enter the Rack Rotation diagnostics screen.
Press “Rotate” and ensure the rack rotates freely
then press “Center” and allow the rack to stop.
Fig. 20
VERSA OVEN WASH CHECK
NOTE: Close oven door before proceeding.
1. Select Wash in Settings/Maintenance/
Diagnostics, to test the Float Operation/Sump
Protection System.
Sump Fill
• With the Grease Valve in the Open position,
ensure the sump fill solenoid turns on to fill the
sump then stops.
NOTE: The sump may already be full; shake oven
and listen for the solenoid to click on and off.
• Ensure there are no leaks in the sump-fill water
supply.
Sump Pump Down
• Ensure the Crouzet Time Down Relay is set
correctly as shown below.
VersaOven(TM) Installation Manual - INSTALLING OVEN
F45645 (0219) Page 16 of 19

Fig. 21
• Press the button on the sump fill relay (#3) for
15-20 seconds to operate the sump solenoid,
overfilling the sump with water.
NOTE: If button is held too long, water may come out
through Grease Valve, which is acceptable, but needs
to be drained into a suitable container.
• After releasing the button on the sump fill relay,
oven should turn on Drain Pump, sending water
down the Main Drain.
NOTE: Sump fill solenoid will energize any time the
drain pump is energized.
• Once the drain pump stops running, the sump will
automatically fill to the minimum level.
Sump Overtemp
• Unplug the Sump Temperature Sensor (J13)
from the IO Board (Fig. 20).
• The Sump Fill Solenoid and the Drain Pump
should turn on and will not shut off until the
temperature sensor is plugged back in.
• If the sump is fully drained, the Sump Fill
Solenoid will continue to run after the
temperature sensor is plugged back in, until the
sump is filled to the minimum level.
• If Sump Temperature Sensor is left unplugged for
longer than 3 minutes, the oven will shut down
and display an error.
NOTE: Sump Fill/Pump-Down control system is only
powered when the Grease Valve is in the Open
position.
Grease Valve Close
• Press the “Grease Valve – Close” button on the
controller and ensure that the Grease Valve
Position display changes to “Unknown” and then
to “Closed” within 10 seconds.
Soap Pump
• Press the “Soap Pump” button on the controller
and ensure the pump rotates freely.
NOTE: Also press the Soap Pump Button on the
Control Panel, and ensure the Soap Pump operates.
If there is no Soap attached to the oven AND in the fill
line, the light on the Soap Pump Button will flash, and
the oven will beep once every minute. When soap IS
in the fill line, the light on the Soap Pump Button will
be solid.
Recirculation Pump
• Press the “Recirc. Pump” button on the controller
and ensure the pump operates.
NOTE: Door must be closed for pump to run.
• Look for water to come out of the Washer Arm in
the oven.
• Look for any leaks in the recirculation system.
Drain Pump
• Press the “Drain Pump” button on the controller
and ensure the Drain Pump operates.
NOTE: The Sump Fill Solenoid should operate at the
same time.
Grease Valve Open
• Press the “Grease Valve – Open” button and
ensure the Grease Valve Position display
changes to “Unknown” then to “Opened” within
10 seconds. Look for a small amount of water to
flow into the Grease Containers as the Grease
Valve opens. Once the Grease Valve opens, the
Sump Fill Solenoid should turn on to fill the sump
to the minimum level.
Ignition Check
• Press the “Heat” button on the controller and wait
to see if the burner lights.
VersaOven(TM) Installation Manual - INSTALLING OVEN
Page 17 of 19 F45645 (0219)

COMBUSTION ANALYSIS
NOTE: Oven temperature must be 300°F or less
before performing this test.
NOTE: The burner must be operating during this test.
1. Set the controller "Temp" to 400°F, bake time to
15 minutes.
2. Make sure the loading door is closed, then press
"Play."
3. When asked to start anyway, press “Wait” and
the oven will begin preheating to 400°F.
4. Set the Combustion Analyzer to extend into
exhaust test hole 7", then turn it on and allow it
to purge before putting it in the exhaust test hole.
5. Once flame is established, insert combustion
analyzer meter into hole in top of the draft
inducer.
Fig. 22
6. Record the combustion readings right before the
burner shuts off at 400°F.
7. The combustion readings must meet the
following specifications:
A. O2 (Not to exceed 6.5%)
B. CO Air Free (Less than 400 ppm)
8. Record set-up information on the label provided
inside the controller compartment.
NOTE: If combustion readings cannot be obtained,
contact Bakery Product Support.
TEMPERATURE CALIBRATION
1. Disconnect the plug that connects to the Rotation
Motor.
NOTE: Be careful not to pull the fitting out of the
motor.
2. Install a wire pan in the center of the oven rack
with a thermocouple attached to the center of the
pan sticking up about 1” with the wire running out
through the door to a thermocouple reader.
NOTE: Do not calibrate controller if the difference in
temperature readings is greater than the range of the
controller, replace controller or thermocouple (range
Combustion and Heat Calibration ±100°F / ±38°C).
NOTE: Before calibrating the controller, the oven
must maintain a constant temperature for at least one
hour.
3. Fully open loading doors to verify that baking
compartment circulation fan de-energizes.
4. Close loading doors and set the control baking
temperature to 400°F (200°C) and bake timer for
60 minutes.
5. Allow oven temperature to stabilize (minimum 3
cycles).
6. Check the temperature reading on the
thermocouple meter when the heat light on the I/
O board goes out.
7. Compare the readings of the thermocouple
meter and the controller temperature display.
8. If the temperature difference between the two
readings is greater than ±2°F or ±1°C, adjust the
temperature offset, located in Settings/
Maintenance/Temperature Calibration.
A. If temperature test shows a temperature
higher than controller, increase temperature
offset, located in the temperature setting
screen.
B. If temperature test shows a temperature
lower than controller, decrease temperature
offset, located in the temperature setting
screen.
FINAL CHECKS
1. Test for proper operation.
NOTE: Baking compartment circulation fan will
remain on while oven is powered on.
2. Cool-Down:
VersaOven(TM) Installation Manual - INSTALLING OVEN
F45645 (0219) Page 18 of 19

A. Set controller "Temp" to 150°F, bake time to
1 minute.
B. Press the Play button.
C. When the preheat prompt appears, press
"WAIT". This will begin the cool-down
operation. The loading door can be opened
at this time to aid in cooling.
D. After the oven has reached 150°F or below,
stop cool-down by selecting the back button.
E. The oven can be powered off at this point if
needed.
VersaOven(TM) Installation Manual - INSTALLING OVEN
Page 19 of 19 F45645 (0219)
/