Page is loading ...

creating better environments
Installing Marmoleum Cinch LOC Seal
Installing Marmoleum Cinch LOC Seal v1.11 02/23 Page 1 of 3
Marmoleum Cinch LOC Seal has a top layer of Marmoleum, which is made from predominantly harvestable natural raw materials and is
processed according to an environmentally friendly procedure. Its main ingredient is natural linseed oil, which is mixed with wood flour,
rosin and limestone. Marmoleum receives its color from ecologically responsible pigments. Pressed onto a jute fabric under high pressure,
an extremely durable and environmentally friendly flooring is produced. As Marmoleum is made from natural raw materials, slight color
and structural differences are possible between the production batches, samples and the goods to be delivered.
Dimensions
Click Panel 11.81” x 35.43” (30cm x 90cm)
Click Square 11.81” x 11.81” (30cm x 30cm)
Structure
Total Thickness 9.8mm
Surface 2.5mm Marmoleum
Base Material 6.8mm HDF
Backing 1.0mm cork
Packaging 7 panels per carton – 20.3 ft
2
(1.89 m
2
)
7 squares per carton – 6.7 ft
2
(0.63 m
2
)
What is Ambering?
Ambering is the slight yellow hue to Marmoleum when it is first removed from the packaging. This is a natural phenomenon that happens
with Marmoleum and is completely normal. Linseed oil, a natural oil extracted from flax seeds and one of the main ingredients in
Marmoleum is what causes this yellow hue. This very important ingredient in Marmoleum provides several unique characteristics:
o Linseed oil, along with wood flour, makes the floor naturally antistatic, repelling dust, making Marmoleum easy to clean.
o When exposed to air and light, the linseed oil oxidizes from within the Marmoleum and continues for the life of the product. This makes
the material harden over time and become more durable.
As time passes, the ambering will fade as Marmoleum is exposed to light, but its unique characteristics will not. The process may take as
little as a few hours in bright sunlight, but it can take longer with artificial light. Areas that are not exposed to any light will retain the
yellow hue until they are exposed to light. If an area of Marmoleum is covered for an extended period, it’s possible the yellow hue will re-
appear. Don’t be alarmed – it will fade once again when it’s exposed to light. Because this is a natural occurrence in the product, there is
no set time frame for the yellow hue to fade. This is not a material defect. It’s actually a sign that Marmoleum is revealing its unique and
valuable characteristics! Performing floor care procedures will not inhibit the process. It’s just takes a little bit of time and understanding
what great benefits this process brings to Marmoleum! All colors of Marmoleum are subject to ambering, however it can be more
noticeable in certain colors. Light blues, greens, greys and beiges will display a more visible yellow hue than darker colors. To discover the
true color of Marmoleum, follow these few simple steps:
1. Take a piece of Marmoleum and cover one half with heavy paper, cardboard or another piece of Marmoleum.
2. Place these pieces in direct sunlight for approximately 1 hour.
3. After the time has passed, remove the cardboard or heavy material and see the visual difference first hand.
General Installation Guidelines
•
The Marmoleum Cinch LOC Seal cartons should be stored flat, and unopened, for approximately 2 – 3 days in the center of the room in
which they are to be installed. In the winter months, store the cartons for approximately 6 days.
•
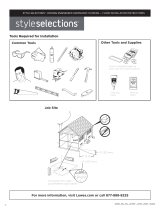
Tools and Materials Required:
o Tape Measure
o Fitting Wedges
o 3/8” Spacers
o Pencil
o Hammer
o Straight Back Hand Saw
o Keyhole Saw or Jigsaw
o Angle or Adjustable Bevel
o Foam Underlayment (for concrete subfloors or subfloors with underfloor heating)
• All Marmoleum Cinch LOC Seal panels and squares should be inspected for manufacturing defects and damage prior to installation.
• The ambient room temperature should be at least 68° F (20° C) and the ambient relative humidity between 50% – 60%. To maintain the
long-term value of Marmoleum Cinch LOC Seal, we recommend the use of a humidifier to avoid extreme drying out during the heating
season.

creating better environments
Installing Marmoleum Cinch LOC Seal
Installing Marmoleum Cinch LOC Seal v1.11 02/23 Page 2 of 3
• Marmoleum Cinch LOC Seal can be installed on any clean, dry, structurally sound subfloor. The subfloor must be flat to within 3/32” in
6’ (2.0mm in 2 meters).
• For concrete subfloors, internal relative humidity should not exceed 75% (tested in accordance with the latest version of ASTM F 2170)
and moisture vapor emissions must not exceed 3 pounds per 1,000 square feet in 24 hours (tested in accordance with the latest version
of ASTM F 1869).
• All concrete subfloors and subfloors with underfloor heating require a vapor barrier. The edges of the vapor barrier should extend up
the walls a minimum of 2”. Follow the underlayment manufacturer’s recommendations for seaming requirements.
• When using underfloor heating, Forbo only recommends installing Marmoleum Cinch LOC Seal over systems that are heated by water
(hydronic).
• IMPORTANT!! An expansion gap of 3/8” (9.8mm) is required around the entire room between the flooring and the wall, including at all
columns, heating pipes, steel door frames, etc.
• Here are some other things to keep in mind before starting the installation:
o There are a variety of moldings (such as “T” moldings, reducers, quarter-round and overlap end profiles) that can be purchased at
local home improvement stores, hardware stores or online.
o All expansion joints should be a minimum of 3/8” (9.8mm) wide.
o Expansion joints are required for any areas longer or wider than 26’ (7.9 meters) and can be covered with a “T” shaped molding.
o As a general rule, expansion joints should be used in doorways connecting hallways, adjacent rooms, or closets.
o It is important to minimize any opportunity for damage by cleaning up spills immediately. Spills should not remain on the surface
of Marmoleum Cinch LOC Seal longer than 30 minutes.
o If a floor drain or sump pump is present, it is there for a reason. DO NOT INSTALL Marmoleum Cinch LOC Seal on that level.
o All expansion spaces located in wet areas, such as areas where sinks dishwashers, refrigerators, toilets, showers, bathtubs are
located should be sealed with 100% mildew-resistant silicone. To seal the area, apply a thin bead of silicone where the bottom of
the Marmoleum Cinch LOC Seal and subfloor meet. DO NOT fill the entire expansion space with silicone.
• For additional information, contact Forbo’s Product Support and Education Services.
Installation
Marmoleum Cinch LOC Seal is installed without any need for glue by placing the tongue into
the groove as well as the groove into the tongue. However, it is easier to work so that you are
placing the tongue into the groove. In Figure 1, the TONGUE (marked as A) is semi-hidden on
the left and top of the material and the GROOVE (marked as B) is the prominent visible locking
piece on the right and bottom of the material.
1. Start by measuring the room and determining the starting point in the room. It is
recommended to install the material perpendicular to the main window. This will help
minimize the appearance of seams throughout the room.
2. Lay out several pieces with the groove side facing right.
NOTE: When installing Marmoleum Cinch LOC Seal panels, the joints of these pieces must
be staggered a minimum of 12”. It may be necessary to cut the first piece of the row to
create this stagger. This same stagger can be created by mixing both panels and squares
throughout the installation. Marmoleum Cinch LOC Seal squares can be installed with all
4 corners touching, or in a checkerboard pattern.
3. To ensure that all pieces are clicked together at exact 90° angles,
install a temporary piece along the front wall (parallel with the
material). Click the tongue of the first piece into the groove of the
temporary piece, allowing the temporary piece to sit halfway on the
first piece. See Figure 2. The temporary piece in the figure is the top
piece.
IMPORTANT!! The pieces must be perfectly aligned with one another.
Any variation in alignment from piece to piece can create gaps
between one row and the next.
Figure 1
Figure 2

creating better environments
Installing Marmoleum Cinch LOC Seal
Installing Marmoleum Cinch LOC Seal v1.11 02/23 Page 3 of 3
4. Place the tongue of the second piece into the groove of the temporary board at a 45° angle. See Figure 3.
5. Slide it gently to the left. Lower it into the groove of the first
piece and press it into place. You should hear a “clicking” sound when it locks into place.
6. Move the temporary board so it now sits halfway on the second piece. See Figure 4.
7. Continue these steps until the end of the row.
8. Before laying the final piece, remove the temporary board and place spacers that are 3/8” wide along the length of the front wall as well
as the left side wall.
9. Slide the entire first row so it is touching the spacers. Measure the distance from the edge of the last piece to the wall. Subtract 3/8”
and cut the final piece to fit. Be sure to cut the piece so that the cut edge will be touching the wall when it’s installed.
NOTE: If using a hand saw, the Marmoleum side must be facing upwards. If using a power saw, the direction of the blade must cut into
the Marmoleum side of the board (Marmoleum side facing downwards).
10. Move the row away from the wall and with the use of a temporary board, install the final piece to the row.
11. Carefully slide the row back to the wall and place a 3/8” spacer against the right side wall.
12. Start installing the second row to the first row as outlined above in Steps 5 – 7. The first row is used in place of the temporary piece.
13. The remainder of the room is installed following these steps. If there are any other fixed objects in the room, such as cabinets, pipes,
etc., it is important to leave a minimum of 3/8” spacer where the flooring meets these objects.
14. For the final row, be sure to leave a minimum of 3/8” spacer at all walls. The bottom groove that will be against the wall can be sawed
off if necessary.
15. For areas where there are door moldings or other obstructions that the material must slide under, remove the groove from the previous
row. Then, instead of clicking the final row into place, it will slide into place. These areas must be secured using wood glue where the
tongue and groove would meet.
NOTE: It may be necessary to cut wooden door frames to allow the flooring to be slid into place. To do this, place a loose panel against
the door frame with the Marmoleum side facing downward, and saw the frame off along the panel.
16. After the final row is in place, molding, such as a quarter round, is installed to cover the expansion perimeter around the room.
17. If for any reason you need to disassemble the floor, gently remove the final row and take the pieces apart starting from the last board
on the right.
18. The floor can be walked on immediately after installation.
For additional information, contact Forbo’s Product Support & Education Services at 1-800-842-7839 or visit www.forboflooringNA.com.
Figure 3
Figure 4
/