Page is loading ...

Technical Information: Establishing StecaGrid Portal
Release: 05.04.2016
Steca Elektronik GmbH
I
Mammostraße 1
I
87700 Memmingen
I
Germany
I
www.steca.com
Seite
1
von
7
Fon +49 (0) 8331 855
8
-
0 I Fax +49 (0) 8331 8558
-
132
Establishing StecaGrid Portal
1 Background
When the Ethernet interface of a coolcept inverter is connected to a router, the data
from the data logger of the inverter is sent directly to the StecaGrid Portal. On the
StecaGrid Portal, up to five coolcept and coolcept³ inverters can be combined to one
system. The data of the individual devices are added up and displayed as a complete
system. Subsequently, the establishment of the StecaGrid Portal is described.
2 Explanation
2.1 Registration
2.1.1 Calling up the Internet portal, entering the language and serial number
1.
Enter the following address into the Internet
browser (or click the address if you
are reading this document as a PDF on a computer monitor):
www.steca.com/portal. Ensure that scripts and cookies for
http://www.steca.com/portal are permitted in the browser.
⇒ Fig. 1 appears.
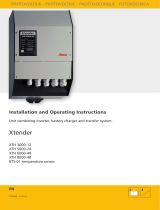
Fig. 1: Language selection and data entry form for the serial number
2.
Select your language using the buttons
①
(in
Fig
. 1
).
⇒
The language is set immediately
.
3.
Enter the serial number of
the device into the field
②
.

Technical Information: Establishing StecaGrid Portal
Release: 05.04.2016
Steca Elektronik GmbH
I
Mammostraße 1
I
87700 Memmingen
I
Germany
I
www.steca.com
Seite
2
von
7
Fon +49 (0) 8331 855
8
-
0 I Fax +49 (0) 8331 8558
-
132
Notice
• The serial number always consists of a sequence with 6
numbers – 2 letters – 12 numbers, e. g.
123456AB123456789012.
• If you enter an invalid serial number, an error message
is displayed and the login process is cancelled.
• Press the green button "+" (at the left next to the field
②
), to enter the serial numbers of further inverters (a
maximum of 5 inverters are possible).
4.
After entering the last serial number, press the button ③.
✓ Fig. 2 appears.
2.1.2 Entering the user data
Fig. 2: Data entry form for user data
NOTICE!
The email address can only be entered once and cannot be
subsequently changed! The email address is also the user name; see
also
①
in Fig. 8.
1.
Enter your email address into the field
①
(
Fig
. 2
)
.
Observe the note
④
.
2.
Enter any desired password into the field
②
and repeat the
entry of this password
in the field
③
(safety check).
3.
Confirm via the button
⑤
o
r

Technical Information: Establishing StecaGrid Portal
Release: 05.04.2016
Steca Elektronik GmbH
I
Mammostraße 1
I
87700 Memmingen
I
Germany
I
www.steca.com
Seite
3
von
7
Fon +49 (0) 8331 855
8
-
0 I Fax +49 (0) 8331 8558
-
132
use the ⑥ button to return to the previous page if necessary (entries in Fig. 2 are
discarded).
✓ After ⑥ has been pressed, Fig. 3 appears.
2.1.3 Entering system data
Fig. 3: Data entry form for the system data
1.
Enter any desired name
A)
for your solar system into the field ⑥
in Fig
. 3
.
2.
Enter the installed power
A)
of the system into the field
②
.
3.
Enter a description
A)
of the system into the field
③
. Observe the note
④
.
4.
Use the Google Maps buttons ⑥ to ⑥ to navigate to the
location of the system
.
⇒
The location data is displayed in the fields ⑥
.
5.
Enter an optional address of the system into the field ⑥
.

Technical Information: Establishing StecaGrid Portal
Release: 05.04.2016
Steca Elektronik GmbH
I
Mammostraße 1
I
87700 Memmingen
I
Germany
I
www.steca.com
Seite
4
von
7
Fon +49 (0) 8331 855
8
-
0 I Fax +49 (0) 8331 8558
-
132
6.
Select the check box ⑥
and confirm via the button ⑥
.
✓ Fig. 5 appears; an email with the same activation code as in Fig. 4 is sent to
the email address ⑥ in Fig. 2.
Fig. 4: Email with the activation code
A)
Data may be subsequently changed.
2.1.4 Completing registration
Fig. 5: Data entry form for the activation code

Technical Information: Establishing StecaGrid Portal
Release: 05.04.2016
Steca Elektronik GmbH
I
Mammostraße 1
I
87700 Memmingen
I
Germany
I
www.steca.com
Seite
5
von
7
Fon +49 (0) 8331 855
8
-
0 I Fax +49 (0) 8331 8558
-
132
1.
In field
②
in
Fig
. 5
, enter the activation code you received in the email shown in
Fig. 4.
2.
Confirm via the button
③
.
✓ After successful registration, Fig. 6 appears, and you are sent another email for
confirmation (Fig. 7). This email contains a direct link to Fig. 9.
Fig. 6: Confirmation message of successful registration
Fig. 7: Email confirming successful registration

Technical Information: Establishing StecaGrid Portal
Release: 05.04.2016
Steca Elektronik GmbH
I
Mammostraße 1
I
87700 Memmingen
I
Germany
I
www.steca.com
Seite
6
von
7
Fon +49 (0) 8331 855
8
-
0 I Fax +49 (0) 8331 8558
-
132
2.2 Login – Displaying yield data – Changing settings
1.
Enter the following address in your Internet browser:
www.solare
-
energiewende.de. Ensure that scripts and cookies for www.solare-
energiewende.de are permitted in the browser.
⇒
The home page of the Internet portal as shown in Fig
. 8
.
2.
The functions as per the legend shown in Fig.
8
.
Fig. 8: Home page of the Internet portal
①
Entry field
User name
(= email address)
②
Entry field
Password
③
Button for logging in after ⑥
and ⑥
have been entered. After logging in, the
functions as per the legend shown in Fig. 9.
④
Data entry field for the postal address of the system that is to be displayed (login
not required).
⑤
Data entry field for the name of the system that is to be displayed.
⑥
Map for searching for systems
.

Technical Information: Establishing StecaGrid Portal
Release: 05.04.2016
Steca Elektronik GmbH
I
Mammostraße 1
I
87700 Memmingen
I
Germany
I
www.steca.com
Seite
7
von
7
Fon +49 (0) 8331 855
8
-
0 I Fax +49 (0) 8331 8558
-
132
Fig. 9: Yield display
①
System data display
②
Performance data display
③
Environmentally related data display
④
Buttons for changing the
display
⑤
Yield charts display
⑥
Buttons for setting the period shown in
⑤
⑦
Button for changing the system data, as described in
2.1.3
„
Entering system
data“.
⑧
Button for selecting the language
3 Contact Steca
Steca Elektronik GmbH
Mammostrasse 1, 87700 Memmingen, Germany
Fon +49 (0) 8331 8558-833
Monday to Friday from 08:00 a.m. to 4:00 p.m.
Fax +49 (0) 8331 8558-132
service@stecasolar.com
/