Page is loading ...

SKU Number: M630214, M630215, M630216
Antibacterial Under Cabinet Light
Installation Instructions
READ AND FOLLOW ALL SAFETY INSTRUCTIONS!
SAVE THESE INSTRUCTIONS AND DELIVER TO
OWNER AFTER INSTALLATION
• To reduce the risk of death, personal injury or property
damage from fire, electric shock, falling parts,
cuts/abrasions, and other hazards please read all
warnings and instructions included with and on the
fixture box and all fixture labels.
• Before installing, servicing, or performing routine
maintenance upon this equipment, follow these
general precautions.
• Installation and service of luminaires should be
performed by a qualified licensed electrician.
• Disconnect or turn off power before installation or
servicing. Verify that supply voltage is correct by
comparing it with the luminaire label information.
• Make all electrical and grounded connections in
accordance with the National Electrical Code (NEC)
and any applicable local code requirements. All wiring
connections should be capped with UL approved
recognized wire connectors.
• Wear gloves and safety glasses at all times when
removing luminaire from carton, installing, servicing or
performing maintenance.
PACKAGING CONTENT
Before beginning installation on this product, make sure all
parts are present.
Items Included:
1. 4-ft Power cord x 1
2. 6-Inch Linkable cable x 1
3. Inline connector x 1
4. 3/8” Romex connector x1
5. Screw rubber cap x2
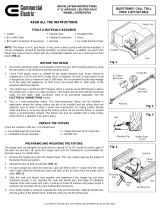
(skip this step if you are not using hardwire installation)
1. Layout where fixture(s) are to be placed, insuring that
first fixture is mounted within 4 feet of an outlet. See
Figure 1
2. Plug-in power cord to the INPUT socket. (FIG. 2)
1. Mount fixture to under cabinet or where you plan to
locate fixture. Plug power cord into wall outlet and
switch on the power from the under cabinet light.
Power Cord
2. Punch out the knockout by hammering; then remove the
screw off the compartment plate using a screwdriver (not
included).
3. Insert Romex connector into the knockout open hole on
the compartment plate cover. Secure it with the nut.
3. Pull 3 wires out of the fixture to allow connection to the
branch circuit. Uses push-in wire connectors inside the
fixture to make wire connection.
Rear Compartment
Wall socket
PowerCord
Method A - Plug-In Installation
Method B - Hardwired Installation via Rear
Compartment
Knockout
Romex
connector
Compartment
plate
Nut
Push-in wire
connectors
Compartment
plate
1. The rear access door is located in the middle of the back
of housing has its own knockout for quick connection.
• Black to Black/Hot
• White to White/Neutral
• Yellow/Green stripe <Ground> to bare wire)
4. Feed wires back into fixture, reattach plate cover,
tighten screw, and attach the fixture to the base
of the cabinet, with screws

1. Open wiring compartment by removing screws at
each end and lifting cover for housing body.
2. Punch out whichever knockout is best suited for
connection to 120V lines wires. Knockouts are
located along back and top of housing.
3. Install cable connector and connect fixture wires
following National Electric Code and/or local
building cord requirements. Use minimum 18AWG
solid copper wires. AC supply should be 120V
protected by circuit breaker or fuse.
4. Attach line voltage AC supply wires to fixture lead
wires: Black to Black/Hot, White to White/Neutral
and Yellow/Green (Ground) to Green or bare wire
inside the fixture. Secure each connection using
push-in wire connectors provided on the fixture
lead wire. If your system has no ground wire,
consult a qualified electrician before proceeding
with the installation. Note: Electric shock,
overheating, low or no light output and shortened
fixture life can result if proper grounding is not
done.
5. Replace the wiring compartment cover, securing
with the existing retaining screws. Note: Be sure
that the wires are not pinched or damaged by any
part of the housing or the cover.
6. Follow directions on reverse for mounting fixture.
Linking up multiple Under Cabinet Light Fixtures
Connect multiple fixtures using Inline connector (included)
or 6-inch Link cable (included). Do not exceed max. of
200W per run.
Questions, problems, missing parts?
Before returning to your retailer, call our
customer service at 1-800-223-3055
Monday to Friday 8:00AM to 4:00PM PM PT
Email: [email protected]
WARRANTY INFORMATION
This product is warranted for 5 years from the date of
purchase. If this product does not perform to the
specifications supplied on this package, send
an email or write to the address below for product
return and replacement. This replacement is the sole
remedy available. Visit www.candexlighting.com for
full warranty details.
SAFE FOR HUMAN EXPOSURE
This light, emits no UV energy, abides by IEC
photobiological safety standard 62471. It causes
no harms to humans skin, eyes and pets
Tip: To keep your kitchen room away from microbial
buildup, turns on the violet blue light for 8 hours a day.
How to switch on and change normal light to
disinfection light color.
On/OffSwitch
Light Color Selector Switch
1. 2700K (Soft-white)
2. 3000K (Warm-white)
3. White Blue
(Disinfection mode)
Inline Connector
Link cable
Method C - Hardwired Installation via Opening
Diffusor Cover
This type of installation is less common – only done
when rear compartment plate is not accessible
Romex
connector
Knockouts
Inline
plug
Remove screws from each end
How to Attach the Light to the Cabinet
Position the light carefully under the cabinet, use
screw driver to tighten the two existing mounting
screws (see diagram below) until the fixture is fixed
and totally attached to the cabinet bottom.
Mounting screw
/