Epson WorkForce WF-2540WF User manual

Category
Print & Scan
Type
User manual

This manual is also suitable for

1
WF-2540
Quick Guide
Your WF-2540. . . . . . . . . . . . . . . . . . . . . . . . . . . . . . . . . . . . . . . . . . . . . . . . . . 2
Using Special Papers . . . . . . . . . . . . . . . . . . . . . . . . . . . . . . . . . . . . . . . . . . . . 4
Placing Originals for Copying, Scanning, or Faxing. . . . . . . . . . . . . . . . . . . . . . 6
Copying a Photo or Document . . . . . . . . . . . . . . . . . . . . . . . . . . . . . . . . . . . . . 8
Printing From Your Computer. . . . . . . . . . . . . . . . . . . . . . . . . . . . . . . . . . . . . . 9
Scanning a Document or Photo . . . . . . . . . . . . . . . . . . . . . . . . . . . . . . . . . . . 13
Faxing a Document. . . . . . . . . . . . . . . . . . . . . . . . . . . . . . . . . . . . . . . . . . . . . 17
Maintaining Your Product . . . . . . . . . . . . . . . . . . . . . . . . . . . . . . . . . . . . . . . . 23
Solving Problems . . . . . . . . . . . . . . . . . . . . . . . . . . . . . . . . . . . . . . . . . . . . . . 28
Notices . . . . . . . . . . . . . . . . . . . . . . . . . . . . . . . . . . . . . . . . . . . . . . . . . . . . . . 35
2 Your WF-2540
Your WF-2540
After you set up your WF-2540 (see the Start Here sheet), turn to this Quick Guide and
your online User’s Guide for instructions on using your product.
Features Where to find information
Copy, scan, and fax from the easy-to-use
control panel
See this Quick Guide for the basics.
See the online User’s Guide for details.
Wireless printing and scanning from mobile
devices with EPSON Connect
See www.epson.com/connect.
Easy Wi-Fi networking See the online User’s Guide.
High-capacity ink cartridges See this Quick Guide for installation
instructions.
Advanced paper handling with Automatic
Document Feeder
See this Quick Guide or the online
User’s Guide for paper loading instructions.
Copy files between a USB storage device and
your computer
See the online User’s Guide for details.
Using the Control Panel 3
Using the Control Panel
The control panel makes it easy to use all the features of your product. To save energy, the
screen goes dark after several minutes of inactivity. Press any button to wake it up.
Note: To turn off the “beep” heard when you press a button, press the r Copy button
to select copy mode, press x Menu, press u or d to select Printer Setup, then press
OK. Select Sound, then select Off and press OK. If you turn off the sound, the dialing
sound made when you transmit a fax is also turned off.
Number Description
1 Turn the product on or off
2 Access your product’s Fax mode
3 Access your product’s Copy mode
4 View menus and status on the LCD Screen
5 Use the arrow keys and
OK button to navigate menus
6 Enter numbers, letters, and symbols
7 Select fax dialing settings
8 Stop printing/copying/scanning/faxing or reset settings
9 View wireless network status
10 Access your product’s Scan mode
11 Display detailed settings for each mode
12 Cancel/return to the previous menu
13 Select Wi-Fi settings
14 Start printing/copying/scanning/faxing
12 3 4
10
5 6
7
8
9
11 12 13
14
4 Using Special Papers
Using Special Papers
Epson offers a wide array of high quality papers, making it easy to maximize the impact of
your photos, presentations, and creative projects.
You can purchase genuine EPSON ink and paper at EPSON
®
Supplies Central
®
at
www.epson.com/ink3 (U.S. sales) or www.epson.ca (Canadian sales). You can also
purchase supplies from an EPSON authorized reseller. To find the nearest one, call
800-GO-EPSON (800-463-7766).
Paper name Size
Part
number
Sheet
count
EPSON Bright White Paper Letter (8.5 × 11 inches
[216 × 279 mm])
S041586 500
EPSON Brochure & Flyer Paper Matte
Double-sided
Letter (8.5 × 11 inches
[216 × 279 mm])
S042384 150
EPSON Ultra Premium Presentation
Paper Matte
Letter (8.5 × 11 inches
[216 × 279 mm])
S041341 50
EPSON Premium Presentation Paper
Matte
8 × 10 inches (203 × 254 mm) S041467 50
Letter (8.5 × 11 inches
[216 × 279 mm])
S041257
S042180
50
100
EPSON Premium Presentation Paper
Matte Double-sided
Letter (8.5 × 11 inches
[216 × 279 mm])
S041568 50
EPSON Presentation Paper Matte Letter (8.5 × 11 inches
[216 × 279 mm])
S041062 100
Legal (8.5 × 14 inches
[216 × 356 mm])
S041067 100
EPSON Ultra Premium Photo Paper
Glossy
4 × 6 inches (102 × 152 mm) S042181
S042174
60
100
5 × 7 inches (127 × 178 mm) S041945 20
8 × 10 inches (203 × 254 mm) S041946 20
Letter (8.5 × 11 inches
[216 × 279 mm])
S042182
S042175
25
50
EPSON Premium Photo Paper
Semi-gloss
4 × 6 inches (102 × 152 mm) S041982 40
Letter (8.5 × 11 inches
[216 × 279 mm])
S041331 20
EPSON Premium Photo Paper Glossy 4 × 6 inches (102 × 152 mm) S041808
S041727
40
100
5 × 7 inches (127 × 178 mm) S041464 20
8 × 10 inches (203 × 254 mm) S041465 20
Letter (8.5 × 11 inches
[216 × 279 mm])
S042183
S041667
25
50
Using Special Papers 5
Note: Media availability varies by country.
For detailed paper loading instructions, see the Start Here sheet or online User’s Guide.
For best results:
Fan and align the edges of the paper before loading.
Load paper against the right edge guide with the printable side faceup; it is usually
whiter or brighter. (Load letterhead or pre-printed paper top edge first.)
Always load paper short edge first and make sure the left edge guide is against the
paper as shown.
If you use paper with binder holes, only use letter-, A4-, or legal-size and load only
one sheet at a time.
EPSON Photo Paper Glossy 4 × 6 inches (102 × 152 mm) S041809
S042038
50
100
Letter (8.5 × 11 inches
[216 × 279 mm])
S041141
S041649
S041271
20
50
100
EPSON Photo Quality Self-adhesive
Sheets
A4 (8.3 × 11.7 inches
[210 × 297 mm])
S041106 10
EPSON Iron-on Cool Peel Transfer
paper
Letter (8.5 × 11 inches
[216 × 279 mm])
S041153 10
Paper name Size
Part
number
Sheet
count
6 Placing Originals for Copying, Scanning, or Faxing
Placing Originals for Copying,
Scanning, or Faxing
Before you copy, scan, or fax, place your documents on the scanner glass or in the
Automatic Document Feeder (ADF). Place photos on the scanner glass only and not in the
ADF.
Using the Scanner Glass
You can place a photo or a document up to letter-size (or A4-size) on the scanner glass.
1. Raise the document cover.
2. Place your original facedown on the front right corner of the scanner glass, with the
top of your original against the right side.
3. Close the cover gently so you dont move your original.
Using the Automatic Document Feeder 7
Using the Automatic Document Feeder
You can place up to 30 sheets of letter- or A4-size paper or 10 sheets of legal-size paper at a
time. Load only plain paper in the ADF.
1. Move the edge guide outward.
2. Fan the originals, then tap them on a flat surface to even the edges.
3. Insert the originals faceup, top edge first. The
ADF light on the control panel turns
on.
4. Slide the edge guide against the originals, but not too tightly.
8 Copying a Photo or Document
Copying a Photo or Document
Follow the steps in this section to copy black-and-white or color documents.
If you use the Automatic Document Feeder (ADF), you can copy up to 30 sheets of letter-
or A4-size paper or 10 sheets of legal-size paper at a time. Load only plain paper in the
ADF.
1. Load paper in the sheet feeder.
2. Place your original document on the scanner glass, or load your documents in the
ADF (see page 6).
3. Press the r
Copy button.
4. Press u or d or use the numeric keypad to select the number of copies you want (up
to 99).
5. Press l or r to change the copy density (lightness or darkness).
6. To change the layout, press x
Menu, press u or d to select Paper and Copy
Settings
, press OK, press u or d to select Layout, then press OK again.
7. Press u or d to select
With Border to leave a small margin around the image or
Borderless (when copying photos onto photo paper) to expand the image all the way
to the edge of the paper (slight cropping may occur). Then press
OK.
8. To change paper type, paper size, or any other print settings, press u or d to select the
setting, then press
OK. Press u or d to select an option, then press OK. If you are
copying legal-size documents on to letter-size paper, select
Reduce/Enlarge, then
select
Legal->Letter.
Note: Not all Paper Type, Paper Size, Layout, and Quality settings may be available
depending on the options you choose. See the online User’s Guide for details.
To clear copy settings, press
y Stop/Reset.
9. After you finish selecting settings, press x Menu to exit the settings menu.
10. Press the
B&W or Color x Start button to begin copying. To cancel copying, press
y
Stop/Reset.
Printing From Your Computer 9
Printing From Your Computer
This section describes the basic steps for printing from a Windows
®
or Mac computer. For
detailed instructions on printing, see the online User’s Guide.
Printing in Windows
1. Select the print command in your application.
2. Make sure your EPSON product is selected, then click the
Preferences or
Properties button.
(If you see a
Setup, Printer, or Options button, click it. Then click Preferences or
Properties on the next screen.)
Click here to open
your printer software
Select your EPSON
product
10 Printing in Windows
3. On the Main tab, select the basic print settings. Make sure you choose the correct
Paper Type setting for the paper you are using (see page 12 for details).
Tip: For quick access to the most common settings, select one of the Printing
Presets on the left side of the screen. You can delete these presets or create your
own by clicking the
Add/Remove Presets button.
4. For more printing options, click the More Options tab.
Note: For more information about print settings, click Help or see your online
User’s Guide.
5. Click OK to save your settings.
6. Click
OK or Print to start printing.
Click here
for quick
access to
preselected
settings
Select your
Document Size
Click here for
2-Sided Printing
Select your
Paper Type
Printing With a Mac 11
Printing With a Mac
Follow the steps below to print from Mac OS X.
1. Open the
File menu and select Print.
2. Select your EPSON product as the
Printer setting.
3. Click the arrow or
Show Details to expand the print window, if necessary.
4. Select basic copy and page settings. For borderless printing, choose a
Paper Size
setting with a
Borderless option. You can also select a custom setting to create a
custom paper size.
Note: If the setting you want isn’t shown (for example, Scale), check for it in your
application before printing. Or select your application from the pop-up menu in this
window and check if the setting is available.
Select your EPSON product
Copy and page
settings
Application
settings
Pop-up menu
12 Selecting the Correct Paper Type
5. Choose Print Settings from the pop-up menu, and select the following print settings:
6. Choose any other printing options you may need from the pop-up menu. See the
online User’s Guide for details.
7. Click
Print.
8. To monitor your print job, click the printer icon in the Dock.
Selecting the Correct Paper Type
Select the correct Paper Type (Windows) or Media Type (Mac OS X) setting in your
printer software so the ink coverage can be adjusted accordingly.
For this paper/media Select this setting
Plain paper
EPSON Bright White Paper
EPSON Presentation Paper Matte
EPSON Photo Quality Self-adhesive Sheets
EPSON Iron-on Cool Peel Transfer paper
Plain Paper/Bright White Paper
EPSON Ultra Premium Photo Paper Glossy Ultra Premium Photo Paper Glossy
EPSON Premium Photo Paper Glossy Premium Photo Paper Glossy
EPSON Photo Paper Glossy Photo Paper Glossy
EPSON Premium Photo Paper Semi-gloss Premium Photo Paper Semi-Gloss
EPSON Premium Presentation Paper Matte
Double-sided
EPSON Ultra Premium Presentation Paper Matte
EPSON Brochure & Flyer Paper Matte Double-sided
Premium Presentation Paper Matte
Envelopes Envelope
Choose Print Settings
Select your Media Type
(see below)
Select higher quality or faster
printing (if available)
Scanning a Document or Photo 13
Scanning a Document or
Photo
You can use your product to scan original documents and photos and save them on your
computer.
Note: For detailed scanning instructions, see the online User’s Guide.
Quick Scanning With the Scan Button
Use the u Scan button to quickly scan a document or photo and save it on your
computer. You can even scan a photo and have it automatically included in an email
message.
1. Place your original document or photo as shown on page 6.
2. Press the u
Scan button.
3. Press u or d to select one of the following options, then press
OK.
Scan to USB Device automatically scans a document or photo and saves it to an
inserted USB storage device.
Scan to Cloud lets you send your scanned files to a destination that you have
registered with EPSON Connect.
Scan to PC automatically creates a JPG image and saves it to your computer;
ideal for scanning photos.
Scan to PC (PDF) automatically creates a PDF file and saves it to your computer;
ideal for scanning documents.
Scan to PC (Email) automatically scans a photo, resizes it, launches your email
application, and attaches a JPG image to a new outgoing message. This works
with MAPI-type email such as Microsoft
®
Outlook or Windows Live Mail, but
not web-based email such as Gmail.
Scan to PC (WSD) lets you manage network scanning in Windows 7 or
Windows Vista
®
(English only). To use this feature, you must first set up WSD
(Web Services for Devices) on the computer you want to scan to.
14 Scanning With EPSON Scan Software
4. Do one of the following:
If youre scanning to a USB storage device, select your scan settings, then press
the
B&W or Color x Start button to begin scanning.
If youre scanning to the cloud, select your destination, then press the B&W or
Color x Start button to begin scanning.
If youre scanning to your computer, select USB Connection if your product is
connected by a USB cable, or select the name of your computer if your product is
connected over a network. Then press the
Color x Start button to begin
scanning.
Scanning With EPSON Scan Software
You can scan original documents and photos and save them as files on your computer
using the EPSON Scan software. You can also launch EPSON Scan from any TWAIN-
compliant application.
Note: For Mac OS X 10.6/10.7, see “Scanning With Mac OS X 10.6/10.7” on page 15.
1. Place your original document or photo as shown on page 6.
2. Do one of the following to start EPSON Scan:
Windows: Double-click the EPSON Scan icon on your desktop.
Mac OS X 10.5: Double-click EPSON Scan in Applications > Epson
Software.
To scan from an application, start your application. Then open the File menu,
choose
Import or Acquire, and select your product.
Scanning With Mac OS X 10.6/10.7 15
EPSON Scan opens in Office Mode the first time you use it. (You can change the
scan mode using the Mode selector in the upper right corner.)
Note: You cannot use Home mode to scan with the Automatic Document Feeder.
3. Click Scan. The image is scanned and you see its icon in the folder you have selected.
Scanning With Mac OS X 10.6/10.7
You can scan original documents and photos and save them as files on your computer.
1. Place your original document or photo as shown on page 6.
2. Open an image editing application such as Image Capture and select your product
from the DEVICES or SHARED list, if necessary.
3. In the Mode pop-up menu, select the setting indicating where you placed your
original.
4. If you would like to select scan settings, such as Color Restoration and file save
settings, click
Show Details.
Click here to change
the scan mode
16 Scanning With Mac OS X 10.6/10.7
5. In the Scan To pop-up menu, select the folder in which you want to save your image.
6. Click
Scan to begin scanning. Your image is saved to the folder you selected.
Note: With Mac OS X 10.6 or 10.7, in addition to scanning with Image Capture, you can
download and install EPSON Scan scanning software. EPSON Scan provides additional
image adjustment and photo correction features for enhancing scanned images, and
provides an interface for TWAIN-compliant OCR scanning software, such as ABBYY
®
FineReader
®
. To download EPSON Scan, visit Epson’s driver download site
epson.com/support (U.S.) or epson.ca/support (Canada).
Faxing a Document 17
Faxing a Document
Your product lets you send faxes by entering fax numbers or selecting entries from a speed
dial or group dial list. If you use the Automatic Document Feeder (ADF), you can fax up
to 30 sheets of letter- or A4-size paper or 10 sheets of legal-size paper at a time. Load only
plain paper in the ADF.
Note: You can also send or receive a fax from your computer using the Epson FAX
Utility. For more information, see the online User’s Guide.
Breakdown or repair of this product may cause loss of fax data and settings. Epson is
not responsible for backing up or recovering data and settings during or after the
warranty period. We recommend that you make your own backup or print out your fax
data and settings.
This product allows you to store names, telephone numbers, and fax data in its
memory even when the power is turned off. Use the following procedure to erase the
memory if you give away or dispose of the product: Select
x Menu > Restore Default
Settings
> All Settings.This procedure will erase all of your network settings and fax
data.
Connecting a Phone or Answering Machine
1. Connect the phone cable from the wall jack to
the
LINE port on the back of the product.
Note: If you’re connecting the product to a
DSL phone line, you must plug a DSL filter
into the wall jack or you won’t be able to use
the fax or telephone equipment. Contact your
DSL provider for the necessary filter.
Telephone
wall jack
18 Setting Up Fax Features
2. To use a telephone or answering machine, you
need a second phone cable. Connect one end
of the cable to the telephone or answering
machine, and connect the other end to the
EXT. port on the back of the product.
In Auto Answer mode, if the incoming call is a fax
and you pick up the phone or the answering
machine answers, the product automatically begins
receiving the fax. If the other party is a caller, the
phone can be used as normal or a message can be
left on the answering machine.
Note: Any phone or answering machine must be connected to the EXT. port for your
product to detect an incoming fax call when the phone is picked up. Epson cannot
guarantee compatibility with VoIP, cable phone systems, or fiberoptic digital services
such as FiOS™.
Setting Up Fax Features
Before sending or receiving faxes, you should create a fax header and select the number of
rings before the fax answers.
Note: To select other settings or use the Epson FAX Utility, see the online
User’s Guide.
Entering Fax Header Information
You should enter your name and phone number in the fax header before sending faxes so
that recipients can identify the origin of the fax.
Note: Some fax machines automatically reject incoming faxes that do not include
header information.
If you leave your product unplugged for a long period of time, the date and time
settings may get lost. See the online User’s Guide for instructions on resetting them.
Entering Your Sender Name
1. Press the K Fax button, then press x Menu.
2. Press u or d to select
Fax Settings, then press OK.
3. Press u or d to select
Communication, then press OK.
4. Press u or d to select
Header, then press OK.
Telephone
wall jack
Setting Up Fax Features 19
5. Press
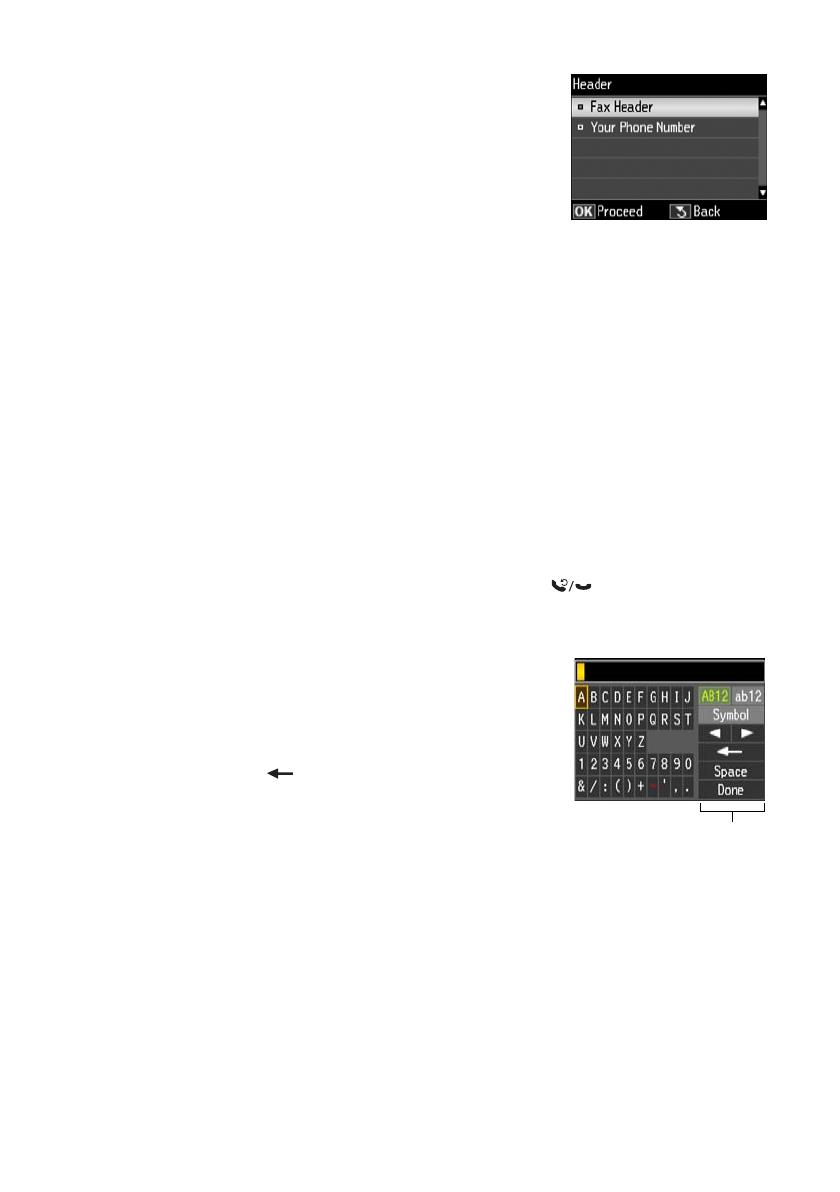
OK to select Fax Header.
6. Use the keypad to enter your sender name or other header
information (see “Using the Keypad to Enter Numbers
and Characters” below). You can enter up to 40 digits.
7. When youre done, use the arrow buttons to select
Done,
then press
OK to return to the Header screen.
Entering Your Phone Number
1. From the Header screen, press u or d to select Your Phone Number, then press OK.
You see the phone number input screen.
2. Use the numeric keypad to enter your phone number (up to 20 digits).
3. When youre done, press
OK.
4. Press x
Menu to exit the Fax Menu.
Using the Keypad to Enter Numbers and Characters
When entering phone numbers and text in Fax mode, follow these guidelines:
To enter a fax number, use the numeric keypad. Press the Redial/Pause button
to insert a pause symbol (
) when a pause is required during dialing. Press r to enter a
space or l to delete a character.
To enter characters, use the l, r, u, or d arrow buttons to
highlight a character on the screen. Press
OK to select it.
Use the on-screen function buttons to select uppercase
(
AB12), lowercase (ab12), symbols (!#%@), or spaces, or
to delete characters ( ).
When youre finished, highlight
Done and press OK.
Selecting the Number of Rings to Answer
If you connected an answering machine and it is set to pick up on the fourth ring, you
should set the product to pick up on the fifth ring or later:
1. Press the K
Fax button, then press x Menu.
2. Press u or d to select
Fax Settings, then press OK.
3. Press u or d to select
Communication, then press OK.
4. Press u or d to select
Rings to Answer, then press OK.
Function buttons
20 Sending a Fax From the Control Panel
5. Press u or d or use the numeric keypad to select the number of rings, then press OK.
Select more rings than you use for the answering machine.
6. Press x
Menu to exit the Fax Menu.
Sending a Fax From the Control Panel
You can send a fax by manually entering a fax number, as described below.
Note: To dial the number using a telephone, by redialing, or by selecting from your
speed dial list, see the next section. To send a fax from your computer using the Epson
FAX Utility, see your online User’s Guide.
1. Press the K Fax button.
2. Place your original(s) for faxing (see page 6).
3. Use the numeric keypad to enter the fax number (see “Using the Keypad to Enter
Numbers and Characters” on page 19). You can enter up to 64 digits.
4. To change fax settings, press x
Menu and select settings as necessary. When youre
done, press x
Menu again.
5. Press the
B&W or Color x Start button to send your fax. If you are prompted, select
where you placed your document (ADF or scanner glass).
Note: If the recipient’s fax machine prints only in black and white, your fax is
automatically sent in black and white even if you select color.
If you are scanning with the ADF, your document is automatically scanned and
faxed.
If you place your document on the scanner glass, you can scan additional pages
after the first one is sent.
If the fax number is busy, you see a redialing message and the product redials
after one minute. To redial immediately, press
Redial/Pause.
To cancel faxing, press y
Stop/Reset at any time.
  • Page 1 1
  • Page 2 2
  • Page 3 3
  • Page 4 4
  • Page 5 5
  • Page 6 6
  • Page 7 7
  • Page 8 8
  • Page 9 9
  • Page 10 10
  • Page 11 11
  • Page 12 12
  • Page 13 13
  • Page 14 14
  • Page 15 15
  • Page 16 16
  • Page 17 17
  • Page 18 18
  • Page 19 19
  • Page 20 20
  • Page 21 21
  • Page 22 22
  • Page 23 23
  • Page 24 24
  • Page 25 25
  • Page 26 26
  • Page 27 27
  • Page 28 28
  • Page 29 29
  • Page 30 30
  • Page 31 31
  • Page 32 32
  • Page 33 33
  • Page 34 34
  • Page 35 35
  • Page 36 36
  • Page 37 37
  • Page 38 38
  • Page 39 39
  • Page 40 40
  • Page 41 41
  • Page 42 42
  • Page 43 43
  • Page 44 44

Epson WorkForce WF-2540WF User manual

Category
Print & Scan
Type
User manual
This manual is also suitable for

Ask a question and I''ll find the answer in the document

Finding information in a document is now easier with AI