Page is loading ...

Thank you for purchasing COMMAX products.
Please carefully read this User’s Guide (in particular, precautions for safety) before using a product and follow
instructions to use a product exactly.
The company is not responsible for any safety accidents caused by abnormal operation of the product.
513-11, Sangdaewon-dong, Jungwon-gu, Seongnam-si, Gyeonggi-do, Korea
Int’l Business Dept. Tel. : +82-31-7393-540~550 Fax. : +82-31-745-2133
Web site : www.commax.com
Thank you for purchasing COMMAX products.
Please carefully read this User’s Guide (in particular, precautions for safety) before using a product and follow
instructions to use a product exactly.
The company is not responsible for any safety accidents caused by abnormal operation of the product.
Color video door phone CDV-70M
F
User Manual

1
Thank you for Purchasing COMMAX Products
Please carefully read this User,s Manual (In particular, pre cautions for safety)
before using a product and follow instructionsto use a product exactly.
Greetings
1.
Table of contents
1. Greetings ····································································· 1
2. Warnings and cautions ····················································· 2
3. Part names ··································································· 4
4. How to use the product ···················································· 5
5. How to install ······························································· 19
6. Wiring diagram ······························································ 20
7. Package contents ·························································· 21
8. Specications ······························································· 22
9. Safe operation guide ······················································ 22

2
Please follow the things described below in order to prevent any
danger or property damage.
Warning
Caution
Prohibition.
No disassembly
No touch
Must follow strictly.
Shows plugging out the power cord
without an exception
Shows the warning and caution for an electric shock.
Shows the warning and caution for a fire.
It may cause a minor damage or injury if violated.
It may cause a serious damage or injury if
violated.
Power & Installation
Warning
Please don’t use several
products at the same time on
one power socket.
·It may cause a fire due to an
abnorma
l overheating.
Please don’t bend the power
cable excessively or it may
cause an electric shock.
·fire when using a damaged
power cable.
Please don’t handle the power
cable with a wet hand.
·It may cause an electric
shock.
Please plug out the power
cable from the socket when
not using it for a long period
of time.
·It may shorten the product
lifespan or cause a fire.
Please don’t install the
product in the place where
there is much oil, smoke or
humidity.
·It may cause an electric
shock or fire.
Please don’t install the
product with the lightening
and thunder.
·It may cause an electric
shock or fire.
Please don’t use and connect
this product with other
products with different rated
voltage
·It may cause a disorder or
fire.
When installing the product
that generates heat, please
install the product away from
the wall (10cm) for the
ventilation.
·It may cause a fire due to
the increased internal
temperature.
2.
Warnings and caution

3
Cleaning & Use
Please don’t disassemble,
repair or rebuild this product
arbitrarily (please contact the
service center if a repair is
needed.
·It may cause an electric
shock or fire.
Please plug the power cable
firmly into the inner end
·It may cause a fire.
Please hold the plug tightly
when unplugging the power
cable (a part of the copper
wire may be disconnected if
the grabbing is only made on
the cord when pulling out the
cable).
·It may cause an electric
shock or fire
When connecting the power
cables after cutting the cable,
please install the product with
power off
·It may cause an electric
shock or fire
When installing the product,
please fix it firmly while using
the wall-mounting unit and
screws.
·It may cause an injury from
the falling object.
Please be careful when using
an AC circuit breaker since
there is a possibility of an
electric shock.
When cleaning the product,
please rub it with a soft and
dry cloth after plugging out
the power cable. (Please don’t
use any chemical products
such as wax, benzene, alcohol
or cleanser.)
Please don’t drop the product
on the ground and don’t apply
a shock .
·It may cause a failure.
Please use the designated
connection cable within the
maximum calling distance
designated for the product
·It may reduce the product
performance.
Please check the use voltage
and current for the DC-only
products and use the
appropriate rectifier.
·It may cause a fire.
Please avoid direct rays of the
sun or heating devices at a
time of installation.
·It may cause a fire.
Please don
’t install the
product on an unstable place
or small support board.
·It may cause an injury if it
falls down while in use.
If an abnormal sound, burning
smell or smoke is coming out
of the product, please plug out
the power cable and contact a
service center.
·It may cause an electric
shock or fire.
Please don’t insert any
metallic or burnable materials
into the ventilation hole.
·It may cause an electric
shock or fire.
Please use only the designated
batteries for the products of
using DC power.
·It may cause an electric
shock or fire.
Cleaning & UsePower & Installation
Warning
Caution

4
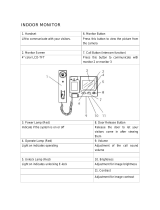
3.
Parts names
No Parts No. Parts No. Parts
1 Touch LCD 2 Speaker 3 Power LED
4 Microphone 5 Power switch 6 Micro SD card slot
7 Connection terminal

5
4.
How to use the product
4-1 Main screen
No. Menu Details
1 Monitor View the door camera
- You cannot use it if door camera is not connected
2 CCTV Monitoring CCTV
- You cannot use it if CCTV is not connected
3 Interphone Move to Interphone menu
4 Playback Move to the list of recorded images and videos
5 Security Move to Security menu.
6 Option Move to the menu ‘Options’
6 Mute Icon Indication of mute status
7 Date & Time Indication of Date and Time, Touch to move to the menu ‘Set-up’
* Cautions
- Please set up date and time before use.
. If you do not set up, some problems in saving still-cut image and video-clip might happen.

6
4-2 Monitor
- The following screen will be shown when calling from door camera or touching the
button ’Monitor'
(CCTV1 with Door1, CCTV2 with Door2 are displayed as PIP.)
(When CCTV is connected)
- Max. time : Monitoring (30 sec.), Call and Talk (60 sec.)
- If the camera is not installed, it cannot be executed.
ྙ Selected camera: Selected camera will be shown on the screen.
ྚ Date & Time: Current date and time will be indicated.
ྛ Storage (Saving) icons: Icons for motion detection and recording will be indicated.
- Details of icons
Storage format: Images / Videos (In Motion detection mode)
Storage mode: MANUAL / AUTO
SD card status: Insertion / Full memory
ྜ Split screen view: Split monitoring of door cameras is available.
It’s not available to use if there is only one camera installed.
ྜྷ Image quality adjustment: Display setting for door camera (Door camera #1, #2).
- Brightness/ Luminosity / Chroma adjustment is available after pushing the button.
- The range for adjustment is 0-20. There is a button located on the right upper for initialization.
ྞ Volume control: You can control calling tone volume and receiving tone volume.
- Push the button in order to adjust the volume.
- Volume adjustment level: Ring (0-3), Speaker (1-3)

7
ྟ Call connection: To call & answer the call.
- After call is connected, 7 & 8 buttons will be changed as follows.
Door open (No.7): To open the door.
End call (No.8): To end a call.
- When you set opening mode from 1 door to 2 doors, the door open icon will be shown as
below. (It will be applied to door1 only, and connected camera should support 2 door
opening)
Touch this icon to open the door connected with door1.
Cautions *
If you set ‘Fast mode’ in the menu option ‘Open door mode’, there will be shown the
‘Door open’ icon. In this case, it is possible to open the door without connecting the door..
ྠ Call cancellation: To cancel the call when you get a call from door or lobby.
ྡ Video-clip storage (saving): To store (save) a video-clip.
- When you touch a button, you can store a video-clip.
(When you set an auto-storage mode, a video-clip is automatically stored)
- Max 120 seconds per one storage (Call connection 60 seconds + Calling 60 seconds)
- The below icon will be shown during storage, and the remaining time will be shown on the right
upper.
- If you want to stop storage, you should touch the icon.
ྡྷ Image (Still-cut image) storage: To store (save) a still-cut image.
- When you touch a button, you can store images. And the below icon will be shown during
storage.
* Calling of v
isitor
ྙ When a visitor calls from entrance, you can hear calling tone(sound) and the visitor’s image
appears on the monitor.
- Max 60 seconds for call connection time.
- When you set an auto-storage mode, video-clip and image are automatically
Stored.
ྚ When you touch a call connection button, you can talk to a visitor. And when you touch a
door-open button, the door will be opened.
- Max 60 seconds for calling time.
- While a video-clip is being stored, you can re-store a video-clip for 60 seconds from
call-connecting moment.
- You can open the door when the screen is on. And, it is possible only when door camera is
interlocked with door release function.
- When you touch a door-open button, the below door-open icon will be shown in the
center of screen. But door-open sound will not work during video-clip and image storage.
ྛ When the other call comes from the other entrance, the current call is finished and the other call

8
is connected.
ྜ When you press a call-end button, the call is end. And the main screen will be shown.
* Calling of Interphone
ྙ In case of installing additional interphone, when a visitor calls from door camera, a calling
tone(sound) will be ringed in the interphone as well.
- Max 60 seconds for call and talk time
ྚ When you pick up the handset, it’s available to talk with door camera.
ྛ During a call, press the door open button to open the door.
(In case door camera is interlocked with door release function)
ྜ Put the handset back on and the call ends.
- The interphone call ends when the connected video phone call finished.
* PIP(Picture in Picture) function
If you touch the screen after a call comes from the individual door camera, CCTV screen is shown
as PIP in the upper left corner.(Same as Monitoring)
At this time, if you touch one of the screens, individual entrance and CCTV screen are switched
to each other.
4-3 CCTV
- When you touch a CCTV button, the below screen will be shown.
- Monitoring time is max. 60 seconds. The video-clip storage can be proceeded within
60 seconds.
- You cannot use CCTV functions if cameras are not installed.
£G CCTV sign: To show the current working CCTV.
¤G Date & Time: Current date and time will be indicated.
¥G Icon set: To show motion detection and video storage. (Monitor section for more details)
¦G CCTV screen change: To see CCTV 1 screen and CCTV 2 screen.
- You cannot use this function when only one camera is connected.
§G Video quality adjustment: To change Brightness/Light & Shade/Chroma.
(Monitor section for more details)
ྞ Video storage: To store (save) a video-clip.
- When you touch a button, the storage will be started.
- The below icon will be shown during image storage. And the remaining time will be shown
on the right upper.

9
- If you want to stop storage, you should touch the icon.
ྟ Image storage: To store (save) a still-cut image.
- When you touch a button, you can store images. And the below icon will be
shown during storage.
* Reference (Door camera and CCTV are same in the below issues.)
ྙ Video-clip cannot be stored while SD card is not inserted.
- In this case, images can be stored in the monitor’s embedded memory.
(Max 50 still-cut images).
- You can use as below when you need back-up of images which are stored in the
monitor’s embedded memory.
1) Turn off the monitor and then insert SD card. Turn on the monitor. And then the
images are automatically stored in SD card.
2) You can check the file through your computer. ([backup folder] in SD card)
3) You can check the date, storage time and information
(camera source, saving format, emergency storage).
- File name: YYYYMMDD_HHMMSS_AB.AVI or JPG
Note : The meaning of the last two digits (denoted by AB)
A : 1 - DOOR1 / 2 - DOOR2 / 3 - CCTV1 / 4 - CCTV2
B : 1 – MANUAL(manual recording)/2 – AUTO/3 - MOTION/4 - ALARM
XXXX : File numbering
ex : The meaning of the file ’20180109_045740_120001.MOV’
-> Video automatically recorded by visitors calling from door1 on January 9, 2018 at 4:57:40
ྚ The image and video-clip can be stored while SD card is inserted. The maximum storage size
depends on the capacity (storage size) of SD card.
4-4 Interphone
- When you touch the Interphone button, it calls the connected interphone and the
following screen is displayed.
ྙ Call & Talk time : To show remaining call and talk time.

10
ྚ Volume control : To control receiving volume (1-3 level).
ྛ Call end : To finish call connection and talk.
ྜ Interphone call : The interphone is called only while pressing the call button.
(A ringtone sounds only while you are pressing and holding)
4-5 Playback
- When you touch Playback button, the below screen will be shown.
- Select the image. (Selected image will be enlarged and video will be displayed.)
ྙ Page information : Current page / Total page
ྚ Move the page: ඔ : previous page / ඖ : next page
ྛ File information
:Image file, : Video file, : New file
ྜ Emergency Recording: File saved when emergency occurs by sensors.
- When 'Auto Rec' is set in Security menu, CCTV video is recorded for 10 secs when emergency
occurs.
(CCTV1 is automatically saved when sensor # 1 is detected and CCTV2 is saved by sensor # 2.
But, if there is no SD card inserted, only steel cut image is saved and the sensor need to be
connect to CCTV.)
- If visitor call is received during emergency, the video of visitor will be saved automatically
on ‘Auto Recording’ setting or also can be saved manually.
(During emergency situation, the visitor communication is restricted and only the visitor image
can be checked.)
- To verify images.
ྙ Storage source & file No.
ྚ Left/Right movement : To move the previous/next file.

11
ྛ
Date &Time : Current date and time will be indicated.
ྜ
Delete files: To delete images.
- To verify video-clip.
ྙ CD Storage source & file No.
ྚ CT Left/Right movement: To move the previous/next file.
ྛ
Playing the file: To play the current video-clip.
During playback, the icon is changed by the pause button.
ྜ
Delete the file: To delete the current playing file.
ྜྷ
Date & Time: Current date and time will be indicated.
ྞ
Video-clip time indication: The remaining time is displayed
<Note>
- Immediately after inserting SD card, the loading time depends on the number of stored file
size.
- If you press Playback button before loading completes, pop-up window will appear.
In this case, please wait a moment.
3-6. Security (Can be used with security sensor)
- Touch the Security button to display the following screen.
- Using this function, the door is detected when the sensor is connected.
< Before operation > < During Operation >
1) Before operating Security mode
Caution
Be aware of the password before proceeding.
You cannot turn off the alarm if you don’t know current password. (Factory default : 1234)
ྙ Security Sensor 1, Security Sensor 2: Select sensor to operate.
ྚ Select check box : If the sensor is selected by check box. (Turn on & Turn off)
ྛ Execute button: Activate the selected sensor. (Please note that the alarm occurs when sensor is
detected)
ྜ Emergency log : You can check emergency log. (Up to 255 log can be stored)
ྜྷ Auto recording: CCTV is automatically recorded for 10 seconds when an emergency occurs.

12
- When the function is active (red), the corresponding function is activated. (You can turn off it
by click.)
- CCTV1 is recorded in case of sensor 1 emergency, and CCTV2 is automatically recorded in case
of sensor 2.
(If there is no SD card, it will be replaced with steel cut image. If CCTV is not connected to the
sensor, it will not be recorded.)
2) During Security mode : The LED light of unit is flickering on red.
ྞ Indicates the security sensor being executed.
ྟ End the security function.
- Press the button and enter the four-digit password. (Factory default password: 1234)
- If the password is correct, the mode is turned off and the screen returns to the main screen.
(If the password is incorrect, you can not turn the mode and please progress initialization of
the device.)
<Password input screen to turn off the mode> <Sensor detected screen during security mode>
1) When security alarm occurs
- When a sensor is detected during security mode, an alarm is generated, and the sensor
number(Sensor1 or Sensor2) and the time of occurrence are displayed.
- If the emergency situation is canceled, press 'Stop' button at the bottom.
(You can turn off the alarm if the corresponding sensor is recovered to normal status.)
- When the password input window appears, enter the four-digit password using the key
buttons.
- Alarm sound occurs for 3 minutes and then only alarm screen is displayed after then.
- If an alarm occurs, it will not be possible to communicate with visitor even if the call is
received. Please turn off the alarm first.
(During the alarm occurs, the calling sound rings by the camera to indicate the emergency
situation.)
4-6 Option
- When you touch option button, the below screen will be shown.
- When you select each item, the corresponding sub item is displayed on the right.
- If you do not do any action for 30 seconds after you get in Option menu, the main screen will be
shown.

13
1) Auto recording
- To set the auto save mode. (Select between Photo / Video)
However, if there is no SD card, video mode cannot be selected.
- This function is only available when a call comes from a door camera (entrance). And you cannot
save photos and video-clip manually until the automatic saving is started.
- Selecting OFF disables the auto save function.
2) Motion detecting
- To set motion detection of the previously set camera.
- Functions of each menu are as following.
Motion detector: To set enable / disable function.
Select camera: To select camera for monitoring. (Select from Door1/2, CCTV1/2)
Storage format: To select storage method. (Select between Photo / Video)
Sensing sensitivity: To set sensitivity. (Select among High / Middle / Low)
Motion timer: To set up the timer function activation. (Motion detection activation time)
Once activated, you can set the timer, start / end time.
LCD is on for motion detection : During video recording, it shows video on LCD.
(for 10 seconds)
* Reference
- When detecting motion, the photo is saved for 1 scene and the video-clip is saved
for 10 seconds.
- The LED is flickering during the saving of the video-clip. And, when you touch the screen,
the saving is stopped.
- After saving, the front LED stops blinking, and the motion detection is started within 3
seconds.
- In the night or dark place, the LED of door camera is always on while this function is
working.
ྙ Recording

14
ྚ Volume
1) Volume
- When individual door camera (entrance) and intercom calls, you can change the calling tone and
receiving tone individually.
- You can change the calling tone from 0 (mute) to 3 level and the receiving tone from
1 to 3 level.
2) Touch sound
- To turn on / off the touch tone.
3) Interphone calling tone (sound), Door1, Door2.
- You can select calling tone of interphone and individual door camera. (Door1, Door2)
- 6 types of calling tones are available.
ྛ Save (Storage)
1) SD card format
- To initialize the SD card.
- It takes about 1 minutes for initialization. (It can be different by types of SD card).
2) File deletion
- To delete the saved images and videos.
- The time required varies depending on the file size.
* Cautions
- It is not available to receive a call while initializing SD card or deleting saved files.

15
- If you start initialization of SD card, it is not possible to stop it.
In case of inevitable ending initialization, it is necessary to start again from the beginning.
ྜ Date/Time
1) System time
- To Set-up Date and Time.
- The changed time will be displayed on the main screen afterward.
ྜྷ Display
1) Display adjustment
- Brightness/ Luminosity / Chroma adjustment is available as below picture.

16
(In this case, you can adjust the display of door camera.)
- The range for adjustment is 0-20 level. There is a button located on the right upper
for initialization.
2) Enter standby mode
- Various standby modes can be set.
LCD OFF(After 30sec) : To set screen off function when entering standby mode
(Activated in 30 seconds after setting)
Open Frame : Enable the Openframe mode while entering standby mode
* Caution : If motion detection function is activated, this function does not work.
- Open Frame Time : You can set the usage time of the wallpaper frame function.
- Night mode : The brightness of the screen is minimized during the set time.
- List of display :
Set which screen to be displayed when the wallpaper frame function is applied.

17
- Image of background :
Set the background image to use when applying the wallpaper frame function.
-No background image : The selected screen is displayed without background images.
-Basic image : The background is set randomly among the images stored
in the internal memory.
-User image : To select up to 6 images stored in the SD card for a background image.
*
Reference
- You can select images if you save images in Wallpaper folder.
(Wallpaper folder is automatically created when the SD care is inserted and powered on)
- Available image - Size : 1920 x 1080, Format : JPG
3) Display panel cleaning mode
- When selecting ‘Cleaning mode’, the touch screen is deactivated for 30 seconds.
(You cannot stop this function until it is finished.)
4) Display
- Set the brightness of the menu screen.
ྜྷ Etc
1) Language

18
- To select the languages.(8 languages.)
ଛ˯ߪ
English le français
русский español
丏丏⇢₼㠖
Język polski Türkçe
2) Door-opening method
- To set up door-opening method.
Standard: To open the door during/after the calling.
Fast: To open the door before the calling.
(You do not need to make a call connection to open the door)
3) Opening mode of the door 1
- You can set 2 door mode for the door1 camera.
(In case the door camera supports 2 door mode)
4) Security password
- Set the password (4 digits) to be used to disable the security mode or to dismiss the alarm
- You cannot use 0000, 1234, 4321 as a password.
1. Enter password :
Press the button and enter the four-digit password in order using the number key generated.
(Initial value: 1234)
(If you lose the password you are using, you can restore to the default value [1234] by executint
System reset)
,
2. Password reset: If the password is correct, the corresponding input window will be generated.
- New password: Enter the new password.
- Confirm password: Press the new password again.
(This is to prevent the wrong password being entered)
3. If the two passwords are different, an alert window will appear. Please input again
4. If they are same, the 'apply' button will be activated. Pressing the button will change the
password.
* If you do not want to change during the input, please click the 'X' tab in the top left corner
4) System reset
- To proceed with initialization.
5) Version
- To di
splay the current program version.
* Reference (SD card information)
1) Available SD card
- SDHC / SDXC: MAX 256 GBytes (Class 10 or higher)
2) FORMAT (File system) method: FAT32 (Boot the product after inserting a formatted SD card
at first use)
3) Maximum storage capacity
- When SD Memory Card is not connected: Only 50 images can be saved (Embeded memory)
- When connected to SD card: Can store up to 10000 images / movies
(However, if the storage file size is large, the maximum quantity may be reduced)
Micro SD Card
Capacity 8GBytes 64GBytes 256GBytes(MAX)
Video
(Max 120 secs)
80 Cuts
700 Cuts 2800 Cuts
<Number of movies can be saved by 120 seconds VIDEO >
* Cautions for using Micro SDHC Cards
1) Please do not turn on/off and insert/remove Micro SDHC card during playing, saving or
formatting and so on. It might cause malfunction and damage products.

19
2) When the saving capacity of Image is over, then it automatically deletes the oldest Image and
saving the newest Image instead.
3) The saving capacity of video-clip may vary depending on the environment being stored.
4) If memory is full, when you are saving old files may be deleted.
(Please back up your data when FULL icon is displayed.)
5) If you use a bad Micro SDHC card, you may experience problems with your product.
Note
- Avoid installing the product in the area of direct sunlight.
- The position of the unit's body should fit the standard height range.
(Recommended height range is 1450 ~ 1500mm)
- Avoid installing the product exposed to gas exposure, magnetic force, in humid
temperatures, as it may damage the condition and performance of the product.
5.
How to install
/