Page is loading ...

7777 Winn Road
Spring Grove, Illinois 60081
www.intermatic.com
IDIGITAL — 24-Hour Digital Time Switch
MODEL DT104
Clear Mem
Clear Entry
BATTERY
MODE
RESET
ENTER
NEXT
+
ON/
OFF
ON/
OFF
-
DT104
SAFETY SECTION
WARNING
Risk of Fire or Electrical Shock
• Disconnect power at the circuit breaker(s) or disconnect switch(es) before installing or servicing.
• Installation and/or wiring must be in accordance with national and local electrical code requirements.
• This enclosure does not provide grounding between conduit connections. When metallic conduit is used, you must also install grounding type bushings and jumper wire.
• Use #14-#12 AWG wires, rated at least 75°C (167°F)-COPPER conductors ONLY.
• If the power disconnect point is out of sight, lock it in the OFF position and tag it to prevent unexpected application power.
• Make sure there is no wire insulation under the terminal plate on the time switch connector. Firmly tighten terminal screws.
• Do not remove insulator that is covering terminals.
• KEEP DOOR CLOSED AT ALL TIMES when not servicing.
NOTICE
• Do NOT touch circuit board components. Contact can create a static discharge, which can damage the microprocessor.
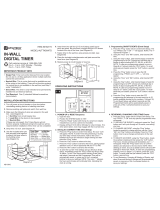
PRODUCT DESCRIPTION
The Intermatic DT104 Digital 24-Hour Time Switch automatically switches loads to a preset daily schedule with to-the-minute
accuracy. Use the DT104 as an ON/OFF timer in applications requiring 24-hour load control such as lighting, air conditioning
systems, pumps, etc. Each load output of the Time Switch can support up to 14 timed ON and 14 timed OFF events per day.
The program can be overridden by pushing the ON/OFF load override button(s). The DT104 Time Switch is designed to directly
switch tungsten or ballast loads up to its rating, and inductive or resistive loads up to 20 A at 120, 208, 240 or 277 VAC.
Specications
Time Switch
• Input Voltage: 120–277 VAC, 60 Hz
• Power Consumption: 6.0 W Max.
• Contact Configuration: 2xSPST or 1xDPST
Switch Ratings
• 20 A Inductive/Resistive, 120/240 VAC
• 20 A Magnetic Ballast, 120-277 VAC
• 1 A Electronic Ballast, 120-277 VAC
• 20 A Resistive, 28 VDC
• 5 A Tungsten: 120/240 VAC
• 1 HP, 120 VAC
• 2 HP, 240 VAC
Set Points (Events)
• The load output of the Time Switch can support up to
14 timed ON and 14 timed OFF events per day.
Battery-Powered Clock Operation
• 3 year minimum (uses two AAA industrial-grade
alkaline nonrechargeable 1.5 V batteries, supplied)
Minimum ON or OFF time
• 1 minute
Maximum ON or OFF time
• 23 hours, 59 minutes
Shipping Weight
• 2.5 lb. (1.1 kg)
Enclosures
• TYPE 1 indoor metal enclosure
Knockouts
• Combination 1/2-3/4" size (one on back, one on each
side, two on bottom)
Wire Size
• #14-#12 AWG

2
IDIGITAL — 24-Hour Digital Time Switch
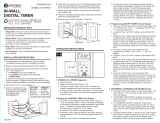
INSTALLATION
Preparing the Time Switch
1. Remove the mechanism from the case by depressing
the catch at the top of the case and pulling out, as
shown in FIG.1.
2. Set the voltage selector for the desired input voltage.
The Time Switch is shipped with voltage set for 277
VAC. To operate at 120, 208 or 240 VAC, move the
selector switch to the desired setting as marked
on the circuit board. See FIG.2.
3. The timer is shipped with DST (Daylight Saving Time)
enabled. To disable DST, move the jumper from Spare
to DST. See FIG.2.
4. Decide whether you want to control multiple loads
simultaneously (SIM), independently (IND), or with a
2-second pulse (PUL) (e.g., for use with mechanically
held contactors or bell ringing applications), and make
sure the jumper is positioned accordingly. See location
B in Rear View above and detail at the right. See FIG.2.
(The unit is shipped with the loads set for IND.)
5. Choose and remove the selected knockout(s) from the
enclosure.
Note: There are five 1/2" to 3/4" combination knockouts
available. There are two on the bottom of the
enclosure, one on each side, and one on the rear.
If a 3/4" knockout is needed, remove the 1/2"
knockout first, then the 3/4" knockout.
Mounting the Time Switch
1. Mount the enclosure in the desired location using the
three mounting holes provided. Position at eye level if
possible, providing space to the left of the enclosure for
the cover to swing open. See FIG.3.
2. Replace the mechanism in the enclosure.
Connecting the Wires
1. Lift the left side of the plastic insulator off the retaining
post and pivot it up and away to expose the terminal
strip. See FIG.4.
2. Strip the supply and load wires to 1/2". Use #14-#12
AWG wires, rated at least 75°C (167°F)-COPPER
conductors ONLY.
3. Insert wire ends under proper terminals and tighten
screws to 10.5 lbf-in. See FIG.5a through FIG.5d
4. Connect the ground wire to the grounding terminal at
the bottom of the enclosure. See FIG.4.
5. Replace the plastic insulator on the retaining post.
Note: If the Time Switch is being powered from a different
circuit than the load, you do not need to install the
jumper wire. If the Time Switch is being powered from
the same circuit as the load, install the jumperwire.
Clear Mem
Clear Entry
BATTERY
MODE
RESET
ENTER
NEXT
+
ON/
OFF
ON/
OFF
-
DT104
FIG.1 Removing the Mechanism
PUL
SIM
IND
DST
Spare
120V
208V
240V
277V
Back of Timer
Mechanism
FIG.2 Setting the Voltage, DST, and SIM/IND/PUL
Mounting Hole
FIG.3 Enclosure Mounting Holes
ON /
OFF
ON /
OFF
Clear Mem Clear Entry
BATTERY
MODE
RESET
+
–
ENTER
NEXT
Clear Mem Clear Entry
BATTERY
MODE
RESET
+
–
ENTER
NEXT
ON /
OFF
ON /
OFF
Wire
Terminal
Plastic
Insulator
Ground
Terminal
FIG.4 Plastic Insulator and Wire Terminals
L2/N
Line 1
123456
Timer Power
ON OFF
Install jumper only if timer input
and load voltage are the same
120/208/240/277 VAC Input
L2/N
Line 1
123456
Timer Power
Load
1
Load
2
120/208/240/277 VAC Input
L2/N
Line 1
123456
Timer Power
Load
1
Load
2
120/208/240/277 VAC Input
Line 2
Line 2
Line 1
Line 1
123456
Timer Power
Load
Install jumper only if timer input
and load voltage are the same
240 VAC Input
FIG.5a DT104 configured for pulse SPST load with jumper set to PUL

3
IDIGITAL — 24-Hour Digital Time Switch
L2/N
Line 1
123456
Timer Power
ON OFF
Install jumper only if timer input
and load voltage are the same
120/208/240/277 VAC Input
L2/N
Line 1
123456
Timer Power
Load
1
Load
2
120/208/240/277 VAC Input
L2/N
Line 1
123456
Timer Power
Load
1
Load
2
120/208/240/277 VAC Input
Line 2
Line 2
Line 1
Line 1
123456
Timer Power
Load
Install jumper only if timer input
and load voltage are the same
240 VAC Input
Line
1
Line
2
Line
1
Line
2
FIG. 5b
DT104 configured for 2 SPST
loads with jumper set to IND
L2/N
Line 1
123456
Timer Power
ON OFF
Install jumper only if timer input
and load voltage are the same
120/208/240/277 VAC Input
L2/N
Line 1
123456
Timer Power
Load
1
Load
2
120/208/240/277 VAC Input
L2/N
Line 1
123456
Timer Power
Load
1
Load
2
120/208/240/277 VAC Input
Line 2
Line 2
Line 1
Line 1
123456
Timer Power
Load
Install jumper only if timer input
and load voltage are the same
240 VAC Input
FIG. 5c DT104 configured for 240VAC DPST
load with jumper set to SIM
L2/N
Line 1
123456
Timer Power
ON OFF
Install jumper only if timer input
and load voltage are the same
120/208/240/277 VAC Input
L2/N
Line 1
123456
Timer Power
Load
1
Load
2
120/208/240/277 VAC Input
L2/N
Line 1
123456
Timer Power
Load
1
Load
2
120/208/240/277 VAC Input
Line 2
Line 2
Line 1
Line 1
123456
Timer Power
Load
Install jumper only if timer input
and load voltage are the same
240 VAC Input
Line
1
Line
2
Line
1
Line
2
FIG. 5d DT104 configured for DPST loads with
jumper set to SIM
Powering the Time Switch
1. Remove the battery case by sliding it down as shown
by the arrows, then install two AAA alkaline batteries.
Make sure the batteries are pointing in the direction
shown in FIG.6.
Note: Replace batteries every 2-3 years with two AAA
industrial-grade alkaline nonrechargeable 1.5 V
batteries. You do not need to remove the Time
Switch or field wiring in order to replace the
batteries.
2. Verify that the display is ON to make sure the batteries
are OK. If the display shows scrambled information,
press the RESET button to clear it up.
3. Apply power to the Time Switch.
Proceed to the Initial Setup section.
Note: You must reset the Time Switch using this procedure
whenever you change the jumpers described in
FIG.2 (SIM/IND/PUL or DST). To reset the Time
Switch, press and hold the ENTER button, then
press the RESET button. The screen will flash 12:00
AM, and the Time Switch status is Manual Mode.
Clear Mem Clear Entry
BATTERY
MODE
RESET
+
–
ENTER
NEXT
ON /
OFF
ON /
OFF
1.5 V
AAA BATTERY
1.5 V
AAA BATTERY
Battery Cover
FIG.6 Inserting the Batteries
INITIAL SETUP
Overview
Upon first use, you must set the Date and Time before you can program any other settings.
If you make a mistake during any of the programming steps,
press the MODE button to cycle through the Time Switch
menus until you locate the error and then correct the entry.
Setting the Date
1. Press the MODE button repeatedly until the words
SET and DATE appear in the upper area of the display.
SeeFIG.7.
2. Press the + or – buttons to enter the current Month.
3. Press the ENTER/NEXT button to save the month.
4. Repeat steps 2 and 3 to set the Date and Year.
5. Press the MODE button to exit and advance to the
Setting the Time section.
Setting the Time
1. If necessary, press the MODE button repeatedly until
the words SET and CLOCK appear in the upper area of
the display. See FIG.8.
2. Press the + or – buttons to enter the current time.
Note: To go from AM to PM, keep pressing the + or – buttons
to cycle through the day. You can hold the + or – buttons
down for 3 seconds to make the time scroll quickly.
3. Press the MODE button to finish and proceed to the
Programming section.
Clear Mem Clear Entry
MODE
RESET
+
–
ENTER
NEXT
ON /
OFF
ON /
OFF
SET DATE
Month
Date
Year
FIG.7 Setting the Date
Clear Mem Clear Entry
MODE
RESET
+
–
ENTER
NEXT
ON /
OFF
ON /
OFF
SET
AM
PM
CLOCK
Time
FIG.8 Setting the Time

4
IDIGITAL — 24-Hour Digital Time Switch
PROGRAMMING
Setting On/Off Events
1. If necessary, press the MODE button repeatedly until
the words SET ON/OFF EVENTS and EVENT 01 (or
next available event number) appear on the display.
SeeFIG.9.
2. Press the ENTER/NEXT button to display ON @ or
OFF @ (depending on what you want to set).
3. Press the + or – buttons to enter the time you want to set
for your ON and OFF times.
Note: To go from AM to PM, keep pressing the + or –
buttons to cycle through the day. You can hold the
+ or – buttons down for 3 seconds to make the time
scroll quickly.
Clear Mem Clear Entry
MODE
RESET
+
–
ENTER
NEXT
ON /
OFF
ON /
OFF
AM
SET
LOAD 1LOAD 2
EVENT #ON/OFF EVENTS
ON @
OFF @
Event
FIG.9 Setting On/Off Events
4. When you have set the event correctly, you have two choices:
– Press the ENTER/NEXT button to set the next ON/OFF event (up to 28 events).
– Press the MODE button to exit.
OPTIONAL – Deleting (Clearing) an Event
1. Press the MODE button repeatedly until the words SET ON/OFF EVENTS display.
2. Press the ENTER button as necessary to cycle through events that have been set until you see the event you want to
delete.
3. Press the + or – buttons AT THE SAME TIME to display --:--.
4. Press the MODE button to exit.
OPERATION
Operating the Time Switch
Press the MODE button repeatedly to select the desired operating mode on the display. There are two options:
• AUTO—Sets the Time Switch to turn circuits ON and OFF using the programmed time(s).
Note: Press the ON/OFF button to override programmed events and manually turn the Time Switch ON/OFF.
• MANUAL—Disables Time Switch events and the circuit using the ON/OFF button.
Edit/Review Programmed Events
Press the MODE button repeatedly to reach the desired menu. Then follow the relevant instructions in this sheet.
LIMITED ONE-YEAR WARRANTY
This warranty is extended to the original household purchaser only and is not transferable. This warranty does not apply to: (a) damage to
units caused by accident, dropping or abuse in handling, acts of God or any negligent use; (b) units which have been subject to unauthorized
repair, opened, taken apart or otherwise modified; (c) units not used in accordance with instructions; (d) damages exceeding the cost of
the product; (e) sealed lamps and/or lamp bulbs, LED’s and batteries; (f) the finish on any portion of the product, such as surface and/or
weathering, as this is considered normal wear and tear; (g) transit damage, initial installation costs, removal costs or reinstallation costs.
INTERMATIC INCORPORATED WILL NOT BE LIABLE FOR INCIDENTAL OR CONSEQUENTIAL DAMAGES. SOME STATES DO
NOT ALLOW THE EXCLUSION OR LIMITATION OF INCIDENTAL OR CONSEQUENTIAL DAMAGES, SO THE ABOVE LIMITATION
OR EXCLUSION MAY NOT APPLY TO YOU. THIS WARRANTY IS IN LIEU OF ALL OTHER EXPRESS OR IMPLIED WARRANTIES.
ALL IMPLIED WARRANTIES, INCLUDING THE WARRANTY OF MERCHANTABILITY AND THE WARRANTY OF FITNESS FOR A
PARTICULAR PURPOSE, ARE HEREBY MODIFIED TO EXIST ONLY AS CONTAINED IN THIS LIMITED WARRANTY, AND SHALL
BE OF THE SAME DURATION AS THE WARRANTY PERIOD STATED ABOVE. SOME STATES DO NOT ALLOW LIMITATIONS ON
THE DURATION OF AN IMPLIED WARRANTY, SO THE ABOVE LIMITATION MAY NOT APPLY TO YOU.
This warranty service is available by either (a) returning the product to the dealer from whom the unit was purchased or (b) completing a
warranty claim online at www.intermatic.com. This warranty is made by: Intermatic Incorporated, Customer Service 7777 Winn Rd., Spring
Grove, Illinois 60081-9698. For warranty service go to: http://www.Intermatic.com or call 815-675-7000.
/