Page is loading ...

102/237080-803H
Owner’s Manual
Operation & Care
INSTALLER: Leave this manual with party responsible for use and operation.
OWNER: Retain this manual for future reference.
Contact your dealer with questions regarding installation, operation or service.
Installation and service of this appliance should be performed by
qualified personnel. Hearth & Home Technologies recommends
HHT Factory Trained or NFI certified professionals.
If the information in these instructions is
not followed exactly, a re could result
causing property damage, personal
injury, or death.
• Donotstoreorusegasolineorotherammablevapors
andliquidsinthevicinityofthisoranyotherappliance.
• Donotoverre-Ifapplianceorchimneyconnector
glows, you are over ring. Over ring will void
yourwarranty.
• Complywithallminimumclearancestocombustibles
asspecied.Failuretocomplymaycausehousere.
NOTE: To obtain a French translation of this manual,
pleasecontactyourdealerorvisitwww.quadrare.com
REMARQUE :Pourobtenirunetraductionfrançaisede
ce manuel, s’il vous plaît contacter votre revendeur ou
visitezwww.quadrare.com
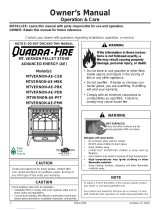
R
TREKKER FREE STANDING PELLET
APPLIANCE
MODEL(S):
TREKKER-MBK
TREKKER-PMH
TREKKER-TWL
Check building codes prior to installation.
• Installation MUST comply with local, regional, state
andnationalcodesandregulations.
• Consult local building, re ocials or authorities
having jurisdiction about restrictions, installation
inspection,andpermits.
CAUTION
WARNING
HOT SURFACES!
Glass and other surfaces are hot
duringoperationANDcooldown.Hot
glasswillcauseburns.
• Donottouchglassuntilitiscooled
• NEVERallowchildrentotouchglass
• Keepchildrenaway
• CAREFULLY SUPERVISE children in same room
asreplace.
• Alert children and adults to hazards of
hightemperatures
• High temperatures may ignite clothing or other
ammablematerials.
• Keep clothing, furniture, draperies and other
ammablematerialsaway.
WARNING
Tested and approved for wood pellets only. Burning of
anyothertypeoffuelvoidsyourwarranty.
CAUTION
For Units Post Serial # HF3156001

202/237080-803H
9.50
HOT WHILE IN OPERATION
DO NOT TOUCH, KEEP
CHILDREN, CLOTHING AND FURNITURE AWAY.
CONTACT MAY CAUSE SKIN BURNS. SEE NAMEPLATE
AND INSTRUCTIONS.
CAUTION:
CHAUD LORS DE
L'OPÉRATION. NE PAS
TOUCHER. GARDEZ LES ENFANTS ET LES
VÊTEMENTS LOIN DE L'ESPACE DÉSIGNÉ DE
L'INSTALLATION. LE CONTACT PEUT CAUSER DES
BRÛLURES À LA PEAU. VOIR L'ÉTIQUETTE ET LES
INSTRUCTIONS.
ATTENTION
:
Listed Solid Fuel Room Heater/Pellet Type. Also suitable for Mobile Home
Installation. This appliance has been tested and listed for use in Manufactured
Homes in accordance with OAR 814-23-9000 through 814-23-909.
Appareil de chauffage de combustible solide/de type de boulettes. Accepté dans
l'installation dans les maisons mobiles. Cet appareil a été testé et enregistré pour
l'usage dans les Maisons Mobiles en accord avec OAR 814-23-9000 jusqu'à
814-23-909.
PREVENT HOUSE FIRES / PRÉVENTION DES FEUX DE MAISON
Install and use only in accordance with manufacturer's installation and operating
instructions. Contact local building or fire officials about restrictions and inspection in
your area.
WARNING - FOR MOBILE HOMES: Do not install appliance in a sleeping room. An
outside combustion air inlet must be provided. The structural integrity of the mobile
home floor, ceiling and walls must be maintained. Refer to manufacturer's
instructions and local codes for precautions required for passing chimney through a
combustible wall or ceiling. Inspect and clean vent system frequently in accordance
with manufacturer's instructions. DO NOT CONNECT THIS UNIT TO A CHIMNEY
SERVING ANOTHER APPLIANCE. Use a 3" or 4" diameter type "L" or "PL" venting
system.
Installez et utilisez en accord avec les instructions d'installation et d'opération du
fabricant. Contactez le bureau de la construction ou le bureau des incendies au sujet
des restrictions et des inspections d'installation dans votre voisinage. Ne pas obstruez
l'espace en dessous de l'appareil.
AVIS - Pour Les Maisons Mobiles: Ne pas installer dans une chambre à coucher. Un
tuyau extérieur de combustion d'air doit être installé et ne doit pas être obstrué
lorsque l'appareil est en usage. La structure intégrale du plancher, du plafond et des
murs de la maison mobile doit être maintenue intacte. Référez vous aux instructions
du fabricant et des codes locaux pour les précautions requises pour passer une
cheminée à travers un mur ou un plafond combustibles, et les compensations
maximums. Inspectez et nettoyez la cheminée fréquemment. Ne pas connecter cet
appareil à une cheminée servant un autre appareil. Utilisez systèm de ventilation "L"
ou "PL" diamètre 76mm ou 102mm
Conforms to ASTM Std E1509-12. Certified to ULC S627-00. Room Heating Pellet
BurningType, (UM) 84-HUD FOR USE ONLY WITH PELLETIZED WOOD FUEL. Do
not use any other type of fuel.
Input Rating: 50,775 Btu's/hr. Electrical Rating:115 VAC, 60 Hz, Start 2.9 Amps, Run
2.45 Amps. Route power cord away from unit. Do not route cord under or in front of
appliance. Do not obstruct the space beneath the heater.
DANGER: Risk of electrical shock. Disconnect power supply before servicing.
Replace glass only with 5mm ceramic. To start, turn dial control to desired setting and
set thermostat above room temperature, the stove will light automatically. To
shutdown, turn dial control to OFF or set thermostat below room temperature. For
further instruction refer to owner's manual. Keep viewing doors tightly closed during
operation. Keep viewing and ash removal doors tightly closed during operation.
Conforme à la norme ASTM E1509-12 Std. Certifié à la norme ULC S627-00. Room
Heating Pellet Burning Type, (UM) 84-HUD POUR USAGE AVEC LES BOULETTES
DE BOIS. N’utiliser aucun autre genre de combustible.
Puissance de Rendement: 50,775 Btu's/hr. Puissance Électrique: 115 VAC, 60 Hz,
Début 2.9 Amps, Courir 2.45 Amps, Éloignez le fil électrique de l'appareil. Ne pas faire
passer le fil électrique au dessus ou en dessous de l'appareil. Ne pas bloquer
l’espace au dessous de l’appareil.
DANGER: Il y a risque de décharge électrique. Déconnectez le fil électrique de la
prise de contact avant le service. Remplacez la vitre seulement avec une vitre
céramique de 5 mm disponible chez votre fournisseur. Pour commencer, tournez la
molette de réglage à la température désirée et réglez le thermostat au-dessus de la
température ambiante, le poêle s'allumera automatiquement. Pour éteindre, tournez la
molette de réglage sur OFF ou réglez le thermostat dessous de la température
ambiante. Pour des instructions supplémentaires, référez vous au manuel du
propriétaire. Gardez la porte d'ouverture et la porte des cendres fermées
hermétiquement durant l'opération.
A
B
CD
D
MINIMUM CLEARANCES TO COMBUSTIBLE MATERIALS
ESPACES LIBRES MINIMUM DES MATÉRIAUX
A Back Wall / Mur Arrière 2 in [51 mm]
B Side Wall / Mur De Côté 6 in [152 mm]
C “L” or “PL” Pipe to Back Wall / “L” ou “PL” Un Tuyau Mur Arrière 1 in [25 mm]
D Side Wall / Mur De Côté 2 in [51 mm]
FLOOR PROTECTION / PROTECTION DU SOL
Floor protector must be non-combustible
material, extending beneath heater and to
the front/sides/rear as indicated. Measure
front distance (I) from the surface of the
glass door.
Le poêle doit être placé sur une assise non
combustible s’étendant tout autour de lui,
comme les schémas l’indiquent. Mesurez la
distance du devant (I) de la surface de la
porte vitrée.
*Non-combustible floor protection must extend 2 inches
(51mm) beneath the flue pipe when installed with horizontal
venting or under the Top Vent Adapter with vertical installation.
RECOMMENDED IN USA; REQUIRED IN CANADA.
*Un protecteur incombustible de plancher doit s'étendre 2
inches (51mm) sous le conduit de cheminée pour une
installation de ventilation horizontale ou sous un adapteur de
ventilation de dessus pour une installation verticale.
RECOMMANDÉ AUX ÉTATS-UNIS; NÉCESSAIRE AU
CANADA.
USA
G = 2 in
H* = 2 in
I = 6 in
CANADA
G = 200 mm
H* = 200 mm
I = 450 mm
G
H
I
G
7080-164F
U.S. ENVIRONMENTAL PROTECTION AGENCY
Certified to comply with 2020 particulate standards at
0.74 G/HR. Tested under ASTM E2515, ASTM E2779,
and CSA B415.1-10
DO NOT REMOVE THIS LABEL / NE PAS ENLEVER L'ÉTIQUETTE
Made in U.S.A. of US and imported parts.
Fabriqué aux États-Unis-d’Amérique par des pièces d’origine américaine et pièces importées.
2021 2022 2023 JAN FEB MAR APR MAY JUN JUL AUG SEP OCT NOV DEC
This wood heater needs periodic inspection and repair
for proper operation. Consult the owner’s manual for
further information. It is against federal regulations to
operate this wood heater in a manner inconsistent
with the operating instructions in the owner’s manual
352 Mountain House Road, Halifax, PA 17032
www.quadrafire.com
Manufactured by:Fabriqué par
Serial No. / N° de série
HF
BARCODE LABEL
REPORT #/RAPPORT #
061-S-83-2, 0061PS094E
*PTREKKER-C*
R
TREKKER Pellet Stove
A. Sample of Serial Number / Safety Label
LOCATION:BackofStove
Serial No.
Model
Name
Test Lab &
Report No.
Mfg. Date
SAMPLE
NOTE: Clearances may only be reduced by means approved by the regulatory authority having
jurisdiction
and Welcome to the Quadra-Fire Family!

302/237080-803H
TABLE OF CONTENTS
Safety Alert Key:
• DANGER!Indicatesahazardoussituationwhich,ifnotavoidedwillresultindeathorseriousinjury.
• WARNING!Indicatesahazardoussituationwhich,ifnotavoidedcouldresultindeathorseriousinjury.
• CAUTION!Indicatesahazardoussituationwhich,ifnotavoided,couldresultinminorormoderateinjury.
• NOTICE:Indicatespracticeswhichmaycausedamagetotheapplianceortoproperty.
Quadra-FireisaregisteredtrademarkofHearth&HomeTechnologies.
A.SampleofSerialNumber/SafetyLabel........... 2
B.WarrantyPolicy.............................. 4
C.QuickStartGuide............................. 6
1 Listing and Code Approvals
A.ApplianceCertication......................... 7
B.BTU&EciencySpecications .................. 7
C.GlassSpecications........................... 8
D.ElectricalRating.............................. 8
E.MobileHomeApproved........................ 8
F.SleepingRoom ............................... 8
G.California-Prop65............................ 8
2 Operating Instructions
A.FireSafety.................................. 9
B.Non-CombustibleMaterials..................... 9
C.CombustibleMaterials ......................... 9
D.FuelMaterialandFuelStorage.................. 9
E.BeforeYourFirstFire ......................... 10
F.FillingtheHopper............................ 10
G.UserDialControl ............................ 10
H.NormalStartupSequence..................... 10
I.FirepotPurge............................... 11
J.Shutdown.................................. 11
K.FireCharacteristics.......................... 11
L.GeneralOperatingofAppliance ................. 11
M.RestartingtheAppliance...................... 11
N.ClearSpace ................................ 12
O.TrimAdjustment............................. 12
P.LEDColorCodingChartandExplanation......... 13
Q.ThermostatControls......................... 14
R.ThermostatSetupOptions ..................... 14
S.ThermostatOperationInstructions............... 15
T.ThermostatTemperaturePrograms.............. 15
U.ThermostatOtherFeatures.................... 16
V.ThermostatBatteryReplacement................ 17
W.FrequentlyAskedQuestions ................... 18
3 Maintenance and Service
A.ProperShutdownProcedure................... 19
B.QuickReferenceMaintenanceChart............. 19
C.GeneralMaintenanceandCleaning............. 20
D.SootorCreosoteFireAwareness............... 23
E.HighAshFuelContentMaintenance............. 24
F.BaeRemoval .............................. 24
G.GlassReplacement .......................... 24
H.ConvectionBlowerReplacement................ 25
I.Combustion/ExhaustBlowerReplacement ......... 25
4 Troubleshooting Guide
A.GeneralAppliance........................... 26
5 Reference Materials
A.ComponentFunctions........................ 30
B.MaintenanceLog............................ 32
C.ServicePartsList............................ 33
=Containsupdatedinformation

402/237080-803H
B. Warranty Policy
Hearth & Home Technologies LLC
LIMITED LIFETIME WARRANTY
Hearth & Home Technologies LLC (“HHT”) extends the following warranty for HHT gas, wood, pellet and electric hearth appliances
(each a “Product” and collecvely, the “Product(s)”) and certain component parts set forth in the table below (“Component Part(s)”)
that are purchased from a HHT authorized dealer or distributor.
WARRANTY COVERAGE:
HHT warrants that the Products and their Component Parts will be free from defects in materials and workmanship for the applicable
period of Warranty coverage set forth in the table below (“Warranty Period”). If a Product or Component Parts are found to be
defecve in materials or workmanship during the applicable Warranty Period, HHT will, at its opon, repair the applicable Component
Part(s), replace the applicable Component Part(s), or refund the purchase price of the applicable Product(s). The maximum amount
recoverable under this Warranty is limited to the purchase price of the Product. This Warranty is transferable from the original purchaser
to subsequent owners, but the Warranty Period will not be extended in duraon or expanded in coverage for any such transfer. This
Warranty is subject to condions, exclusions, and limitaons as described below.
WARRANTY PERIOD:
Warranty coverage begins at the date of installaon. In the case of new home construcons, Warranty coverage begins on the date of
rst occupancy of the dwelling or six months aer the sale of the Product(s) by an independent, authorized HHT dealer or distributor,
whichever occurs earlier. However, the Warranty coverage shall commence no later than 24 months following the date of Product
shipment from HHT, regardless of the installaon or occupancy date.
The term “Lifeme” in the table below is dened as: 20 years from the beginning date of warranty coverage for gas appliances, and 10
years from the beginning date of warranty coverage for wood and pellet appliances. These me periods reect the minimum expected
useful lives of the designated Component Parts under normal operang condions.
Page 1 of 2
4021-645L 10/20
Component
Parts Labor Gas Pellet Wood Electric Venting Component Parts Covered by this Warranty
XAll parts except as covered by Warranty Conditions,
Warranty Exclusions, and Warranty Limitations listed
X X
Igniters, Auger Motors, Electronic Components, and
Glass
X
Electrical components limited to modules, remotes/wall
switches, valves, pilots, blowers, junction boxes, wire
harnesses, transformers and lights (excluding light bulbs)
X X Molded Refractory Panels, Glass Liners
XVent Free Burners, Vent Free Logs
X X Castings, Medallions and Baffles
6 years 3 years XCatalysts
7 years 3 years X X Manifold tubes, HHT Chimney and Terminations
10 years 1 year XBurners, logs and refractory
Limited
Lifetime 3 years XXX Firebox and heat exchanger, FlexBurn® System
(engine, inner cover, access cover and fireback)
1 Year None XXXXX All purchased replacement parts
Warranty Period HHT Manufactured Appliances and Venting
All parts including handles, external enameled
components and other material except as covered by
Warranty Conditions, Warranty Exclusions, and
Warranty Limitations listed
2 years
X1 Year X X X
2 Years
5 years 1 year
Firepots, burnpots, mechanical feeders/auger
assemblies
3 years X

502/237080-803H
WARRANTY CONDITIONS:
•
Because HHT cannot control the quality of any Products sold by unauthorized sellers, this Warranty only covers Products that are
purchased through an HHT authorized dealer or distributor unless otherwise prohibited by law; a list of HHT authorized dealers
is available on the HHT branded websites.
• This Warranty is only valid while the applicable Product remains at the site of original installaon.
• This Warranty is only valid in the country in which the HHT authorized dealer or distributor that sold the applicable Product is
authorized to sell applicable Product.
• Contact your installing distributor or dealer for Warranty service. If the installing dealer or distributor is unable to provide
necessary parts, contact the nearest HHT authorized dealer or supplier. Addional service fees may apply if you are seeking
Warranty service from a dealer other than the dealer from whom you originally purchased the applicable Product.
• No HHT consumer should bear cost of warranty service or costs incurred while servicing warranty claims (i.e., travel, gas, or
mileage) when the service is performed within the terms of this Warranty. Check with your dealer or distributor in advance for
any costs to you when arranging a warranty call. Travel and shipping charges for parts are not covered by this Warranty.
WARRANTY EXCLUSIONS:
This Warranty does not cover the following:
•
Changes in surface nishes as a result of normal use. As a heang appliance, some changes in color of interior and exterior surface
nishes may occur. This is not a aw and is not covered under the Warranty.
• Damage to printed, plated, or enameled surfaces caused by ngerprints, accidents, misuse, scratches, melted items or other
external sources and residues le on the plated surfaces from the use of abrasive cleaners or polishes.
• Repair or replacement of parts that are subject to normal wear and tear during the Warranty Period are not covered. These parts
include: paint, wood and pellet gaskets, rebricks, grates, ame guides, baeries and the discoloraon of glass.
• Minor expansion, contracon, or movement of certain parts causing noise. These condions are normal and complaints related to
this noise are not covered by this Warranty.
• Damages resulng from: (1) failure to install, operate, or maintain the applicable Product in accordance with the installaon
instrucons, operang instrucons, and lisng agent idencaon label furnished with the applicable Product; (2) failure to
install the applicable Product in accordance with local building codes; (3) shipping or improper handling; (4) improper operaon,
abuse, misuse, connued operaon with damaged, corroded or failed components, accident, or improperly/incorrectly performed
repairs; (5) environmental condions, inadequate venlaon, negave pressure, or draing caused by ghtly sealed construcons,
insucient make-up air supply, or handling devices such as exhaust fans or forced air furnaces or other such causes; (6) use of fuels
other than those specied in the operaon instrucons; (7) installaon or use of components not supplied with the applicable
Product or any other components not expressly authorized and approved by HHT; (8) modicaon of the appliance not expressly
authorized and approved by HHT in wring; and/or (9) interrupons or uctuaons of electrical power supply to the applicable
Product.
• Non-HHT venng components, hearth connecons or other accessories used in conjuncon with the applicable Product.
• Any part of a pre-exisng replace system in which an insert or a decorave gas applicable Product is installed.
•
HHT’s obligaon under this Warranty does not extend to the Product’s capability to heat the desired space. Informaon is provided
to assist the consumer and the dealer in selecng the proper Product for the applicaon. Consideraon must be given to the
Product locaon and conguraon, environmental condions, insulaon and air ghtness of the structure.
This warranty is void if:
• The applicable Product has been over-red, operated in atmospheres contaminated by chlorine, uorine, or other damaging
chemicals. Over-ring can be idened by, but not limited to, warped plates or tubes, deformaon/warping of interior cast iron
structure or components, rust colored cast iron, bubbling, cracking and discoloraon of steel or enamel nishes.
• The applicable Product is subjected to prolonged periods of dampness or condensaon.
•
There is any damage to the applicable Product due to water or weather damage which is the result of, but not limited to, improper
chimney or venng installaon.
LIMITATIONS OF REMEDIES AND LIABILITY:
• EXCEPT TO THE EXTENT PROVIDED BY LAW, HHT MAKES NO EXPRESS WARRANTIES OTHER THAN THE WARRANTY SPECIFIED
HEREIN. The owner’s exclusive remedy and HHT’s sole obligaon under this Warranty or in contract, tort or otherwise, shall be
limited to replacement of the Component Part(s), repair of the Component Part(s), or refund of the original purchase price of the
applicable Product(s), as specied above; provided, however, that (i) if HHT is unable to provide replacement of the Component
Part(s) and repair of the Component Part(s) is not commercially praccable or cannot be mely made, or (ii) the customer is
willing to accept a refund of the purchase price of the applicable Product(s), HHT may discharge all such obligaons by refunding
the purchase price of the applicable Product. In no event will HHT be liable for any incidental or consequenal damages caused
by defects in the applicable Product. Some States do not allow the exclusion or limitaon of incidental or consequenal damages,
so the above limitaon or exclusion may not apply to you. This Warranty gives you specic legal rights and you may also have
other rights which vary from State to State. THE DURATION OF ANY IMPLIED WARRANTY IS LIMITED TO DURATION OF THE
EXPRESSED WARRANTY SPECIFIED ABOVE FOR THE APPLICABLE PRODUCT. Some States do not allow limitaons on how long an
implied warranty lasts, so the above limitaon may not apply to you.
Page 2 of 2
4021-645L 10/20

602/237080-803H
April05,2021
QUICK START GUIDE
*Beforeyoupluginthisappliance,followtheseinstructions*
Prime
1. Aftertheexhaustblowerhasstopped;quicklyturnthedialfromOFFtoHItwotimes:
H
E
A
T
S
E
T
T
I
N
G
H
E
A
T
S
E
T
T
I
N
G
O
F
F
HI
LO
H
E
A
T
S
E
T
T
I
N
G
H
E
A
T
S
E
T
T
I
N
G
O
F
F
HI
LO
H
E
A
T
S
E
T
T
I
N
G
H
E
A
T
S
E
T
T
I
N
G
O
F
F
HI
LO
• TheLIGHTwillturnsolidgreenandpelletswillfeed.Waitfor2minutes
• IftheLIGHTdidnotturnsolidgreen:
- TurndialbacktoOFF
- Unplugappliance,plugitbackinandrepeat
Priming is only needed for fi rst fi re or starting fi re on empty hopper.
NOTE: The prime function is only required during initial set up of the unit, or after the unit has
alarmedoutduetoanemptyhopper.Primingwhileundernormaloperatingconditionswillcause
therepottooverll.
SetUp
1. Empty re box of
componentpacketand
anyotherdebris.
Run
1. WhilethermostatisinRUNmode,the
set temperature can be temporarily
changedbypressingUP.
2. ChooseSetting:
Light
H
E
A
T
S
E
T
T
I
N
G
H
E
A
T
S
E
T
T
I
N
G
0
-
1
-
2
-
3
-
4
+
1
+
2
+
3
+
4
O
N
A
L
A
R
M
O
F
F
HI
LO
Dial
Trim
Control Panel
*The temporarily changed set temperature
willreturntotheprogrammedvaluestoredin
memorywhenstarttimeofthenextupcoming
scheduled event is reached (MORN, DAY,
EVE,ORNITE).
**Appliance will not turn on unless target
temperatureisahighertemperaturethanthe
roomtemperature.
*For rst re, HHT
recommends running on HI
forrst30minutes
It may take as long as 10
minutes to achieve a re in
therepot.Turningthe knob
orthermostattooduringthis
time will interrupt the startup
process.
• LO–HI*
• GreenLIGHTwillbegin
ashing and stove will
start
2. Add pellets and close
lid.
3.TurnDIALtoOFF
4.Plugintheappliance
• Exhaustblowerwillrunforabout45
Seconds (wait for it to stop before
priming)
• Greenlightwillstartashing
5.Ensurethermostatisconnectedproperly
perincludedinstructions.
C. Quick Start Guide

702/237080-803H
Thispelletapplianceneedsperiodicinspectionandrepair
for proper operation. It is against federal regulations to
operatethispelletapplianceinamannerinconsistentwith
theoperatinginstructionsintheowner’smanual.
A. Appliance Certication
NOTICE:Thisinstallationmustconformwithlocalcodes.
Intheabsenceoflocalcodesyoumustcomplywiththe
ASTM E1059-12, ULC S627-00, (UM) 84-HUD and
ULC/ORD-C-1482.
B. BTU & Eciency Specications
EPA Certication Number: Number:98-17
EPA Certied Emissions: 0.74gramsperhour
*LHV Tested Eciency: 83.2%
**HHV Tested Eciency: 77.9%
***EPA BTU Output: 12,682to39,428/hr.
****BTU Input: 16,396to50,775/hr.
Vent Size: 3”or4”Type“L”or“PL”
Hopper Capacity: 80lbs.
Fuel: PremiumWoodPellets
*WeightedaverageLHV(LowHeatingValue)eciency
using data collected during EPA emissions tests in
accordancewiththerequirementsofCSAB415.1.
**WeightedaverageHHV(HighHeatingValue)eciency
using data collected during EPA emissions tests in
accordancewiththerequirementsofCSAB415.1.
***ArangeofBTUoutputscalculatedusingHHVeciency
andtheburnratesfromtheEPAtests.
****Basedonthemaximumfeedrateperhourmultiplied
byapproximately8600BTU’swhichistheaverageBTU’s
fromapoundofpellets.
1 1 Listing and Code Approvals
The Trekker is Certied to comply with
2020particulateemissionstandards.
Model: TrekkerPelletStove
Laboratory: OMNITestLaboratories,Inc.
Report No: 061-S-83-2,0061PS094E
Type: Solid Fuel Room Heater, Pellet Fuel
BurningType
Standard(s): ASTM E1509-12, ULC S627-00 and
(UM)84-HUD,MobileHomeApproved.
Can be found at:
www.quadrare.com/about-us/epa-certication

802/237080-803H
NOTE: Hearth & Home Technologies, manufacturer of
this appliance, reserves the right to alter its products,
theirspecicationsand/orpricewithoutnotice.
Improper installation, adjustment, alteration, service or
maintenancecancauseinjuryorpropertydamage.
Forassistanceoradditionalinformation,consultaqualied
installer,serviceagencyoryourdealer.
C. Glass Specications
This stove is equipped with 5mm ceramic glass. Replace
glass only with 5mm ceramic glass. Please contact your
dealerforreplacementglass.
D. Electrical Rating
115VAC,60Hz,Start2.9Amps,Run2.45Amps
E. Mobile Home Approved
• Thisapplianceisapprovedformobilehomeinstallations
when not installed in a sleeping room and when an
outsidecombustionairinletisprovided.
• Thestructuralintegrityofthemobilehomeoor,ceiling,
andwallsmustbemaintained.
• Theappliancemustbeproperlygroundedtotheframe
ofthemobilehomeanduseonlyListedpelletventClass
“L”or“PL”connectorpipe.
• OutsideAir Kit (OAK-3) must be installed in a mobile
homeinstallation.
F. Sleeping Room
Wheninstalledinasleepingroomitisrecommendedthat3ft
ofverticalbeinstalledpriortohorizontallyexitingtheroom
andasmoke/COalarmbeinstalledinthebedroom.Thesize
of the room must be at least 50ft³ per 1,000 Btu/hr stove
input, if the stove exceeds the room size, out air must be
installed.
G. California - Prop65
This product and the fuels used to operate this product (wood), and the
products of combustion of such fuels, can expose you to chemicals
including carbon black, which is known to the State of California to
cause cancer, and carbon monoxide, which is known to the State of
California to cause birth defects or other reproductive harm. For more
information go to: WWW.P65Warnings.ca.gov
WARNING
• Installationanduseofanydamagedappliance.
• Modicationoftheappliance.
• InstallationotherthanasinstructedbyHearth&
HomeTechnologies.
• Installationand/oruseofanycomponentpartnot
approvedbyHearth&HomeTechnologies.
• Operatingappliancewithoutfullyassembling
allcomponents.
• Operatingappliancewithoutlegsattached(if
suppliedwithunit).
• DoNOTOverre-Ifapplianceorchimney
connectorglows,youareoverring.
Anysuchactionthatmaycausearehazard.
WARNING
Fire Risk.
Hearth&HomeTechnologiesdisclaimsany
responsibilityfor,andthewarrantywillbe
voidedby,thefollowingactions:

902/237080-803H
Visit www.quadrare.com/shopping-tools/videos to view
productanduse&carevideos.
A. Fire Safety
To provide reasonable re safety, the following should be
givenseriousconsideration:
• Installatleastonesmokedetectoroneachoorofyour
home.
• Install at least one carbon monoxide detector on each
oorofyourhome.
• Locatesmokedetectorawayfromtheheatingappliance
andclosetothesleepingareas.
• Follow the smoke detector manufacturer’s placement
andinstallationinstructionsandmaintainregularly.
• Followthecarbonmonoxidemanufacturer’splacement
andinstallationinstructionsandmaintainregularly.
• ConvenientlylocateaClassAreextinguishertocontend
withsmallres.
• Intheeventofahopperre:
- Evacuatethehouseimmediately.
- Notifyredepartment.
B. Non-Combustible Materials
Material which will not ignite and burn, composed of any
combinationofthefollowing:
- Steel
- Plaster
- Glass
- Tile
- Brick
- Iron
- Slate
- Concrete
Materials reported as passing ASTM E 136, Standard
Test Method for Behavior of Metals, in a Vertical Tube
Furnace of 750° C.
Fire Risk.
• Donotoperateappliancebeforereading
andunderstandingoperatinginstructions.
• Failuretooperateapplianceproperlymay
causeahousere.
C. Combustible Materials
Material made of/or surfaced with any of the
followingmaterials:
- CompressedPaper
- Wood
- Plywood/OSB
- SheetRock(drywall)
- Plastic
- PlantFibers
Any material that can ignite and burn:ameproofedor
not,plasteredornon-plastered.
D. Fuel Material and Fuel Storage
Pelletfuelqualitycangreatlyuctuate.Werecommendthat
youbuyfuelinmulti-tonlotswheneverpossible.However,
wedorecommendtryingvariousbrandsbeforepurchasing
multi-tonlotstoensureyoursatisfaction.
Fuel Material
• Madefromsawdustorwoodby-products
• Dependingonthesourcematerialitmayhaveahighor
lowashcontent.
Higher Ash Content Material
• Hardwoodswithahighmineralcontent
• Fuelthatcontainsbark
• Standardgradepelletsorhighashpellets
Lower Ash Content Material
• Mostsoftwoods
• Fuelswithlowmineralcontent
• Mostpremiumgradepellets
Clinkers
Mineralsandothernon-combustiblematerialssuchassand
will turn into a hard, glass-like substance called a clinker
whenheatedintherepot.
Treesfromdierentareaswillvaryinmineralcontent.That
iswhysomefuelsproducemoreclinkersthanothers.
Moisture
Alwaysburndryfuel.Burningfuelwithhighmoisturecontent
takes heat from the fuel and tends to cool the appliance,
robbingheatfromyourhome.Damppelletfuelcanclogthe
feedsystem.
2 2 Operating Instructions
WARNING

10 02/237080-803H
F. Filling the Hopper
Openthehopperlidbyliftingthehandle.Fillthehopperwith
fuel.Closethehopperlid.Theappliancewillnotfeedwith
thehopperlidopenandtherewillgoout.
Odors and vapors released during initial operation.
• Curingofhightemperaturepaint.
• Openwindowsforaircirculation.
• Odorsmaybeirritatingtosensitiveindividuals.
Storage
• Woodpelletsshouldbeleftintheiroriginalsealedbag
untilusingtopreventmoistureabsorption
• Do not store any pellet fuel within the clearance
requirements or in an area that would hinder routine
cleaningandmaintenance.
E. Before Your First Fire
1. First, make sure your appliance has been properly
installedandthatallsafetyrequirementshavebeenmet.
Payparticularattentiontothereprotectionandventing.
2. Doublecheckthatthereboxisemptyandtherepot
oorisfullyclosed.
3. Closeandlatchthedo
Size
• Pellets are either 1/4 inch or 5/16 inch (6-8mm) in
diameter
• Lengthshouldbenomorethat1-1/2inches(38mm)
• Pellet lengths can vary from lot to lot from the same
manufacturer
• Duetolengthvariations,thefeedratemayneedadjusting
occasionally
Performance
• Higher ash content requires the re pot and the ash
drawertobeemptiedmorefrequently
• Hardwoodsrequiremoreairtoburnproperly
• Premiumwoodpelletsproducethehighestheatoutput
• Burning pellets longer than 1-1/2 inches (38mm) can
cause an inconsistent fuel feed rate and/or missed
ignitionsorfeedjams.
Tested and approved for wood pellets. Burning of any
othertypeoffuelvoidsyourwarranty.
CAUTION
CAUTION
G. User Dial Control
Theappliancehasonedialcontrollocatedonthesideofthe
appliance(behindadropdoor)usedforchangingtheheat
setting and restarting the appliance. There are ve heat
settings on this dial ranging to include: LOW, MED-LOW,
MED,MED-HIGH,andHIGH. Figure 10.1
Turnthedialcontroltothedesiredheatsettingandturnthe
applianceONandOFFusingthethermostat.
Figure 10.1
H
E
A
T
S
E
T
T
I
N
G
H
E
A
T
S
E
T
T
I
N
G
0
-
1
-
2
-
3
-
4
+
1
+
2
+
3
+
4
O
N
A
L
A
R
M
O
F
F
HI
LO
H. Normal Startup Sequence
Theappliancewillgointotheignitionsequencefollowedby
astartupsequence(thegreenLEDwillashrapidly).
The ignition sequence involves the exhaust blower and
igniterturningon,andthefeedmotorrunningintwostages.
Therststageinvolvesthefeedmotorrunningcontinuously
foraboutaminutetostartloadingpelletsintotherepot.
In the second stage, the feed motor will begin cycling on
ando.
Whenthepelletsarewarming-onthevergeofigniting-itis
notuncommonforthereboxtollwithsmoke.
Onceignitionhappens,thesmokeshouldquicklydisappear.
During this stage, as well as any part during the burn
process,thefrontdoorshouldnotbeopened.
This startup cycle continues until the appliance senses
ignitionbyariseintheexhausttemperatureortheappliance
times out. Following the ignition cycle the appliance
continuestofeedpelletstobuildupthere.
Afterwarmingup,theconvectionblowerwillbegintoblow
warmairintotheroom.Astheapplianceincreasesheatthe
blowerwillincreaseitsoutput.

11 02/237080-803H
K. Fire Characteristics
Theoverallheightoftheamewillvarythroughouttheburn
foracoupleofreasons:
1. Theamewillvarybasedontypeoffuelorbatchoffuel.
2. The appliance adjusts the burn rate according to the
dialsetting–thefurtherthedialisrotatedclockwisethe
highertheameandconsequently,heatoutput.
NOTICE: If you expect children to come into contact
withthisappliance,werecommendabarriersuchas a
decorativescreen.Seeyourretailerforsuggestions.
I. Fire pot Purge
Purpose:Tohelpremovedebrisfromtherepotandhelp
theapplianceburnasecientaspossible.
Thefrequencyofthepurgecycleisonceevery30minutes
whiletheapplianceisburning.Duringtherepotpurge,the
feedisreducedtothelowestsettingandtheexhaustblower
rampsuptoaveryhighsetting.Thepurgecyclelasts99
seconds.
The purge cycle does not replace daily cleaning.
J. Shutdown
Toshuttheappliancedown,turnthedialcontroltoOFFor
turnthethermostattoOFF.Duringtheshutdownprocess,
thelightwillashamberorgreenrapidly.
Unliketherepotpurge,duringshutdownexistingfuel in
therepotwillcontinuetoburnwithoutthefeedmotorrun-
ning;but,the exhaustandconvectionblowerswill remain
onuntiltheexhausthascooled.
NOTE: If maintenance or daily cleaning is going to be
conducted immediately following a shutdown, please use
cautionascomponentsespeciallythoseinsidetherebox
maystillbehot.
Duetosafetyprecautions:
• IfthedialcontrolisturnedtoOFFandbackon(evenif
bymistake)theappliancewillgothroughtheshutdown
sequencebeforerestarting.
• Additionally,ifthethermostatisturnedto“OFF”during
operation the appliance will go through a shutdown
sequencebeforerestarting.
NOTE: If maintenance or daily cleaning is going to be
conductedimmediatelyfollowingashutdown,pleaseuse
cautionascomponentsespeciallythoseinsidetherebox
maystillbehot.
L. General Operating of Appliance
Ash Dump Lever
Baffle Latch
Firepot
Baffle
Dial
Control
Hopper
Switch
Figure 11.1
HOT WHILE IN OPERATION. KEEP CHILDREN,
CLOTHINGAND FURNITURE AWAY. CONTACT MAY
CAUSESKINBURNS.
CAUTION
3. General maintenance and cleaning. Infrequent or poor
generalmaintenancewillresult in poorer performance.
Indicatorsforadditionalmaintenanceactivitiesinclude:
- Lazyame
- Black-sootedglass
- Pelletsnotigniting
- Excesspelletsfallingtothesideoftherepot
4. Seetrimadjustmentsectionforadditionalinformation.
M. Restarting the Appliance
RestartProcess
1. Whentheappliancehasrunoutoffuelandthe“empty
hopper” error code illuminates, add pellet fuel to the
hopper.
2. Dumptheashesandclinkersbuiltupintherepotby
pullingtheashdumpremovalhandleoutseveraltimes.
Makesureclinkershavedroppedintotheashpanthen
returnthehandletofullyclosedposition.
3. TurnthedialcontroltoOFFandthenuptohigh2Xto
prime.
4. Afterseeingpelletsdropthenturntodesiredsettingto
reset the appliance control system. The appliance will
thenbeginitsstartupsequence.
RestartingAfteraPowerFailure
1. For an electrical disruption the appliance will start on
itsownwithoutneedforpriming-providingthecontrol
systemisaskingforheat.
2. Theappliancewillalwaysgothroughanormalshutdown
sequencebeforerestarting.

12 02/237080-803H
N. Clear Space
Mantel:
Avoid placing candles and other heat-sensitive
objectsonmantelorhearth.Heatmaydamagethese
objects.
O. Trim Adjustment
Trim adjustment is the small dial located below the main
dialcontrol.Thefunctionofthetrimadjustmentistoallowfor
variationsinelevation,ventingandinstallationcongurations,
andfueltypes(hardwood/softwood).
Rotatingthisdialwilladjusttheair/fuelratiototheappliance:
• Clockwiseadjustmentsincreasetheameheight.
• Counter-clockwise adjustments will decrease the ame
height.
• Whenchanging trimsettingsonlyadjust1levelatatime,
allowing 15 minutes for re to stabilize before making
anotheradjustment.
• Thefactorydefaulttrimadjustmentsaresettozero(0)for
mostfuelsandrecommendedventingcongurations.
Aproperlyadjustedrewillhaveabright,activeamepattern
that extends out of the re pot approximately 6 to 9 inches
whenburningonhigh.Aproperlyadjustedrewillburncleaner
andhavehighereciencies.
Figure 12.1
NOTICE: Clearances may only be reduced by means
approvedbytheregulatoryauthorityhavingjurisdiction.
WARNING
Fire Risk
Do NOT operate appliance:
• Withappliancedooropen.
• Firepotooropen.
Do NOT store fuel:
• Closer than required clearances to combustibles to
appliance
• Withinspacerequiredforloadingorashremoval.
HOT SURFACES!
Glass and other surfaces are hot during
operationANDcooldown.
WARNING
Hot glass will cause burns.
• Donottouchglassuntilitiscooled.
• NEVERallowchildrentotouchglass.
• Keepchildrenaway.
• CAREFULLY SUPERVISE children in same room
asappliance.
• Alert children and adults to hazards of
hightemperatures.
• High temperatures may ignite clothing or other
ammablematerials.
• Keep clothing, furniture, draperies and other
ammablematerialsaway.

13 02/237080-803H
LED
Color No. of Flashes
between pauses Description Notes
Green
SteadyONwhile
primingfeedtube
(maxtime
2minutes)
FeedMotorisrunning
continuously.
(primingthefeedtube)
Whenprimingthefeedsystemandllingtherepot,DO
NOTOVERFILLFirepotFORIGNITION.Theappliancewill
automaticallygointostartupfollowingtheprimefunction.
Green 1xevery2
seconds Applianceisonstandby Tostartappliance,followstartupsequence.
Green Blinks
Continuously
Applianceisinthestart
up/ignitionsequenceorin
shutdown.
Duringshutdown,theblowerswillshutowhentheexhaust
temperaturehascooled.
Green 1X Stage1:Lowheat BTURange:14,620-19,694 Average:19,054
Green 2X Stage2:Med-Lowheat BTURange:22,102-23,506 Average:22,735
Green 3X Stage3:Medheat BTURange:30,778-32,680 Average:31,603
Green 4X Stage4:Med-Hiheat BTURange:38,576-42,914 Average:40,665
Green 5X Stage5:Hiheat BTURange:49,830-52,460 Average:51,528
Amber Blinks
Continuously
Applianceisinthe
shutdownsequence.
Duringshutdown,theblowerswillshutowhentheexhaust
temperaturehascooled.
Red 1X EmptyHopperAlarm Thisalarmiscausedbytheregoingoutfromlackoffuel.
Resetbyturningto“OFF”thenturndialtodesiredsetting.
Red 2X ExhaustProbeAlarm Failedcomponenterror.Seetroubleshootingsectionfor
moreinformation.
Red 4X MissedIgnition
Thereareatotalof2triesperignitionsequence.Ifafter
2triesthereisnoriseinexhausttemperaturethiserror
willoccur.Seethetroubleshootingsectionforadditional
information.
Red 6X EncoderAlarm FailedComponentError:ExhaustSpeedSensor.See
troubleshootingguideformoreinformation
Red 8X ExhaustOver
TemperatureAlarm Seetroubleshootingguideformoreinformation.
P. LED Color Coding Chart and Explanation
Thenumberofashesisoneeverysecondunlessotherwiseindicated.
Fire Risk
DoNOToperateappliance:
• Withappliancedooropen.
• Firepotooropen.
DoNOTstorefuel:
• Closer than required clearances to
combustiblestoappliance
• Within space required for loading or ash
removal.
WARNING

14 02/237080-803H
Q. Thermostat Controls
TEMPERATURE (HEAT / OFF) SWITCH:
Setthis switchtoHEATtocontrolyourappliance.Theo
positionwilldisabletheappliance.
SET (MULTI- FUNCTION) SLIDE SWITCH:
Thisprovideseasyaccesstocommonsettings,andshould
alwaysremaininRUNunlessitemsarebeingadjusted.
NOTE: When thermostat is set to “Manual” non-
programmablemode,allpositionsoftheSETslideswitch
willactlikeRUN.
UP / DOWN BUTTONS:
The UP and DOWN buttons are used to control the set
temperature,oradjustanyotheron-screenitems.Anitems
ashing,istheitemcurrentlybeingadjusted.
HOLD BUTTON:
This button activates and deactivates the manual
Temperature HOLD feature, which maintains a xed set
temperatureindenitelywithoutfollowingaprogramroutine.
COPY BUTTON:
Thisisusedtocopytemperatureprogramitemsfromone
daytothenext.Alsousedtoaccessthemenusetup.
NEXT BUTTON:
Thisisusedwhensettingitemssuchassoftwareoptions,
andtemperature programs when they are ashingonthe
screen.PressingtheNEXTbuttonwillcyclethroughwhich
itemisashing.
Figure 14.1
R. Thermostat Setup Options
Setup options for how the thermostat will function are
performedusingamenuonthedisplayscreen.
TO ACCESS THE SETUP MENU:
Move the TEMPERATURE switch into the OFF position,
andthenholddowntheCOPYbuttonforapproximately5
seconds until the screen changes. The menu will always
startwithitem#01,andisadvancedtoeachfollowingitem
byasinglepressoftheNEXTbutton.Theoptionsforeach
itemarechangedusingtheUPorDOWNbuttons.
ITEM #01 (CLK = CLOCK FORMAT):
• 12Hr,default:Thisdisplaystheclocktimesusingstandard
AMandPMvalues.
• 24Hr:Thisdisplaystheclocktimesusingthemilitary-time
format(example22:00hours,withoutusingAMorPM).
ITEM #02 (TMP = TEMPERATURE SCALE):
• F,default:ShowsalltemperaturevaluesinFahrenheit.
• C:ShowsalltemperaturevaluesCelsius.
ITEM #03 (PROGRAMMING STYLE):
• 7Day,default:Thisstyleusesaseparateprogramroutine
foreachofthe7daysintheweek.
• 5/2Day:Thisstyleusesaweekdayprogramroutinefor
Monday, Tuesday, Wednesday, Thursday, Friday, and
aseparateweekendprogramroutine for Saturdayand
Sunday.
• Manual Non-Programmable: In this setting, there are
noprogramroutinesforthethermostattofollowandthe
temperaturecontrolwillbesetonlybytheUPandDOWN
buttonsonthefrontpanel.
ITEM #04 (PERD = EVENT OR PERIOD QUANTITY):
• 4P,default:ThermostatusesfourEventsperday(called
MORN,DAY,EVE, and NITE).
• 2P:ThethermostatusestwoEventsperday(calledDAY
and NITE).
NOTE: Eventor PeriodQuantityfeatureisnotaccessible
duringManualNon-Programmablemode.
ITEM #07 (DLAY = DELAY TIME):
• 5, default: Thermostat waits 5 minutes before turning
the system back on after it was last run. This internal
delaypreventstheappliancefromturningontooquickly
aftershuttingdown.The5minutesettingisneformost
applications.
• 2:Sameoperationasabove but reduced to 2minutes
betweenstatechanges.
NOTE: Thereisnodelayavailablewhenthethermostatis
manuallyturnedupanddown.

15 02/237080-803H
ITEM #08 (TEMPERATURE DIFFERENTIAL):
• Thethermostatworksbyturningyourheatingsystemon
andowhenevertheroomtemperaturevariesfromthe
desiredset-pointtemperature.
• UsetheUP/DOWNbuttonstochangethenumbervalue
between 1 and 9. Generally your system should cycle
on about 3 to 6 times per hour.A smaller dierential
numbermakesthesystemcyclemorefrequently,sothe
roomtemperatureismorepreciseandconstant.Alarger
dierentialnumberwillmakethesystemremainonfora
longerdurationeachtimeanddecreasesthenumberof
cyclesperhour.
• Defaultissetto4.
S. Thermostat Operation Instructions
SET DAY AND TIME:
PlacetheSETswitchintotheDAY/TIMEposition.Withthe
dayashingpressUPorDOWNtosetthedayortheweek.
PressNEXTandtheclocktimewillstartashing.UseUPor
DOWNtosetthetime;verifytheAM/PMindicatoriscorrect.
ReturntheSETswitchtoRUNpositionwhennished.
HEATING:
Basic operation of the thermostat can be obtained with
the SET switch in the RUN position. The temperature
canbeadjustedusing the UPandDOWN buttons.When
the thermostat is rst powered on, it will follow a default
temperatureroutinethatispresetfromthefactory(Figure
15.1).
LCD DISPLAY BACK LIGHT:
Figure 15.1
Event Time Temperature
MORN 6:00AM 70°F(21°C)
DAY 8:00AM 62°F(17°C)
EVE 6:00PM 70°F(21°C)
NITE 10:00PM 62°F(17°C)
T. Thermostat Temperature Programs
Thethermostatbydefaulthas4separateprogramevents
theyare:MORN,DAY,EVE,andNITE.Eacheventendsat
thestarttimeofthefollowingevent.
6. Usesteps3through5tosetuptheeventsfortherestof
theweekorgroupofdays.
7. ReturntheSETswitchbacktoRUN.
NOTE:Whenthelasteventisnishedforeachdayor
groupofdays,thethermostat willadvanceforwardinto
thenextdayorgroupofdays.
SET TEMPERATURE PROGRAMS:
1. MoveTEMPERATUREswitchtoHEAT.
2. MoveSETswitchtoTEMPPROGposition.
3. StartingwithMonday,usetheUPorDOWNbuttonsto
adjustthestarttimeandsettemperaturefortheMORN
event,andthenpressNEXTbuttontoadvance.
4. Adjust the start time and set temperature of the DAY
eventthenpressNEXTbutton.
5. Continue in this same manner to adjust the start time
andsettemperaturesfortheEVEandNITEeventsfor
Monday.
NOTE:Ifthethermostatissetfor2eventsadayinstead
of 4, the thermostat will only use the DAY and NITE
events.
TEMPERATURE HOLD:
Temperature hold is used for maintaining a xed set
temperature;onceaHOLDisinitiated,thethermostatwill
maintainthesettemperatureindenitely.ToenteraHOLD
state,presstheHOLDbuttononetimeandthewordHOLD
willappearonthedisplay.Tocancel,presstheHOLDbutton
onceagain.
Thedisplayscreenislightedtoassistviewingatnighttime,
orinlocationswithlowlightlevels.Pressanybuttononthe
frontpaneltoactivatetheapproximate10secondbacklight.
TEMPERATURE OVERRIDE:
While thermostat is in RUN mode, the set temperature
can be temporarily changed by pressing UP or DOWN.
The temporarily changed set temperature will return to
the programmed value stored in memory when start time
ofthenextupcomingscheduledeventisreached(MORN,
DAY, EVE, OR NITE). While the temporary changed set
temperatureisineect,thewordOVERRIDEwillbeshown
on the display screen. To cancel, move TEMPERATURE
switchtoOFFandbacktoHEATagain.
STATIC NOTICE
Thermostat is protected against normal static electric
discharges, however to minimize the risk of damaging
thethermostatinextremelydryweather,pleasetoucha
groundedmetalobjectbeforetouchingthethermostat.

16 02/237080-803H
COPY PROGRAM FEATURE:
Using similar instructions as SET TEMPERATURE
PROGRAMS the COPYbuttonwillallowawholedayof
setprogrameventstobecopiedtoanotherday.
1. MoveTEMPERATUREswitchtoHEATaswellasmove
SETswitchtoTEMPPROGposition.
2. StartingwithMonday,usetheUPorDOWNbuttonsto
adjustthestarttimeandsettemperaturefortheMORN,
DAY, EVE, and NITE events. Press the COPY button
andthenpresstheNEXTbuttontoadvancetoTuesday.
3. With Tuesday displayed press COPY button. As
all programs events from Monday will be copied to
Tuesday (this will advance automatically to the next
day;Wednesday,asthewordCOPYwillappearonthe
screenforonesecond).
4. Continue in this pressing COPY button to set desired
dayswithoriginalsetting.
NOTE: The word COPY will not appear on the display
for Monday, but will display each day afterwards for
approximatelyonesecondandthedayoftheweekwill
automaticallyadvanceforwardtothenextday.
U. Thermostat Other Features
NOTE: Allotherfeaturesneedtobecompletedinatimely
mannerasthethermostatwilltimeoutafter10seconds.
TEMPERATURE CALIBRATION:
The internal temperature sensor in this thermostat is
accurately calibrated at the factory, and in most cases
alterations to this setting should not be needed. The
temperaturecalibrationfeatureallowsyoutomanuallyoset
themeasuredtemperaturebyasmuchasplusorminus5°F
(3°C)fromitsoriginalvalue.Ifseveralthermostatsareused
inthesamehouse,thisfeaturecanbeusedtosynchronize
thisthermostattotheothers.
Change the temperature calibration:
1. MoveTEMPERATUREswitchtoOFF.
2. MoveSETswitchtoRUN.
3. PressandholdbothUPandDOWNbuttonstogetherfor
atleast5seconds;thewordsSETandCALwillappear
onthedisplayalongwitha single ashing temperature
digit.
4. UsetheUPorDOWNbuttonstochangethenumberof
degrees desired for adjustment; 0° is the default value
andalsomeansnocorrectionwillbeapplied.
5. PresstheNEXTbuttontoacceptthesetting.
HW
RST
Figure 16.1
KEYPAD LOCKOUT:
Thereistheoptiontolockthefrontpanelbuttonstoprevent
unauthorizedtamperingofyourthermostatsettings.
To Lock the Keypad:
1. MoveTEMPERATUREswitchtoHEAT.
2. MoveSETswitchtoRUN.
3. Perform a single press of each button in the following
sequence:
• NEXT,NEXT,NEXT,HOLD
Apadlockwillappearonthedisplayscreen.
To Unlock the Keypad:
1. MoveTEMPERATUREswitchtoHEAT.
2. MoveSETswitchtoRUN.
3. Perform a single press of each button in the following
sequence:
• NEXT,NEXT,NEXT,HOLD
Apadlockwillnolongerbepresentonthedisplayscreen.
HARDWARE RESET:
The hardware reset button; labeled HW RST, is a small
roundpushbuttonthatislocatedinthemiddleofthecircuit
board,justbelowthebatteryholder(Figure 16.1).Pressing
thisbuttonwill:
• CausetheLCDdisplayscreentobecomefullypopulated
• Thermostat to perform an internal system check of its
components
Ifthethermostatappearstobeactinginanerraticmanner,
pressing the HW RST button may remedy this behavior.
Thetemperatureprogramsarenoterasedwhenahardware
reset is performed, however the clock will have to be
changedtomatchthecurrentdayandtime.

17 02/237080-803H
SOFTWARE RESET:
Software reset is used to eraseALL temperature events,
andto returnalluser-adjustablesoftwaresettingsbackto
theiroriginalfactorydefaultsettings.
ToPerformaSoftwareReset:
1. Verifythethermostat’skeypadisnotlocked.
2. MoveTEMPERATUREswitchtoOFF.
3. Press and hold the UP, DOWN, and NEXT buttons all
atthesametimeforatleast5seconds.WhentheLCD
displayscreenwill become fully populated let go of all
buttonsatthatpointthescreenwillreturntonormal.
Theclockwillhavetobechangedtomatchthecurrentday
andtime.
V. Thermostat Battery Replacement
Thisthermostatispoweredbytwo“AA”Alkalinebatteries.
The batteries should be replaced AT LEAST once per
yeartoensurereliableoperationorsooneriftheLOBATT
appearsonthedisplayscreen.Thebatteriesarelocatedon
thebackofthethermostat’scircuitboard.Thefrontportion
of the thermostat can be removed from the back half by
usingthetabsonthetopedgeof the thermostat housing
(Figure 17.1).
Figure 17.2-Fullbatteryicon
Figure 17.3-Lowbatteryicon
Figure 17.1
Wheninstallingnewbatteries,itisrecommendedusingonly
brand new “AA” size alkaline batteries. Please verify the
polaritymarkingsshowninthebatterycompartmentbefore
adding batteries to the compartment. When nished, line
upthefrontofthethermostattothebase,andrmlypress
togethertosecurelylatchthefrontandbackhalvestogether
properly.
BATTERY GRAPHIC:
Anytime time the batteries are physically present in the
thermostat,therewillbeavisualindicatorshowingthelifeof
thebattery.Thiswillappearonthedisplayscreen(Figures
17.2 & 17.3).
CONNECT THERMOSTAT WIRES TO APPLIANCE:
Thereisa4screwterminalblocklocatedonthebacklower
leftcornerofthestovedirectlyabovethepowercordinlet.
Thecenter2screwsareforthethermostatwires(Figure
17.4).
Figure 17.4
Shockhazard.
• DoNOTremovegroundingprongfromplug.
• Plug directly into properly grounded 3 prong
receptacle.
• Routecordawayfromappliance.
•
DoNOTroutecordunderorinfrontofappliance.
CAUTION

18 02/237080-803H
What causes my glass to become dirty?
Iftheglasshaswhiteashbuildupitisnormalandtheglassshouldbecleaned.Ifitisablacksootbuildupairowthroughthe
appliancemayberestricted.Themostoftencauseisoverduemaintenanceandcleaning.SeeMaintaining and Servicing
on page 19and/ormakeadjustmentstothetrimcontrol.
How can I get more heat out of the appliance?
Themostoftencauseofdiminishedheatoutputisoverduemaintenanceandcleaning.SeeMaintaining and Servicing on
page 19.
What should I do if I smell smoke or there is ash/soot coming from the appliance?
SealexhaustventingsystemtotheappliancewithHighTempsilicone.Securetheventingsystemtotheappliancewithat
least(3)screws.Allpelletventpipemustbesecuredtogethereitherbymeansprovidedbythepipemanufacturerorby(3)
screwsateachjoint.
Inadditionmosthomesarebuiltverytighttodayandwithexhaustsystemscancreatenegativepressureinthehome.See
Negative Pressure on page 15oftheinstallationmanual.Forashorsootchecktheaboveandtheexhaustblowerhousing
andseals.
Why would my appliance run ne last winter but not start this fall?
ItispossiblethatthestovewasnotproperlypreparedfortheNon-burnseason;seeTroubleshooting Guide starting on
page 26.
Is there a place to lubricate the blowers to quiet them down?
No.Themostoftencauseofnoisyblowersisfromtheimpellersbecomingdirtyovertime.Seemaintenanceandservice
sectionformaintainingandservicing.
What is the metal object with the bend in it that came inside the plastic bag?
Itisaclean-outtoolusedtohelpcleantherepotandremoveanyjamsintherareeventtheyoccurinthefeedtube.
Why is there a black residue building up on the outside of my home?
Windcancausethistohappen.Iftheapplianceisoperatingcorrectlyverylittlesootshouldeverexittheterminationcap.
Checktobesuretheventingisinstalledpertheowner’smanualandlocalcodes.
Do I need an outside air kit?
Outsideairisrequiredformobilehomeinstallsandinsomejurisdictions.RefertoAppliance Certications on page 3,
Mobile Home Installation on page 24oftheinstallationmanual and Appliance Set-up on page 20 of the installation
manual.Alsorefertolocalbuildingcodes.
I am seeing sparks coming out of my pipe (termination cap) outside is this safe?
Thisisnormal.Aslongasclearancestocombustibleswerefollowedthisissafe.
I have no power to anything. Does this appliance have a circuit breaker or fuse or a reset button?
Thisappliancehasonefuseonthecontrolboardandaresettablesnapdiscmountedtothefeedtube.Iftheappliance
overheatsthenthesnapdisccanbereset;ifthefuseisblownthecontrolboardmustbereplaced.
Can I burn corn in my appliance?
No,thisapplianceisnotapprovedtoburncorntypefuel.
Where is the serial # located on my appliance?
Theserialnumberislocatedonthebackofthestove.
Nopelletsaredroppinginmyrepot.
SeeTroubleshooting Guide starting on page 26.
Contact your dealer for additional information regarding operation and troubleshooting.
Visit www.quadrare.com to locate a dealer.
W. Frequently Asked Questions

19 02/237080-803H
Thispellet heaterhasamanufacturer-setminimum low
burn rate that must not be altered. It is against federal
regulationstoalterthissettingorotherwiseoperatethis
pellet heater in a manner inconsistent with operating
instructionsinthismanual.
NOTICE: Thesearerecommendations.Whenburninghighashcontentpelletfuelora/pelletmixyoumayneed
tocleantherepotseveraltimesaday.Cleanthestoveandrepotmorefrequentlyifyouencounterheavy
build-upofashattherecommendedintervaloryouseesootcomingfromthevent.Notproperlycleaningyour
applianceonaregularbasiswillvoidyourwarranty.
Follow the detailed instructions found in this section for each step listed as referenced in the chart below.
B. Quick Reference Maintenance Chart
Whenproperlymaintained,yourappliancewillgiveyoumany
yearsoftrouble-freeservice.Contactyourdealertoanswer
questions regarding proper operation, troubleshooting
and service for your appliance. Visit www.quadrare.com/
owner-resourcestoviewbasictroubleshooting,FAQs,use
&carevideos.Werecommendannualservicebyaqualied
dealer.
A. Proper Shutdown Procedure
TurndialcontroltoOFF,letappliancecompletelycooland
exhaustblowermustbeo.Aftercoolingunplugappliance
beforeservicing.
Cleaning or Inspection Frequency Daily Weekly Monthly Yearly
Firepot Asneeded OR X
AshRemovalfromFirebox About5bagsoffueldependingon
ashbuild-up OR X
Glass Whenclearviewofrepot
becomesobscure OR X
Hopper Everytonoffuel(50bags) OR X
ExhaustPath,DropTubeandBehind
Baes
Everytonoffuel(50bags)or
morefrequently OR X
DoorHandle&GasketInspection Prior to heating season OR X
Blower,Convection Everytonoffuelormorefrequently
dependingonperformance OR X
Blower,Exhaust Everytonoffuelormorefrequently
dependingonperformance OR X
Firebox-PrepareforNon-BurnSeason Atendofheatingseason OR X
VentingSystem
Every3tonsoffuelor
morefrequentlydepending
onperformance
OR X
Table 19.1
3 3 Maintenance and Service
Shock and Smoke Hazard
• Smoke spillage into room can occur if
applianceisnotcoolbeforeunplugging.
• Risk of shock if appliance not unplugged
beforeservicingappliance.
CAUTION

20 02/237080-803H
Figure 20.2-Firepotwithlargeclinker
Clinker
Figure 20.1
C. General Maintenance and Cleaning
1. Cleaning Fire pot using Lever
• Frequency:Dailyorasneeded*
• By:Homeowner
a. Besuretheapplianceisallowedtocool.
b. Opencastfaceofappliance
c. Pullrepotoorcleaninglevertwotimesuntiltheash
fallsintotheashpanbelow(Figure 20.1).
d. Itmaybenecessarytouseyourrepotclean-outtool
tochipaway materialthathasbuilt uponthesides
ofthe re pot and topush out any clinkers (Figure
20.2).
e. Largerclinkersmayhavetoberemovedfromthetop
oftherepot.
f. Iftheclinkeradherestothesidesoftherepot,you
willneedtomanuallycleantherepot.Therepot
oorplatemustbefullyclosedwhennished.
2. Cleaning Ash Pan
• Frequency:Weeklyorevery3-5bags
• By:Homeowner
a. Locatetheashpanunderneaththerepot.
b. Slidetheashpanstraightout.
c. Emptyintoanon-combustiblecontainerandre-install
ashpan.
d. Whenreplacingashpanpushitbackuntilitcatches
onthe2sidelatches.
Clinkersllingtheashpanwillhavetobecleanedoutmore
oftenthanash.
3. Ash Disposal:
Ashes should be placed in a steel container with a tight-
ttinglid.Thecontainerofashesshouldbemovedoutdoors
immediately and placed on a non-combustible oor or on
theground,wellawayfromcombustiblematerials,pending
naldisposal.
Iftheashesaredisposedofbyburialinsoilorotherwise
locally dispersed, they should be retained in the closed
container until all cinders have thoroughly cooled. Other
wasteshallnotbeplacedinthiscontainer.
4. Ash Removal from Firebox
• Frequency: Weekly or more frequently depending on
ashbuild-up
• By:Homeowner
a. Besuretheapplianceisallowedtocool.
b. Theremustnotbeanyhotashesinthereboxduring
cleaning.
c. Frequent cleaning of the ash in the rebox with a
vacuum cleaner will help slow down the build-up of
ashintheexhaustblowerandventsystem.
WARNING
RISK OF FIRE
Keep combustible materials, gasoline and
other ammable vapors and liquids clear of
appliance.
• DoNOTstoreammablematerialsintheappliance’s
vicinity.
• DoNOTusegasoline,lanternfuel,kerosene,charcoal
lighteruidorsimilarliquidstostartor“freshenup”a
reinthisheater.
Keepallsuchliquidswellawayfromtheheaterwhileitis
inuseascombustiblematerialsmayignite.
/