Hisense 58H6550E Quick start guide

Category
LED TVs
Type
Quick start guide

Hisense 58H6550E is a 4K UHD HDR Smart TV with a variety of features to enhance your viewing experience. With 4K resolution, you'll enjoy stunning picture quality with four times the resolution of Full HD. HDR (High Dynamic Range) technology expands the contrast ratio and color palette, resulting in more realistic and lifelike images. The Smart TV features built-in Wi-Fi and access to a variety of streaming apps, including Netflix, YouTube, and Amazon Prime Video. You can also connect external devices via HDMI or USB ports.

Hisense 58H6550E is a 4K UHD HDR Smart TV with a variety of features to enhance your viewing experience. With 4K resolution, you'll enjoy stunning picture quality with four times the resolution of Full HD. HDR (High Dynamic Range) technology expands the contrast ratio and color palette, resulting in more realistic and lifelike images. The Smart TV features built-in Wi-Fi and access to a variety of streaming apps, including Netflix, YouTube, and Amazon Prime Video. You can also connect external devices via HDMI or USB ports.

ES-G183756-1
4K UHD HDR Smart TV
Quick Start Guide
58H6500E
58H6520E
58H6530E
58H6540E
58H6550E
58H6560E
58H6570E
58H6580E
58H6590E
Help Hisense improve the environment by reducing paper waste.
For detailed instructions and feature descriptions, access the full User Manual online.
Before using the TV, please read this guide carefully and keep it for future reference.
© 2018 Hisense Company Ltd. All Rights Reserved.
All material in this Quick Start Guide is the property of Hisense Company Ltd. and its subsidiaries, and is protected under US, CANADA,
MEXICO and International copyright and/or other intellectual property laws. Reproduction or transmission of the materials, in whole or in
part, in any manner, electronic, print, or otherwise, without the prior written consent of the Hisense Company Ltd. is a violation of Hisense
Company Ltd. rights under the aforementioned laws.
No part of this publication may be stored, reproduced, transmitted or distributed, in whole or in part, in any manner, electronic or
otherwise, whether or not for a charge or other or no consideration, without the prior written permission of Hisense Company Ltd.
Requests for permission to store, reproduce, transmit or distribute materials may be made to one of the following addresses:
USA:
Hisense USA Corporation
7310 McGinnis Ferry Road
Suwanee, GA 30024
CANADA: Hisense Canada Co., Ltd
2283 Argentia Road, Unit 16
Mississauga, ON, Canada
L5N 5Z2
MEXICO: Hisense Mexico S. de R.L. de C.V.
Blvd. Miguel de Cervantes Saavedra No 301
Torre Norte Piso 2, Col. Ampliación Granada
Miguel Hidalgo, Ciudad de México, C.P. 11520
Hisense, and any and all other Hisense product names, logo’s, slogans or marks are registered trademarks of Hisense Company Ltd.
and its subsidiaries. All other trademarks are the property of their respective holders.
Table of Contents
Register Your TV! .....................................................................................................................1
Packaged Contents ..................................................................................................................2
Buttons and Ports on the TV ....................................................................................................3
Attach the TV Stand or Wall Mount Bracket ............................................................................. 4
Connect Devices to your TV ..................................................................................................... 6
Establish a Network Connection...............................................................................................8
Buttons on your TV Remote ...................................................................................................10
Begin Using your Remote....................................................................................................... 11
Power on the TV ..................................................................................................................... 13
Complete Setup Wizard..........................................................................................................13
Begin to Enjoy your TV ........................................................................................................... 13
Product Specications ............................................................................................................ 15
Quick Problem-Solving Tips ...................................................................................................17
Certication and Compliance..................................................................................................18
1
Register Your TV!
Congratulations on the purchase of your new TV! This Quick Start Guide will walk you through a few easy steps to set up
your TV.
For detailed instructions, access the User Manual on the support pages listed below.
Because we value your business, we want to keep you in the know of 'all things Hisense'. Using your mobile phone, scan the Registration page QR code
to register your TV. Depending on the make and model of your phone, you may need to download a QR code scanning app.
Country
Customer Care Center Hisense Support Page REGISTER YOUR TV
U.S.A
Phone: 1-888-935-8880
Hours of Operation:
Monday - Friday: 9 AM to 9 PM EST
Saturday - Sunday: 9 AM to 6 PM EST
Service Email: [email protected]
http://www.hisense-usa.com/
support/
https://www.hisense-
usa.com/support/
register
CANADA
Phone: 1-855-344-7367
Hours of Operation:
Monday - Friday: 8 AM to 8 PM EST
Service Email: [email protected]
http://www.hisense-canada.
com/support/
http://www.hisense-
canada.com/support/
productReg.asp
MEXICO
Phone: 01-800-008 8880
Hours of Operation:Monday - Friday 9:00-18:00
Service Email: [email protected]
https://hisense.com.mx/
support/
*Scan to download user manual
https://hisense.
com.mx/product-
registration/
Disclaimer:
This Quick Start Guide is intended as a general guideline to help you set up your TV. Images throughout this
document are for illustrative purposes only and may differ from the actual product.
2
Packaged Contents
Your package in which you purchased your new TV contains the following items:
2 AAA batteries A left and right leg that forms the TV stand
Quick Start Guide Important Safety Information and Warranty Card
4 screws (M4×35) Remote Control
Power Cord
IMPORTANT:
To prevent accidentally discarding items that came with your TV, be sure to
check ALL of the foam
in the carton box.
Required tools and devices
Wireless router (not included) for Internet connectivity
Phillips screwdriver (not included) to secure the TV stand
HDMI and other types of cables (not included) to connect external devices to the TV
Wall mount bracket (not included) if you prefer to mount the TV to the wall
·
Please check foam for accessories before discarding.
·
Veuillez vérifier la mousse pour qu'il n'y ait pas d'accessoires avant de la jeter.
·
Antes de desechar la espuma, asegúrese de retirar todos los accesorios.
3
Buttons and Ports on the TV
Back View of the TV
TV Side View
TV Bottom Panel
AC Input
USB 2
1A(MAX)DC 5V
HDMI 3
(4K@30Hz)
HDMI 2
(4K@60Hz)
HDMI 1
(4K@60Hz)
ARC
USB 1
0.5A(MAX)DC 5V
ANT/CABLE
TV Bottom View
AV IN
VIDEO
L
R
SERVICE
AUDIO
OUT
DIGITAL
AUDIO OUT
LAN
4
STEP 1. Attach the TV Stand or Wall Mount Bracket (not included)
Attach the TV Stand
(For steps to attach the wall mount see page 5)
CAUTION:
Be sure to disconnect the A/C power cord before installing a stand or Wall-Mount brackets.
The LED display is very fragile and must be protected at all times when installing the legs that form the stand. Be sure to protect the
TV screen from getting scratched or damaged by any hard objects. In addition, DO NOT exert pressure on the front of the TV at any
time because it could crack.
To attach the left and right leg that forms the stand:
1. Carefully place your TV face down on a soft, flat surface to prevent the TV from being damaged or the screen from getting scratched.
2. Remove the 2 legs from the foam and then insert the legs into the bottom slots of the TV.
3. Use the screws that came inside the carton with your TV to secure each leg tightly.
leg
leg
Screws:
M4×35
5
Attach the Wall Mount Bracket (not included)
Before you begin the third-party manufacturer instructions, be
sure to do the following things:
1. Place the TV face down on a clean, safe and cushioned surface.
2. Remove the TV stand if you already attached it.
3. Place the spacers (not included) in the corresponding bracket
holes.
Screw
(not included)
CAUTION:
• Whenyouattachthemount,besuretousethespacers
(provided by the third-party manufacturer) between the TV
and the bracket.
To preventinternaldamagetotheTVandensureitis
mountedsecurely,besuretousefixingscrews(not
included) that are 9.5 - 11.5 mm in length when measured
from the attaching surface of the mounting hook.
Rear cover of the TV Spacer
Screw
Wall mount bracket
9.5 - 11.5 mm
Wall mount hole pattern
VESA (mm)
300 × 200
Wall mount screw size (mm) M6
Follow instructions provided with the Wall mount bracket.
To complete the installation, please contact the wall-mount
manufacturer or the retailer from which you purchased the TV.
The selected screws are 9.5 - 11.5 mm in length when
measured from the attaching surface of the rear cover.
NOTE: The diameter and length of the screws differ
depending on the Wall-mount bracket model.
Bracket
(not included)
Spacer
(not included)
6
STEP 2. Connect Devices to your TV
Check to ensure that you have selected the right cables for the ports and that they are connected securely. Loose connections can affect
the quality of the picture image and color.
TV label Port Cable External Equipment Brief Description
ANT/CABLE
Antenna
VHF/UHF Antenna
ANT OUT
Connect an outdoor VHF/UHF antenna.
HDMI
DVD Player/Recorder
Set-top Box
Satellite Receiver
Satellite
antenna
cable
VCR
Video
Camera
Connect a High Denition Multimedia Interface
(HDMI) cable from an external device.
AV IN
VIDEO
Yellow
Connect a composite video cable and left-right
audio cables from an external AV device.
L
White
R
Red
DIGITAL AUDIO OUT
SpeakerAudio Amplier
Connect an optical cable from an external
digital audio system.
7
TV label Port Cable External Equipment Brief Description
AUDIO
OUT
Connect headphones to hear audio from the
TV.
Headphones with microphones are not
supported.
Connect an audio adapter (not provided) from
an external analog audio system.
USB
Connect a USB device for browsing photos,
music and movies.
Hard disks with a total current consumption
or impulse current consumption greater than
500mA are not supported.
LAN
LAN
Connect an Ethernet cable to access a network
or the Internet. The TV also has a wireless
connectivity feature.
SERVICE
This port is not available for you to connect an external device. It can only be used by our factory for testing
purposes.
White
Red
Speaker
Audio Amplier
8
STEP 3. Establish a network connection
1. Press the Home button on the remote control and then select
Settings
to enter the Settings menu.
2. Select
Network
.
TV JACK
Modem Cable LAN CableLAN Cable
External Modem
(ADSL / VDSL / Cable TV)
IP Sharer (Router)
(with DHCP server)
LAN
Establish a wired network connection
Automatically obtain an IP address
1. If you have been connected to the wired network, the TV will automatically obtain an IP address and connect to the network.
NOTE: The default option of IP Settings Mode is DHCP.
2. If the connection fails then "
Not Connected
" will display for the Ethernet status. Retry or enter the
IP settings
, select
Static
to input
the information again.
Manually enter the IP address
1. Enter the
IP settings
to select
Static
.
2. Enter the IP address, Gateway, Network prefix length, DNS 1 and DNS 2 in the menu.
9
Establish a wireless network connection
The TV can directly receive network signals via wireless router
1.Turn on your
Wi-Fi.
2. Select
Wi-Fi
. The list of networks will be displayed automatically.
3. Select a wireless network from the list and then enter your password.
4. If the network connection does not appear in the list, select
See all
to display all the list or select
Add new network
to input name and
then manually enter SSID and Security mode selection
NOTE:
When you connect the WiFi, a notification will display to prompt you to unplug the network cable if a wired network is connected.
Close the network connection
Unplug the net or turn off your Wi-Fi. The network connection will close.
Wireless router with DHCP
LAN Cable
Wireless LAN Adapter
built-in TV set
10
Buttons on your TV remote
BUTTON DESCRIPTION
Power on / off
Power Indicator and Microphone
Turn on the virtual keyboard
Google Assistant
CC
Turn Closed Caption On/Off and turn Closed
Caption on when mute
TV Return to the previous source
The button for the Menu
D-pad (up/down/left/right navigation buttons)
Conrmation button
Return to the previous place in the menu or
app
BUTTON DESCRIPTION
Display the Home screen
VOL Volume (up/down)
CH Channel (up/down)
Mute and restore sound
MTS Set the audio language(MTS)
Media content control function buttons
NRT
Choose to leave the Video description feature
On or Off
APP Quick access buttons to apps
APP/FUNC
Quick access buttons to apps or to some func-
tions
NOTE:
The button descriptions are only provided as a
reference.
The actual appearance of your remote may differ from
the buttons that are listed.
11
STEP 4. Begin Using your Remote
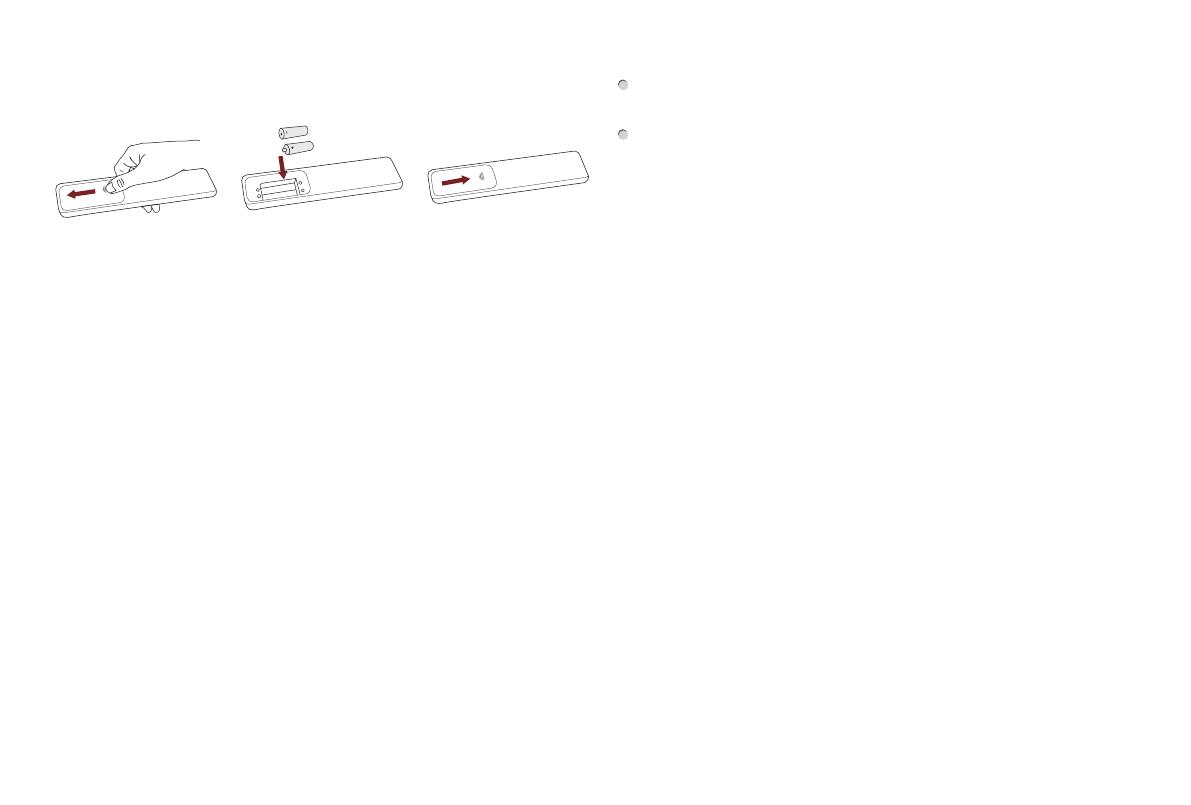
1. Slide the back cover to open the battery compartment of the
remote control.
2. Insert two AAA size batteries. Make sure to match the (+) and (-)
ends of the batteries with the (+) and ( - ) ends indicated in the
battery compartment.
3. Replace the battery compartment cover.
Important Information about the remote and batteries:
Discardbatteriesinadesignateddisposalarea.Donot
throw them into a fire.
Removeoldbatteriesimmediatelytopreventthemfrom
leaking into the battery compartment.
• Ifyoudonotintendtousetheremotecontrolforalong
time,thenremovethebatteries.
• Batterychemicalscancausearash.Ifthebatteriesleak,
clean the battery compartment with a cloth. If chemicals
touch your skin then wash it immediately.
• Donotmixoldandnewbatteries.
• Donotmixalkaline,standard(carbon-zinc)orrechargeable
(NiCd,NiMH,etc.)batteries.
• Donotcontinueusingtheremoteifitgetswarmorhot.
Call our Support Center immediately on the support website.
Insert the batteriesGently push and slide Gently push and slide
Remote Control Range Information
The remote control can work at a distance of up to 26 feet in
front of the TV set.
It can work at a 30 degree horizontal or vertical angle.
Program Your Universal Cable or Satellite Remote
Control to Operate Your New Television (only for
USA)
If you would like to program your other household remote
controls to your new television, please refer to the User's Manual
supplied by your Cable or Satellite provider. The Cable or Satellite
providers' User's Manuals should include instructions on how to
program their remote to your television.
A list of codes for the most common Cable and Satellite providers
are listed below. Use the code that is associated with your Cable
or Satellite provider (if applicable).
DIRECTV
......0178, 10178, 10019, 10748, 11314, 11660, 11710,
11780, 12049, 10171, 11204, 11326, 11517, 11564, 11641, 11963,
12002, 12183
Time Warner Cable
......386, 0178, 10178, 400, 450, 461, 456,
0748, 1463, 0463, 10463
Comcast
......0178, 10178, 10463, 11463, 10748, 11314, 11660,
10171, 11204, 11326, 11517, 11641, 11780, 11785, 11892, 11963,
12002
CoxCommunications
......0178, 10178, 1326, 1463
Dish Network
......505, 627, 538, 720, 659
If the code associated with your Cable or Satellite provider is
not listed, does not work or you cannot locate the instructions to
program your remote, call your local Cable or Satellite provider's
customer service center.
12
If your Cable or Satellite provider does not have a code available, please
contact us at one of the phone numbers on Page 1.
UsingYourCableSet-topBoxorSatelliteReceiver
Remote as a ‘Universal’ Remote
If you prefer to use your Cable Set-top Box or Satellite Receiver
Remote as a ‘Universal Remote’, then visit the Support page to
view a list of the codes.
Pairing the Remote Control
1. Pair the remote to the TV after you power it on. Keep the
remote control within 10 feet from the TV. Press and hold the
[ ] button at least 3 seconds to start pairing.
2. If the remote paired successfully then a confirmation will
display on the screen. If it did not pair successfully then an
'unsuccessful' message will display. Repeat step 1.
NOTE:
If an unknown error occurred with the remote then it could
have been caused by interference. Try to remove what's
causing the interference and pair it again.
If an unknown error occurred in the remote control while the
battery power is normal, you can take out the batteries and
press any key for 1~2 seconds, then the remote control can
work normally.
The remote cannot be paired to the TV while the TV is in
standby mode.
13
STEP 5. Power on the TV
Plug the power cord into a power outlet.
Power Cord
Wall Outlet
Press the
Power button
on the remote to turn on the TV. A
splash screen that shows the logo appears. Next, the Setup Wiz-
ard begins by prompting you to set up the Language, Region and
Time Zone, etc. The Home screen will be your starting point for
navigating the TV
STEP6.CompleteSetupWizard
After the splash screen that shows the logo appears, begin the
setup wizard. Once you’ve completed the setup menu then your
TV will be ready to use.
STEP 7. Begin to Enjoy your TV
Your Smart TV is easy to use and brag-worthy!
Now that you’ve completed the first-time setup menu, the
Home
screen is your starting point for navigating the TV. Gone are
the days where your TV only provides one way for you to be
entertained. This showpiece provides you the convenience
of watching a program on a live channel, accessing Video on
Demand to watch a movie and many other entertainment options.
Using your remote, press the
Home
button to begin enjoying your
TV.
14
Disclaimer:
Subscriptions or other payments may be required to access content through some applications. Some or all of the included
or downloaded application services in this Hisense device may not function depending on the Internet connection, local limitations of
included applications or other reasons outside of Hisense’s control. HISENSE EXPRESSLY DISCLAIMS RESPONSIBILITY FOR ANY
APPLICATION SERVICE FROM FUNCTIONING AT ANY TIME, FOR CONTENT IN ANY APPLICATION SERVICE, FOR DISRUPTIONS
OF SERVICE, LOCAL OR REGIONAL LIMITATIONS, WARRANTIES OF TITLE, NO INFRINGEMENT, AND FOR IMPLIED
WARRANTIES OF MERCHANTABILITY OR FITNESS FOR A PARTICULAR PURPOSE. By purchasing this device, you accept such
Disclaimer without any claim on Hisense at any time.
Text-to-Speech(TTS)andVideoDescriptionfunctionalitiesonTV
Text-to-Speech (TTS) and Video Description can help you to navigate the menus on the screen and hear an audio description of relevant
programs. Text-to-Speech can convert written text into voice text to help visually impaired people listen to the information they are unable
to read. In addition, the Video Description has an audio narration added to certain programs that will describe the main visual elements
which visually impaired users may not be able to see.
Follow the steps below to enable the functions:
1.Press the button to access the Menu.
2.Next, select Settings to enter the Settings menu.
3.Select Accessibility > TalkBack or Video Description to turn the Menu Audio or Video Description on or off by selecting the appropriate
choice that is presented.
Note: TalkBack is enabled by selecting the checkbox. Video Description is enabled by selecting the Toggle button.
www.hisense-usa.com/text-to-speech-hisense-android-tvs
15
Product Specifications
Model Name
58H6500E
/
58H6520E/ 58H6530E/ 58H6540E/ 58H6550E
58H6560E/ 58H6570E/ 58H6580E/ 58H6590E
Dimension
(W × H × D)
Without Stand 51.2 × 30.1 × 2.9 inches
(1301 × 765 × 74 mm)
With Stand 51.2 × 32.3 × 9.6 inches
(1301 × 821 × 244 mm)
Weight Without Stand 33.1 lbs (15 kg)
With Stand 33.7 lbs (15.3 kg)
Active Screen Size (Diagonal) 57.5 inches
Screen Resolution 3840 × 2160
Audio Power 10 W + 10 W
Power consumption 160 W
Power Supply 120 V ~ 60 Hz
Picture Quality Screen resolution: 3840 x 2160, UHD Upscaler
HDMI Input
RGB / 60 Hz (640×480, 800×600, 1024×768), YUV / 60 Hz (480i, 480p, 720p, 1080i, 1080p)
3840x2160/60Hz, 3840x2160/24Hz, 3840x2160/25Hz, 3840x2160/30Hz
Ports
3 HDMI ports, 2 USB ports, 1 LAN port for Ethernet, 1 Digital Audio Output, 1 RF Input, 1 Earphone Audio Output, 1
RCA Composite Video Input , 1 left/right Audio Input for Composite
Receiving Channels
VHF: 2 - 13, UHF: 14 - 69, CATV: 1 - 125
Digital Terrestrial Broadcast (8VSB): 2 - 69
Digital cable (64/256 QAM): 1 - 135
Tuner Type Frequency synthesized
Receiving
system
Analog NTSC
Digital ATSC / QAM
16
Disclaimer:
All products, product specifications, and data are subject to change without notice to improve reliability, function, design or
otherwise. HDR viewing experience will vary by model, content availability and Internet connection.
Operating Temperature 5°C to 35°C(41°F to 95°F)
Operating Humidity 20% to 80% non-condensing
Storage Temperature -15°C to 45°C(5°F to 113°F)
Storage Humidity 10% to 70%, non-condensing
  • Page 1 1
  • Page 2 2
  • Page 3 3
  • Page 4 4
  • Page 5 5
  • Page 6 6
  • Page 7 7
  • Page 8 8
  • Page 9 9
  • Page 10 10
  • Page 11 11
  • Page 12 12
  • Page 13 13
  • Page 14 14
  • Page 15 15
  • Page 16 16
  • Page 17 17
  • Page 18 18
  • Page 19 19
  • Page 20 20
  • Page 21 21
  • Page 22 22

Hisense 58H6550E Quick start guide

Category
LED TVs
Type
Quick start guide

Hisense 58H6550E is a 4K UHD HDR Smart TV with a variety of features to enhance your viewing experience. With 4K resolution, you'll enjoy stunning picture quality with four times the resolution of Full HD. HDR (High Dynamic Range) technology expands the contrast ratio and color palette, resulting in more realistic and lifelike images. The Smart TV features built-in Wi-Fi and access to a variety of streaming apps, including Netflix, YouTube, and Amazon Prime Video. You can also connect external devices via HDMI or USB ports.

Ask a question and I''ll find the answer in the document

Finding information in a document is now easier with AI