Tandberg Data SLR75 Installation guide
- Category
- Tape drives
- Type
- Installation guide

TANDBERG SLR
TAPE INFORMATION STORAGE SOLUTION
Installation and User's Guide
PC-BACKUP-SYSTEME
Installation und Benutzeranleitung
SOLUTION DE STOCKAGE DE DONNÉES
SUR BANDE MAGNÉTIQUE
Manuel d'installation et guide de l'utilisateur
SOLUCIÓN DE ALMACENAMIENTO DE DATOS
EN CINTA MAGNÉTICA
Manual de Instalación y Guía del Usuario
Part No. 43 18 55-07
© Tandberg Data ASA August 2003

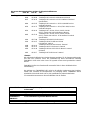
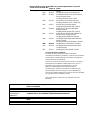
Drive Series Publ. No. Part. No. Title
Tandberg SLR 9048 43 05 08 Tandberg SLR Product Line Reference Manual
6028 42 26 86 Tandberg SLR Product Line Maintenance Manual
6047 42 30 42 Tandberg SLR Product Line SCSI-2 Interface Functional
9084 43 15 65
Specifications
Tandberg SLR Product Line - SLR5 4.0/8.0GB Product
9033 43 01 37
Verification Reports
Tandberg SLR Product Line - SLR4 (TDC 4220) Product
9031 43 04 44
Verification Reports
Tandberg SLR7,SLR24, SLR40, SLR50, SLR60, SLR75
9063 43 07 43
SLR100 and SLR140 Reference Manual
Tandberg SLR7, SLR24, SLR40, SLR50, SLR60, SLR75
9100 43 17 88
SLR100 and SLR140 - SCSI Interface Functional
Specifications
Tandberg SLR50 (MLR3) PVR Manual
9144 43 21 67 Tandberg SLR100, SLR60 and SLR40
9148 43 22 23
PVR Manual - Internal
Tandberg SLR24-100 PVR Manual - External
9149 43 22 22 Tandberg SLR2-5 PVR Manual - External
9156 42 22 46 Tandberg SLR24 and SLR50 PVR Manual - Internal
(VU2000)
9162 43 23 17 Tandberg SLR7 PVR Manual - Internal
Please Note
This publication may describe designs for which patents are granted or pending. By
publishing this information, Tandberg Data ASA conveys no license under any patent
or any other rights.
Every effort has been made to avoid errors in text and diagrams. However,
Tandberg Data ASA assumes no responsibility for any errors, which may appear in
this publication.
It is the policy of Tandberg Data ASA to improve products as new techniques and
components become available. Tandberg Data ASA therefore reserves the right to
change specifications at any time.
We would appreciate any comments on this publication.
Related publications available from our Marketing Department:
IMPORTANT!
The Tandberg SLRx equipment must be connected to an earthed
mains socket outlet!
VIKTIG!
Apparatet må kun tilkobles jordet stikkontakt!
WICHTIGE
SICHERHEITS-
HINWEISE!
Benutzen Sie stets das werkseitig mitgelieferte Netzkabel und
verbinden Sie es ausschließlich mit geerdeten Netzsteckdosen!
VIKTIGT!
Apparaten får endast anslutas till jordat uttag!

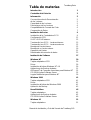
Table of Contents
Introduction 1
Solution Contents 3
Information 5
Tape Drive Naming Convention 5
Tape Drive Capacity 5
Tape Drive Performance 6
Media Specifications 6
Tape Format Compatibility 6
Data Compression 7
Tape Drive Installation 9
SCSI Controller Board Installation 9
SCSI Configuration 11
External SLR2
- SLR140: 12
SCSI-bus Termination - Internal Tape Drives 13
SCSI-bus Termination - External Tape Drives 15
Mounting the Internal Tape Drive 15
Mounting a Tabletop Tape Drive 19
Tape Drive Operation 21
How to Rewind a Data Cartridge 23
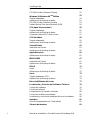
Software Installation 27
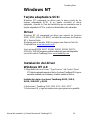
Windows NT 29
SCSI Host Adapter 29
Tape Driver 29
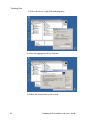
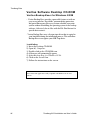
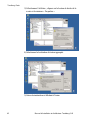
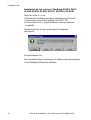
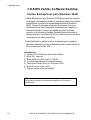
Windows NT 4.0 Tape Driver Installation 29
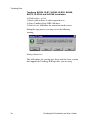
Backup Applications 31
Computer Associates ARCserveIT for Windows NT 32
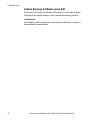
Veritas Software Server CD-ROM 35
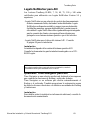
Legato Networker for Windows NT 39
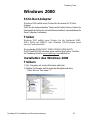
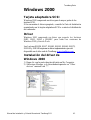
Windows 2000 41
SCSI Host Adapter 41
Tape Driver 41
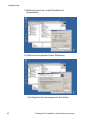
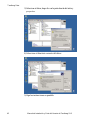
Windows 2000 Tape Driver Installation 41
Backup Applications 43
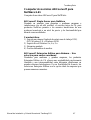
Novell NetWare 45
Host Adapter 45
Backup Applications 45
Veritas Software Server CD-ROM 49
Windows 95 51
Host Adapter 51
Tandberg SLR Installation and User's Guide i
Tandberg Data

Tandberg Data
Backup Applications 51
Veritas Software Desktop CDROM 52
Windows 98 Windows 98
2nd
Edition
53
Host Adapter 53
Backup Applications 53
Veritas Software Desktop CD-ROM 54
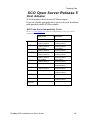
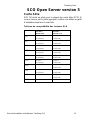
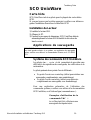
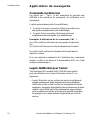
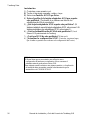
SCO Open Server Release 5 55
Host Adapter 55
Backup Applications 57
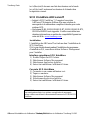
SCO UnixWare 59
Host Adapter 59
Backup Applications 59
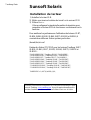
Sunsoft Solaris 61
Tape Drive Installation 61
Backup Applications 62
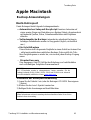
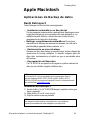
Apple Macintosh 65
Backup Applications 65
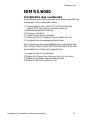
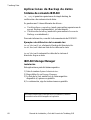
IBM RS/6000 67
Tape Drive Installation 67
Backup Applications 68
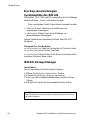
HP/UX 71
Tape Drive 71
Backup Applications 72
Linux 73
SCSI Host Adapter 73
Backup Applications 74
Tape Drive Utility Disk 77
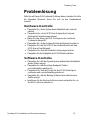
Troubleshooting 79
Hardware Checking 79
Software Checking 79
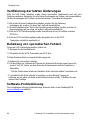
Verifying Recent Changes 80
Correcting Intermittent Failures 80
Software Troubleshooting 80
Appendix 81
Regulatory Compliance Notices 81
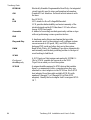
Glossary of Terms 83
ii
Tandberg SLR Installation and User's Guide

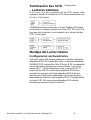
Introduction
Congratulations on your new
Tandberg Data SLR tape storage
solution!
Total customer satisfaction is of the most importance to
Tandberg Data. We guarantee that this product left our
premises defect free. If you are not satisfied the quality of this
product, please contact your distributor, dealer or the nearest
Tandberg Data office to have your problem resolved quickly.
If you need technical support or have any problem with your
SLR tape storage solution, phone, fax and addresses can be
found on the back cover of this manual, ask for Customer
Services.
Tandberg Data ASA is a leading global supplier of advanced, tape-
based information data storage products for the professional
market. The company offers a wide range of products and
solutions for data protection and other user applications within
data storage management.
Tandberg Data supplies Travan NS™, SLR
™
and DLT
™
branded tape drives and tape storage solutions to the world's
leading OEMs and through a worldwide channel sales network.
On the following pages, before the installation guide starts,
there is some brief information about the Tandberg Data SLR
tape storage solutions. Also listed is what is included with the
Tandberg Data product you have purchased.
All documentation referred to in this Product Line installation
guide, is available as a downloadable PDF file from the
Tandberg Data web site:
www.tandberg.com
Tandberg Data
Tandberg SLR Installation and User's Guide 1

This Page Intentionally Left Blank
Tandberg Data
2 Tandberg SLR Installation and User's Guide

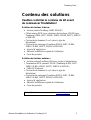
Solution Contents
Please Check the Package Contents
before Beginning the Installation!
For the Internal Solution:
· Internal Tandberg SLR tape drive (SLR2-140)
• Internal SCSI cable (with removable LVD/SE terminator for
Tandberg SLR24, SLR7, SLR40, SLR50, SLR60, SLR75,
SLR100 and SLR140)
· Data cartridge (1 or 5 depending on type of kit/solution)
· Cleaning cartridge (Tandberg SLR5, SLR24, SLR7,
SLR40, SLR50, SLR60, SLR75, SLR100 and SLR140)
· Application software
· Installation and User's Guide
· Warranty Card
For the Tabletop Solution:
· Tabletop Tandberg SLR tape drive with power cord
· External LVD/SE SCSI terminator (Tandberg SLR24,
SLR7, SLR40, SLR50, SLR60, SLR75, SLR100 and SLR140)
· External SCSI cable
· Data cartridge (1 or 5 depending on type of kit/solution)
· Cleaning cartridge (Tandberg SLR24, SLR7, SLR40,
SLR50, SLR60, SLR75, SLR100 and SLR140)
· Application software
· Installation and User's Guide
· Warranty Card
Tandberg Data
NOTE:
See also our website: www.tandberg.com.
Tandberg SLR Installation and User's Guide 3

This Page Intentionally Left Blank
Tandberg Data
4 Tandberg SLR Installation and User's Guide

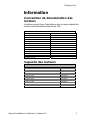
Information
Tape Drive Naming Convention
The following table gives the equivalence between the original
tape drive name and their associated SLR naming.
Tandberg SLR2 Tandberg TDC 3820
Tandberg SLR3 Tandberg TDC 4120
Tandberg SLR4 Tandberg TDC 4220
Tandberg SLR4-DC Tandberg TDC 4222
Tandberg SLR5 NA
Tandberg SLR24 Tandberg SLR6
Tandberg SLR7 NA
Tandberg SLR40 NA
Tandberg SLR50 Tandberg MLR3
Tandberg SLR60 NA
Tandberg SLR75 NA
Tandberg SLR100 NA
Tandberg SLR140 NA
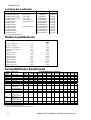
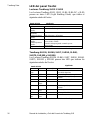
Tape Drive Capacity
Tandberg Data Tape Drive Model Capacity
Tandberg SLR2
(TDC 3820)
525 MB
Tandberg SLR3
(TDC 4120)
1.2GB
Tandberg SLR4
(TDC 4220)
2.5GB
Tandberg SLR4-DC
(TDC 4222)
2.5GB/5.0*GB
Tandberg SLR5
(SLR5 4/8 GB)
4.0GB/8.0*GB
Tandberg SLR24
(SLR6 12/24 GB)
12GB/24*GB
Tandberg SLR7 20 GB/40GB*
Tandberg SLR40 20GB/40*GB
Tandberg SLR50
(MLR3 25/50 GB)
25GB/50*GB
Tandberg SLR60 30GB/60*GB
Tandberg SLR75 38 GB/75*GB
Tandberg SLR100 50GB/100*GB
Tandberg SLR140 70GB/140*GB
* Using 2:1 Hardware Compression
Tandberg Data
Tandberg SLR Name Convention Previous Tape Drive Name
Tandberg SLR Installation and User's Guide
5

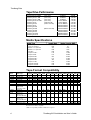
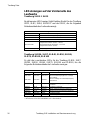
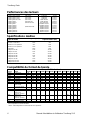
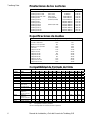
Tape Drive Performance
Tandberg Data Tape Drive Model Per Minute Per Hour
Tandberg SLR2 525MB
(TDC 3820)
12 MB/min 720 MB
Tandberg SLR3 1.2GB
(TDC 4120)
18 MB/min 1.08 GB
Tandberg SLR4 2.5GB
(TDC 4220)
18 MB/min 1.08 GB
Tandberg SLR4-DC 5GB
(TDC 4222)
18/36* MB/min 2.16 GB
Tandberg SLR5
(SLR5 4/8 GB)
24/48* MB/min 2.88 GB
Tandberg SLR24
(SLR6 12/24 GB)
72/144* MB/min 8.64 GB
Tandberg SLR7 180/360* MB/min 21.6 GB
Tandberg SLR40 180/360* MB/min 21.6 GB
Tandberg SLR50
(MLR3 25/50 GB)
120/240* MB/min 14.4 GB
Tandberg SLR60 240/480* MB/min 28.8 GB
Tandberg SLR75 240/480* MB/min 28.8 GB
Tandberg SLR100 300/600* MB/min 36.0 GB
Tandberg SLR140 360/720* MB/min 43.2 GB
* Using 2:1 Hardware Compression
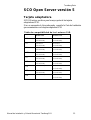
Media Specifications
DC 6250 or equivalent 1020 250
DC 6525 or equivalent 1020 525
MAGNUS 1.2 or equivalent 950 1200
MAGNUS 2.5 or equivalent 1200 2500
SLR5 8GB * 1500 4000
SLRtape24 24 GB * 1130 12 000
SLRtape7 40 GB* 1545 20 000
SLRtape40 40 GB* 600 20 000
SLRtape50 50 GB * 1515 25 000
SLRtape60 60 GB* 900 30 000
SLRtape75 75 GB* 1150 38 000
SLRtape100 100 GB* 1500 50 000
SLRtape140 140 GB* 1670 70 000
* Using 2:1 Hardware Compression
Tape Format Compatibility
Tape Native
Tape Drive Compatibility
Drive Media Type SLR140 SLR100 SLR75 SLR60 SLR50 SLR40 SLR7 SLR32 SLR24 SLR5 SLR
4
SLR3 SLR2
SLR140 SLRtape140 R/W
SLR100 SLRtape100 R R/W
SLR75 R R/W R/W
SLR60 SLRtape60 R R/W R/W R/W
SLR50 SLRtape50 R R/W R/W R/W R/W
SLR40 SLRtape40 R R/W R/W R/W - R/W
SLR7 SLRTape7 R R* R R* - R* R/W
SLR32 SLR32,
MLR1-26GB,
Accuscribe 13GB
R R R R/W R - R/W
SLR24 SLRtape24 R R R R/W R - R/W R/W
SLR5 SLR5 R R R R R R/W R R/W
SLR4 Magnus 2.5,
Magnus 2.0,
DC 92xx, QD 92xx
R R R R/W R RW R/W
SLR3 Magnus 1.2,
Magnus 1.0,
DC 91xx, QD 91xx
R/W R/W R/W
SLR2 DC6525, DC6320 R/W R/W R/W R/W
SLR1 DC6250, DC6150 R/W R/W R/W
R à Read only
R/W à Read
and Write compatible
*SLR7 read capability available in F/W 04.30 or greater
Tandberg Data
6
Tandberg SLR Installation and User's Guide

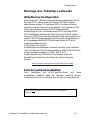
Data Compression
Data Compression is a way to increase capacity on a storage
device. Compression ratios are normally specified to be 2:1,
meaning that it is possible to store twice as much data on the tape
as normal without data compression. However, the
compression rate is depending on the type of data, e.g. ordinary
text files can be compressed in a much higher rate than
program files.
There are two ways to compress data, hardware compression
and software compression. The storage device very often does
hardware compression, and software compression means that
the program is compressing the data before it is sent to the
storage device. Hardware compression is much more efficient,
and works much faster than software compression.
The Tandberg Data SLR4-DC, SLR5, SLR24, SLR7, SLR40,
SLR50, SLR60, SLR75, SLR100 and SLR140 use ALDC
Hardware compression to compress data. This feature is
enabled per default but the user may turn off data compression
through the application software or specific Software Tools.
(Please refer to the Tandberg SCSI tools chapter at the end of
this manual for more information).
Tandberg Data
Tandberg SLR Installation and User's Guide 7

This Page Intentionally Left Blank
Tandberg Data
8 Tandberg SLR Installation and User's Guide

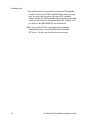
Tape Drive Installation
SCSI Controller Board Installation
All Tandberg Data SLR tape drives uses a SCSI interface to the
host system.
Before any SCSI device can be installed it is necessary to have a
SCSI controller board installed. Please pay attention to the
following points.
• Make sure your computer is turn off before proceeding to the
installation.
• If you computer is equipped with an onboard SCSI
controller, before proceeding with the installation, you
must first locate the SCSI connector on the computer
motherboard.
• Refer to the documentation provided with your computer to
find out where this connector is located.
• If multiple SCSI connectors are available, you can choose any of
them, except if your computer documentation mentions
something different.
· When done, firmly connect the SCSI connector to the Main-
board connector and refer to the section
Mounting the Tape
Drive
to install your internal SLR.
• If your PC/Server needs a separate SCSI controller, you need
to make sure it is properly installed before connecting your
SLR tape drive.
Tandberg Data
Tandberg SLR Installation and User's Guide 9

· You will also need a software driver from the SCSI controller
vendor to activate the SCSI Controller. Please make sure you
have the latest software driver for your SCSI controller
loaded, and that the SCSI controller board is properly installed.
Software drivers can be downloaded from the vendors' web
site. Refer to the README file for installation.
Please refer to the PC/Server documentation for further
information on how to install additional boards in the
PC/Server. Or ask your local dealer for assistance.
Tandberg Data
10
Tandberg SLR Installation and User's Guide

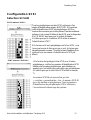
SCSI Configuration
SCSI-ID Selection
All devices on a SCSI-bus need their own unique
identification, called SCSI-ID. If a SCSI-ID conflict
exists, some of the SCSI devices will not be recognized
by your system. In many systems it is common to
use the SCSI-bus for the hard-drive and CD-ROM,
as well as the tape drive. Remember that the SCSI
Controller uses SCSI-ID 7.
If the tape drive is the only device on the SCSI -
bus, you do not need to do anything. The tape drive
will be recognized automatically. (All Tandberg
Data tape drives are delivered with SCSI-ID 2 as
default.)
If the tape drive is going to share the SCSI-bus with
other devices, check the SCSI-ID numbers used by
the other devices, then set the drive’s SCSI-ID to a
number that is not being used by any of the other
devices (remember the SCSI host adapter uses ID 7).
The SCSI-ID is often set by “jumpers” where
you can “read out” which SCSI-ID the device has
been set up for. All SCSI device ID's are
displayed on the screen during system startup.
Tandberg Data
Tandberg SLR Installation and User's Guide 11
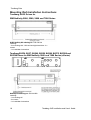
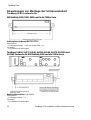
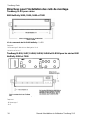
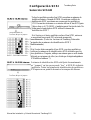
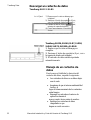
Internal SLR7 - SLR140

SCSI-ID Selection
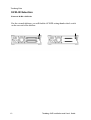
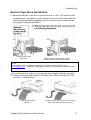
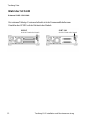
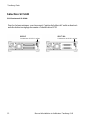
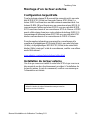
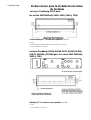
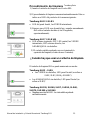
External SLR2 ® SLR140:
For the external tabletops, you will find the SCSI-ID setting thumb-wheel switch
on the rear end of the unit box:
Tandberg Data
12 Tandberg SLR Installation and User's Guide
SLR2-5
SCSI-ID Thumb-wheel Switch
SLR7-140
SCSI-ID Thumb-wheel Switch

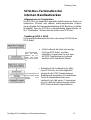
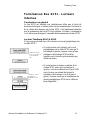
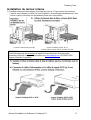
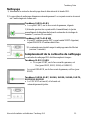
SCSI-bus Termination - Internal
Tape Drives
Termination in General
A SCSI-bus is susceptible to interference, such as noise from
electrical motors and other electromagnetic devices. Also due
to the speed of the data on the SCSI-bus, it is of outmost
importance to terminate the SCSI-bus properly. “Termination” is
used to define the ends of the SCSI-bus.
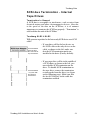
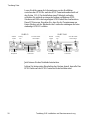
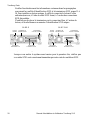
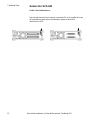
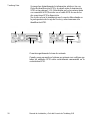
Tandberg SLR2 ® SLR5
Will your new tape drive be the last or only SCSI device on a SCSI
cable?
• If your drive will be the last device on
the SCSI cable or the only device on the
cable, as shown to the left, make sure
that the SCSI termination packs are
installed in the drive (Factory default).
• If your tape drive will be in the middle of
a SCSI chain, as shown to the left, you
must disable SCSI termination on the
drive. To disable SCSI termination on
the tape drive, remove the termination
resistor packs from the drive (see figure
on the following page). Make sure that
the last SCSI device on the cable has
termination enabled.
Tandberg Data
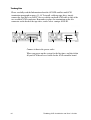
SCSI termination
where the tape
drive is the last or
only SCSI device.
SCSI termination
in a system with
three internal
SCSI devices.
Tandberg SLR Installation and User's Guide 13

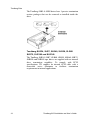
The Tandberg SLR2 ® SLR5 drives have 3 passive termination
resistor packages that can be removed or installed inside the
drive.
Tandberg SLR24, SLR7, SLR40, SLR50, SLR60
SLR75, SLR100 and SLR140
The Tandberg SLR24, SLR7, SLR40, SLR50, SLR60, SLR75,
SLR100 and SLR140 tape drives are supplied with no internal
drive termination capability. To comply with PC99
specifications, TD supplies an internal SCSI cable with a
removable active terminator to facilitate termination
requirements in internal applications.
Tandberg Data
14
Tandberg SLR Installation and User's Guide

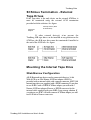
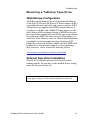
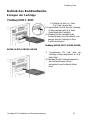
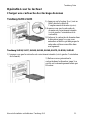
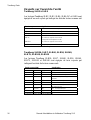
SCSI-bus Termination - External
Tape Drives
If the Tape drive is the only device on the external SCSI-bus, it
must be terminated using the external SCSI termination
provided with the solution. See figure:
SLR Tape Drive (Must
be terminated)
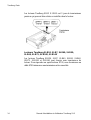
If other external device(s) is/are present, the
Tandberg SLR tape drive can be installed in any position on the
SCSI-bus, the SLR tape drive must be terminated if installed at
the end of the SCSI-bus. See figure:
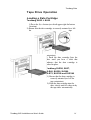
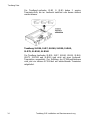
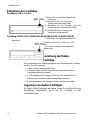
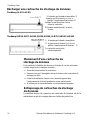
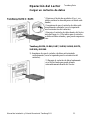
Mounting the Internal Tape Drive
Wide/Narrow Configuration
All SLR internal tape drives can be connected either to a 16 bit
Wide SCSI or an 8-bit Narrow SCSI host adapter. SLR25 is
provided with an internal cable with a narrow connector. SLR7-140
internal tape drives are supplied with a WIDE connector. If you plan
to use SLR2-5 with a WIDE SCSI host adapter you will need a
Narrow SCSI host adapter Narrow to WIDE converter for the
internal cable supplied with your SLR2-5 tape storage solution. If
you plan to use SLR7-140 with a narrow SCSI host adapter you will
need a Wide to Narrow converter.
Tandberg Data
SCSI Host
Adapter
Tandberg SLR Installation and User's Guide 15

More detailed information regarding these converters and connecting
8 bit narrow SCSI peripherals to 16 bit wide SCSI host adapter and 16
bit WIDE SCSI peripherals to 8 bit narrow host adapters as well as
purchasing these converters, can be found at the following website.
www.adaptec.com/products/solutions/cables.html
Tandberg Data
NOTE:
When mounting a Tandberg SLR24, SLR7, SLR40, SLR50, SLR60,
SLR75, SLR100 or SLR140 tape drive on an 8-bit SCSI host adapter, using
the Wide/Narrow converter, check that the WIDE Negotiation feature is
disabled from the SCSI host adapter Bios. Refer to the SCSI adapter
manual for more information.
Page is loading ...
Page is loading ...
Page is loading ...
Page is loading ...
Page is loading ...
Page is loading ...
Page is loading ...
Page is loading ...
Page is loading ...
Page is loading ...
Page is loading ...
Page is loading ...
Page is loading ...
Page is loading ...
Page is loading ...
Page is loading ...
Page is loading ...
Page is loading ...
Page is loading ...
Page is loading ...
Page is loading ...
Page is loading ...
Page is loading ...
Page is loading ...
Page is loading ...
Page is loading ...
Page is loading ...
Page is loading ...
Page is loading ...
Page is loading ...
Page is loading ...
Page is loading ...
Page is loading ...
Page is loading ...
Page is loading ...
Page is loading ...
Page is loading ...
Page is loading ...
Page is loading ...
Page is loading ...
Page is loading ...
Page is loading ...
Page is loading ...
Page is loading ...
Page is loading ...
Page is loading ...
Page is loading ...
Page is loading ...
Page is loading ...
Page is loading ...
Page is loading ...
Page is loading ...
Page is loading ...
Page is loading ...
Page is loading ...
Page is loading ...
Page is loading ...
Page is loading ...
Page is loading ...
Page is loading ...
Page is loading ...
Page is loading ...
Page is loading ...
Page is loading ...
Page is loading ...
Page is loading ...
Page is loading ...
Page is loading ...
Page is loading ...
Page is loading ...
Page is loading ...
Page is loading ...
Page is loading ...
Page is loading ...
Page is loading ...
Page is loading ...
Page is loading ...
Page is loading ...
Page is loading ...
Page is loading ...
Page is loading ...
Page is loading ...
Page is loading ...
Page is loading ...
Page is loading ...
Page is loading ...
Page is loading ...
Page is loading ...
Page is loading ...
Page is loading ...
Page is loading ...
Page is loading ...
Page is loading ...
Page is loading ...
Page is loading ...
Page is loading ...
Page is loading ...
Page is loading ...
Page is loading ...
Page is loading ...
Page is loading ...
Page is loading ...
Page is loading ...
Page is loading ...
Page is loading ...
Page is loading ...
Page is loading ...
Page is loading ...
Page is loading ...
Page is loading ...
Page is loading ...
Page is loading ...
Page is loading ...
Page is loading ...
Page is loading ...
Page is loading ...
Page is loading ...
Page is loading ...
Page is loading ...
Page is loading ...
Page is loading ...
Page is loading ...
Page is loading ...
Page is loading ...
Page is loading ...
Page is loading ...
Page is loading ...
Page is loading ...
Page is loading ...
Page is loading ...
Page is loading ...
Page is loading ...
Page is loading ...
Page is loading ...
Page is loading ...
Page is loading ...
Page is loading ...
Page is loading ...
Page is loading ...
Page is loading ...
Page is loading ...
Page is loading ...
Page is loading ...
Page is loading ...
Page is loading ...
Page is loading ...
Page is loading ...
Page is loading ...
Page is loading ...
Page is loading ...
Page is loading ...
Page is loading ...
Page is loading ...
Page is loading ...
Page is loading ...
Page is loading ...
Page is loading ...
Page is loading ...
Page is loading ...
Page is loading ...
Page is loading ...
Page is loading ...
Page is loading ...
Page is loading ...
Page is loading ...
Page is loading ...
Page is loading ...
Page is loading ...
Page is loading ...
Page is loading ...
Page is loading ...
Page is loading ...
Page is loading ...
Page is loading ...
Page is loading ...
Page is loading ...
Page is loading ...
Page is loading ...
Page is loading ...
Page is loading ...
Page is loading ...
Page is loading ...
Page is loading ...
Page is loading ...
Page is loading ...
Page is loading ...
Page is loading ...
Page is loading ...
Page is loading ...
Page is loading ...
Page is loading ...
Page is loading ...
Page is loading ...
Page is loading ...
Page is loading ...
Page is loading ...
Page is loading ...
Page is loading ...
Page is loading ...
Page is loading ...
Page is loading ...
Page is loading ...
Page is loading ...
Page is loading ...
Page is loading ...
Page is loading ...
Page is loading ...
Page is loading ...
Page is loading ...
Page is loading ...
Page is loading ...
Page is loading ...
Page is loading ...
Page is loading ...
Page is loading ...
Page is loading ...
Page is loading ...
Page is loading ...
Page is loading ...
Page is loading ...
Page is loading ...
Page is loading ...
Page is loading ...
Page is loading ...
Page is loading ...
Page is loading ...
Page is loading ...
Page is loading ...
Page is loading ...
Page is loading ...
Page is loading ...
Page is loading ...
Page is loading ...
Page is loading ...
Page is loading ...
Page is loading ...
Page is loading ...
Page is loading ...
Page is loading ...
Page is loading ...
Page is loading ...
Page is loading ...
Page is loading ...
Page is loading ...
Page is loading ...
Page is loading ...
Page is loading ...
Page is loading ...
Page is loading ...
Page is loading ...
Page is loading ...
Page is loading ...
Page is loading ...
Page is loading ...
Page is loading ...
Page is loading ...
Page is loading ...
Page is loading ...
Page is loading ...
Page is loading ...
Page is loading ...
Page is loading ...
Page is loading ...
Page is loading ...
Page is loading ...
Page is loading ...
Page is loading ...
Page is loading ...
Page is loading ...
Page is loading ...
Page is loading ...
Page is loading ...
Page is loading ...
Page is loading ...
Page is loading ...
Page is loading ...
Page is loading ...
Page is loading ...
Page is loading ...
Page is loading ...
Page is loading ...
Page is loading ...
Page is loading ...
Page is loading ...
Page is loading ...
Page is loading ...
Page is loading ...
Page is loading ...
Page is loading ...
Page is loading ...
Page is loading ...
Page is loading ...
Page is loading ...
Page is loading ...
Page is loading ...
Page is loading ...
Page is loading ...
Page is loading ...
Page is loading ...
Page is loading ...
Page is loading ...
Page is loading ...
Page is loading ...
Page is loading ...
Page is loading ...
Page is loading ...
Page is loading ...
Page is loading ...
Page is loading ...
Page is loading ...
Page is loading ...
Page is loading ...
Page is loading ...
Page is loading ...
Page is loading ...
Page is loading ...
Page is loading ...
Page is loading ...
Page is loading ...
Page is loading ...
Page is loading ...
Page is loading ...
Page is loading ...
Page is loading ...
Page is loading ...
Page is loading ...
Page is loading ...
Page is loading ...
Page is loading ...
Page is loading ...
Page is loading ...
Page is loading ...
Page is loading ...
Page is loading ...
Page is loading ...
Page is loading ...
Page is loading ...
Page is loading ...
Page is loading ...
Page is loading ...
Page is loading ...
Page is loading ...
Page is loading ...
Page is loading ...
Page is loading ...
Page is loading ...
Page is loading ...
-
 1
1
-
 2
2
-
 3
3
-
 4
4
-
 5
5
-
 6
6
-
 7
7
-
 8
8
-
 9
9
-
 10
10
-
 11
11
-
 12
12
-
 13
13
-
 14
14
-
 15
15
-
 16
16
-
 17
17
-
 18
18
-
 19
19
-
 20
20
-
 21
21
-
 22
22
-
 23
23
-
 24
24
-
 25
25
-
 26
26
-
 27
27
-
 28
28
-
 29
29
-
 30
30
-
 31
31
-
 32
32
-
 33
33
-
 34
34
-
 35
35
-
 36
36
-
 37
37
-
 38
38
-
 39
39
-
 40
40
-
 41
41
-
 42
42
-
 43
43
-
 44
44
-
 45
45
-
 46
46
-
 47
47
-
 48
48
-
 49
49
-
 50
50
-
 51
51
-
 52
52
-
 53
53
-
 54
54
-
 55
55
-
 56
56
-
 57
57
-
 58
58
-
 59
59
-
 60
60
-
 61
61
-
 62
62
-
 63
63
-
 64
64
-
 65
65
-
 66
66
-
 67
67
-
 68
68
-
 69
69
-
 70
70
-
 71
71
-
 72
72
-
 73
73
-
 74
74
-
 75
75
-
 76
76
-
 77
77
-
 78
78
-
 79
79
-
 80
80
-
 81
81
-
 82
82
-
 83
83
-
 84
84
-
 85
85
-
 86
86
-
 87
87
-
 88
88
-
 89
89
-
 90
90
-
 91
91
-
 92
92
-
 93
93
-
 94
94
-
 95
95
-
 96
96
-
 97
97
-
 98
98
-
 99
99
-
 100
100
-
 101
101
-
 102
102
-
 103
103
-
 104
104
-
 105
105
-
 106
106
-
 107
107
-
 108
108
-
 109
109
-
 110
110
-
 111
111
-
 112
112
-
 113
113
-
 114
114
-
 115
115
-
 116
116
-
 117
117
-
 118
118
-
 119
119
-
 120
120
-
 121
121
-
 122
122
-
 123
123
-
 124
124
-
 125
125
-
 126
126
-
 127
127
-
 128
128
-
 129
129
-
 130
130
-
 131
131
-
 132
132
-
 133
133
-
 134
134
-
 135
135
-
 136
136
-
 137
137
-
 138
138
-
 139
139
-
 140
140
-
 141
141
-
 142
142
-
 143
143
-
 144
144
-
 145
145
-
 146
146
-
 147
147
-
 148
148
-
 149
149
-
 150
150
-
 151
151
-
 152
152
-
 153
153
-
 154
154
-
 155
155
-
 156
156
-
 157
157
-
 158
158
-
 159
159
-
 160
160
-
 161
161
-
 162
162
-
 163
163
-
 164
164
-
 165
165
-
 166
166
-
 167
167
-
 168
168
-
 169
169
-
 170
170
-
 171
171
-
 172
172
-
 173
173
-
 174
174
-
 175
175
-
 176
176
-
 177
177
-
 178
178
-
 179
179
-
 180
180
-
 181
181
-
 182
182
-
 183
183
-
 184
184
-
 185
185
-
 186
186
-
 187
187
-
 188
188
-
 189
189
-
 190
190
-
 191
191
-
 192
192
-
 193
193
-
 194
194
-
 195
195
-
 196
196
-
 197
197
-
 198
198
-
 199
199
-
 200
200
-
 201
201
-
 202
202
-
 203
203
-
 204
204
-
 205
205
-
 206
206
-
 207
207
-
 208
208
-
 209
209
-
 210
210
-
 211
211
-
 212
212
-
 213
213
-
 214
214
-
 215
215
-
 216
216
-
 217
217
-
 218
218
-
 219
219
-
 220
220
-
 221
221
-
 222
222
-
 223
223
-
 224
224
-
 225
225
-
 226
226
-
 227
227
-
 228
228
-
 229
229
-
 230
230
-
 231
231
-
 232
232
-
 233
233
-
 234
234
-
 235
235
-
 236
236
-
 237
237
-
 238
238
-
 239
239
-
 240
240
-
 241
241
-
 242
242
-
 243
243
-
 244
244
-
 245
245
-
 246
246
-
 247
247
-
 248
248
-
 249
249
-
 250
250
-
 251
251
-
 252
252
-
 253
253
-
 254
254
-
 255
255
-
 256
256
-
 257
257
-
 258
258
-
 259
259
-
 260
260
-
 261
261
-
 262
262
-
 263
263
-
 264
264
-
 265
265
-
 266
266
-
 267
267
-
 268
268
-
 269
269
-
 270
270
-
 271
271
-
 272
272
-
 273
273
-
 274
274
-
 275
275
-
 276
276
-
 277
277
-
 278
278
-
 279
279
-
 280
280
-
 281
281
-
 282
282
-
 283
283
-
 284
284
-
 285
285
-
 286
286
-
 287
287
-
 288
288
-
 289
289
-
 290
290
-
 291
291
-
 292
292
-
 293
293
-
 294
294
-
 295
295
-
 296
296
-
 297
297
-
 298
298
-
 299
299
-
 300
300
-
 301
301
-
 302
302
-
 303
303
-
 304
304
-
 305
305
-
 306
306
-
 307
307
-
 308
308
-
 309
309
-
 310
310
-
 311
311
-
 312
312
-
 313
313
-
 314
314
-
 315
315
-
 316
316
-
 317
317
-
 318
318
-
 319
319
-
 320
320
-
 321
321
-
 322
322
-
 323
323
-
 324
324
-
 325
325
-
 326
326
-
 327
327
-
 328
328
-
 329
329
-
 330
330
-
 331
331
-
 332
332
-
 333
333
-
 334
334
-
 335
335
-
 336
336
-
 337
337
-
 338
338
-
 339
339
-
 340
340
-
 341
341
-
 342
342
-
 343
343
-
 344
344
-
 345
345
-
 346
346
-
 347
347
-
 348
348
-
 349
349
-
 350
350
-
 351
351
-
 352
352
-
 353
353
-
 354
354
-
 355
355
-
 356
356
-
 357
357
-
 358
358
-
 359
359
-
 360
360
-
 361
361
-
 362
362
-
 363
363
-
 364
364
-
 365
365
-
 366
366
-
 367
367


Tandberg Data SLR75 Installation guide
- Category
- Tape drives
- Type
- Installation guide
Ask a question and I''ll find the answer in the document
Finding information in a document is now easier with AI
in other languages
Related papers
-
Tandberg Data 6721 7151 00 User manual
-
-
-
-
-
-
-
-
-
Other documents
-
 TANDBERG 840LTO Quick start guide
-
Symantec E130258 User manual
-
TANDBERG SLR60 Reference guide
-
IBM 40/80 GB DLT User manual
-
Symantec E180538 Datasheet
-
-
Dell POWERVAULT 735N User guide
-
Iomega UltraMax Desktop Hard Drive 1 TB Owner's manual
-
Symantec BACKUP EXEC 11D User manual
-
