PCS 2000
Solar Powered Alarm Desktop Clock with Projection
Introduction
This solar powered desktop clock comes with calendar, day, and temperature
display. lt is solar powered with optional backup DC batteries
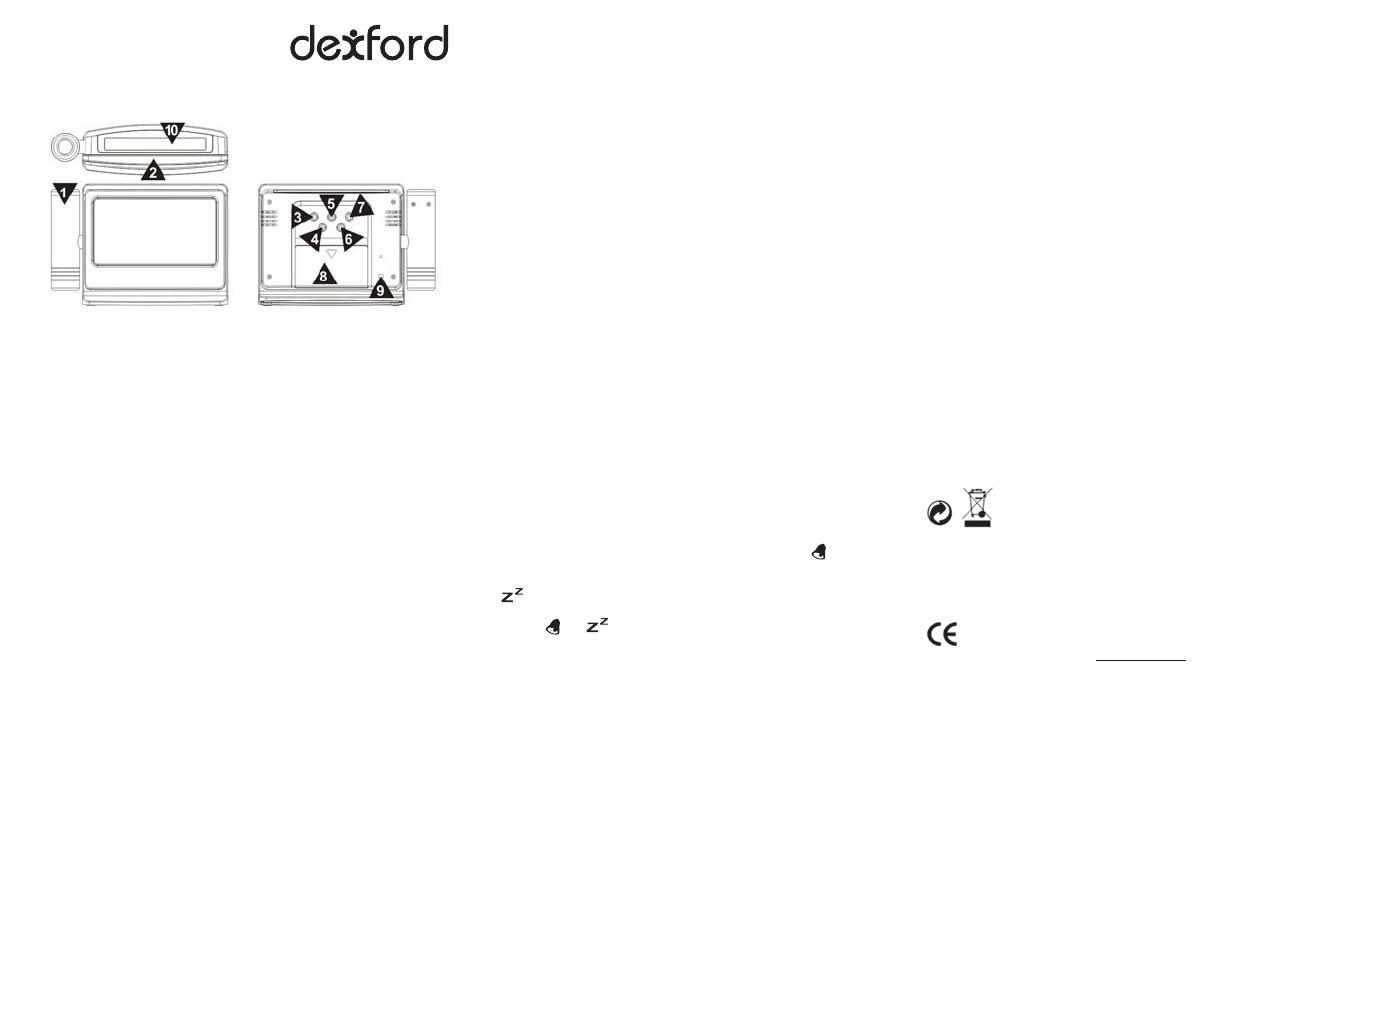
1 Projection
2 [ SNOOZE / LIGHT ] button
3 [ MODE ] button
4 [ ALM SET ] button
5 [ -/C/F ] button
6 [ ALM ON/OFF ] button
7 [ +/12/24 ] button
8 Battery compartment
9 AC/DC input jack (not available in this model)
10 Solar panel on top
Getting started
Toggle the "On/Off" switch under battery compartment (8) to turn the clock on
and off.
Optional batteries installation
1. Open battery compartment (8) on the back of the unit.
2. Install / replace with 2x "AAA" size batteries in the compartment. lt is rec-
ommended that only alkaline batteries are used.
3. Replace the battery compartment (8) on the back of the unit.
4. A short beep will be heard to confirm proper installation of batteries.
Batteries safety warnings
1. Please read all instructions carefully before use.
2. Install batteries correctly by matching the polarities (+/-).
3. Always replace a complete set of batteries.
4. Never mix used and new batteries.
5. Remove exhausted batteries immediately.
6. Remove batteries when not in use.
7. Do not recharge and do not dispose of batteries in fire as the batteries
may explode.
8. Ensure batteries are stored away from metal objects as contact may
cause a short circuit.
9. Avoid exposing batteries to temperature or humidity extremes or direct
sunlight.
10. Keep all batteries out of reach from children. They are a choking hazard.
11. Please retain packaging for future reference.
To set time
1. Hold down the [ MODE ] button (3) for approximately 3 seconds until the dis-
play is flashing.
2. Press [ +/12/24 ] button (7) or [ -/C/F ] button (5) to change the hour setting.
Press [ MODE ] button (3) to confirm.
3. Press [ +/12/24 ] button (7) or [ -/C/F ] button (5) to change the minute set-
ting. Press [ MODE ] button (3) to confirm.
4. Press [ +/12/24 ] button (7) or [ -/C/F ] button (5) to change the second set-
ting. Press [ MODE ] button (3) to confirm.
5. Press [ +/12/24 ] button (7) or [ -/C/F ] button (5) to change the year setting.
Press [ MODE ] button (3) to confirm.
6. “date/month“ is flashing. Press [ MODE ] button (3) to confirm.
7. Press [ +/12/24 ] button (7) or [ -/C/F ] button (5) to change the month setting.
Press [ MODE ] button (3) to confirm.
8. Press [ +/12/24 ] button (4) or [ -/C/F/RCC ] button (5) to change the date set-
ting. Press [ MODE ] button (3) to confirm.
9. Press [ +/12/24 ] button (4) or [ -/C/F/RCC ] button (5) to change the lan-
guage setting. ENG for English; GER for German; SPA for Spanish; ITA for
Italian; FRA for French. Press [ MODE ] button (3) to confirm.
10. The display will no longer flash.
To set alarm time
1. Press [ ALM SET ] button (4) until the alarm time is shown on the bottom right
hand corner.
2. Press and hold [ ALM SET ] button (4) for approximately 3 seconds until the
alarm display is flashing.
3. Press [ +/12/24 ] button (7) or [ -/C/F ] button (5) to change the minute set-
ting. Press [ ALM SET ] button (4).
4. Press [ +/12/24 ] button (7) or [ -/C/F ] button (5) to change the hour setting.
Press [ ALM SET ] button (4).
5. The display will no longer flash.
6. Press [ MODE ] button (3) to show the temperature.
To activate the alarm
1. Set desired alarm time as per instructions above.
2. Press [ ALM ON/OFF ] button (8) to active the preset alarm. will be
shown.
3. Press [ ALM ON/OFF ] button (8) once more to activate automatic snooze.
will be shown.
4. Press [ ALM ON/OFF ] button (8) again to activate both alarm and automatic
snooze. and will be shown.
5. The alarm will sound for 60 seconds when the preset alarm time is reached.
Hit any button on the back of the clock to deactivate the alarm. The clock will
automatically enter snooze mode if the alarm is not deactivated.
6. Hit the [ SNOOZE / LIGHT ] button (2) when the alarm is on to enter snooze
mode. The alarm will sound again in 5 minutes. Hit any button on the back of
the clock to deactivate the alarm.
AM / PM and 24-hour clock setting
Press [ +/12/24 ] button (7) to toggle between AM / PM and 24-hour clock setting
when the time is shown.
Setting the Thermometer
Touch [ -/C/F ] button (5) to toggle between Fahrenheit and Celsius.
Projecting the current time
1. This clock is equipped with night time projection. The time can be projected
onto a flat surface in a very dark room.
2. Press the [ SNOOZE / LIGHT ] button (2) to activate the time projection. The
current time will be projected for approximately 3 seconds.
3. Turn the bottom knob clockwise or counterclockwise to adjust focus.
Warnings
• Do not subject the unit to excessive force, shock, dust, temperature or
humidity.
• Do not immerse the unit in water.
• Batteries recharge at its optimal with bright indirect sunlight.
• Avoid exposing unit to direct sunlight.
• The battery in this product is not replaceable. Do not replace.
• The rechargeabie battery has a limited shelf life.
• Dispose the complete unit when battery is no longer charging or when the
unit is no longer displaying the temperature.
• Do not remove any screws.
• Do not dispose this unit in a fire. IT MAY EXPLODE.
• Keep unit away from small children. The unit or parts of the unit might be a
choking hazard.
• Never attempt to recharge the batteries in any other methods.
• Solar cells will charge built-in rechargeable batteries at a minimum average
of 3,000 lux.
Specification
1. Calendar range: year 2000 to year 2069
2. This clock is equipped with night time projection. The time can be project-
ed onto a flat surface in a very dark room.
3. Press [ SNOOZE / LIGHT ] (2) to activate the time projection. The current
time will be projected for approximately 3 seconds.
4. The projection is auto-focus. Flat projection surface should be a minimum
800 mm (2'-10") away. For maximum clarity, the projection surface should
be no longer than 1800 mm (6'-0") away from the clock. This is approxi-
mately the distance between the top of a bed side table and the height of
common height ceiling.
Disposal
You can help protect the environment! Please remember to
respect the local regulations: Hand in the non-working electrical
equipments to an appropriate waste disposal center.
Hotline
In the event of technical problems, you can contact our hotline service,
Tel. 0900 00 1675 within Switzerland (cost via Swisscom at time of going to
print: CHF 2.60/min).
Conformity
This equipment complies with the European EMV directive. To view the
complete Declaration of Conformity, please refer to the free download
available at our web site: www.dexford.com
.
www.dexford.com V 1.0 / 27.06.2011


