Page is loading ...

1
Owner’s Manual
1111 W. 35th Street, Chicago, IL 60609 USA • www.tripplite.com/support
Copyright © 2017 Tripp Lite. All rights reserved.
DVI over Cat5 Extenders
and Extender/Splitters
Extender Kit Models:
B140-101, B140-1P1-WP-1, B140-101X, B140-1A1-WP
Local Unit Models: B140-002 and B140-004
Remote Unit Models: B140-1P0, B140-1A0,
B140-1A0-WP-1 and B140-110
PROTECT YOUR INVESTMENT!
Register your product for quicker service and ultimate peace of mind.
You could also win an ISOBAR6ULTRA surge protector—a $100 value!
www.tripplite.com/warranty
Este manual esta disponible en español en la página de Tripp Lite:
www.tripplite.com/support
Ce manuel est disponible en français sur le site Web de Tripp Lite :
www.tripplite.com/support
Русскоязычная версия настоящего руководства
представлена на веб-сайте компании Tripp Lite по адресу:
www.tripplite.com/support
17-08-507-933094-EN.indd 1 9/25/2017 12:51:30 PM

2
Table of Contents
Package Contents ................................................................................3
Product Features .................................................................................3
Mounting (Optional) ............................................................................8
Standard Extender Kit Installation .......................................................... 9
Extender Kit with Remote/Repeater Installation ....................................11
(B140-101X and B140-1A1-WP extender kits only)
Standard Extender/Splitter Installation ..................................................14
Extender/Splitter with Remote/Repeater Installation .............................. 17
(B140-1A0 and B140-1A0-WP-1 remote receiver units only)
Extender/Splitter Daisy-Chain Installation .............................................. 20
Extender/Splitter Daisy-Chain with Remote/Repeater Installation ............ 22
(B140-004 extender/splitter, and B140-1A0 and B140-1A0-WP
remote receivers only)
Warranty and Product Registration ....................................................... 27
17-08-507-933094-EN.indd 2 9/25/2017 12:51:30 PM

3
Package Contents
Product Features
B140-101
B140-1P1-WP-1
B140-101X
B140-1A1-WP
B140-002
B140-004
B140-1A0
B140-1A0-WP-1
B140-1P0
B140-110
Local Unit (L), Remote Unit (R), or
Both (B)
B B B B L L R R R R
External Power Supplies (0, 1, or 2) 0 0 1 2 1 1 1 1 0 1
Mounting Hardware X X X X X
Wallplate Screws X X X
Screwdriver for Equalization
Adjustment
X X X X X
DVI Daisy-chain Cable X
All
• Support DVI-D Single-Link video resolutions up to 1920 x 1080 (60 Hz)
• Plug-and-play; no software or drivers required
• Compatible with all major operating systems
• HDCP compatible
B140-101
• DVI over Cat5 Passive Extender Kit (Box-style)
• Extend a 1024 x 768 (60 Hz) signal up to 100 ft. (30.5 m) from the
source, or a 1920 x 1080 (60 Hz) signal up to 50 ft. (15 m) from the
source
• No external power required
17-08-507-933094-EN.indd 3 9/25/2017 12:51:30 PM

4
Product Features
B140-1P1-WP-1
• DVI over Cat5 Passive Extender Wallplate Kit
• Extend a 1024 x 768 (60 Hz) signal up to 75 ft. (23 m) from the source,
or a 1920 x 1080 (60 Hz) signal up to 50 ft. (15 m) from the source
• RJ45-style wallplates allow for the use of standard Cat5e/6 patch cables;
110 punchdown connection not required
• No external power required
B140-101X
• DVI over Cat5 Active Extender Kit (Box-style)
• Extend a 1024 x 768 (60 Hz) signal up to 200 ft. (60 m) from the
source, or a 1920 x 1080 (60 Hz) signal up to 150 ft. (45 m) from the
source
• Remote receiver unit features a built-in Equalization control for video
image adjustment
• Includes mounting hardware that allows remote unit to be wall-mounted,
rack-mounted or pole-mounted
B140-1A1-WP
• DVI over Cat5 Active Extender Wallplate Kit
• Extend a 1024 x 768 (60 Hz) signal up to 200 ft. (60 m) from the
source, or a 1920 x 1080 (60 Hz) signal up to 150 ft. (45 m) from the
source
• Remote receiver unit features a built-in Equalization control for video
image adjustment
• RJ45-style wallplates allow for the use of standard Cat5e/6 patch cables;
110 punchdown connection not required
17-08-507-933094-EN.indd 4 9/25/2017 12:51:30 PM

5
Product Features
B140-002
• 2-Port DVI over Cat5 Extender/Splitter Local Transmitter Unit (Box-style)
• Splits a DVI-D single link signal into two separate signals
• Works with remote/repeater and receiver units to extend a DVI-D single
link signal beyond the 16 ft. (5 m) distance limitation
• Includes mounting hardware that allows the unit to be wall-mounted,
rack-mounted or pole-mounted
B140-004
• 4-Port DVI over Cat5 Extender/Splitter Local Transmitter Unit (Box-style)
• Splits a DVI-D single link signal into four
• Additional DVI port can be used to connect a local monitor or daisy-chain
additional B140-004 units. Up to three B140-004 units can be daisy-
chained to increase the number of connected monitors
• Works with remote/repeater and receiver units to extend a DVI-D single
link signal beyond the 16 ft. (5 m) distance limitation
• Includes mounting hardware that allows the unit to be wall-mounted,
rack-mounted or pole-mounted
• Up to three B126-004 units can be mounted in a B132-004-RB
1U rackmount bracket
17-08-507-933094-EN.indd 5 9/25/2017 12:51:30 PM

6
Product Features
B140-1A0
• DVI over Cat5 Active Extender Remote Receiver Unit (Box-style)
• Works with B140-002 and B140-004 extender/splitters to extend a
1024 x 768 (60 Hz) signal up to 200 ft. (60 m) from the source, or a
1920 x 1080 (60 Hz) signal up to 150 ft. (45 m) from the source
• Built-in Equalization control for video image adjustment
• Includes mounting hardware that allows the unit to be wall-mounted,
rack-mounted or pole-mounted
B140-1A0-WP-1
• DVI over Cat5 Active Extender Wallplate
• Works with B140-002 and B140-004 extender/splitters to extend a
1024 x 768 (60 Hz) signal up to 200 ft. (60 m) from the source, or a
1920 x 1080 (60 Hz) signal up to 150 ft. (45 m) from the source
• Built-in Equalization control for video image adjustment
• RJ45-style wallplate allows for the use of standard Cat5e/6 patch cables;
110 punchdown connection not required
B140-1P0
• DVI over Cat5 Passive Extender Remote Receiver Unit (Box-style)
• Works with B140-002 and B140-004 extender/splitters to extend a
1024 x 768 (60 Hz) signal up to 100 ft. (30.5 m) from the source, or a
1920 x 1080 (60 Hz) signal up to 50 ft. (15 m) from the source
• Built-in DVI cable; separate DVI cable not required
• No external power required
17-08-507-933094-EN.indd 6 9/25/2017 12:51:31 PM

7
Product Features
B140-110
• DVI over Cat5 Extender Remote/Repeater Unit (Box-style)
• Extends and expands your Tripp Lite DVI over Cat5 installation, allowing
you to locate multiple monitors at different points in a chain of up to
700 ft. (213 m)
• Extends a 1024 x 768 (60 Hz) signal up to 175 ft. (50 m), or a
1920 x 1080 (60 Hz) signal up to 125 ft. (38 m) from the local
transmitter unit to the first remote/repeater unit in the installation
• Extends a 1024 x 768 (60 Hz) signal up to an additional 175 ft. (53 m),
or a 1920 x 1080 (60 Hz) signal up to an additional 125 ft. (38 m) from
each remote/repeater unit to the next unit in the chain. In a full four-level
daisy-chain installation, a 1024 x 768 (60 Hz) signal can be extended up
to 700 ft. (213 m), or a 1920 x 1080 (60 Hz) signal up to 500 ft.
(152 m) from the source to the last remote unit in the chain.
• Connect up to four remote units (three remote/repeaters and one
receiver), with a monitor located at each point in the chain
• Built-in Equalization control for video image adjustment
• Includes mounting hardware that allows the unit to be wall-mounted,
rack-mounted or pole-mounted
Optional Accessories:
• B132-004-RB 1U Rack-mount Bracket
• N202-Series Cat6 24 AWG Solid Wire Patch Cables
• P561-Series DVI-D Single-Link Cables
17-08-507-933094-EN.indd 7 9/25/2017 12:51:31 PM

8
Mounting (Optional)
The B140-101X, B140-002, B140-004, B140-1A0 and B140-110 come
with mounting hardware that allows them to be mounted in a variety of
ways. The following images show the different mounting methods.
Note: The B140-004 can also be mounted to a Tripp Lite B132-004-RB 1U
Rackmount Bracket. Up to 3 B140-004 local units can be connected to a
B132-004-RB.
Wall-Mount
19” Rack-Mount Pole-Mount
17-08-507-933094-EN.indd 8 9/25/2017 12:51:33 PM

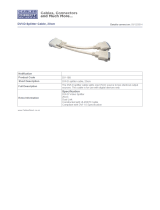
TO DVI SOURCE
RJ45 JACK
Cat5/5e/6
PATCH CABLE
LOCAL UNIT
POWER
JACK
REMOTE UNIT
TO DVI MONITOR
B140-101 — Up to 100 ft. (30.5 m) at 1024 x 768 (60 Hz), or up to 50 ft. (15 m) at 1920 x 1080 (60 Hz)
B140-1P1-WP-1 — Up to 75 ft. (23 m) at 1024 x 768 (60 Hz), or up to 50 ft. (15 m) at 1920 x 1080 (60 Hz)
B140-101X and B140-1A1-WP — Up to 200 ft. (60 m) at 1024 x 768 (60 Hz),
or up to 150 ft. (45 m) at 1920 x 1080 (60 Hz)
9
Standard Extender Kit Installation
(B140-101, B140-1P1-WP-1, B140-101X, B140-1A1-WP)
Notes:
1. The diagram below shows a B140-101X installation. Installation will be the same
for the B140-1A1-WP. Installation will be similar for the B140-101 and
B140-1P1-WP-1, except they will not require external power.
2. Test to make sure the entire installation works properly before pulling cables through
ceilings/walls.
3. To achieve maximum distance and performance, use 24 AWG Solid Wire Cat5e/6
cable. Using stranded wire cable, or cable with a gauge (AWG) size higher than
24 AWG will result in lesser performance and shorter extension distance. Tripp Lite
N202-Series (Cat6) patch cables are made with 24 AWG solid wire cabling.
1
Make sure power to the DVI source is turned off.
2
Connect the built-in DVI connector on the B140-101 or B140-101X
local unit to the DVI source, or connect the B140-1A1-WP or
B140-1P1-WP-1 local unit to the source using a Tripp Lite
P561-Series DVI cable.
17-08-507-933094-EN.indd 9 9/25/2017 12:51:34 PM

10
Standard Extender Kit Installation
3
B140-1A1-WP only: Connect the external power supply to the local
unit and plug it into a Trip Lite Surge Protector, Power Distribution Unit
(PDU), or Uninterruptable Power Supply (UPS). The green Power LED will
illuminate.
4
Connect the RJ45 ports on the local and remote units using
Cat5e/6 cable.
5
Connect the built-in DVI connector on the B140-101 remote unit to the
DVI monitor, or connect the B140-1A1-WP, B140-1P1-WP-1 or
B140-101X remote unit to the monitor using a Tripp Lite
P561-Series DVI cable.
6
B140-1A1-WP and B140-101X only: Connect the external power
supply to the remote unit and plug it into a Tripp Lite Surge Protector,
Power Distribution Unit (PDU) or Uninterruptible Power Supply (UPS).
The green RJ45 LED on the B140-101X remote unit will illuminate to
indicate it is receiving power. The green Power LED will illuminate on the
B140-1A1-WP remote unit.
7
Turn on the power to the DVI source. The green RJ45 LEDs will
illuminate on the B140-101 and B140-101X units, and the Power LEDs
will illuminate on the B140-1P1-WP-1 units to indicate that they are
receiving power. The orange RJ45 LED will illuminate on the B140-101X
remote unit to indicate it is receiving a signal from the source. The
orange Activity LEDs will illuminate on the B140-1A1-WP units.
8
B140-1A1-WP and B140-101X only: If necessary, adjust the
Equalization control on the remote unit to improve the video image.
Note: An improper Equalization setting can cause the monitor not to
display a picture at all. Try each Equalization setting until an acceptable
image is displayed.
17-08-507-933094-EN.indd 10 9/25/2017 12:51:34 PM

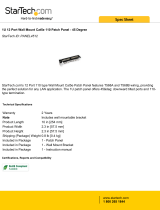
DVI SOURCE
B140-1A1-WP LOCAL
TRANSMITTER
B140-1A1-WP REMOTE
RECEIVER
B140-110
REMOTE
REPEATER
B140-110
REMOTE
REPEATER
B140-110
REMOTE
REPEATER
Up to 175 ft. (50 m) at 1024 x 768 (60 Hz)
Up to 125 ft. (38 m) at 1920 x 1080 (60 Hz)
Up to 175 ft. (50 m) at 1024 x 768 (60 Hz)
Up to 125 ft. (38 m) at 1920 x 1080 (60 Hz)
0
1
2
3
4
5
6
7
0
1
2
3
4
5
6
7
0
1
2
3
4
5
6
7
0
1
2
3
4
5
6
7
11
Extender Kit with Remote/Repeater Installation
(B140-101X and B140-1A1-WP extender kits only)
Notes:
1. Test to make sure the entire installation works properly before pulling cables through
ceilings/walls.
2. To achieve maximum distance and performance, use 24 AWG solid wire Cat5e/6
cable. Using stranded wire Cat5e/6 cable, or cable with a gauge (AWG) size higher
than 24 AWG will result in shorter extension distance. All Tripp Lite N202-Series
Cat6 cables are made with 24 AWG solid wire cabling.
3. The installation diagram shows a B140-1A1-WP. The B140-101X installation is the
same, except its local unit does not require power.
1
Make sure the DVI source is powered OFF.
2
Connect the built-in DVI connector on the B140-101X local unit to the
DVI source; or, connect the DVI source to the INPUT port on the
B140-1A1-WP local unit using a Tripp Lite P561-Series DVI-D Single
Link Cable.
3
B140-1A1-WP only: Connect the external power supply to the local
unit and plug it into a Tripp Lite Surge Protector, PDU or UPS. The green
Power LED will illuminate.
17-08-507-933094-EN.indd 11 9/25/2017 12:51:34 PM

12
4
Using Cat5e/6 cable, connect the RJ45 port on the local unit to the
RJ45 INPUT port on the B140-110 remote/repeater unit.
5
Connect a monitor to the DVI OUTPUT port on the remote/repeater unit
using a Tripp Lite P561-Series DVI-D Single Link Cable.
6
Connect the external power supply to the remote/repeater unit and plug
it into a Tripp Lite Surge Protector, PDU or UPS. The green Power LED
and the green RJ45 LEDs illuminate to indicate the unit is receiving
power.
Up to four units can be daisy chained (three remote/repeaters and one
receiver). To connect additional remote/repeater units, proceed to step 7.
To finish your installation with the B140-101X or B140-1A1-WP remote
receiver unit, proceed to step 11.
7
Using Cat5e/6 cable, connect the RJ45 OUTPUT port on the first remote/
repeater unit to the RJ45 INPUT port on a second remote/repeater unit.
8
Connect a monitor to the DVI OUTPUT port on the remote/repeater unit
that you just added using a Tripp Lite P561-Series DVI-D
Single Link Cable.
9
Connect the external power supply to the remote/repeater unit and plug
it into a Tripp Lite Surge Protector, PDU or UPS. The green Power LED
and the green RJ45 LEDs illuminate to indicate the unit is receiving
power.
10
To add a third remote/repeater unit, repeat steps 7 through 9.
To finish your installation with the B140-101X or B140-1A1-WP remote
receiver unit, proceed to step 11.
11
Using Cat5e/6 cable, connect the RJ45 OUTPUT port on the last remote/
repeater unit to the RJ45 INPUT port of the B140-101X or
B140-1A1-WP remote receiver unit.
Extender Kit with Remote/Repeater Installation
(B140-101X and B140-1A1-WP extender kits only)
17-08-507-933094-EN.indd 12 9/25/2017 12:51:35 PM

13
12
Connect a monitor to the DVI OUTPUT port on the remote receiver unit
using a Tripp Lite P561-Series DVI-D Single Link Cable.
13
Connect the external power supply to the remote receiver unit and plug
it into a Tripp Lite Surge Protector, PDU or UPS. The green RJ45 LED on
the B140-101X remote receiver, or the green Power LED on the
B140-1A1-WP remote wallplate, illuminates to indicate the unit is
receiving power from the external power supply.
14
Turn on the power to the DVI source. The orange LEDs on the
B140-1A1-WP units illuminate to indicate a signal is being received from
the source. The orange RJ45 LEDs on the B140-101X and B140-110
units illuminates to indicate a signal is being received from the source.
15
If necessary, use the Equalization control on the remote/repeater unit(s)
and remote receiver unit to adjust the video image.
Note: An improper Equalization setting can cause the monitor not to display a
picture at all. Try each Equalization setting until an acceptable picture is displayed.
Extender Kit with Remote/Repeater Installation
(B140-101X and B140-1A1-WP extender kits only)
17-08-507-933094-EN.indd 13 9/25/2017 12:51:35 PM

B140-004
B140-1A0
B140-1P0
B140-1A0-WP-1
Up to 200 ft. (60 m) at 1024 x 768 (60 Hz)
Up to 150 ft. (45 m) at 1920 x 1080 (60 Hz)
Up to 100 ft. (30.5 m) at 1024 x 768 (60 Hz)
Up to 50 ft. (15 m) at 1920 x 1080 (60 Hz)
DVI OVER Cat5
EXTENDER
REMOTE UNIT
MODEL: B140-1P0
B140-1A0-WP-1
14
Standard Extender/Splitter Installation
Notes:
1. The diagram below shows a B140-004 installation. Installation will be the same
when using a B140-002, except the B140-002 has fewer RJ45 ports and no local
monitor port.
2. Test to make sure that the entire installation works properly before pulling cables
through ceilings/walls.
3. To achieve maximum distance and performance, use 24 AWG solid wire Cat5e/6
cable. Using stranded wire cable, or cable with a gauge (AWG) size higher than
24 AWG will result in lesser performance and shorter extension distance. Tripp Lite
N202-Series (Cat6) patch cables are made with 24 AWG solid wire cabling.
17-08-507-933094-EN.indd 14 9/25/2017 12:51:35 PM

15
Standard Extender/Splitter Installation
1
Make sure the DVI source is powered OFF.
2
Connect the DVI source to the DVI port on the B140-002 or
B140-004 labeled INPUT using a Tripp Lite P561-Series DVI-D Single-
Link Cable.
3
Optional for B140-004: Connect a DVI monitor to the DVI port on the
B140-004 marked LOCAL using a Tripp Lite P561-Series DVI-D Single-
Link Cable.
4
Connect the external power supply to the B140-002 or B140-004
local unit and plug it into a Tripp Lite Surge Protector, PDU or UPS. The
green RJ45 LEDs and red Power LED on the B140-004 will illuminate
to indicate power is being received from the external power supply. The
green RJ45 LEDs on the B140-002 will illuminate to indicate power is
being received from the external power supply.
5
Using Cat5e/6 cable, connect one of the RJ45 output ports on the local
unit to the RJ45 input port on the B140-1P0, B140-1A0 or
B140-1A0-WP-1 remote unit.
6
Repeat step 5 for each additional remote unit you are connecting.
7
B140-1A0 and B140-1A0-WP-1 only: Connect the external power
supply to the B140-1A0 or B140-1A0-WP-1 and plug it into a Tripp Lite
Surge Protector, PDU or UPS. The green RJ45 LED on the B140-1A0
and the green LED on the B140-1A0-WP-1 will illuminate to indicate
that the unit is receiving power.
8
Repeat step 7 for each additional B140-1A0 or B140-1A0-WP-1 in the
installation.
17-08-507-933094-EN.indd 15 9/25/2017 12:51:35 PM

16
9
Connect the B140-1P0 DVI-D Single Link connector to the monitor or
connect the B140-1A0 or B140-1A0-WP-1 to the monitor using a
Tripp Lite P561-Series DVI-D Single Link Cable. The green RJ45 LED on
the B140-1P0 will illuminate to indicate the unit is receiving power from
the monitor.
10
Repeat step 9 for each additional monitor you are connecting.
11
Turn on the power to the DVI source. The orange RJ45 LEDs illuminate
on the B140-002, B140-004 and B140-1A0, and the orange LED
illuminates on the B140-1A0-WP-1 to indicate the unit is receiving
a signal from the source. The image should now be displayed on the
connected monitors.
12
If necessary, use the Equalization control on the B140-1A0 or
B140-1A0-WP-1 to adjust the video image.
Note: An improper Equalization setting can cause the monitor not to display a
picture at all. Try each Equalization setting until an acceptable image is displayed.
Standard Extender/Splitter Installation
17-08-507-933094-EN.indd 16 9/25/2017 12:51:35 PM

OPTIONAL LOCAL
MONITOR
B140-004 LOCAL
TRANSMITTER
B140-110 REMOTE/
REPEATER
B140-110 REMOTE/
REPEATER
B140-110 REMOTE/
REPEATER
Up to 175 ft. (50 m) at 1024 x 768 (60 Hz)
Up to 125 ft. (38 m) at 1920 x 1080 (60 Hz)
Up to 175 ft. (50 m) at 1024 x 768 (60 Hz)
Up to 125 ft. (38 m) at 1920 x 1080 (60 Hz)
DVI SOURCE
B140-110 REMOTE/
REPEATER
B140-110 REMOTE/
REPEATER
B140-110 REMOTE/
REPEATER
B140-110 REMOTE/
REPEATER
B140-110 REMOTE/
REPEATER
B140-110 REMOTE/
REPEATER
B140-1A0-WP-1
REMOTE RECEIVER
B126-1A0-WP-1
REMOTE RECEIVER
B126-1A0
REMOTE RECEIVER
B140-110 REMOTE/
REPEATER
B140-110 REMOTE/
REPEATER
B140-110 REMOTE/
REPEATER
0
1
2
3
4
5
6
7
0
1
2
3
4
5
6
7
0
1
2
3
4
5
6
7
0
1
2
3
4
5
6
7
0
1
2
3
4
5
6
7
0
1
2
3
4
5
6
7
0
1
2
3
4
5
6
7
0
1
2
3
4
5
6
7
0
1
2
3
4
5
6
7
0
1
2
3
4
5
6
7
0
1
2
3
4
5
6
7
0
1
2
3
4
5
6
7
B126-1A0
REMOTE RECEIVER
17
Notes:
1. Test to make sure the entire installation works properly before pulling cables through
ceilings/walls.
2. To achieve maximum distance and performance, use 24 AWG solid wire Cat5e/6
cable. Using stranded wire Cat5e/6 cable, or cable with a gauge (AWG) size higher
than 24 AWG will result in shorter extension distance. All Tripp Lite N202-Series
Cat6 cables are made with 24 AWG solid wire cabling.
3. The installation diagram shows the B140-004. The B140-002 installation will be
the same, except there are only 2 remote ports and there is no local monitor port.
Extender/Splitter with Remote/Repeater Installation
(B140-1A0 and B140-1A0-WP-1 remote receiver units only)
1
Make sure the DVI source is powered OFF.
2
Connect the DVI source to the INPUT port on the B140-002 or
B140-004 using a Tripp Lite P561-Series DVI-D Single Link Cable.
17-08-507-933094-EN.indd 17 9/25/2017 12:51:36 PM

18
Extender/Splitter with Remote/Repeater Installation
(B140-1A0 and B140-1A0-WP-1 remote receiver units only)
3
Optional for B140-004: Connect a local monitor to the DVI OUTPUT
port using a Tripp Lite P561-Series DVI-D Single Link Cable.
4
Connect the external power supply to the local unit and plug it into a
Tripp Lite Surge Protector, PDU or UPS. The green RJ45 LEDs illuminate
to indicate power is being received from the external power supply. An
additional red LED on the B140-004 also illuminates to indicate that
power is being received.
5
Using Cat5e/6 cable, connect one of the RJ45 output ports on the local
unit to the RJ45 input port on the B140-110 remote/repeater unit.
6
Connect a monitor to the DVI OUTPUT port on the remote/repeater unit
using a Tripp Lite P561-Series DVI-D Single Link Cable.
7
Connect the external power supply to the remote/repeater unit and plug
it into a Tripp Lite Surge Protector, PDU or UPS. The green Power LED
and the green RJ45 LEDs illuminate to indicate the unit is receiving
power.
Up to four units can be daisy chained (three remote/repeaters and one
receiver) To connect additional remote/repeater units, proceed to step 8. To
finish your installation with a B140-1A0 or B140-1A0-WP-1 remote receiver
unit, proceed to step 12.
8
Using Cat5e/6 cable, connect the RJ45 OUTPUT port on the first remote/
repeater unit to the RJ45 INPUT port on a second remote/repeater unit.
9
Connect a monitor to the DVI OUTPUT port on the remote/repeater unit
that you just added using a Tripp Lite P561-Series DVI-D Single Link
Cable.
10
Connect the external power supply to the remote/repeater unit and plug
it into a Tripp Lite Surge Protector, PDU or UPS. The green Power LED
and the green RJ45 LEDs illuminate to indicate the unit is receiving
power.
17-08-507-933094-EN.indd 18 9/25/2017 12:51:37 PM

19
Extender/Splitter with Remote/Repeater Installation
(B140-1A0 and B140-1A0-WP-1 remote receiver units only)
11
To add a third remote/repeater unit, repeat steps 8 through 10. To finish
your installation with a B140-1A0 or B140-1A0-WP-1 remote receiver
unit, proceed to step 12.
12
Using Cat5e/6 cable, connect the RJ45 OUTPUT port on the last remote/
repeater unit to the RJ45 INPUT port on a B140-1A0 or B140-1A0-
WP-1 remote receiver unit.
13
Connect a monitor to the DVI OUTPUT port on the remote receiver unit
using a Tripp Lite P561-Series DVI-D Single Link Cable.
14
Connect the external power supply to the remote receiver unit and plug
it into a Tripp Lite Surge Protector, PDU or UPS. The green RJ45 LEDs on
the B140-1A0 and the green LED on the B140-1A0-WP-1 illuminate to
indicate that the unit is receiving power.
15
Repeat steps 5 through 14 for each additional RJ45 output port on the
local transmitter unit.
16
Turn on the power to the DVI source. The orange RJ45 LEDs on the local
transmitter, remote/repeater and B140-1A0 illuminate to indicate a
signal is being received from the source. The orange LED on the
B140-1A0-WP-1 illuminates to indicate a signal is being received from
the source.
17
If necessary, use the Equalization control on the remote/repeater unit(s)
and remote receiver unit to adjust the video image.
Note: An improper Equalization setting can cause the monitor not to display a
picture at all. Try each Equalization setting until an acceptable picture is displayed.
17-08-507-933094-EN.indd 19 9/25/2017 12:51:37 PM

Level 1
Level 2
Level 3
OPTIONAL LOCAL
MONITOR
B140-1P0 — Up to 100 ft. (30.5 m) at 1024 x 768 (60 Hz), or up to 50 ft. (15 m) at 1920 x 1080 (60 Hz)
B140-1A0 and B140-1A0-WP-1 — Up to 200 ft. (60 m) at 1024 x 768 (60 Hz),
or up to 150 ft. (45 m) at 1920 x 1080 (60 Hz)
20
Extender/Splitter Daisy-Chain Installation
(B140-004 only)
Notes:
1. Test to make sure that the entire installation works properly before pulling cables
through ceilings/walls.
2. To achieve maximum distance and performance, use 24 AWG solid wire Cat5e/6
cable. Using stranded wire cable, or cable with a gauge (AWG) size higher than
24 AWG will result in lesser performance and shorter extension distance. Tripp Lite
N202-Series (Cat6) patch cables are made with 24 AWG solid wire cabling.
17-08-507-933094-EN.indd 20 9/25/2017 12:51:38 PM
/