Dell S2319HS User guide

Category
LED displays
Type
User guide
Model: S2319HS/S2719HS
Regulatory model: S2319HSt/S2719HSt
Dell S2319HS/S2719HS
User’s Guide
NOTE: A NOTE indicates important information that helps you make
better use of your computer.
CAUTION: A CAUTION indicates potential damage to hardware or loss of
data if instructions are not followed.
WARNING: A WARNING indicates a potential for property damage,
personal injury, or death.
Copyright © 2018-2019 Dell Inc. or its subsidiaries. All rights reserved. Dell, EMC, and other
trademarks
are trademarks of Dell Inc. or its subsidiaries. Other trademarks may be trademarks of their respective
owners.
2019 10
Rev. A01
Contents
About your monitor .................................5
Contents of the box . . . . . . . . . . . . . . . . . . . . . . . . . . . . . . . . . 5
Product features . . . . . . . . . . . . . . . . . . . . . . . . . . . . . . . . . . . 6
Identifying parts and controls . . . . . . . . . . . . . . . . . . . . . . . . . . . 7
Monitor specifications. . . . . . . . . . . . . . . . . . . . . . . . . . . . . . . .11
Plug-and-play . . . . . . . . . . . . . . . . . . . . . . . . . . . . . . . . . . . . .17
LCD monitor quality and pixel policy . . . . . . . . . . . . . . . . . . . . . . .17
Setting up the monitor ..............................18
Attaching the stand . . . . . . . . . . . . . . . . . . . . . . . . . . . . . . . . 18
Using the tilt, swivel, and vertical extension. . . . . . . . . . . . . . . . . . 19
Configuring the rotate feature from the Display Settings of your
computer. . . . . . . . . . . . . . . . . . . . . . . . . . . . . . . . . . . . . . . 20
Connecting your monitor. . . . . . . . . . . . . . . . . . . . . . . . . . . . . .21
Organizing your cables . . . . . . . . . . . . . . . . . . . . . . . . . . . . . . 23
Removing the monitor stand . . . . . . . . . . . . . . . . . . . . . . . . . . . 23
Wall mounting (Optional) . . . . . . . . . . . . . . . . . . . . . . . . . . . . 24
Operating the monitor ..............................25
Turning on the monitor . . . . . . . . . . . . . . . . . . . . . . . . . . . . . . 25
Using the front panel controls . . . . . . . . . . . . . . . . . . . . . . . . . . 25
Contents | 3
4 | Contents
Using the On-Screen Display (OSD) menu . . . . . . . . . . . . . . . . . . . 28
Troubleshooting ...................................48
Self-test . . . . . . . . . . . . . . . . . . . . . . . . . . . . . . . . . . . . . . . 48
Built-in diagnostics. . . . . . . . . . . . . . . . . . . . . . . . . . . . . . . . . 50
Common problems. . . . . . . . . . . . . . . . . . . . . . . . . . . . . . . . . .51
Product specific problems . . . . . . . . . . . . . . . . . . . . . . . . . . . . 53
Universal Serial Bus (USB) specific problems . . . . . . . . . . . . . . . . . 53
Appendix.........................................55
Safety instructions . . . . . . . . . . . . . . . . . . . . . . . . . . . . . . . . . 55
FCC notices (U.S. only) and other regulatory information . . . . . . . . . 55
Contacting Dell . . . . . . . . . . . . . . . . . . . . . . . . . . . . . . . . . . . 55
Setting up your monitor. . . . . . . . . . . . . . . . . . . . . . . . . . . . . . 56
Maintenance guidelines . . . . . . . . . . . . . . . . . . . . . . . . . . . . . . 58
Pin assignments. . . . . . . . . . . . . . . . . . . . . . . . . . . . . . . . . . . 59
About your monitor | 5
About your monitor
Contents of the box
Your monitor ships with the components shown below. Ensure that you have received all the
components and see Contacting Dell if anything is missing.
NOTE: Some components may be optional and may not ship with your monitor.
Somefeatures may not be available in certain countries.
Monitor
Stand riser
Stand base
Power cable (varies by country)
USB 3.0 upstream cable (enables the
USB ports on the monitor)
6 | About your monitor
HDMI cable
•Quick Setup Guide
•Safety,Environmental,and
Regulatory Information
Product features
The Dell S2319HS/S2719HS monitor has an active matrix, Thin-Film Transistor (TFT), liquid
crystal display (LCD), and LED backlight. The monitor features include:
• S2319HS: 58.4 cm (23.0-inch) active area display, measured diagonally.
• S2719HS: 68.6 cm (27-inch) active area display, measured diagonally.
• Up to 1920 x 1080 (16:9) resolution, with full screen support at lower resolutions.
• Color gamut of 72% NTSC.
• Tilt, swivel, height adjustment and pivot functionality.
• Removable pedestal and Video Electronics Standards Association (VESA™) 100 mm
mounting holes for flexible mounting solutions.
• Digital connectivity with DisplayPort and HDMI.
• Equipped with one USB upstream port and four USB downstream ports.
• Plug and play capability if supported by your system.
• On-Screen Display (OSD) adjustments for easy setup and screen optimization.
• Security-lock slot.
• Stand lock.
• 0.3 W standby power when in the sleep mode.
• Optimize eye comfort with a flicker-free screen.
NOTE: Possible long-term effects of blue light emission from the monitor may
cause damage to the eyes, including eye fatigue or digital eye strain. ComfortView
feature is designed to reduce the amount of blue light emitted from the monitor to
optimize eye comfort.
About your monitor | 7
Identifying parts and controls
Front view
1 2
Label Description Use
1 Function buttons Use the function buttons to adjust items in the OSD
(For more information, see Using the front panel
controls)
2 Power on/off button
(with LED indicator)
Use the power button to turn the monitor On and Off.
8 | About your monitor
Back view
5
1
2
3
4
Label Description Use
1 VESA mounting holes (100 mm x 100
mm-behind attached VESA cover)
Wall mount monitor using VESA-
compatible wall mount kit (100 mm x 100
mm).
2 Stand release button Releases stand from monitor.
3 Security lock slot Secures monitor with security cable lock
(sold separately).
4 Barcode, serial number, and Service
Tag label
Refer to this label if you need to contact Dell
for technical support.
5 Cable management slot Use to organize cables by placing them
through the slot.
About your monitor | 9
Side view
1
Label Description Use
1 USB downstream ports (2) Connect your USB device.
NOTE: You can only use this connector after you
have connected the USB cable to the computer and
USB upstream connector on the monitor.
10 | About your monitor
Bottom view
1 2 3 4 5 6
7
Label Description Use
1 AC power connector To connect the monitor power cable.
2 HDMI connector Connect your computer with HDMI cable.
3 DP connector Connect your computer with DP cable (optional).
4 VGA connector Connect your computer with VGA cable (optional).
5 USB upstream port Connect the USB cable that comes with your monitor
to the computer. Once this cable is connected, you
can use the USB downstream connectors on the
monitor.
6 USB downstream ports (2) Connect your USB device. You can use these ports
only after you have connected the USB cable from
the computer to the monitor.
7 Stand lock Secure the stand to the monitor using a M3x6 mm
screw (screw not included).
About your monitor | 11
Monitor specifications
Model S2319HS S2719HS
Screen type Active matrix - TFT LCD
Panel Type In-plane switching technology
Aspect ratio 16:9
Viewable image dimensions
Diagonal 58.4 cm (23.0 in.)
68.6 cm (27.0 in.)
Active Area
Horizontal 509.18 mm (20.05 in.) 597.88 mm (23.54 in.)
Vertical 286.42 mm (11.28 in.) 336.31 mm (13.24 in.)
Area 145839.33 mm
2
(226.05 in.
2
)
201073.02 mm
2
(311.67 in.
2
)
Pixel pitch 0.265 mm x 0.265 mm 0.311 mm x 0.311 mm
Pixel per inch (PPI) 96 82
Viewing angle
Horizontal 178° (typical)
Vertical 178° (typical)
Brightness 250 cd/m² (typical) 300 cd/m² (typical)
Contrast ratio 1,000 to 1 (typical)
Display screen coating Anti-Glare with 3H hardness
Backlight LED edgelight system
Response Time
(Gray to Gray)
5 ms (Fast mode)
8 ms (Normal mode)
Color depth 16.7 million colors
Color gamut 72% (CIE1931)
NOTE: Color gamut (typical) is based on CIE1976 (82%) and
CIE1931 (72%) test standards.
Connectivity •one x HDMI 1.4 port (HDCP 1.4)
•one x DP 1.2 port
•one x VGA port
•one x USB 3.0 upstream port
•two USB 2.0 downstream ports (rear)
•two USB 3.0 downstream ports (side)
Border width (edge of
monitor to active area)
5.40 mm (Top/Left/Right)
19.86 mm (Bottom)
6.00 mm (Top/Left/Right)
20.70 mm (Bottom)
12 | About your monitor
Adjustability
Height adjustable stand
Tilt
Swivel
Pivot
130 mm
-5° to 21°
-45° to 45°
-90° to 90°
Dell Display Manager
(DDM)Compatibility
Easy Arrange
and other key features
Security Security-lock slot (cable lock sold separately)
Resolution specifications
Model S2319HS/S2719HS
Horizontal scan range
30 khz to 83 khz (automatic)
Vertical scan range 56 Hz to 76 Hz (automatic)
Maximum preset resolution 1920 x 1080 at 60 Hz
Video display capabilities
(VGA & DP & HDMI
playback)
480i, 480p, 576i, 576p, 720p, 1080i, 1080p
Preset display modes
Display Mode Horizontal
Frequency
(kHz)
Vertical
Frequency
(Hz)
Pixel Clock
(MHz)
Sync Polarity
(Horizontal/
Vertical)
VESA, 640 x 480 31.5 60.0 25.2 -/-
VESA, 640 x 480 37.5 75.0 31.5 -/-
IBM, 720 x 400 31.5 70.0 28.3 -/+
VESA, 800 x 600 37.9 60.0 40.0 +/+
VESA, 800 x 600 46.9 75.0 49.5 +/+
VESA, 1024 x 768 48.4 60.0 65.0 -/-
VESA, 1024 x 768 60.0 75.0 78.8 +/+
VESA, 1152 x 864 67.5 75.0 108.0 +/+
VESA, 1280 x 1024 64.0 60.0 108.0 +/+
VESA, 1280 x 1024 80.0 75.0 135.0 +/+
VESA, 1600 x 900 60.0 60.0 108.0 +/+
VESA, 1920 x 1080 67.5 60.0 148.5 +/+
About your monitor | 13
Electrical specifications
Model S2319HS/S2719HS
Video input signals •Digital video signal for each dierential line
Per dierential line at 100 ohm impedance
•VGA/DP/HDMI signal input support
Input voltage/frequency/current 100-240 VAC / 50 or 60 Hz ± 3 Hz / 1.5 A (maximum)
Inrush current 120 V: 30 A (Max.) at 0 °C (cold start)
240 V: 60 A (Max.) at 0 °C (cold start)
Physical characteristics
Model S2319HS S2719HS
Signal cable type
•Digital: DisplayPort, 20 pins
•Digital: HDMI, 19 pins
•Analog: D-Sub, 15 pins
•Digital: USB, 9 pins
Dimensions (with stand)
Height (extended)
481.1 mm (18.94 in.) 524.3 mm (20.64 in.)
Height (compressed)
351.1 mm (13.82 in.) 394.3 mm (15.52 in.)
Width
520.0 mm (20.47 in.) 609.9 mm (24.01 in.)
Depth
166.0 mm (6.54 in.) 185.0 mm (7.28 in.)
Dimensions (without stand)
Height
311.7 mm (12.27 in.) 363.0 mm (14.29 in.)
Width
520.0 mm (20.47 in.) 609.9 mm (24.01 in.)
Depth
41.3 mm (1.63 in.) 42.8 mm (1.69 in.)
Stand dimensions
Height (extended)
400.8 mm (15.78 in.) 418.4 mm (16.47 in.)
Height (compressed)
353.4 mm (13.91 in.) 371.0 mm (14.61 in.)
Width
206.0 mm (8.11 in.) 245.0 mm (9.65 in.)
Depth
166.0 mm (6.54 in.) 185.0 mm (7.28 in.)
Base 206.0 mm x 166.0 mm
(8.11 in. x 6.54 in.)
245.0 mm x 185.0 mm
(9.65 in. x 7.28 in.)
14 | About your monitor
Weight
Weight with packaging
7.00 kg (15.43 lb) 9.05 kg (19.95 lb)
Weight with stand assembly and
cables
5.11 kg (11.27 lb) 6.67 kg (14.70 lb)
Weight without stand assembly
(For wall mount or VESA mount
considerations - no cables)
3.11 kg (6.86 lb) 4.35 kg (9.59 lb)
Weight of stand assembly 1.67 kg (3.68 lb) 1.93 kg (4.25 lb)
Environmental characteristics
Model S2319HS/S2719HS
Compliant standards
•ENERGY STAR Certified Monitor
•TCO Certified Display
•RoHS Compliant
•BFR/PVC Free monitor (excluding external cables)
•Arsenic-Free glass and Mercury-Free for the panel only
Temperature
Operating 0°C to 40°C (32°F to 104°F)
Non-operating •Storage: -20 °C to 60 °C (-4 °F to 140 °F)
•Shipping: -20 °C to 60 °C (-4 °F to 140 °F)
Humidity
Operating 20% to 80% (non-condensing)
Non-operating •Storage: 10% to 90% (non-condensing)
•Shipping: 10% to 90% (non-condensing)
Altitude
Operating 5,000 m (16,404 ft) (maximum)
Non-operating 12,192 m (40,000 ft) (maximum)
Thermal dissipation
S2319HS 131.37 BTU/hour (maximum)
51.18 BTU/hour (typical)
S2719HS 184.26 BTU/hour (maximum)
56.62 BTU/hour (typical)
About your monitor | 15
Power Management Modes
If you have VESA’s DPM-compliant video card or software installed in your PC, the monitor
can automatically reduce its power consumption when not in use. This is referred to as
power save mode
1
. If the computer detects input from the keyboard, mouse, or other input
devices, the monitor automatically resumes functioning. The following table shows the
power consumption and signaling of this automatic power saving feature.
S2319HS
VESA
modes
Horizontal
sync
Vertical
sync
Video Power indicator Power consumption
Normal
operation
Active Active Active White 38.5 W (maximum)
2
15 W (typical)
Active-off
mode
Inactive Inactive Off White
(Glowing)
Less than 0.3 W
Switch off - - - Off Less than 0.3 W
Power Consumption P
on
11.9 W
Total Energy Consumption (TEC) 37.6 kWh
S2719HS
VESA
modes
Horizontal
sync
Vertical
sync
Video Power indicator Power consumption
Normal
operation
Active Active Active White 54 W (maximum)
2
16.3 W (typical)
Active-off
mode
Inactive Inactive Off White
(Glowing)
Less than 0.3 W
Switch off - - - Off Less than 0.3 W
Power Consumption P
on
14.2 W
Total Energy Consumption (TEC) 44.6 kWh
16 | About your monitor
The OSD operates only in the normal operation mode. If you press any button in the active-
off mode, one of the following message is displayed.
S2319HS
No DP signal from your device.
Dell 23 Monitor
Press any key on the keyboard or move the mouse to wake it up.
If there is no display, press the monitor button again to select
the correct input source.
S2319HS
S2719HS
No DP signal from your device.
Dell 27 Monitor
Press any key on the keyboard or move the mouse to wake it up.
If there is no display, press the monitor button again to select
the correct input source.
S2719HS
1
Zero power consumption in OFF mode can only be achieved by disconnecting
the AC mains cable from the monitor.
2
Maximum power consumption with maximum luminance, and USB active.
This document is informational only and reflects laboratory performance. Your product may
perform differently, depending on the software, components and peripherals you ordered
and shall have no obligation to update such information. Accordingly, the customer should
not rely upon this information in making decisions about electrical tolerances or otherwise.
No warranty as to accuracy or completeness is expressed or implied.
Activate the computer and the monitor to gain access to the OSD.
NOTE: This monitor is ENERGY STAR -compliant.
This product qualifies for ENERGY STAR in the factory default settings which can be
restored by “Factory Reset” function in the OSD menu. Changing the factory default
settings or enabling other features may increase power consumption that could exceed
the ENERGY STAR specified limit.
NOTE:
P
on
: Power consumption of On Mode as defined in Energy Star 8.0 version.
TEC: Total energy consumption in kWh as defined in Energy Star 8.0 version.
About your monitor | 17
Plug-and-play
You can install the monitor in any Plug-and-Play-compatible system. The monitor
automatically provides the computer system with its extended display identification data
(EDID) using display data channel (DDC) protocols so that the computer can configure itself
and optimize the monitor settings. Most monitor installations are automatic; you can select
different settings if desired. For more information about changing the monitor settings, see
Operating the monitor.
LCD monitor quality and pixel policy
During the LCD monitor manufacturing process, it is not uncommon for one or more pixels
to become fixed in an unchanging state which are hard to see and do not affect the display
quality or usability. For more information on LCD Monitor Pixel Policy, see Dell support site
at: www.dell.com/support/monitors.
18 | Setting up the monitor
Setting up the monitor
Attaching the stand
NOTE: The stand riser and stand base are not attached when the monitor is shipped
from the factory.
NOTE: The following procedure is applicable for the stand that is shipped with your
monitor. If you are connecting a third-party stand, see the documentation that shipped
with the stand.
To attach the monitor stand:
1 Using the instructions printed on the packaging box, remove the stand from the
cushion that secures it.
2 Align the tabs on the stand base with the slots on the stand riser and slide the
stand riser into the stand base.
3 Open the latch at the bottom of the stand base, tighten the screw by turning it
clockwise and then close the latch.
1 2
3
4 Lift the cover to access the VESA mount area at the back of the monitor.
Setting up the monitor | 19
5 Connect the stand assembly to the monitor.
a. Align and slide the tabs on the top of the stand assembly into the slots at the back of
the monitor.
b. Press the stand down until it snaps into place.
1 2
6 Lift the monitor along with the stand and place it in.
CAUTION: Lift the monitor carefully to prevent it from slipping or falling.
Using the tilt, swivel, and vertical extension
NOTE: The following procedure is applicable for the stand that shipped with your
monitor. For a third-party stand, see the documentation that shipped with the stand.
With the stand attached to the monitor, you can tilt the monitor for the most comfortable
viewing angle.
45°
45°
130 mm
21°
20 | Setting up the monitor
Rotating the monitor
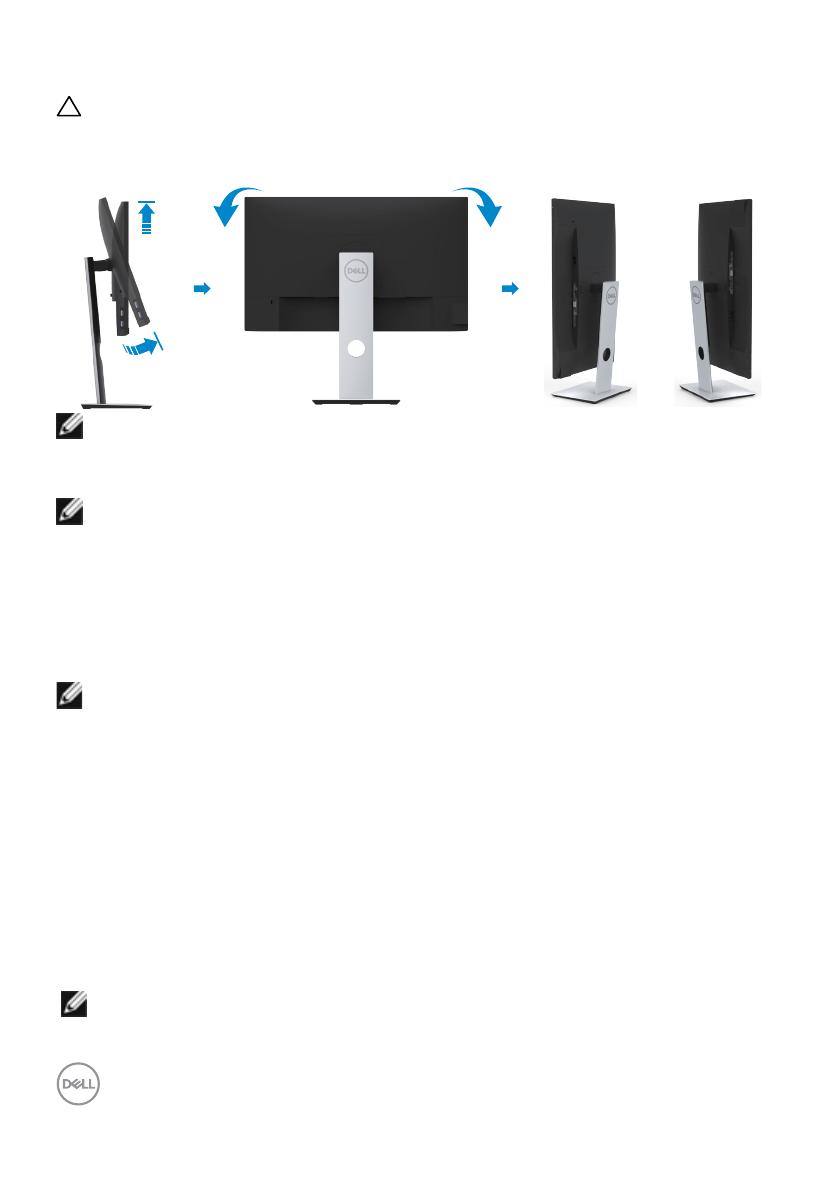
CAUTION: Before you rotate the monitor, ensure the monitor is vertically extended and
then tilt the monitor backwards to the maximum angle. This will avoid any potential damage
to the bottom edge of the display.
2
1
90°
90°
NOTE: To use the Display Rotation function (Landscape versus Portrait view) with
your Dell computer, you require an updated graphics driver that is not included with
this monitor. To download the graphics driver, go to www.dell.com/support and see the
Download section for Video Drivers for latest driver updates.
NOTE: When in the Portrait View Mode, you may experience performance degradation
in graphic-intensive applications (3D Gaming and so on).
Configuring the rotate feature from the Display
Settings of your computer
After you have rotated your monitor, you need to complete the procedure below to adjust
congure the rotate feature of the display settings on your computer.
NOTE: If you are using the monitor with a non-Dell computer, see the manufacturer’s
website for information on configuring the rotate feature of the Display Settings.
To adjust the Rotation Display Settings:
1 Right-click on the Desktop and click Properties.
2 Select the Settings tab and click Advanced.
3 If you have an AMD graphics card, select the Rotation tab and set the preferred
rotation.
4 If you have an nVidia graphics card, click the nVidia tab, in the left-hand column
select NVRotate, and then select the preferred rotation.
5 If you have an Intel
®
graphics card, select the Intel graphics tab, click Graphic
Properties, select the Rotation tab, and then set the preferred rotation.
NOTE: If you do not see the rotation option or it is not working correctly, go to
www.dell.com/support and download the latest driver for your graphics card.
1 / 1

Dell S2319HS User guide

Category
LED displays
Type
User guide

Ask a question and I''ll find the answer in the document

Finding information in a document is now easier with AI

Ask the document