Pantech Flex P8010 User manual
- Category
- Smartphones
- Type
- User manual
This manual is also suitable for


3
1
1. Before Using
Before Using

4
Before Using
Important Safety Information
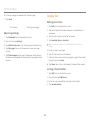
Safety information
The following list shows how to maintain your mobile phone
and precautions to take as you use the device.
x Keep your mobile phone and its accessories out of the
reach of children and pets.
x Maintain your mobile phone in dry conditions and keep it
within normal operating temperatures. It may be damaged
at temperatures higher than 55°C/131°F or lower than
-20°C/-4°F.
x Do not dry your phone in a microwave oven. Sparks may
occur and cause an explosion or fire.
x Do not use or store your mobile phone in dusty, dirty areas.
x Do not disassemble your mobile phone.
x Do not drop or cause severe impact to your mobile phone.
x Do not clean your mobile phone with chemical products,
cleaning solvents or detergents.
x Contact your dealer immediately if your mobile phone does
not work properly.
x Use only authorized batteries, battery chargers and
accessories. Any malfunction or damage caused by the
use of unauthorized batteries, battery chargers and
accessories will void the limited product warranty.
x Ensure that the battery and the battery charger do not
come in contact with conductive objects.
x For optimal performance, use cases and accessories that
do not contain magnets.
Safety precautions
x Using a mobile phone while driving is prohibited.
x Using a mobile phone while driving can distract your
attention and cause an accident. Always switch your phone
off to drive safely.
x In an emergency, use a hands-free device built into your car
or pull over in a safe place first.
x Check local laws and regulations and comply with them,
with regard to the prohibition of mobile phone use while
driving.
Switch off in restricted areas
Always switch your phone off in areas where mobile phone use
is restricted.
Switch off in an aircraft
Always switch your phone off or select the airplane mode when
you are in an aircraft. Electromagnetic waves emitted by your
phone may affect the electronic navigation equipment in the
aircraft.
Switch off in hospitals and near medical
equipment
Always switch your phone off in hospitals and obey their
regulations. Switch your phone off when using medical
equipment for private purposes. Always consult with the
medical equipment’s manufacturer or an expert regarding
phone use near the medical equipment.

5
Before Using
Switch off in dangerous areas
Always switch your phone off in areas where explosive or
dangerous materials (e.g. fuels or chemical products) are
located and obey relevant instructions or signals. Do not insert
or remove your mobile phone’s battery in such areas.
Install a hands-free device in a safe location
Install a hands-free device away from the steering wheel and
airbag expansion areas. Otherwise you can be injured in a car
accident.
Keep away from other electronic devices
Mobile phones emit electromagnetic waves that may affect
nearby electronic devices. After switching on your phone, do
not place it close to other electronic goods.
About the battery usage
Your phone is powered by a Lithium Ion (Li-Ion) battery. This
type of battery typically has a longer lifespan than other types
of batteries. However, it must be handled with care. Please read
and follow these battery guidelines:
x Do not use a damaged battery or charger.
x Do not disassemble, open, crush, bend, deform, puncture,
or shred the battery.
x Do not modify or remanufacture the battery, insert foreign
objects into the battery, immerse or expose the battery
to water or other liquids, or expose it to fire, explosions, or
other hazard.
x Dispose of and recycle used batteries in accordance with
local regulations. Do not dispose of batteries by burning as
they may explode. Do not use an unauthorized charger or
battery.
x Use the battery only for the device for which it is specified.
x Use the battery with a charging device that has been
qualified for the device. Use of an unqualified battery or
charger may present a risk of fire, explosion, leakage, or
other hazard.
x Do not short circuit a battery or allow metallic conductive
objects to contact battery terminals.
x Replace the battery only with another battery that has been
qualified with the device per the IEEE-Std-1725-2006.
x Children should not be allowed to handle the battery.
x Avoid dropping the phone or the battery. If the phone or the
battery is dropped, especially on a hard surface, and you
suspect damage, take it to a service center for inspection.
x Use your battery for its specified purpose only.
x The battery recharging time varies depending on the
remaining battery capacity and the battery and charger
type.
x Battery life inevitably shortens over time.
x Since overcharging may shorten battery life, remove the
phone from its charger once it is fully charged. Unplug
the charger once charging is complete. Do not store the
battery in exceedingly hot or cold places, such as inside
a car in the summer or winter as doing so may reduce its
capacity and life span.

6
Table of contents
1. Before Using
Before Using ..................................................................... 4
Safety information ......................................................................................4
Safety precautions ......................................................................................4
About the battery usage ............................................................................ 5
Trademarks....................................................................... 8
About DivX video .........................................................................................8
Dolby Digital Plus/Dolby Mobile for Dolby Mobile Solutions
3 Plus Kits ......................................................................................................8
On-screen Indicators ..................................................... 9
2. Getting Started
Getting Started ................................................................ 11
Layout ........................................................................................................... 11
Inside the package .................................................................................... 12
Using the SIM or USIM card ...................................................................... 12
Using the battery ....................................................................................... 13
Installing the microSD card ..................................................................... 14
3. Product Overview
Product Overview ...........................................................16
Turning the phone on or off ..................................................................... 16
Setting up the phone ................................................................................ 16
Resetting the phone ................................................................................. 16
Selecting a boot mode ............................................................................. 17
Getting to know the phone's attractions .............................................. 17
Capturing the screen ................................................................................ 18
Locking the Screen .................................................................................... 18
Unlocking the screen ................................................................................ 18
Locking the phone ..................................................................................... 19
Unlocking the phone ................................................................................. 19
Using the touch screen ........................................................................... 20
Entering text .............................................................................................. 21
4. Basic Operation
Basic Operation ............................................................. 23
Understanding the Home screen ...........................................................23
Customizing the Home screen ...............................................................24
Using the Shortcuts and folders bar ...................................................... 25
Using the Home screen settings bar .....................................................25
Using Task Manager ..................................................................................26
Using the Applications menu ..................................................................27
Connecting to the Internet ......................................................................28
Connecting to a mobile network ............................................................28
Setting up a Bluetooth Connection .......................................................28
Using Bluetooth .........................................................................................29
Installing or uninstalling apps ................................................................. 31
5. Call & Message
Call & Message ............................................................... 33
Calling .......................................................................................................... 33
Managing Contacts ...................................................................................34
Messaging ...................................................................................................36
Before Using

7
Before Using
6. Media Center
Media Center .................................................................. 39
Using the Camera ......................................................................................39
Using the Gallery ....................................................................................... 41
Downloading Music or Video Files from a PC .......................................42
Using the Music Player ..............................................................................42
7. Communication
Communication ............................................................. 46
Using the Internet .................................................................................... 46
Emailing ..................................................................................................... 48
Using Gmail ................................................................................................ 49
Using Twitter ............................................................................................. 50
Using Facebook.......................................................................................... 51
Google Talk .................................................................................................52
8. Menu Function
Menu Function................................................................ 55
Alarm Clock .................................................................................................55
Calculator ...................................................................................................55
Converter ....................................................................................................56
Key Ring .......................................................................................................56
Latitude .......................................................................................................56
Navigation ..................................................................................................57
Note Pad ......................................................................................................58
Pulse .............................................................................................................58
Place.............................................................................................................58
Pill Reminder ..............................................................................................59
Tip calculator .............................................................................................59
Weather .......................................................................................................59
Voice Recorder ......................................................................................... 60
9. Settings
Settings ........................................................................... 62
Customization settings ............................................................................62
Wireless & networks ..................................................................................62
Device ..........................................................................................................63
Personal ......................................................................................................65
System ........................................................................................................ 68
10. Appendix
Appendix ......................................................................... 72
PC Suite .......................................................................................................72
Icons .............................................................................................................72
Cautions for using external memory cards ..........................................73
Troubleshooting checklist ....................................................................... 74
Specifications ............................................................................................74
FCC Hearing-Aid Compatibility Regulations for
Wireless Devices........................................................................................75
FCC Regulatory Compliance ...................................................................76
Warranty .....................................................................................................78
Legal notice ............................................................................................... 80

8
Trademarks
About DivX video
DivX
®
is a digital video format created by DivX, LLC, a subsidiary
of Rovi Corporation. This is an official DivX Certified
®
device
that plays DivX video. Visit www.divx.com for more information
and software tools to convert your files into DivX videos.
About DivX Video-On-Demand
This DivX Certified
®
device must be registered in order to play
purchased DivX Video-on-Demand (VOD) movies. To obtain
your registration code, locate the DivX VOD section in your
device setup menu. Go to vod.divx.com for more information
on how to complete your registration.
DivX Certified
®
to play DivX
®
video up to HD 720p, including
premium content.
DivX
®
, DivX Certified
®
, and associated logos are trademarks of
Rovi Corporation or its subsidiaries and are used under licence.
Covered by one or more of the following U.S. patents:
7,295,673; 7,460,668; 7,515,710; 7,519,274
Dolby Digital Plus/Dolby Mobile for
Dolby Mobile Solutions 3 Plus Kits
License Notice and Trademark Acknowledgment Required
for Licensed Products
Manufactured under license from Dolby Laboratories.
Dolby and the double-D symbol are trademarks of Dolby
Laboratories.
®
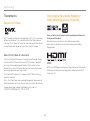
HDMI
HDMI, the HDMI logo, and the term “High Definition Multimedia
Interface” are trademarks or registered trademarks of HDMI
Licensing LLC.
Before Using

9
On-screen Indicators
Icon Description
Connected to a Wi-Fi network.
Wi-Fi networks are available.
An alarm has been set.
Sync in progress
TTY is active.
The GPS is active.
Unsent message
New SMS message
New MMS message
New Email
New WAP message
New voicemail
Bluetooth is connected.
Bluetooth is active, but not connected to other
device.
Portable Wi-Fi hotspot is active.
USB tethering is active.
The speakerphone is active.
Signal strength: The number of bars increases
when the signal is strong.
Icon Description
Airplane mode is active.
There is no signal.
A call is in progress.
Call on hold
Missed call
Battery level: The more green the icon, the more
charge remaining.
The battery is charging.
Upcoming event
Music is playing.
No SIM or USIM card
Vibrate mode activated
Microphone muted
Silent mode activated
The memory is full.
An error has occurred.
Before Using

2
2. Getting Started
Getting Started

11
Getting Started
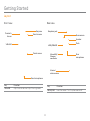
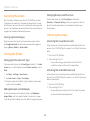
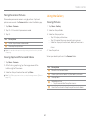
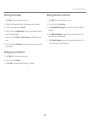
Layout
Front view
Earpiece
Proximity
Sensor
Front microphone
VOLUME
Front camera
Touch screen
Key Function
VOLUME Adjust sound volume. Adjust the ring mode.
Rear view
Rear camera
Speaker
Rear
microphone
Micro USB/
Charger
connector
Earphone jack
Internal
antenna area
LOCK/POWER
Flash
Key Function
LOCK/PWR Lock the screen. Turn the phone on or off.

12
Getting Started
Note
x Your phone may not be compatible with all types of stereo
earphones.
x Do not cover the proximity sensor (area with LCD protection file).
If you cover the sensor, they touch screen may not perform
properly.
x Do not allow the touch screen to come in contact with water or
chemicals.
x Do not block the internal antenna embedded in the phone.
x Do not hold the handset too close to your face, as you may block
the microphone and prevent others from hearing you clearly..
Gripping the phone
Hold the phone in the correct position to avoid blocking the
internal antenna.
Note
x If you block the internal antenna, you may disrupt the wireless signal
and increase battery consumption.
x Do not use metallic cases or accessories, as they can interfere with
the signal reception.
Inside the package
Check your product package for the following items:
x Handset
x Battery
x MicroSD card
x Adapter
x USB cable
x User Guide
Using the SIM or USIM card
Before using the card
x Be careful not to damage your fingernails when you remove
the battery cover.
x Turn off the phone before installing the SIM or USIM card.
x Do not bend or force the card. Doing so may damage the
card or destroy data on the card.
x Turn off the phone before removing the SIM or USIM card.
x Do not expose the SIM or USIM card to moisture.
x Avoid static electricity.
x Do not lose or transfer your SIM or USIM card to someone.
Pantech is not responsible for damage due to theft or loss.

13
Getting Started
Installing the SIM or USIM card
1. Insert a finger into the groove at the bottom of the phone,
and then lift up to remove the battery cover.
2. Remove the battery.
3. Insert the SIM or USIM card into the card slot. Ensure that
the gold contacts on the card are facing the metal contacts
on the phone.
4. Reinsert the battery and reattach the battery cover.
About SIM or USIM cards
When you sign up for phone service, you will receive a SIM
or USIM card that contains your registration information,
PIN code, and other personal data. Keep the card secure
and handle it carefully. Do not bend or scratch the card and
keep it away from moisture and static electricity. Pantech is
not responsible for damages caused by theft or loss of your
personal data.
Using the battery
Inserting the battery
1. Turn off the phone, if it is not already turned off.
2. Insert your finger into the groove at the bottom of the
phone, and then lift up to remove the battery cover.
3. Align the gold contacts on the battery with the contacts
located at the top of the battery compartment.
4. Slide the battery into the phone until it lays flat in the
compartment.
5. Reattach the battery cover.
Note Be careful not to damage your fingernails when you remove the
battery cover.

14
Getting Started
About the battery
Your battery uses a lithium ion (Li-Ion) battery. Use only
approved batteries and chargers with your phone. The average
battery life will vary, based on your usage patterns. For more
details, contact your retailer.
Charging the battery
Connect the charger adapter to the Micro USB/Charger
connector connector of the phone
Note
x Do not use the handset while the battery is charging. Doing so may
result in an electric shock.
x Use only authorized adapters. Using unauthorized adapters may
cause the handset to malfunction or may damage the handset or
battery.
x Carefully align the connector as indicated in the image. Failure to
do so may damage the charger connector or preven the battery
from charging.
Installing the microSD card
Insert a microSD card to store files, such as photos or videos.
1. Insert your finger into the groove at the bottom of the
phone, and then lift up to remove the battery cover.
2. Remove the battery.
3. Insert the microSD card into the memory card slot. Ensure
that the gold contacts on the card face the metal contacts
on the phone.
4. Reinsert the battery and reattach the battery cover.
About the microSD card
Inserting a microSD card allows you to store files and
application data. You can use up to a 32GB microSD card. We
recommend that you format the microSD card before using it.
For more information, refer to page 69.

3. Product Overview
3
Product Overview

16
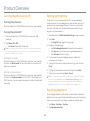
Turning the phone on or off
Turning the phone on
Press and hold the LOCK/PWR key for more than two seconds.
Turning the phone off
1. Press and hold the LOCK/PWR key for more than two
seconds.
2. Tap Power off > OK.
x Tap Restart to restart the phone.
Note If you forcibly shut down the phone by removing the battery,
the screen may malfunction shortly. This is normal and should not
affect the lifespan of the screen.
Setting Mute mode
Press and hold the LOCK/PWR key for more than two seoncds,
and then tap Mute mode. All sounds except multimedia and
alarms are silenced.
Setting Airplane mode
Press and hold the LOCK/PWR key for more than two seoncds,
and then tap Airplane mode. to turn off Wi-Fi, Bluetooth, and
GPS functions. You can reactivate these functions individually,
if desired.
Setting up the phone
When you turn on the phone for the first time, a welcome
screen appears. To use Google apps and services, you must
create or sign into a Google account. You can synchronize
Contact, Calendar, and Gmail data for each account if you
register multiple accounts.
1. Tap Yes when the Data Network Settings screen appears.
2. Tap Start.
x Tap English to change the language.
3. Do one of the following:
x Tap Get a Google Account to create a new account.
x Tap Sign in to sign into an existing Google account.
x Tap Not now to skip this step.
4. If you chose to create a Google account, follow the
onscreen instructions.
5. Configure the backup and restore settings, and then tap
Next.
6. Configure the location service settings and tap Next.
7. Enter your name and tap Next > Finish.
Note You must be connected to the Internet to register a Google
Account. If you tap No when the Data Network Settings screen
appears, available Wi-Fi networks will appear. Select and tap an
available Wi-Fi network. For more details, refer to page XX.
Resetting the phone
Email, Google account information, and contacts will also be
deleted when you reset the phone. Before you reset the phone,
back up your contacts, messages, photos, and other data.
1. Tap Menu > Settings > System.
2. Tap Backup and reset.
Product Overview

17
Product Overview
3. Tap Factory data reset.
4. Tap Reset phone.
5. Tap Erase everything.
Selecting a boot mode
Safe mode
This mode prevents all applications from starting when
the phone boots. Select this mode when it appears that a
downloaded application is crashing the phone as it boots up.
1. Press the LOCK/PWR key to access the boot mode.
2. When the 4G LTE logo appears, press and hold the Volume
Up key.
Recovery mode
This mode offers several menus to recover the system when
the phone cannot boot, due to system failures.
Press and hold the Volume Down key and the LOCK/PWR key at
the same time to enter recovery mode.
Emergency mode
This mode allows you to force the phone into self-upgrade
mode when an error occurs during an upgrade.
1. Remove and reinsert the battery.
2. Press and hold the Volume Up key, the Volume Down key,
and the LOCK/PWR key at the same time.
Getting to know the phone's attractions
Locking messages
To prevent other people from viewing your messages or
sending messages from your phone, tap Messaging > Settings
> Message Lock > Pattern or Password, and then follow the
on-screen instructions. Once the message lock function is
activated, you must draw your pattern on the screen or enter
the password to view or send messages. For more details, refer
to page XX.
Using Multi mode
When you move the phone horizontally in some applications
such as Email and Notepad, the phone changes to Multi
mode. In Multi mode, you can view a list of items and details
about the items at the same time. To stop the screen from
rotating automatically, drag the area at the top of the screen
downward, and then tap Auto Rotate in Easy Setting.

18
Product Overview
Capturing the screen
Press the Volume Down key and the LOCK/PWR key, and tap
XX together for more than two seconds to capture an image
of the screen. You can edit and share the captured image, and
also set it as a wallpaper or contact photo. You cannot capture
images from videos or the camera preview.
Viewing captured images
Drag the area at the top of the screen downward, and then
tap Image Captured. You can also view captured images by
tapping Menu > Gallery > Screenshots.
Locking the Screen
Changing the Screen Lock Type
The screen lock type is set to Visual type by default. The Lock
screen menu is activated only when Screen security is set to
Slide.
1. Tap Menu > Settings > User theme.
2. Tap Lock screen > Type > Visual type.
3. Drag the screen to the left or right to select a screen lock
type, and then tap Save.
Adding a Screen Lock Wallpaper
To display wallpaper on the locked screen, tap Wallpaper >
image folder, and then select a folder that contains images.
If you do not select a folder, only the default image will appear.
Changing Screen Lock Shortcuts
Set the lock screen type to Visual type, and then tap
Shortcuts > Shortcut setting. You can change the shortcuts
to your favorite applications on the locked screen for your
favorite apps.
Unlocking the screen
Unlocking the Visual Screen Lock
When you do not use the phone for a specified length of time
or press the LOCK/PWR key, the screen turns off and the phone
locks.
1. Press the LOCK/PWR key.
2. Tap and drag XX to XX.
x You can also drag an application shortcut to XX to
unlock the screen and launch the application..
Unlocking the Android Screen Lock
When you do not use the phone for a specified length of time
or press the LOCK/PWR key, the screen turns off and the phone
locks automatically.
1. Press the LOCK/PWR key.
2. Tap and drag XX to XX.
x You can also tap and drag XX to XX to unlock the screen
and launch the camera application.

19
Product Overview
Unlocking the Modern Screen Lock
When you do not use the phone for a specified length of time
or press the LOCK/PWR key, the screen turns off and the phone
locks.
1. Press the LOCK/PWR key.
2. Tap and drag XX into the circle.
x You can also drag an application shortcut into the circle
to unlock the screen and launch the application.
Locking the phone
Setting an unlock Patter, PIN, or Password
You must connect at least four dots for a pattern lock, enter at
least four numbers for a PIN lock, or enter a password that is
at least four characters long (at least one character must be a
letter).
1. Tap Menu > Settings > System.
2. Tap Security > Screen lock.
3. Select and tap a lock type, and then follow the on-screen
instructions.
x Tap No to disble the screen lock.
Setting the Face Unlock Function
You can use this feature to recognize your face for unlocking
the phone. The face unlock function is less secure than locking
the phone with a pattern, PIN, or password.
1. Tap Menu > Settings > System > Face unlock.
2. Tap Set it up > Continue.
3. Align your face with the figure on the screen.
4. Tap Continue when your face is captured.
4. Select and tap the secondary unlock type.
Unlocking the phone
Unlocking the phone with a pattern
1. Press the LOCK/PWR key.
2. Draw a pattern on the screen.
You can make emergency call without having to unlock the
screen.
If you forget your pattern
If you draw an incorrect pattern more than five times in a
row, you cannot retry for 30 seconds. When this happens,
you can unlock the phone by entering your Google account
information.
If you draw an incorrect pattern more than 20 times, times
total, you must do one of the following to unlock it:
If you registered a Google account:
Enter your account information
If you did not register a Google account:
Visit the Pantech website
Visit a Pantech Service Center

20
Product Overview
Note For more details about registering your Google account, refer
to page XX.
Unlocking the phone with a PIN or Password
1. Press the LOCK/PWR key.
2. Enter your PIN or password, and then tap OK or Complete.
Note: You can make emergency calls without having to unlock
the screen.
If you forget your PIN or password
If you enter an incorrect PIN or password more than three
times in a row, the screen for entering a PIN unlock key (PUK)
appears. Visit the Pantech website or a Pantech Service Center
to unlock the phone.
If you enter the incorrect PUK more than 10 times
If you enter an incorrect PUK more than 10 times in a row, your
SIM or USIM card will be permanently disabled. a new SIM or
USIM card to use your phone.
Unlocking the phone with face recognition
phone unlocks when you align your face to the figure on
the screen. If the phones fails to recognize your face, use
secondary unlock type to unlock the phone.
1. Press the LOCK/PWR key.
2. Align your face with the figure on the screen.
Using the touch screen
About the touch screen
x Do not subject the touch screen to strong impacts.
x Do not use sharp tools that can scratch the touch screen.
x Do not allow the touch screen to come in contact with water
or chemicals.
x Do not sit on the phone. Doing so may damage the touch
screen.
Performing touch screen commands
Tap: Tap once to access a menu or an option.
Double tap: Tap an item twice.
Drag: Tap and hold your finger on an item and then move your
finger without lifting it from the the screen.
Flick: Place a finger on the screen and move the screen up,
down, left, or right.
Pinch: Place two fingers on the screen and then spread them
apart to zoom in, or move them together to zoom out.
Select and tap: Tap an item in a list.
Press and hold: Touch and hold an area for a few seconds.
Page is loading ...
Page is loading ...
Page is loading ...
Page is loading ...
Page is loading ...
Page is loading ...
Page is loading ...
Page is loading ...
Page is loading ...
Page is loading ...
Page is loading ...
Page is loading ...
Page is loading ...
Page is loading ...
Page is loading ...
Page is loading ...
Page is loading ...
Page is loading ...
Page is loading ...
Page is loading ...
Page is loading ...
Page is loading ...
Page is loading ...
Page is loading ...
Page is loading ...
Page is loading ...
Page is loading ...
Page is loading ...
Page is loading ...
Page is loading ...
Page is loading ...
Page is loading ...
Page is loading ...
Page is loading ...
Page is loading ...
Page is loading ...
Page is loading ...
Page is loading ...
Page is loading ...
Page is loading ...
Page is loading ...
Page is loading ...
Page is loading ...
Page is loading ...
Page is loading ...
Page is loading ...
Page is loading ...
Page is loading ...
Page is loading ...
Page is loading ...
Page is loading ...
Page is loading ...
Page is loading ...
Page is loading ...
Page is loading ...
Page is loading ...
Page is loading ...
Page is loading ...
Page is loading ...
Page is loading ...
-
 1
1
-
 2
2
-
 3
3
-
 4
4
-
 5
5
-
 6
6
-
 7
7
-
 8
8
-
 9
9
-
 10
10
-
 11
11
-
 12
12
-
 13
13
-
 14
14
-
 15
15
-
 16
16
-
 17
17
-
 18
18
-
 19
19
-
 20
20
-
 21
21
-
 22
22
-
 23
23
-
 24
24
-
 25
25
-
 26
26
-
 27
27
-
 28
28
-
 29
29
-
 30
30
-
 31
31
-
 32
32
-
 33
33
-
 34
34
-
 35
35
-
 36
36
-
 37
37
-
 38
38
-
 39
39
-
 40
40
-
 41
41
-
 42
42
-
 43
43
-
 44
44
-
 45
45
-
 46
46
-
 47
47
-
 48
48
-
 49
49
-
 50
50
-
 51
51
-
 52
52
-
 53
53
-
 54
54
-
 55
55
-
 56
56
-
 57
57
-
 58
58
-
 59
59
-
 60
60
-
 61
61
-
 62
62
-
 63
63
-
 64
64
-
 65
65
-
 66
66
-
 67
67
-
 68
68
-
 69
69
-
 70
70
-
 71
71
-
 72
72
-
 73
73
-
 74
74
-
 75
75
-
 76
76
-
 77
77
-
 78
78
-
 79
79
-
 80
80


Pantech Flex P8010 User manual
- Category
- Smartphones
- Type
- User manual
- This manual is also suitable for
Ask a question and I''ll find the answer in the document
Finding information in a document is now easier with AI