Page is loading ...

IM-222/3-19
Quick Cone-Fire
programming . . .
page 10
Ramp-Hold
programming for
the power user . . .
page 13
Error messages . . .
pages 25 - 27
Confused about
display messages?
... pages28-29
Top: Light is on dur
-
ing programming.
Middle: Light is on dur
-
ing program review.
Bottom: Light turns on
only when the elements
are on during a firing.
Start/Stop Key
1) On/Off: Starts and stops a firing.
2) Enter Data: Press after each pro-
gramming step. It works like the Enter
key on a computer.
Up Arrow Key
1) Raise Numbers
2) Select a Firing Mode: From
[IDLE] press Start/Stop.PressUp
Arrow to select Cone-Fire or
Ramp-Hold.
3) Edit a Program While the Kiln
is Firing p16:
[SKIP ]Skip a segment
[HLDT] Change hold time
[CHGT] Change end temperature
4) All Other Options:
[DELA]Select how Delay works.17
[TC ]Select thermocouple type.
p18
[ALAR] Set temperature alarm. p18
[DIAG ] Check amps. p19
[F/C ]Select °F or °C display p19
[LIM ]Set max temperature. p19
[COST] Look up cost of a firing. 19
[EXIT ]Press Start/Stop to return
to IDLE.
[OPT2 ] Press Start/Stop to see
level 2 options.
[OFST ] Adj. cone temperature. p16
[TCOS] Adjust thermocouple. p20
[TEDE ] Change sensitivity of
the FTH, FTC and LTDE warning
alarms. p20
[HTDE] Change sensitivity of the
HTDE shut down alarm. p21
[LOCK] Lock programs. p21
[AOP1] For kilns with the optional
AOP switch box electrical outlet.p22
[ELEC ] Check circuit board tem
-
perature, useful in hot weather. p22
[EXIT ]Press Start/Stop to return
to IDLE.
[OPT3 ] Press Start/Stop to see
level 3 options.
[COOL] Select Slow Cooling so it
appears during Cone-Fire program
-
ming. p17
[RATE ] Select your preferred type
of rate. p22
[CENT] Enter cost of electricity. 23
[KW ]Enter kiln’s wattage. p23
[SFTY ] See kiln’s max tempera
-
ture. p24
[SOFT ] See software version. p24
[CFG ]Shows controller model.24
[RST ]Reset the controller to its
factory default settings. p24
Down Arrow Key
1) Lower Numbers
2) Repeat the Last Fir
-
ing: From
[IDLE] press
Down Arrow.Thepro-
gram you have selected
will appear one step at a
time. When
[STRT] ap-
pears, press Start/Stop.
Page 5
4) Review a Program:
During firing, press Down
Arrow. The program you
entered will appear one
step at a time. Page 5
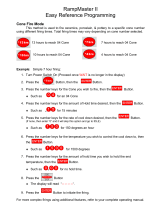
Temperature Display
No Display Dot: Tempera
-
ture display is in °F.
Right-Hand Display Dot:
Temperature display is in °C.
Seepage19forinstructions
on selecting °F and °C.
Time Display
Center Display Dot:
Separates hours from min-
utes. Example: Display
shown above is 1 hour
and 30 minutes.
°C Display Dot
Sentry Xpress 5.0
Digital Temperature Controller
Cone-Fire and Ramp-Hold Instructions
Indicator
Lights
°F
°C
To stop a firing, press
Start/Stop key at any
time. ABRT will appear,
and the heating ele
-
ments will turn off. Press
Start/Stop again to re
-
turn to IDLE.

Sentry Xpress 5 Cone-Fire / Ramp-Hold
2 Do not leave your kiln unattended during operation.
Before You Begin
Thank you for purchasing the Sentry Xpress temperature
controller. As you read the manual, pull up a chair and sit in
front of your kiln so you can try out the keys.
Thecontrollerdisplaymessagesarelimitedtofourcharac
-
ters. If at any time you are confused by these messages, turn
to Display Messages on pages 28 - 29.
The back cover is a shorthand guide to programming, to be
used after you have read the programming instructions on
pages 10 and 13.
You can customize the programming (pages 10 and 13) by
adding or removing these steps:
Delay: Schedule a firing for later. This works in all firings. Page 17
Fan: If your kiln is set up with a vent and switch box outlet, or, socket, you can turn the fan on or
off for Ramp-Hold segments. Page 22.
Lock: Passcode-protect individual Ramp-Hold programs. Page 21
Slow Cooling: Enhance certain glazes in Cone-Fire mode. Page 17.
If you don’t need these features, streamline programming by removing their display prompts.
Turn to the pages shown above for instructions.
Do not worry if you hear a clicking noise during operation. Mechanical relays click as they turn
the heating elements on and off. This is normal. It is also normal for the temperature to fluctuate
up and down as the kiln heats up. Please don’t be concerned.
The warranty on your Sentry controller does not cover damage from
overfiring, regardless of the circumstances. It is the operator’s
responsibility to make sure the kiln turns off at the end of the firing.
We are constantly trying to find better ways to make kilns, and your kiln is extremely reliable.
Nevertheless, it contains mechanical parts that eventually wear out. In some cases, a parts failure
can lead to a kiln overfire. Therefore it is important that you occasionally check on the kiln during
operation. Although the kiln does not require constant attention, it should never be left unat
-
tended. Please check the kiln especially during the later stages of firing.
Write notes on the controller features that you use. Then if you are away from your kiln for a
period, you can review your notes to refresh your memory. The cover shows the controller op
-
tions at a glance. Use the cover as a quick index.
Use Program Review (page 5) every time you fire the kiln. This is your assurance that you are
firing the correct program. Check the program in the display against a written copy.
©2019, by Paragon Industries, L.P. IM-222/3-19

Keep the kiln lid or door closed when the kiln is not in use. 3
Contents
Before You Begin .............2
Safety Rules .................4
Safety first. Quick habits for trou
-
ble-free firing.
Chapter 1 Basic Pointers .......5
A quick read of this chapter will
save you time later.
Time and Temperature Displays ....5
Operation Begins from
the IDLE Display ................5
Thermocouple Inspection .........5
How to Scroll Numbers Rapidly ....5
Program Review & Repeat Firing . . . 5
Delay .........................6
The LID Message................6
Power Failures ..................6
CPLT Message: Firing Completed . . 6
Hot and Cold Weather;
Storage Sheds..................6
Thunder Storms and Power Surges . 7
Canceling a New Program ........7
Two Firing Modes:
Cone-Fire and Ramp-Hold ........7
Preventing an Overfire............7
How to Disable the Audible Alarm . . 7
Chapter 2 Cone-Fire ...........8
Learn quick ceramic firing.
Pyrometric Cones ...............8
Firing Schedules ................9
How to Interpret the Bending
of a Pyrometric Cone.............9
How to Correct for
Under- or Over-Fired Cones .......9
Cone-Fire Programming
Instructions ..................10
Firing Speed [SPD] .............10
Hold at Cone Temperature [HOLD] 10
Slow Cooling [COOL] ...........11
How to Customize Cone-Fire .....11
For Kilns with the AOP Outlet .....11
Chapter 3 Ramp-Hold .........12
Read this section for non-ceramic
firings and customized ceramic
firings.
Theory of Ramp-Hold Operation. . . 12
How to Store Programs..........12
Ramp-Hold Rate: 3 Types
Rate as Degrees Per Hour . . . . . . 13
Rate as Degrees Per Minute. . . . . 14
Rate as Time Needed to Reach
the Target Temperature . . . . . . . . 14
Ramp-Hold Programming
Instructions ..................13
Hold (HD ) ....................14
Temperature Overshoot .........14
AOP: Turn on a Fan or Alarm .....14
Programming a Cooling Segment . 14
A Ramp-Hold Practice Program . . . 15
Chapter 4 Customize Your
Controller with Options .......15
Become a power user. The infor
-
mation is here if you ever need it.
How to Edit a Program
During a Firing .................15
Skip to the Next Segment . . . . . . 16
Change Hold Time . . . . . . . . . . . . 16
Change Target Temperature . . . . 16
Cone-Fire Options
OFST / Cone Offset ............16
Interpreting Cone Bending to
Set a Cone Offset . . . . . . . . . . . . . 17
When Cone Temperature
Is Off More Than 20°F/11°C . . . . . 17
COOL / Slow Cooling for Glazes . . 17
General Options
DELA / Delay the Firing for Later . . 17
TC / Choose Thermocouple Type . 18
ALAR / Temperature Alarm.......18
Setting the Alarm From IDLE . . . . 18
Setting the Alarm During a Firing. 18
DIAG (Diagnostics) .............19
Check the Amperage
Test the Relays and AOP1 Outlet
F/C / Select °F or °C
Temperature Display ............19
°F/°C Temperature
Conversion Formulas
LIM / Set a Maximum
Temperature for Your Kiln ........19
COST / View the Electrical
Cost of a Firing ................19
TCOS / Thermocouple Offset .....20
TEDE / Temperature Deviation ....20
HTDE / Adjust High
Temperature Deviation ..........21
LOCK / Program Lock ..........21
How to Activate the Lock Option . 21
How to Lock Individual Programs 22
AOP1 / Auxiliary Output .........22
ELEC / Electronics Temperature . . 22
RATE / Select Preferred
Type of Ramp-Hold Rate.........22
CENT / Enter Cost Per Kilowatt-Hour
from Your Electric Bill
(for Firing Cost) ................23
KW / Kilowatts of Your Kiln
(Needed to Calculate Firing Cost). . 23
SFTY / Maximum Temperature....24
SOFT / Software Version.........24
CFG / Configuration Code .......24
RST / Reset ...................24
Chapter 5 Error Messages.....25
Error messages are like the heart
rate monitor on a digital watch.
They let you know when some
-
thing is wrong.
Non-Interrupting Error Messages
FTC / Failed to Cool ............25
FTH / Failed to Heat ............25
LTDE / Low Temperature Deviation 25
PF / Power Failure..............25
Terminating Error Messages
- - - - / No Thermocouple ........25
BADP / Bad Programming .......25
ETH / Electronics Too Hot .......25
FAIL / Thermocouple Failure .....25
FE 1 / Failed to Read/Write
To Memory ...................26
FE 4 / Unstable Analog-to-Digital Con
-
version; Errors Detecting
Thermocouple Signal ...........26
FTL / Firing Too Long ...........26
HTDE / High Temperature
Deviation .....................26
LAG / Thermocouple Lag ........26
LID / Safety Switch .............26
OTL / Over Temperature Limit ....27
PF1 / Power Failure.............27
PF 2 / Power Failure ............27
PF 3 / Power Failure ............27
TC 2 / Thermocouple Failure .....27
TCR / Thermocouple Leads
Reversed .....................27
Basic Power Failure Principles ....27
Using Ceramic Witness Cones
After an Extended
Power Failure . . . . . . . . . . . . . . . . 27
Display Messages............28
Preset Cone-Fire Programs ....30
Orton Cone Temperature Chart . 31
Ramp-Hold Firing Records ....33
Make copies. Keep a log book of
your firings. Build a knowledge
base.
Glossary ...................34
Ramp-Hold
Shorthand Instructions .......35
Cone-Fire
Shorthand Instructions .......36

Sentry Xpress 5 Cone-Fire / Ramp-Hold
Safety Rules
The warranty on your Sentry Xpress controller does not
cover damage from overfiring, regardless of the circum
-
stances. It is the operator’s responsibility to make sure the
kiln turns off at the end of the firing.
Follow these safety rules in addition to the ones in your
kiln manual:
G
When the kiln is not in use, disconnect the
power and keep the lid or door closed. (For
larger kilns with heavy cordsets, we recommend
a power disconnect box near the kiln.)
G
Do not leave the kiln unattended, especially
near the expected shut-off time. Do not leave a
kiln turned on at your studio while you are at
home sleeping.
G
Wear green #3 firing safety glasses when look
-
ing into the peephole of a hot kiln.
G
Do not touch hot sides of kiln. Keep unsuper
-
vised children away.
G
Install your kiln at least 12 - 18 inches from any
wall or combustible surface. (See manufac
-
turer’s recommendation for your model.)
G
Do not open lid or door until kiln has cooled and
all switches are off.
G
Fire only in a well-ventilated, covered and pro
-
tected area away from flammable materials.
Keep cordset away from hot sides of kiln.
G
DANGEROUS VOLTAGE! Do not touch
heating elements with anything. Disconnect
kiln before servicing.
G
Do not operate if the controller itself is hotter
than 158°F / 70°C. (See instructions on page 22
for checking circuit board temperature.) Never
allow the firing room temperature to exceed
110°F / 43°C. (Measure room temperature
three feet from the kiln.)
G
Stop a firing by pressing the Start/Stop button,
not by only disconnecting the power. In certain
conditions, the controller will interpret a power
interruption as a power failure and turn the kiln
back on when you reconnect the power.
G
Place the kiln on the stand recommended by the
manufacturer. When a kiln is safety tested, the
lab fires the kiln on the stand designed for the
kiln. Cinder blocks or bricks can inhibit the flow
of air under the kiln. They can also change the
kiln’s heating characteristics.
G
Place the kiln on a non-combustible surface.
G
Keep the kiln lid or door closed when the kiln is
not in use. This keeps dust out of the kiln. Also,
should someone turn on the kiln while you are
away, the closed lid will keep the heat safely in-
side the firing chamber.
G
Never place anything on top of the kiln, even
when the kiln is idle. If people become accus-
tomed to placing papers and other objects on
the kiln, they may forget and do that while the
kiln is firing.
G
Remove tripping hazards from around the kiln.
Keep the kiln’s supply cord out of traffic areas.
G
Avoid using extension cords.
G
Never fire tempered glass inside a kiln. It could
explode.
G
Greenware, which is unfired clay, must be bone
dry before firing. Moist greenware can explode
inside the kiln, damaging the ware and the kiln.
Place a piece of greenware against the inside of
your wrist. If it feels cool, it is too wet to fire.
G
Store kiln shelves in a dry area. Moist shelves
can explode inside a kiln.
G
If you smell burning plastic, turn the kiln off.
Examine the wall outlet (socket) and supply
cord for signs of burning.
G
Never place extra insulation around the kiln in
an attempt to conserve energy. The extra insu
-
lation can cause the wiring and the steel case to
over-heat.
4
Do not leave your kiln unattended during operation.
Large studio kilns should have a power disconnect box for the
kiln. Place the box in the kiln room.

Chapter 1
Basic Pointers
In This Chapter you will learn to . . .
G
Choose between Cone-Fire and Ramp-Hold
G
Use the controller in freezing or hot weather
G
Understand the display window layout
G
Easily repeat the last firing
G
Make a quick visual check of your thermocouple
G
Avoid overfiring your kiln
G
Disable the audible alarm
Time and Temperature Displays
Center Dot: Time
A center dot appears during
time display. It separates hours
from minutes. (Example: 1 hour,
30 minutes displays as 01.30.)
During temperature display, the
dot disappears.
Right-Hand Dot: °C
When temperature is dis-
played in °C, a dot appears in the
lower right. In °F display, it disap-
pears. You can choose between
Fahrenheit and Celsius display. See page 19.
Operation Begins
from the IDLE Display
[IDLE] must appear before you
can fire the kiln.
I
If [CPLT], [PF3], or other message appears instead of
[IDLE] when the kiln is first turned on, press the
Start/Stop key (the key with the circular arrow).
[IDLE] will appear.
I
If you press Start/Stop during a firing, [ABRT] will ap
-
pear. To get back to
[IDLE], press Start/Stop again.
I
If the display shows an error message such as [FAIL] in
-
stead of
[IDLE], see pages 25-27.
[CPLT] (firing completed) appears at the end of a firing.
To make
[IDLE] appear, press Start/Stop.
Thermocouple Inspection
The small rod protruding into the firing chamber is the
temperature sensor, or thermocouple.
CAUTION: Bumping the thermocouple can push
it out of the firing chamber. This could cause an
overfire! The controller does not contain an alarm
to detect this type of failure. Bumping the thermo
-
couple could also cause inaccurate readings.
Thermocouples come in different widths. The wider the
thermocouple, the farther it should extend into the firing
chamber. A ¼” - ½” diameter
thermocouple should extend
into the kiln about ¾” - 1”. (Do
not be concerned if your thermo
-
couple extends into the firing
chamber even farther.)
Note: Keep shelves, posts
and ware 1” - 1 ½” away
from the thermocouple.
Keep an extra thermocou
-
ple on hand, especially if
you fire hotter than 2000°F /
1093°C.
If you are using a separate portable controller, you will
need to install the thermocouple on the kiln. See the sepa
-
rate TnF 2 installation instructions.
How to Scroll Numbers Rapidly
During programming, hold an arrow key down several
seconds, and numbers will begin to scroll rapidly. Ordi
-
narily, you would press the Up Arrow to raise a number
and the Down Arrow to lower it. But sometimes it is faster
to press the opposite key. This is because the numbers scroll
below 0000 to the highest number, and vice versa. Exam-
ples:
I
To program a 99.59 hour Hold when the display shows
[00.00], press the Down Arrow once.
I
To program a FULL rate when the display shows
[0000], press the Down Arrow once.
I
To program a temperature of 200°F when the display
shows
[1800], press the Up Arrow. That is faster than
pressing the Down Arrow and scrolling from 1800 to
200.
Program Review & Repeat Firing
Program Review lets you check that the program in the
controller is accurate. Use Program Review before every
firing. It takes only seconds. Program Review shows the val
-
ues for the program in active memory. Use Program Re
-
view from
[IDLE] to repeat the last program you fired. The
program in active memory is 1) the program that you fired
last, or 2) the program that you entered or selected since
the last firing.
I
Using Program Review during firing: Press the Down
Arrow key. The rate, temperature, hold, etc. will dis
-
play one after the other. The firing will continue.
I
To repeat a firing, use Program Review from [IDLE]:
Press the Down Arrow key. After rate, temperature,
hold, etc.,
[STRT] will appear. Press Start/Stop.
[DELA] will appear unless it has been removed in Op
-
tions. Enter the delay time, or press the Start/Stop key.
[-ON-] will appear, and the kiln will begin firing the pro
-
gram just reviewed.
Pointer: When
[DELA] flashes after [STRT], you
can end the firing before it begins. Do nothing for
60 seconds. The display will return to
[IDLE].
Keep the kiln lid or door closed when the kiln is not in use. 5
Pointer: Keep shelves,
posts and ware 1” - 1 ½” away
from the thermocouple.
Time
°C

Note: In Program Review, Cone-Fire speed is dis
-
played as the RA (ramp) part of each segment.
Cone-Fire Review shows the segments and ramp
rates listed in the charts on pages 30-31.
Delay
Delay is a count-down timer. The kiln begins firing when
the timer runs out of time. Use delay to fit a firing into your
schedule. See also page 17.
CAUTION: For safety, do not leave the kiln alone
during a delay or a firing. We cannot guarantee
your kiln against overfiring even though the con
-
troller is automatic.
1 After you have selected a program and the control
-
ler is ready to begin firing,
[STRT] will appear.
2 Press the Start/Stop key once. [DELA] will ap
-
pear, alternating with
[00.00].
3 Use the arrow keys to enter delay time. (The deci
-
mal separates hours and minutes. Example: 1 hour
and 10 minutes = 01.10) Then press Start/Stop.
[-ON-] will appear, then [DELA] alternating with
time left until the firing begins.
Note: Press Start/Stop during delay to end the
delay and begin the firing. The maximum delay is
99 hours and 59 minutes.
CAUTION: For safety, do not leave the kiln alone
during a delay or a firing. We cannot guarantee
your kiln against overfiring even though the con-
troller is automatic. The operator assumes full re-
sponsibility for shutting the kiln off at the proper
time.
The LID Message
This indicates that your kiln is equipped with a lid or
door safety switch, and the lid or door is open. This will turn
off the elements.
If your kiln does not have a safety switch, or the kiln is
closed, please see page 26.
Power Failures
After a power failure, the controller will continue firing
provided–
I
The kiln temperature is above 212°F / 100°C when the
power comes back on.
I
The temperature dropped no more than 180°F / 100°C
while the power was off.
Power Failure Messages
[PF 1] The power failed during a cooling segment, and
the kiln cooled past the target temperature while the power
was off.
[PF 2] The power failed during a firing and the kiln tem
-
perature was below 212°F / 100°C when the power came
back on.
[PF 3] The power failed during a firing and the tempera
-
ture dropped more than 72°F / 40°C by the time the power
came back on.
CPLT Message: Firing Completed
When the firing has successfully completed, the Sentry
Xpress will beep for 60 seconds and shut off the elements.
Then four messages will cycle one after the other:
1 [CPLT] (complete)
2 Firing time in hours and minutes
3 The temperature reached during the last segment
that you programmed
4 The current kiln temperature
Note: After the kiln fires to completion, discon
-
nect the power. It is okay to turn off the power to
the controller while the kiln cools to room
temperature.
Hot and Cold Weather; Storage Sheds
It is okay to store the Sentry Xpress at sub-zero tempera
-
tures. But before operating, raise the room temperature to
at least 32°F / 0°C.
The Sentry Xpress will register sub-zero °F / °C tempera
-
tures. However, 32°F / 0°C is the lowest recommended op
-
erating temperature.
Pointer: Raise the room temperature with a space
heater before firing the kiln. Place the space heater
within a couple of feet of the control panel and let it
run for an hour or so. Or even hang a shop light
near the kiln to raise the temperature above
freezing.
The circuit board is rated for 176°F / 80°C maximum op
-
erating temperature. However, the maximum recom
-
mended temperature is 158°F / 70°C, measured at the con
-
troller inside the kiln switch box. To lower the temperature,
open windows and blow air across the kiln’s switch box with
a fan. Place several fans in the room during hot weather.
(See ELEC, page 22, to check circuit board temperature.)
High humidity will not adversely affect the Sentry
Xpress unless water condenses on the circuit board. In this
case, do not fire the kiln until the moisture has evaporated
from the board.
Sentry Xpress 5 Cone-Fire / Ramp-Hold
6 Do not leave your kiln unattended during operation.
Hot weather pointer: Blow a gentle stream of air through the control
panel of the kiln to reduce the temperature of the controller circuit board.

Thunder Storms and Power Surges
Unplug the kiln when not in use, especially during thun
-
der storms and in areas that have frequent power surges. If
the kiln is part way through a firing when a storm begins, it
may be okay to continue the firing. When the kiln shuts off,
disconnect the power.
CAUTION: When firing the kiln during a storm,
do not leave the kiln unattended.
Canceling a New Program
It’s okay if you pause while entering a program. There is
no time out. If you change your mind and want to cancel a
new program, turn off the power to the controller. Or con-
tinue entering a program. When
[STRT] appears, press the
Down Arrow key. The controller will cancel the firing and
go back to
[IDLE].
Cone-Fire and Ramp-Hold
To give you greater flexibility, your controller has two
firing modes: Cone-Fire and Ramp-Hold.
Cone-Fire Mode (see pages 8-11)
Cone-Fire mode fires the ware to a pyrometric cone
number using the Orton cone tables on page 32. This mode
is for ceramics, pottery, stoneware, and glazes. Your sup
-
plier can tell you which cone number to program.
Ramp-Hold Mode (see pages 12-15)
Use Ramp-Hold mode to create custom firings. Select
your own firing speed, temperature, and hold time in up to
20 steps, or segments.
The chart shows the recommended firing mode for sev
-
eral types of ware:
Type of Firing Suggested Firing
Mode
China Painting Cone-Fire
Ceramic Decals Cone-Fire
Ceramic Glaze Cone-Fire
Ceramic Greenware Cone-Fire
Glass Bead Annealing Ramp-Hold
Glass Fusing Ramp-Hold
Glass Slumping Ramp-Hold
Lost Wax Ramp-Hold
Preventing an Overfire
Even though a digital controller turns off the kiln auto
-
matically, you should monitor the kiln during firing. This is
to prevent a possible overfire.
1 Remain nearby while the kiln is firing. Check the
kiln occasionally.
2 Set the temperature
alarm (page 18) to re
-
mind yourself to check
the kiln. If you are too far
away to hear the alarm,
you might try using a
baby monitor.
3 After the kiln fires to
completion, disconnect
the power. It is okay to
turn off the power to the
controller while the kiln
cools to room tempera
-
ture.
How to Disable the Audible Alarm
The Sentry Xpress makes a beeping noise when it fires to
completion and when it displays error messages. Some peo-
ple prefer not to have an audible alarm. You can disable the
alarm by removing a jumper on the back of the controller.
Replace the jumper
when you want the
alarm again.
1 Disconnect the kiln
from the power.
2 Remove the four
corner screws that
hold the controller
to the switch box.
Lift out the con
-
troller.
3 Find the 2-pin
jumper plug for the
alarm on the back
of the controller. It
is on the connec
-
tion pins labeled
BUZZ ENABLE.
Remove and save
the jumper plug.
4 Reinstall the con
-
troller being careful not to tug on the wires.
Keep the kiln lid or door closed when the kiln is not in use. 7
Try to avoid firing your kiln during thunderstorms. Keep the kiln discon
-
nected from the power when not in use. (Lake Grapevine, Texas. Photo by
Jared Davidson.)
Pointer: Set a wristwatch alarm,
cell phone, or even an alarm clock
to remind youself to check on your
kiln.
Remove the 2-pin jumper plug from the
connectors labeled BUZZ ENABLE to si
-
lence the beeping alarm.You will find the
connectors on the back of the controller.

Chapter 2
Cone-Fire
In this chapter you will learn to . . .
G
See witness cones at high temperatures
G
Program a Cone-Fire program in minutes
G
Pre-heat the ware so it doesn’t explode
G
Bend a cone by adding extra hold time
G
Cool slowly (called down fire) to alter glazes
Cone-Fire mode is based on Orton pyro
-
metric cones. It is not designed for heat
treating, glass fusing and enameling. For
these firings, see “Ramp-Hold,” pages
12-15. Use Ramp-Hold to fire ceramic
pieces that require a custom firing
schedule, such as some types of stone
-
ware sculpture or crystalline glaze.
Before using Cone-Fire mode, read all of
this chapter. Have your controller in
front of you so you can try out the keys as
youread.Formoredetailsonpyrometric
cones, please see your kiln manual.
Pyrometric Witness Cones
Question A cone 5 firing was 7°F below the target
listed in your manual, and a cone 6 firing was 22°F
below the target. Is this typical and okay? Is the dig
-
ital controller on my kiln operating normally even
though it did not achieve the controller tempera
-
tures that were programmed at cone 5 and 6?
Answer This is normal for Cone-Fire operation. If
the kiln fires slower than the normal rate, it will
shut off at a lower temperature. If the kiln fires
faster than a normal rate, it will shut off at a higher
temperature, sometimes by only a few degrees.
The Sentry Xpress controller shuts off automatically
without cones. Nevertheless, every ceramic firing should
include at least one witness cone (also called the shelf
cone). The witness cone is placed inside the kiln. The wit
-
ness cone is the most accurate measurement of heat work in
a ceramic firing.
If you fire the same size load and type of ware regularly,
the witness cones let you compare one firing to the next and
alert you when something is wrong. For example, if the wit
-
ness cone bends farther and farther with each consecutive
firing, this may indicate thermocouple temperature drift.
Note: If the bending of the witness cone does not
match the Cone-Fire shut-off, you may want to ad
-
just Cone Offset (page 16) or Thermocouple Off
-
set (page 20). If the witness cones bend inconsis
-
tently from one firing to another, see “Sentry
Troubleshooter,” a separate publication.
How to Position Cones on the Shelf
(for Ceramic Kilns)
Position the witness cones so
you can see them through a
peephole during firing. If the
kiln takes longer than usual to
fire, you may wonder if some
-
thing has gone wrong and the
kiln is over-firing. But by seeing
the cones, you will know how the
firing is actually progressing.
If you follow these guidelines,
you should be able to see the
cones even at cone 10:
1 Place the cones 8” - 12”
away from a peephole. Positioning them closer
makes them difficult to see.
2 Have enough space
around the cones to
keep them from touch
-
ing a piece of ware
when they bend.
3 Position cones so that
when viewed from the
peephole, they are sil
-
houetted by a glowing
heating element on the
opposite kiln wall.
(Keep cones at least 2”
from an element.)
4 The element that silhouettes the cones should be
level with the lower part of the cone. If the element
is in line with the upper part of the cone, you won’t
be able to see the cone when it bends.
Sentry Xpress 5 Cone-Fire / Ramp-Hold
8 Do not leave your kiln unattended during operation.
Use self-supporting witness
cones on the shelf. They stand
upright without cone holders.
Silhouette the lower part of the
cone against an element. Keep
the cone 8” - 12” away from the
peephole.
The heating element in the background should be lined up with the lower
part of the witness cones. If the element is too high, the tips of the cones
will disappear from view when they bend.

Keep the kiln lid or door closed when the kiln is not in use. 9
5 If you use the three cone system, always have the
higher temperature cone on the same side in every
firing. Otherwise you can lose track of which cone is
which.
6 Wear green #3 kiln firing safety glasses when view
-
ing the cones through the peephole.
See your dealer if in doubt about which cone number to
use with each clay and glaze.
Firing Schedules
Cone-Fire uses three ranges of firing schedules:
I
Low fire cones 022 - 011
I
Medium fire cones 010 - 01
I
High fire cones1-10
The firing schedules programmed into Cone-Fire mode
are listed on pages 30-31. Should you ever want to custom
-
ize a Cone-Fire program, make the desired changes to a fir
-
ing schedule and program it in Ramp-Hold (page 11).
CAUTION: Cone numbers beginning with 0 are
lower in temperature than those without the 0.
When programing a Cone-Fire, be sure you know
the difference between an 05 and 5. See “Tempera-
ture Equivalents Chart for Orton Self-Supporting
Pyrometric Cones,” page 32.
Low Fire Cones 022 - 011
This range includes decals, over-decorations, lusters,
and golds. You can usually fire fast. Good venting is impor-
tant because of the oils and other organics. Do not close the
lid from the vented position until all odor has disappeared.
Middle Fire Cones 010 - 01
Glazes fired on bisque ware (ware that has already been
fired) can be fired faster than greenware.
High Fire Cones 1 -10
This is the firing range for porcelain and stoneware.
These bodies fire nearly to vitrification and can shrink up to
16%. Water, carbon and sulfur burn out during the early
stages and must be vented. The amount of oxygen in the
kiln affects the color of the fired clay. The high fire sched
-
ules programmed into Cone-Fire slow down during the last
216°F/120°C (two hours) to produce better density in the
ware.
How to Interpret the Bending of a
Pyrometric Cone
The cones illustrated here are called self-supporting
cones. They are the easiest type of witness cone to use.
1. Correct Bend
When the self-supporting cone
bends so that the tip is approxi
-
mately even with the top of the
base, the cone has been exposed to
the correct amount of heat work
for that cone number. This is
calleda6o’clock bend.
2. Under-Fired Cone
The cone in this photo has not
bent far enough. It indicates that
the kiln did not fire long enough or
hot enough.
3. Over-Fired Cone
When a cone collapses or pud
-
dles, it indicates that the kiln
over-fired the ware rated to that
cone number.
Note: Do not be overly con-
cerned with achieving an exact 6 o’clock bend. The
difference between a 3 o’clock and a 6 o’clock bend
is only a few degrees of temperature.
How to Correct for Under- or
Over-Fired Cones
Before changing a firing because of an under- or
over-fired cone, make sure the correct cone was in the kiln.
For instance, if you fired to cone 05, make sure the cone in
the kiln was not a cone 5 instead. (See the cone temperature
chart on page 32.) Try the following ideas, one at a time:
Compensating for an Under-Fired Cone
I
Fire to the same cone number next time, but add hold
time. How much to add is a matter of experimentation.
A general guideline would be 10-30 minutes.
I
If the kiln still does not fire hot enough, then fire to the
next hotter cone number, without hold time.
I
Adjust the Thermocouple Offset. See page 20.
I
Customize the firing in Ramp-Hold. See page 11.
Compensating for an Over-Fired Cone
I
Fire to the next cooler cone number.
I
If firing to the next cooler cone number results in un
-
der-firing, add hold time.
I
Adjust the Thermocouple Offset. See page 20.
I
Customize the firing in Ramp-Hold. See page 11.

Entering a Cone-Fire
Program
Firing Speed [SPD]
When you select Medium speed in a Cone-Fire pro
-
gram, the kiln uses the standard firing schedules listed on
pages 30-31. When you select Fast, the standard schedules
fire 20% faster. On Slow, they fire 20% slower.
Pointer: The Medium speed appears in the display
as
[STD] (Standard).
Note: The final segment heating rate will not
change. It will always be 108°F/60°C per hour. Slow
and Fast speeds affect only the earlier ramp seg
-
ments of the Cone-Fire schedules on pages 30-31.
Hold at Cone Temperature [HOLD]
Cone-Fire Hold heat-soaks the ware at the cone temper
-
ature. Without Hold, the kiln shuts off after it reaches the
cone temperature or Slow Cooling begins. Hold maintains
the cone temperature for the length of time you specify.
Hold is not needed in every firing. Experience will help
you decide when to use Hold. Some of the reasons you
might consider using it:
I
To even out the temperature throughout the kiln.
I
To allow heat to penetrate more completely into the
clay. (Rapid firing is like cooking: the turkey will be
done on the outside but not on the inside.)
I
To help glaze absorb china paint.
I
To heal glaze defects such as bubbles.
CAUTION: Too much hold time can overfire your
ware and burn out colors. Be sure to experiment
with hold before firing a full load of ware with it.
One way to add hold time without over-firing is to fire to
one cone cooler than needed. Then add enough hold time
to bend the next hotter cone. Hold time needed to bend the
next cone will vary. As a rule of thumb, 20 minutes of hold =
one cone of heat work.
Example: to fire to cone 05, program Cone-Fire for 06
and add 20 minutes of hold time.
If your kiln has a peephole, watch the pyrometric witness
cones during firing. Press Stop/Start when the correct wit
-
ness cone bends. Note how much Hold time was needed.
Program that much Hold time the next time you fire the
same type of ware.
Note: During Hold, the display temperature will
alternate with time left in Hold. To figure hold
time for the next firing, subtract time left in Hold
from the total hold time entered.
Sentry Xpress 5 Cone-Fire / Ramp-Hold
10 Do not leave your kiln unattended during operation.
Cone-Fire Programming
Instructions
Lock, Slow Cooling, and Delay can each be turned on
or off as programming steps. Ignore the steps below that
you have deactivated. See LOCK, page 21; COOL, page
17; and DELA, page 17.
1 From [IDLE], press Start/Stop (left button).
2 Using the Up Arrow key (not the Down Ar
-
row), skip past
[USER] and select [CONE].
Then press Start/Stop.
3 The last pyrometric cone you fired will appear.
Use the arrow keys to change the cone number.
Then press Start/Stop.
4 If the program is locked, [UNLO] (Unlock) will
appear alternating with
[0000]. If you want to
change the program, enter your passcode. Oth
-
erwise press Start/Stop, which will take you to
Step 9.
5 [SPD] alternating with [SLOW], [STD] (stan
-
dard) or
[FAST] will appear. Use the arrow keys
to change speed. Then press Start/Stop.
6 [HOLD] and the hold time from the last firing
will appear. (Example: 1 hour and 10 minutes =
01.10) Use the arrow keys to change the hold
time. Then press Start/Stop.
7 [COOL] will appear. Enter a slow cooling rate
as degrees per hour. (180°F/82°C is the maxi-
mum cooling rate. Enter 0 to turn Slow Cooling
off.) Then press Start/Stop.
8 [LOCK] alternating with [0000] will appear.
Enter your passcode to lock the program, or
press Start/Stop to leave it unlocked.
9 [STRT] will appear. Press Start/Stop. [DELA]
will appear. Set a delay time. If you don’t need to
delay the firing, leave the time at
[00.00]. Then
press Start/Stop.
[-ON-] will appear, the Run
indicator light will begin blinking, and the kiln
will begin firing. If Delay was programmed,
[DELA] will appear, then time remaining until
start.
To stop a firing before completion, press Start/Stop.
[ABRT] (abort), the firing time, final firing temperature,
and current temperature will appear.
When the kiln fires to completion, it will beep for 30
seconds.
[CPLT] (fired to completion), the firing time,
final firing temperature, and current temperature will
appear.
To return to
[IDLE], press Start/Stop.
To fire the same program again, see “Program Re
-
view & Repeat Firing,” page 5.

When Hold is set to 99.59 hours, the Sentry Xpress will
remain at that temperature indefinitely, until the
Start/Stop key is pressed.
Slow Cooling [COOL]
Slow cooling, also called down firing, enhances the qual
-
ity of some ceramic glazes and may heal glaze bubbles. Slow
cooling encourages crystal develoment, deeper gloss, and
sometimes startling color shifts. Iron red glazes seem to re
-
spond well to slow cooling.
I
The [COOL] prompt does not appear in the display dur
-
ing programming until you activate the Slow Cooling
Option. See page 17.
I
The Sentry’s Slow Cooling begins after the cone firing
and ends at 800°F / 426°C.
I
When [COOL] appears in Cone-Fire programming, en
-
ter a cooling rate between 1°F - 180°F / 1°C - 82°C per
hour. A good starting point is a rate of 90°F / 50°C.
I
Enter a rate of 0 to turn Slow Cooling off.
Pointer: If the kiln seems to take forever to shut
off, press the Down Arrow for Present Status.
Check the Slow Cooling rate. The firing time can
extend for many hours if the cooling rate is too
slow. This also adds to element wear.
How to Customize Cone-Fire
You can customize a Cone-Fire program using
Ramp-Hold. (See the next section.) On pages 30-31, tables
show the segments used to program each cone number in
Cone-Fire. For instance, a cone 016 firing at medium speed
[STD] uses these two segments:
Rate Temp.
Segment °F/°C °F/°C Hold
1 396 / 220 1314 / 712 00.00
2 108 / 60 1422 / 772 00.00
Suppose your 016 witness cone, at a medium speed fir
-
ing, only barely started to bend. To fire 25° hotter, raise the
target temperature of segment 2 by 25°:
1422 + 25 = 1447
This is the program you would enter in Ramp-Hold:
Rate Temp.
Segment °F/°C °F/°C Hold
1 396 / 220 1314 / 712 00.00
2 108 / 60 1447 / 786 00.00
You could also easily add a slow cooling segment:
Rate Temp.
Segment °F/°C °F/°C Hold
1 396 / 220 1314 / 712 00.00
2 108 / 60 1447 / 786 00.00
3 100 / 55 1000 / 537 00.00
Question My kiln is taking too long to fire: 9 ½
hours to cone 6. I want the kiln to fire in 4 hours.
Answer 9 ½ hours is the firing time programmed
into the Cone-Fire mode at fast speed. The easiest
way to go faster is to use Ramp-Hold mode, where
you can program the exact speed you want. Note,
however, that the firing speed is limited to the
kiln’s heating capacity.
For Kilns with the AOP Outlet
The AOP (auxiliary output) is an optional receptacle, or
socket, mounted on the kiln. Plug a kiln vent into the recep
-
tacle, and use your controller to turn on the vent automati
-
cally. You must select
[VFAN] (Vent Fan) in the [AOP1]
option. See page 22.
When the Kiln Shuts Off Too Soon
Ceramic Firings
If the kiln fires to completion before the pyrometric wit-
ness cone bends, you can turn the kiln back on and keep fir-
ing. Program for a hotter cone following the instructions in
the red box, page 10. The kiln will begin firing, taking up
where it left off.
Note: By seeing the witness cones through a peep
-
hole, you will know if the kiln shuts off too soon.
If the kiln shuts off within 100°F/55°C of maturity, and
the temperature drops 50°F/28°C or more after the kiln
shuts off, do not depend on the witness cones. Once they
cool 50°F/28°C after they have been heated to within
100°F/55°C of maturity, they will not bend properly. This is
because they form a hard shell.
Wrong Thermocouple Type
If a K-Type thermocouple is installed on your kiln, but
S-Type is selected in Options, the kiln will continually
underfire by a wide margin. (The kiln will overfire if S-Type
is installed and K-Type is selected.) See the TC option,
page 18, to check the thermocouple type selected.
Starting a Firing in a Hot Kiln
If you ever need to begin a firing when the kiln is already
hot, begin the program as you normally would. The Sentry
Xpress will automatically begin firing from the first seg
-
ment that matches the current kiln temperature.
Keep the kiln lid or door closed when the kiln is not in use. 11
TheOrtonVentMastercanbeturnedonoroff
throughout the firing through the controller.

Chapter 3
Ramp-Hold
In this chapter you will learn to . . .
G
Program a Ramp-Hold firing
G
Store programs in memory
G
Turn a vent fan on or off throughout the firing
G
Control the cooling rates for down firing
Before using Ramp-Hold, read all of this
chapter with your controller in front of
yousoyoucanpressthekeysasyouread.
Theory of Ramp-Hold Operation
The temperature you are firing to in Ramp-Hold is
called the target temperature. After the Sentry Xpress
reaches the target temperature, it can hold, or soak, the kiln
at that temperature for the length of time that you program.
The Sentry Xpress fires at a controlled heating rate. The
rate is usually figured in degrees per hour. If you selected a
rate of 100° per hour, it would take 10 hours for the kiln to
reach 1000°. Rate is similar to miles per hour.
Ramp-Hold mode does three basic tasks:
1) It fires at a controlled heating rate, or speed, usually
measured in degrees of temperature change per hour.
2) It fires to a target temperature.
3) It can hold, or soak, the target temperature for a pe-
riod of time.
The Sentry Xpress fires in segments, or stages. A
segment is a controlled heating rate to a target tempera
-
ture. A segment can also have a hold. Shown in the chart
above is a segment with a target temperature of 1250°, a
rate of 625°, and a hold of one hour.
A segment has two parts:
I
Ramp: The temperature changes at a rate that you
select.
I
Hold: The temperature remains the same.
The heating rate is figured in degrees per hour. The rec
-
ommended heating rate for the material you are firing is
usually available from your supplier. The heating rate also
varies depending on the thickness of the material.
Note: Some brands of controllers fire to a temper
-
ature in a given length of time. If you would prefer
to program that way instead of in degrees per hour,
see the Rate option, pages 13-14.
A segment can have only one ramp and only one hold.
Therefore, if you need more than one hold, add more seg
-
ments to the firing. Firing to a temperature at a single rate
would need only one segment. Reasons to add more seg
-
ments:
I
To change the heating rate.
I
To add a hold somewhere in the firing.
I
To control the cooling rate.
The diagram below shows a 3 segment firing. Segments 1
and 2 were used on the way up in temperature. Segment 3
was added to control the cooling rate.
To figure how many hours a segment will take to fire,
subtract the current temperature from the target tempera-
ture and divide the result by the heating rate. In the diagram
in the left column, the firing time is 1250° - 80° (room tem-
perature) = 1170 ÷ 625 = 1.87 hours.
After the Sentry Xpress has finished firing the last seg-
ment, it will turn off the heating elements.
Note: If you enter a rate of 0000 in segment 1, or if
the target temperature in segment 1 is lower than
the current temperature,
[BADP] (Bad Program)
will appear in the display.
How to Store Programs
The controller can retain 25 Ramp-Hold programs that
can each fire up to 20 speeds and temperatures. (Each set of
speeds and temperatures is called a segment.) The pro
-
Sentry Xpress 5 Cone-Fire / Ramp-Hold
12 Do not leave your kiln unattended during operation.
This segment will reach the target temperature of 1250° in 2 hours, then
hold that temperature for 1 hour.
Here is a simple 3-segment program. Segments 1 and 2 each have a hold.
Segment 3 is a controlled cooling segment.

grams stay in memory even when the power is turned off.
Programs are numbered1-25.
The first message to appear after you plug in your Sentry
Xpress is
[ IDLE]. Press Start/Stop. Then press the Up
Arrow key twice to scroll through two messages:
[USER]
and [CONE].
To use Ramp-Hold mode, select
[USER]. Press the
Start/Stop key. Then follow the boxed instructions in the
next column to enter temperature, heating rate, etc.
[PRO1] is Program 1. When you fire the kiln again, you
can repeat Program 1 by selecting
[PRO1]. When you are
ready to fire a different program, select
[PRO2], which is
program 2. Then enter temperatures, heating rates, etc. Se
-
lect programs
[PRO3] - [PR25] the same way.
Pointer: To Select a high number Ramp-Hold
program from
[PRO1], press the Down Arrow.
You will go to
[PR25], the highest program num
-
ber. Use the up and down arrow keys to scroll
through your stored programs.
To over-write a program, select it and enter new rates
and temperatures. This automatically over-writes the pre
-
vious program. Write down your programs in a notebook.
Make copies of the blank firing record on page 33.
Three Types of Rate
In the Rate option, page 22, you can set up your control
-
ler to calculate rate in one of three ways: 1) degrees of tem
-
perature change per hour, 2) degrees of temperature
change per minute, or 3) elapsed time needed to reach a
temperature. The normal setting is degrees per hour. If you
are having problems entering rate, check the RATE option
to be sure your controller is set for degrees per hour.
Rate as Degrees Per Hour
Each segment must include a rate, which is the firing
speed of that segment. We usually measure rate as degrees
per hour. This is similar to miles per hour; just replace miles
with degrees. During programming, enter the rate when
[RA] appears. [RA] will also include the segment number:
[RA 1] [RA 2] etc.
The diagram above shows three rates. A rate of 1000°
per hour will reach 1000° in 1 hour. A rate of 500° will reach
1000° in 2 hours. A rate of 333° will reach 1000° in 3 hours.
Keep the kiln lid or door closed when the kiln is not in use. 13
Ramp-Hold Programming Instructions
You have up to 20 segments available in Ramp-Hold.
Zero out segments that you don’t need. See step 9 below.
Lock, Fan, and Delay can each be turned on or off as
programming steps. Ignore the steps below that you have
deactivated. See LOCK (page 21), FN (selected in AOP1,
page 22), and DELA, (page 17).
1 From [IDLE], press Start/Stop(the left button).
2 Using the Up Arrow key (not the Down Arrow),
skip past
[CONE] and select [USER]. Then press
Start/Stop.
3 Press the up and down arrow keys to select a pro
-
gram, from
[PRO1] to [PR25].Thenpress
Start/Stop.
4 If the program is locked, [UNLO] (Unlock) will
appear alternating with
[0000]. If you want to
change the program, enter your passcode. (Other
-
wise press Start/Stop to go to Step 11.)
5 [RA 1] will appear. Enter firing rate (temperature
change per hour) for segment 1. (1° = slowest rate.
1799°F / 999°C = full power.) Then press
Start/Stop.
6 [°F 1] or [°C 1] and the target temperature from
the last firing will appear. Use the arrow keys to
change the temperature. Then press Start/Stop.
7 [HD 1] and the hold time from the last firing will
appear. (Example: 1 hour, 10 minutes = 01.10).
Use the arrow keys to change the hold time. Then
press Start/Stop. (No hold = 00.00)
8 If your kiln is set up with a vent fan, [FN 1] will ap-
pear. Press Start/Stop. Use the arrow keys to se-
lect
[ON] or [OFF]. Press Start/Stop.
9 Continue entering values for the segments
needed. When
[RA _] appears for the next seg
-
ment that you don’t need, select
[0000]. Then
press Start/Stop. This will zero out the remaining
segments. (Example: You need only 1 segment.
When
[RA 2] appears, enter 0000.)
10 [LOCK] alternating with [0000] will appear. En
-
ter your passcode to lock the program, or press
Start/Stop to leave it unlocked.
11 [STRT] will appear. Press Start/Stop. [DELA]
will appear. Set a delay time. If you don’t need to
delay the firing, leave the time at
[00.00]. Then
press Start/Stop.
[-ON-] will appear, and the kiln
will begin firing. If Delay was programmed,
[DELA] will appear and time remaining until start.
To stop a firing before completion, press Start/Stop.
[ABRT] (abort) will appear.
When kiln fires to completion, it will beep for 30 sec
-
onds.
[CPLT] (fired to completion), the firing time, final
firing temperature, and current temperature will appear.

If you want the kiln to fire at full speed, enter a rate of
9999. See step 5, inside the red box on the previous page.
Note: In Program Review, a heating rate of 9999 is
displayed as
[FULL]. When a kiln is heated at full
power, it may overshoot the target temperature,
especially in the lower range. To avoid this, add an
extra segment with a slower rate for the last 50 de
-
grees of temperature rise.
CAUTION: The Sentry Xpress includes error
messages to warn you when the kiln is at the wrong
temperature. Firing the kiln at full rate turns off
some of these warnings. See TEDE, Temperature
Deviation, and HTDE, High Temperature Devia
-
tion, page 21.
If you are not sure how fast to fire, remember an old fir
-
ing adage: When in doubt, slow it down.
Rate as Degrees Per Minute
Rate as degrees of temperature change per minute
works the same as temperature change per hour. Only the
math is different.
A maximum (Full) rate per minute is 29.97°F / 16.65°C.
After you have entered all the segments for your pro-
gram, zero out the remaining available segments. Do that
by entering 0 for the next available ramp rate.
Rate as Time Needed to Reach the
Target Temperature
After selecting [TIME] in the RATE option, page 22,
program the amount of time that each segment should take
to reach its target temperature. For example, 1 hour and 30
minutes is programmed in Rate as 01.30.
The Time mode in some ways is different and opposite
the standard degrees-per-hour rate explained above:
I
For a Full rate, or the fastest that the kiln will fire, select
a time rate of 00.00.
I
After you have entered all of the segments for your pro
-
gram, you will need to zero out the remaining available
segments. To do this, select a rate of 99.00 hours.
Question I programmed a FULL rate, yet my kiln
heated at only 550°F per hour.
Answer The controller is limited by the heating ca
-
pacity of each kiln. Your kiln heated at 550° per
hour because that is its maximum heating rate.
Hold (HD )
Hold is the length of time that you want the kiln to re
-
main at the target temperature. Hold is also called soak or
dwell time. Hold helps even out the temperature through
-
out the kiln. Hold can be used in either heating or cooling
segments.
In programming step 7, previous page, enter the hold
time. When hold is set to 99.99 hours, the Sentry Xpress will
remain at that temperature indefinitely until you press the
Start/Stop key.
Ceramics: Watch the pyrometric witness cones
through a peephole during hold. Press the Start/Stop key
when the correct witness cone bends, noting how much
Hold time was needed. Program that much Hold time the
next time you fire the same type of ware.
Temperature Overshoot
When a kiln is heated too fast, it may overshoot the tar
-
get temperature, especially in small kilns at lower tempera
-
tures. To avoid this, add an extra segment to slow the firing.
The segment with the slower rate should begin about 40° -
60° below the target temperature of the following segment.
AOP: Turn on a Fan, Light, or Alarm
The AOP (auxiliary output) is an optional receptacle, or
socket, mounted on the kiln. If your kiln has the auxiliary
output receptacle and you want to use it, see the AOP1 op
-
tion on page 22. Follow the instructions to activate the
AOP.
Plug a kiln vent, light, or bell into the receptacle, and use
your controller to turn the receptacle on or off for each seg
-
ment. (The light or bell act as alarms.)
During programming,
[FN] will appear for each seg-
ment (
[FN 1] [FN 2] [FN 3] etc.). Use the up and down
arrow keys to select ON or OFF for each segment.
[FN] will
appear only if the auxiliary output has been activated in the
AOP1 option, page 22.
Programming a Cooling Segment
For controlled cooling, program a segment to a lower
target temperature than that of the previous segment.
Example: You fire at a rate of 500°F per hour to 1450°F
in your first segment. Then you want the kiln to cool at a
rate of 100°F per hour down to 700°F. Here is how you
would program the two segments:
Rate Temp.
Segment °F/°C °F/°C Hold
1 500 / 277 1450 / 788 00.00
2 100 / 55 700 / 371 00.00
Segment 1 is the heating segment. Segment 2 is the cool
-
ing segment. The controller does not use minus numbers
for cooling. Just enter a lower target temperature than that
of the previous segment. Segment 2 will lower the tempera
-
ture to 700°F / 371°C.
Pointer: If you prop the lid or door of the kiln for a
fast cooling, program a fast cooling rate for that
segment. If you lower the temperature quickly by
propping the lid but program a slow cooling rate,
the controller will raise the temperature again.
Example: Some glass artists flash-cool the glass just after
it fuses. They open the door a few inches to remove heat,
then close it again. This takes the glass down rapidly
through the devitrification range. To program a flash-cool,
Sentry Xpress 5 Cone-Fire / Ramp-Hold
14 Do not leave your kiln unattended during operation.

use a rate of Full. This shuts off the heating elements during
that segment, allowing the kiln to cool rapidly.
Note: During fast cooling, do not open the door all
the way. Do not force-cool the kiln with a fan.
Note: See Temperature Deviation (TEDE), page
20, for information on error codes that may appear
during crash cooling. To turn these codes off, pro
-
gram a crash cooling rate of Full. This turns off
TEDE error codes only for that particular seg
-
ment. The TEDE codes still work on the hold and
the other segments.
Suppose you enter a cooling rate that is faster than the
kiln can cool? Depending on the rate you enter, you may get
an alarm message. (Press the Down Arrow key to turn off
the alarm.) The controller, of course, cannot speed
cooling beyond the kiln’s natural cooling rate.
A Ramp-Hold
Practice Program
To practice using the controller, we will enter a program
that includes three segments. The last segment is a cooling
segment.
Use the programming instructions on page 13 to enter
this firing schedule. Then use Program Review (page 5) to
check for accuracy.
PrO1
rA1 = 250
°F1=750
HLd 1 = 00.00
rA2 = 900
°F 2 = 1425
HLd 2 = 00.30
rA3 = 150
°F3=750
HLd 3 = 00.00
rA4 = 0000 (zeroes cancel segments 4-25)
When the Kiln Shuts Off Too Soon
If the kiln shuts off before the pyrometric witness cone
bends, you can turn the kiln back on and keep firing. Simply
program the next hotter cone in Cone-Fire. The kiln will
begin firing, taking up where it left off.
Starting a Firing in a Hot Kiln
If you ever need to begin a firing when the kiln is already
hot, begin the program as you normally would. The Sentry
Xpress will automatically begin firing from the first seg
-
ment that matches the current kiln temperature.
Chapter 4
Customize Your
Controller with
Options
In this chapter you will learn to . . .
G
Activate slow cooling in Cone-Fire
G
Check the amperage that your kiln pulls
G
Choose Fahrenheit or Centigrade display
G
Choose from three types of rates used in pro
-
gramming
G
Set up your controller to give the cost of electricity
G
Activate Program Lock so you can protect stored
Ramp-Hold programs
G
Check the circuit board temperature, adjust error
messages, check the software version, and more
The Options give you access to special features and ad
-
justments in your Sentry Xpress. With each press of the Up
Arrowkey, the controller will display the next option. Press
the Up Arrow either while the kiln is firing or from IDLE.
1 When you find the option you want to use, press the
Start/Stop key again.
2 Use the arrow keys to select changes for that option.
3 After making a selection for an option, press the
Start/Stop key.
There are two ways to get out of Options and back to
[IDLE]:
1 Press the Start/Stop key.
2 Do nothing for 60 seconds while in an option. You
will automatically be taken out of the option and
back to
[IDLE].
How to Edit a Program
During a Firing
See pages 12-15 for details on ramps, holds, and seg
-
ments. While the kiln is firing, you can edit the program in
three ways:
I
Skip out of a segment and into another segment.
I
Change the hold time of the current segment.
I
Change the target temperature of the current segment.
Why would you ever want to edit a program during a fir
-
ing? Suppose you have programmed 2167°F for a cone 5
glaze firing, followed by a segment for slow cooling. Watch
-
ing the witness cone through a peephole, you notice that
cone 5 is bending at 2150°F, so the kiln doesn’t need to fire
Keep the kiln lid or door closed when the kiln is not in use. 15

to 2167°F as you had programmed. Skip to the next seg
-
ment, which is a slow cooling one. If the firing does not in
-
clude a slow cooling segment, and you are in the last seg
-
ment, Skip Segment will not end a Hold. Press the
Start/Stop key to end the firing.
Pointer: Make a note of the temperature at which
the cone bent. Program that temperature for the
next firing. This is the type of information that
should be recorded in a kiln firing log book if you
have one.
You can see the segments in the Cone-Fire firing sched
-
ules on pages 30-31.
The
[SKIP] option does not skip from a ramp to a hold
of the same segment. It skips to the next segment from ei
-
ther a ramp or hold of the current segment.
If the current segment has already started its hold time,
you can edit only the hold time. See below.
Note: If you wait 60 seconds without touching a key
during editing, the controller will exit editing with
-
out changing the settings. The firing will continue.
Skip to the Next Segment
1 During a Cone-Fire or Ramp-Hold firing, press
the Up Arrow.
[SKIP] will appear.
2 To skip to another segment, press Start/Stop.
The next segment will appear. Each time you press
the Up Arrow, another segment will appear, if an-
other has been programmed, followed by CANC
(Cancel).
3 Press the Up Arrow until the segment that you
want to skip to appears. Press Start/Stop. The
kiln will continue to fire in the segment you se-
lected.
4 If you don’t want to skip to another segment after
all, press the Up Arrow until CANC appears.
Then press Start/Stop. The kiln will continue to
fire as before.
Change the Hold Time of the Current Segment
1 During a Cone-Fire or Ramp-Hold firing, press
the Up Arrow twice.
[HLDT] (Hold Time) will ap
-
pear.
2 To change the hold time of the current segment,
press Start/Stop.
3 Use the arrow keys to change the hold time. Each
time you press an arrow key, the hold time will in
-
crease or decrease by 5 minutes.Then press
Start/Stop. (If you don’t want to change the hold
time after all, leave the setting alone and press
Start/Stop.)
Change the Target Temperature
of the Current Segment
1 During a Cone-Fire or Ramp-Hold firing, press
the Up Arrow 3 times.
[CHGT] (change tempera
-
ture) will appear. Press Start/Stop.
2 Use the arrow keys to change the temperature.
Then press Start/Stop.
Cone-Fire Options
These options appear only if a Cone-Fire program has
been selected. If your controller doesn’t have Cone-Fire
mode, skip to General Options, next page.
OFST / Cone Offset
Calibrate Cone-Fire to a Witness Cone
Sometimes the pyrometric cones programmed in
Cone-Fire do not match the bending of the witness cones.
Cone Offset will adjust Cone-Fire to bend the cones.
Note: TCOS, Thermocouple Offset, page 20, ad
-
justs all temperature readings. Cone Offset
changes only the last heating segment of all the
Cone-Fire firings. You can see the Cone-Fire
schedules on pages 30-31.
Follow these guidelines before deciding to use Cone
Offset:
I
The thermocouple (temperature sensor) must protrude
into the firing chamber the correct distance: about ¾”
for ¼” wide thermocouples, ½” - 5/8” for 1/8” wide
thermocouples.
I
Keep shelves 1”-1½”away from the thermocouple.
I
Keep pyrometric witness cones at least 2” away from
heating elements.
I
Place witness cones in several locations in the kiln.
How to Use Cone Offset
Cone Offset changes the shut-off point of the cone by the
degrees of temperature shown in the chart, next page.
1 First, program a Cone-Fire. See page 10.
2 From [IDLE] , press the Up Arrow repeatedly un
-
til
[OFST] appears.
Note: With each Up Arrow key press, you will see
the next option. When you see
[EXIT], press the
Up Arrow again to see more options. When
[OPT2] appears, press Start/Stop. That will take
you to more options.
3 When you see [OFST] press the Start/Stop key.
The current Cone Offset adjustment number will
appear.
4 Using the arrow keys, select a new adjustment
number (see chart, next column). Then press the
Start/Stop key.
[IDLE] will appear.
Sentry Xpress 5 Cone-Fire / Ramp-Hold
16 Do not leave your kiln unattended during operation.

Keep the kiln lid or door closed when the kiln is not in use. 17
Cone Offset Settings
Note: You must have a Cone-Fire program in active memory before
you can change Cone Offset.
°F Setting °C Setting Result
0 0 No adjustment
5 3 Kiln will fire hotter
10 6 Kiln will fire hotter
15 8 Kiln will fire hotter
20 11 Kiln will fire hotter
-5 -3 Kiln will fire cooler
-10 -6 Kiln will fire cooler
-15 -8 Kiln will fire cooler
-20 -11 Kiln will fire cooler
You can change the cone offset or remove it at any time.
A cone offset is also removed when the Reset option is
used. (See RST, page 24).
Interpreting Cone Bending to
Set a Cone Offset
Position the witness cones in the kiln according to the in
-
structions on page 8.
The cone bent to 6 o’clock: No calibration in Cone Off-
set needed. The self-supporting cone has fired to maturity
when the tip is fairly even with the cone base.
The cone did not bend far enough: Use a positive Cone
Offset number for a hotter firing, such as 10 (°F).
The cone bent too far: Use a negative Cone Offset for a
cooler firing, such as -10 (°F).
Note: Do not be overly concerned with achieving
an exact 6 o’clock bend. The difference between a 3
o’clock and a 6 o’clock bend is only a few degrees of
temperature.
When Cone Temperature
Is Off More Than 20°F/11°C
The maximum amount that Cone Offset can change the
temperature is 20°F/11°C. When the temperature is off
more than that amount, correct with Thermocouple Offset.
See TCOS, page 20.
COOL / Slow Cooling for Glazes
Add Slow Cooling to Cone-Fire Programming
Slowing down the cooling rate in Cone-Fire mode can
totally change the appearance of many glazes. Copper red
glaze, for instance, is enhanced by cooling slowly starting at
around 1750°F / 954°C.
For the full benefit of slow cooling, you can bring the
temperature back up several times as the glaze cools. You
would need Ramp-Hold mode to do this. See pages 12-15.
You can also slow the cooling in Cone-Fire mode by
turning on the Slow Cooling feature. It will appear as the
[COOL] prompt during Cone-Fire programming. But first
you have to turn on Slow Cooling in options. If you don’t
turn on the option, the Slow Cooling prompt will remain
hidden in Cone-Fire programming.
1 First, program a Cone-Fire. See page 10.
2 From [IDLE] press the Up Arrow repeatedly until
[COOL] appears.
Note: With each Up Arrow key press, you will see
the next option. When you see
[EXIT], press the
Up Arrow again to see more options. When
[OPT2] appears, press Start/Stop. That will take
you to more options. Follow the same steps to go
past
[OPT3].
1 When you see [COOL], press the Start/Stop key.
2 Using the 1 key, select [YES] or [NO]. If you want to
use Slow Cooling, select yes. If you never use it, se
-
lect no. Then press Start/Stop.
[IDLE] will appear.
General Options
DELA / Delay the Firing for Later
Most controllers come from the factory with delay-fire
added to the programming. After you program a firing, you
will see
[DELA] in the display window. If you want the kiln
to turn on later, enter the delay time with the arrow keys.
Use this format:
Hours.Minutes
Example: 4 hours, 30 minutes = 04.30
Enter hours to the left of the decimal point and minutes
to the right of it. If you don’t need a delay, leave the setting
at 00.00.
The delay time will zero out after each firing. You can
change the way delay works by adjusting it in Options as
follows.
1 From [IDLE], press the Up Arrow key to get to
[DELA].
2 When [DELA] appears, press the Start/Stop key.
Using an arrow key, scroll through the following
choices. To select a choice, press Start/Stop.
I
[DFLT] This is the default factory setting. [DELA] ap
-
pears after you enter a program and before you start the
kiln. The delay time that you enter zeroes out after each
firing.
I
[ALL] The [DELA] prompt appears before you start a
firing, just as above. However, the delay time doesn’t
zero out after each firing. It stays in memory for all your
future firings or until you change the delay time again.
I
[OFF] This turns off the [DELA] prompt. If you select
Off, you won’t see the delay prompt again before firing
the kiln. Turn the delay prompt off if you never use it.
That will help streamline your programming steps.

TC / Choose Thermocouple Type
Select K-Type, -N, -S or -R Thermocouple
The Sentry Xpress can use K-, N-, S- or R-Type
thermocouples. If you specialize in firings above 2200°F /
1204°C, you might consider obtaining the S- or R-Type.
The K-Type is best suited for temperatures below 2200°F /
1204°C and is ideal for glass fusing.
The controller cannot detect the type of thermocouple
installed in your kiln. So if you change the thermocouple to
a different type, be sure to select the new thermocouple
type in the TC option.
Note: Ask your kiln supplier if you are not sure
about the type of thermocouple in your kiln.
CAUTION: Be careful about changing the ther
-
mocouple type! If you select S- or R-Type, but your
kiln is equipped with a K-Type, your kiln will
underfire. If you select K-Type and your kiln is
equipped with an S- or R-Type, your kiln will
OVERFIRE. After using the Reset (RST) option,
page 24, use the Thermocouple (TC) option, page
18, to select the correct thermocouple. (For safety,
RST changes the thermocouple selection to
S-Type.)
Because the kiln will over- or underfire if the wrong ther-
mocouple type is chosen in Options, we have locked the
thermocouple option so it cannot be unintentionally
changed. Here are instructions for unlocking it:
1 From [IDLE], press the Up Arrow repeatedly un-
til
[TC] appears.
2 Press Start/Stop.
3 [PASS] will appear alternating with 0000. The
thermocouple option is locked. To unlock it, press
the arrow keys to enter this password:
0155
4 After you enter the password, press Start/Stop.
The thermocouple setting will appear.
5 Use an arrow key to select [K], [N], [R]or [S].
6 After selecting one of the above, press
Start/Stop.
[IDLE] will appear.
ALAR / Temperature Alarm
If you need to know when your kiln reaches a particular
temperature, set the alarm. The controller will beep and
[ALAR] will flash when the kiln reaches the alarm tempera
-
ture. Use the alarm to alert you to—
I
Lower the lid from the venting position and insert the
peephole plugs.
I
Check the witness cone through a peephole near the ex
-
pected shut-off time.
I
Visually check the glass before the expected fusing or
slumping temperature. You can see the glass through a
kiln window.
You can enter only one alarm temperature at a time.
However, after the alarm beeps, you can set the alarm for
another temperature, as many times as you want, during the
firing. Entering an alarm temperature automatically erases
the previous one.
Note: The alarm temperature that you set during a
firing must be higher than the current display tem
-
perature. The alarm is designed only for higher
temperatures and not for cooling temperatures.
After the alarm beeps, the alarm temperature will stay in
memory for future firings until you replace it with a new
temperature.
Monitoring the Alarm from a Distance
Place an inexpensive baby monitor near the kiln. From
another location in your building, you will be able to hear
the temperature alarm beeping and even the relays clicking
if your kiln has mechanical relays.
Setting the Alarm From IDLE
1 From [IDLE], press the Up Arrow key repeatedly
until
[ALAR] appears. Press Start/Stop.
2 Using the arrow keys, enter an alarm temperature.
(To disable the alarm, set the alarm temperature
to 32°F / 0°C.) Press Start/Stop.
[IDLE] will ap-
pear.
3 When the alarm temperature is reached during a
firing, the controller will beep and
[ALAR] will ap-
pear. Press the Down Arrow to turn off the alarm.
Setting the Alarm During a Firing
1 The alarm beeps while the kiln is firing. [ALAR]
will appear, alternating with the temperture. Press
the Down Arrow to turn off the alarm.
2 Press the Up Arrow key repeatedly until a steady
[ALAR] appears. Press Start/Stop.
3 Enter the new temperature with the arrow keys.
(To disable the alarm, set the alarm temperature
to 32°F / 0°C.) Press Start/Stop. The kiln will con
-
tinue firing.
If you enter a new alarm temperature, and forget to
press Start/Stop, the controller will continue firing with
-
out resetting the alarm.
[ALAR] will continue alternating
with the kiln temperature.
Question The alarm on my Sentry sounds a min
-
ute into each firing. Why is the alarm going off?
Answer The alarm was set to a temperature below
the current temperature. To deactivate the alarm
for your next firing, set it to 32°F / 0°C.
Sentry Xpress 5 Cone-Fire / Ramp-Hold
18 Do not leave your kiln unattended during operation.

Keep the kiln lid or door closed when the kiln is not in use. 19
DIAG (Diagnostics) / Check the
Amperage,TesttheRelays,andthe
AOP1 Outlet
Check Your Kiln’s Amperage (If Your Kiln Has an
Amp Sensor)
If you are wondering why your kiln is taking so long to
reach temperature, you can check the amperage that the
kiln is pulling. (To check the amperage, your kiln must be
equipped with an amperage sensor.)
Compare the amperage reading with the amps listed on
the kiln’s electrical data plate. (For most models, the data
plate, or label, is on the side of the kiln’s switch box.)
Note: Low voltage or worn elements can cause a
low amperage reading. Before deciding that the el
-
ements are worn out, also check the voltage.
Check the Amperage at IDLE or While Firing
1 From [IDLE], press the Up Arrow repeatedly until
[DIAG] appears. Press Start/Stop.
2 With the arrow keys, you can rotate between
[AMPS] and [TEST]. Select [AMPS] and press
Start/Stop. The amperage that the kiln is pulling
will appear.
If your kiln has more than one relay, the display will show
the amperage for the elements connected to each relay,
with these codes:
[AMP1] [AMP2] [AMP3].
Test the Heating Elements, Relays, and AOP1 Outlet
Use this option when testing thermocouples with a ciga-
rette lighter or other heat source.
Pointer: Raising the thermocouple temperature
fast with a lighter or propane torch may cause an
[FE4] error. This will not harm the controller,
though. See page 26.
1 From [IDLE], press the Up Arrow repeatedly until
[DIAG] appears. Press Start/Stop.
2 With the arrow keys, you can rotate between
[AMPS] and [TEST]. Select [TEST] and press
Start/Stop. Each relay will turn on for 2 minutes,
one relay at a time.
3 After testing the relays, kilns equipped with the
AOP1 outlet will display
[J3-3] for two minutes to
test power to the AOP outlet.
Pointer: The relays are tested for 2 minutes each,
followed by the AOP1 outlet. You can press the
Start/Stop key during a 2-minute test to advance
to the next relay before the 2 minutes are over.
F/C / Select Between °F and °C
Temperature Display
The controller operates in your choice of Fahrenheit or
Celsius temperature. In °C display, a lighted dot appears in
the lower right. In °F, it disappears. To switch from °F to °C
or vice versa:
1 From [IDLE], press the Up Arrow repeatedly until
[F/C] appears.
2 Press Start/Stop. Use the arrow keys to select [F]
or [C.].
3 After selecting one of the above, press Start/Stop.
[IDLE] will appear.
°F/°C Temperature Conversion Formulas
Below are formulas for converting temperture between
°F and °C. Converting a firing rate requires a different for
-
mula than converting a temperature that you are firing to:
Firing to a Temperature
(i.e. “Fire to 1600°F.” 1600°F = 871°C)
(°C x 1.8) +32 = °F
(°F - 32) ÷ 1.8 = °C
Firing Rate or Temperature Change
(i.e. “Fire at 200°F per hour” or “Fire 200°F hotter.” 200°F =
111°C)
°Cx1.8=°F
°F÷1.8=°C
LIM / Set a Maximum Temperature
for Your Kiln
Your kiln has a maximum temperature rating, which is
listed on its electrical data plate. In a classroom setting
where students use kilns, you may want to lower the maxi-
mum rating to the temperature of a particular clay or glass.
The
[LIM] option allows you to do that.
Set the maximum temperature of the clay or glass in the
[LIM] (temperature limit) option. When the kiln goes 1 de-
gree over that temperature, the kiln will shut off.
[OTL]
(Over Temperature Limit) will appear in the display.
The adjustment range is from 200°F / 93°C up to the tem
-
perature rating listed on the safety data plate of your kiln.
1 From [IDLE], press the Up Arrow key repeatedly
until
[LIM] appears.
2 Press Start/Stop. Change the maximum tempera
-
ture with the arrow keys.
3 Press Start/Stop to return to [IDLE].
COST / View the Electrical Cost
of a Firing
Your Sentry Xpress controller can give you the electrical
cost of a firing. This will help you determine how much to
charge for the ware that you sell. It will also enable you to
experiment with saving electricity by adjusting your firing
schedules. For instance, how much extra electricity would
you use if you slowed the firing rate? How much does it cost
to add slow cooling to a ceramic glaze firing?
Before the controller can give you the cost of your fir
-
ings, you will need to enter the wattage of your kiln in the
[KW] option, page 23, and the cost of electricity in the
[CENT] option, page 23.

Sentry Xpress 5 Cone-Fire / Ramp-Hold
20 Do not leave your kiln unattended during operation.
After you have set up the [KW] and [CENT]options, you
can check the progressive cost of a firing while the kiln is on,
and you can check the total cost after the kiln fires to com
-
pletion.
1 While the kiln is firing, or from [IDLE], press the
Up Arrow key repeatedly until
[COST] appears.
Press Start/Stop.
2 The cost of the firing will appear.
3 Press Start/Stopto return to the normal display.
Note: If you enter the kiln wattage in the
[KW] op
-
tion but you do not enter cost per kilowatt-hour in
the
[CENT] option, the controller will display kilo
-
watt-hours instead of the firing cost.
Note: By checking the
[COST] option during a fir
-
ing, you can see how much the cost increases as the
firing progresses.
Pointer: If you wonder how much Slow Cooling
adds to the cost of a firing, check the
[COST] op
-
tion before Slow Cooling begins, and check it again
after the kiln has fired to completion.
TCOS / Thermocouple Offset
Calibrate the Thermocouple(s)
The thermocouple is the rod extending into the firing
chamber. The thermocouple measures the temperature.
K-Type thermocouples can “drift” as they age, causing a
gradual shift in temperature readings. Thermocouple Off-
set calibrates the controller to compensate for drift.
Note: The thermocouple must protrude into the
firing chamber the correct distance: about ¾” for
¼” wide thermocouples, ½” - 5/8” for 1/8” wide
thermocouples.
How to Set Thermocouple Offset
You can enter a temperature change up to 45°F/25°C
higher or lower than the zero factory setting.
1 From [IDLE] , press the Up Arrow repeatedly un
-
til
[TCOS] appears.
Note: With each Up Arrow key press, you will see
the next option. When you see
[EXIT], press the
Up Arrow again to see more options. When
[OPT2] appears, press Start/Stop. That will take
you to more options.
2 When you see [TCOS] press the Start/Stop key.
The current Thermocouple Offset adjustment
number will appear.
3 Using the arrow keys, select a new adjustment
number (see chart, next column). Then press the
Start/Stop key.
[IDLE] will appear.
4 From [IDLE], press the Up Arrow repeatedly un
-
til
[TCOS] appears.
5 Press Start/Stop. [O], or a Thermocouple Off
-
set, will appear.
6 Using the arrow keys, enter the new offset. Press
Start/Stop.
[IDLE] will appear.
Thermocouple Offset Settings
°F Setting °C Setting Result
0 0 No adjustment
H 1-45 H 1-25 Kiln will fire hotter
C 1-45 C 1-25 Kiln will fire cooler
Thermocouple Offset Examples
Setting Result
H 1 Kiln will fire 1° hotter
H 17 Kiln will fire 17° hotter
C 12 Kiln will fire 12° cooler
TEDE / Temperature Deviation
Adjust Temperature Sensitivity of Error Codes
The temperature that the controller is trying to reach, at
any given time, is called the set point. During heating or
cooling, the set point changes at the rate you programmed.
During a hold, the set point remains steady.
The Sentry Xpress shows error messages when it can’t
maintain the set point temperature. The cushion, or lee-
way, allowed before an error message flashes is called Tem-
perature Deviation. When the temperature in the kiln is off
target by more than the Temperature Deviation setting, the
alarm sounds. Temperature Deviation affects these error
messages (see page 25):
[FTH] Fail to Heat
[FTC] Fail to Cool
[LTDE] Low Temperature Deviation
Some people worry when
[FTH], [FTC] or [LTDE] ap
-
pears. They wonder if something is wrong with the kiln
when in many cases there isn’t. Here are four ways to stop
the alarm messages from appearing during routine firings:
Method 1: Test your kiln to find its fastest firing rate
and its slowest cooling rate. Then program the controller
using rates within the range of the kiln’s heating/cooling ca
-
pacity. Example: If your fastest heating rate is 600° per
hour, enter a rate no faster than 600°.
Method 2: Set the deviation temperature to a higher
number in the
[TEDE] option. The higher the number, the
less likely that an alarm message will appear.
Method 3: Set the deviation temperature to 0 in the
[TEDE] option. This turns off the [FTH], [FTC] and
[LTDE] alarms (page 25). We ordinarily do not recom
-
mend a 0 setting.
Method 4: Program a segment at FULL rate (9999°).
This will shut off the deviation alarms for that segment.
(However, deviation alarms will continue to work during
the hold and all other segments with slower rates.)
/