Luxart Square and Rectangular Shower Wall Kits User manual
- Type
- User manual
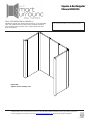
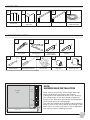
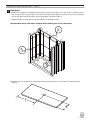
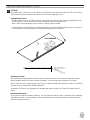
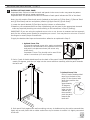
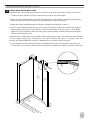
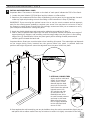
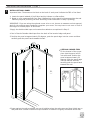
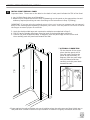
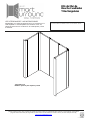
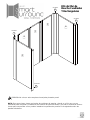
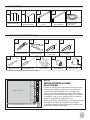
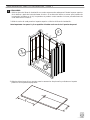
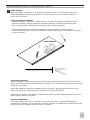
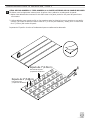
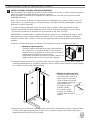
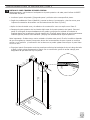
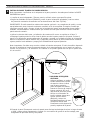
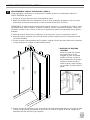
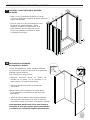
Luxart Square and Rectangular Shower Wall Kits are designed for easy installation over various surfaces, including cement, concrete, plaster, sheetrock, green board, cement board, and wood. The kit includes tongue and groove panels, corner and edge trim (optional), and double-sided construction tape for a secure fit. Cut the panels to size using a circular saw or utility knife, and make plumbing cut-outs with a drill and hole saw. Apply adhesive and tape to the back of the panels and install them starting with the left back wall panel.
Luxart Square and Rectangular Shower Wall Kits are designed for easy installation over various surfaces, including cement, concrete, plaster, sheetrock, green board, cement board, and wood. The kit includes tongue and groove panels, corner and edge trim (optional), and double-sided construction tape for a secure fit. Cut the panels to size using a circular saw or utility knife, and make plumbing cut-outs with a drill and hole saw. Apply adhesive and tape to the back of the panels and install them starting with the left back wall panel.


-
 1
1
-
 2
2
-
 3
3
-
 4
4
-
 5
5
-
 6
6
-
 7
7
-
 8
8
-
 9
9
-
 10
10
-
 11
11
-
 12
12
-
 13
13
-
 14
14
-
 15
15
-
 16
16
-
 17
17
-
 18
18
-
 19
19
-
 20
20
-
 21
21
-
 22
22
-
 23
23
-
 24
24
-
 25
25
-
 26
26
-
 27
27
-
 28
28
-
 29
29
-
 30
30


Luxart Square and Rectangular Shower Wall Kits User manual
- Type
- User manual
Luxart Square and Rectangular Shower Wall Kits are designed for easy installation over various surfaces, including cement, concrete, plaster, sheetrock, green board, cement board, and wood. The kit includes tongue and groove panels, corner and edge trim (optional), and double-sided construction tape for a secure fit. Cut the panels to size using a circular saw or utility knife, and make plumbing cut-outs with a drill and hole saw. Apply adhesive and tape to the back of the panels and install them starting with the left back wall panel.
Ask a question and I''ll find the answer in the document
Finding information in a document is now easier with AI
in other languages
Other documents
-
Foremost GFS6030LDMB-GML Installation guide
-
Foremost GFS3838-SLNA Installation guide
-
Swan SS-72-3-051 Operating instructions
-
Swan SS0489602.050 Installation guide
-
Swann SW-7032 User manual
-
-
-
Transolid KSE603272-5475BC-44 Installation guide
-
Swan TI30000.010 Installation guide
-
Transolid SWKX60368412-49 Installation guide