Page is loading ...

Model SS-3072-1
Single Swanstone
wall panel 30"x72"
Model SS-3672-1
Single Swanstone
wall panel 36"x72"
Model SS-3696-1
Single Swanstone
wall panel 36"x96"
Model SS-4896-1
Single Swanstone
wall panel 48"x96"
Model SS-6060-1
Single Swanstone wall panel 60"x60"
Model SS-6072-1
Single Swanstone wall panel 60"x72"
each
60
"
or
72
"
30"
60"
A
B
C
Models
DK-326072 & DK-346072
Models
SS-60-3 and SS-72-3
Model SSIT-60-3
INCLUDED IN CARTON
A. Two flat side panels
B. One flat back panel
C. Two corner moldings
INCLUDED IN CARTON
A. Two flat side panels
B. One flat back panel
C. Two corner moldings
D. Two bathtub apron strips
INCLUDED IN EACH
MODEL CARTON
A. Two flat side panels
B. One flat back panel
C. Two corner moldings
D. Two corner soap dishes
E. Four tubes of adhesive,
one tube of caulk, and
one roll of pressure
sensitive tape
INCLUDED IN EACH MODEL CARTON
A. Two flat side panels B. Two flat back panels
C. One batten strip D. Two corner moldings
E. Two corner soap dishes
F. Four tubes of adhesive, one tube of caulk,
and one roll of pressure sensitive tape
60
"
33
1
/2"
35"
60"
CAUTION
Read ALL instructions carefully
BEFORE starting your installation.
Save this manual for future reference.
Bathtub Wall Panel Systems
Shower Wall Panel Systems
Bath Shower Wall Panels
Installation Care
and Cleaning
A
B
C
D
A
B
C
Kits that include caulk, adhesive,
and pressure sensitive tape are sold
separately. It may be necessary to
combine panels to accommodate
desired installation.
Kits that include caulk, adhesive, and pressure
sensitive tape are sold separately.
Models:
DWP-3696BA Barcelona
DWP-3696BB Beadboard
DWP-3696BS Brushed Squares
DWP-3696GO Geometric
DWP-3696PB Pebble
DWP-3696TN Tangier
DWP-9636WB Wainscot Beadboard
Single Swanstone decorative
wall panel 36"x96"
Model SS-3072-2
Two Swanstone
wall panels
30"x72" each
Model SS-3672-2
Two Swanstone
wall panels
36"x72" each
Model SS-3696-2
Two Swanstone
wall panels
36"x96" each
Model SS-3672-3
Three Swanstone wall
panels 36"x72"
D
E
F
E
F
C
A
B
C
A
B
C
E
D
E
E
Models
SK-326072 & SK-346072
Models
SK-324872 & SK-344872
Models
SK-363672 & DK-363672
Models
DK-324872 & DK-344872
72"
35
1
⁄8"
47"
72"
31
1
⁄8"
59"
72"
A
B
D
29
1
/4"
29
1
/4"
31
1
⁄8"
72"
Decorative Wall Panels
D
A
B
72"
D
1
Model SSWP-4872
INCLUDED IN CARTON
A. Two flat side panels
B. One flat back panel
C. Two corner moldings
D. Two corner soap dishes
E. Four tubes of adhesive,
one tube of caulk, and
one roll of pressure
sensitive tape
60
"
48"
72"
A
B
C
E
D
or
33
1
⁄8"
or
33
1
⁄8"
Side panel “A”
dimensions:
SK-324872: 31
1
⁄8"
SK-344872: 33
1
⁄8"
Side panel “A”
dimensions:
SK-326072: 31
1
⁄8"
SK-346072: 33
1
⁄8"
31
1
⁄8"
or
33
1
⁄8"
23
1
/4"
23
1
/4"
31
1
⁄8"
or
33
1
⁄8"
C
Side panel “A”
dimensions:
DK-324872: 31
1
⁄8"
DK-344872: 33
1
⁄8"
Side panel “A”
dimensions:
DK-326072: 31
1
⁄8"
DK-346072: 33
1
⁄8"

Bathtub & Shower Wall Panel Systems
IMPORTANT SS-60-3 and SS-72-3 only
Measure the width of the back wall. If it measures more than 60", the SS-60-3 or
SS-72-3 cannot be installed.
If your bath area is more than 29" deep, the side panels will not come flush to
the front edge of the tub. For bath areas 32" deep, the TK-6072 trim kit may be
required. You must follow the procedures, as directed, in the Swanstone trim kit
installation instructions.
Measure the width of the back wall. If it
measures more than 60", Model SSIT-60-
3 cannot be used. Model SS-IT-60-3 is
designed to overhang the front edge of
the bathtub. To give a finished look to
your installation, the bathtub apron
strips may be cut to fit the wall area in
front of the bathtub.
Side panels can be notched so the inte-
gral trim butt-joints to the back panel.
However, this in not required as long as
the corner molding seals the joint below
the integral trim area.
For best
results, extend
filler board
to the ceiling
Old Tiles
Tub
Wall
Panels
FILLER BOARD
Measure the height of the tiles from
the tub ledge upward. If the tiles
measure less than 59
5
/8", it is neces-
sary to install a filler board. The filler
board must equal the thickness of
the tile. Usually, 1/4" masonite or
similar material is adequate.
For best results, extend the filler
board from the top tile edge to the
ceiling.
Side Panel
Integral Trim
Back Panel
Integral Trim
NOTE
The Swanstone SS-29 Installation Kit (an accessory –– p.3) contains the four tubes
of adhesive, one tube of caulk, and one roll of pressure sensitive tape needed
for installation. This kit is suggested for installing the SS-60-3, SS-72-3 and SSIT-
60-3. To mount individual Swanstone wall panels, the SS-72 installation kit will
be needed.
TOOLS NEEDED TO INSTALL
Saber saw, drill, ruler, caulking gun and tools needed for faucet work.
CUTTING AND ROUTING TOOLS
• Circular saw: Minimum 40-tooth carbide blade (triple chip grind, 60-tooth will give
a smooth, clean cut).
• Portable power plane with carbide blades or cutter heads.
• Saber Saw (straight up/down blade travel). Fine plywood carbide blade or blade
with no tooth overhang (14 teeth per inch).
To mount panels to wall we suggest that your purchase the SS-72 installation kit
for each panel that you plan to install.
DO NOT NAIL PANELS TO TUB WALLS
Panels mount to walls with adhesive and pressure sensitive tape.
IMPORTANT SSIT-60-3
optional fit
Filler
Board
2
When installing over SHEETROCK/GREENBOARD/WOOD:
A. Surface must be dry, smooth, and free of any dust, soap scum or any other
contaminants. Wipe wall surface with a damp cloth.
B. To insure proper adhesion between the Swanstone product and
Sheetrock/Greenboard/Wood, it is best to use a primer/sealer, and it is IMPORTANT
to follow these guidelines: Oil based primer/sealers (such as Bin-Seal, or all pur-
pose enamel paint) should NOT be used to cover the entire wall surface
(Sheetrock/Greenboard/Wood) but only should be applied at the areas where the
double-faced tape adheres to the wall surface. Water based primer/sealers (such
as latex paint) MAY be used to cover the entire wall surface
(Sheetrock/Greenboard/Wood).
C. After the proper primer/sealer is completely dry, complete the installation fol-
lowing the installation instruction sheet.
When installing over PLASTER:
A. Surface must be dry, smooth and free of any dust, soap scum or any other cont-
aminants. Wipe wall surface with a damp cloth.
B. The wall surface (textured/swirled finish must be sanded smooth) must be
sealed with a primer (Bin-Seal or other primer/sealer).
C. After primer/sealer is completely dry, complete the installation following the
installation sheet.
When installing over CEMENT/CONCRETE:
A. Surface must be dry, smooth and free of any dust, soap scum or any other cont-
aminants. Wipe wall surface with a damp cloth.
B. The complete area must be sealed with two coats of primer. (Bin-Seal or other
primer/sealer).
C. After primer/sealer is completely dry, complete the installation following the
installation sheet.
NOTE:
CERAMIC: LOOSE TILE MUST BE REMOVED.
PLASTIC: ALL TILES MUST BE REMOVED.
When installing over OLD TILE:
A. Rough up the glossy tile surface by belt sanding the wall area with 60-grit sand-
paper.
B. Surface must be dry, smooth and free of any dust, or any other contaminants.
Wipe wall surface with a damp cloth.
C. For proper adhesion, the wall surface must be sealed with a primer (Bin-Seal or
other primer sealer).
D. After primer/sealer is completely dry, complete the installation following the
installation sheet.
When installing over WALL PAPER:
A. All wallpaper must be removed from the area to be covered. Surface must be
dry, smooth and free of any dust, soap scum or any other contaminants. Wipe wall
surface with a damp cloth.
B. The complete wall surface area to be covered by unit must be sealed with two
coats of primer (Bin-Seal or other primer sealer).
C. After primer/sealer is completely dry, complete the installation following the
installation sheet.
When installing over MASONITE:
A. Surface must be dry, smooth and free of any dust, soap scum or any other cont-
aminants. Wipe wall surface with a damp cloth.
B. For proper adhesion, the wall surface must be sealed with a primer (Bin-Seal or
other primer sealer).
C. Complete the installation following the installation sheet.
WALL SURFACE PREPARATION FOR SWANSTONE TUB WALL AND SHOWER WALL UNITS

Wall Panel Trim Kits
TK-6072 Fits Swanstone 60"
and 72" high bathtub and
shower wall panel system.
TK-105 Fits Swanstone 96"
high shower wall panel sys-
tems including NEO 96" walls.
TK-0372
Batten Strip includes
one 3-3/4" x 72" flat
batten strip.
ACCESSORIES
NOTE
If installing a Corner
Shower Unit (DTF
Double Threshold or
NEO):
Select either wall for
initial panel installa-
tion. Measure out from
the wall which is per-
pendicular (right angle)
to the wall you select-
ed 3/16" onto the
shower floor threshold.
You will locate the
lower back corner of
the Swanstone panel
on this mark. This will
allow symmetrical
panel location as both
panels extend from the
corner along the wall
to the front edge of
the shower floor. There
must NEVER be more
than 3/16" gap
between the first panel
and the perpendicular
(right angle) wall. If a
gap greater than 3/16"
exists, it may be nec-
essary to shim the
panel slightly.
MULTIPLE PANEL
APPLICATION
FOR BACK WALL:
Measure the distance
along the back wall.
The width of the
panel will determine
the procedure to
use. If the back wall
is greater than the
overall width of the
panel, a second
panel, or possibly a
third, will be
required. When mul-
tiple panels are
installed, divide the
distance by two, or
three if a third panel
is required, and
transfer that mea-
surement to each of
the back panels.
Trim panels using
tools as directed in
step one. Repeat
steps two and three.
NOTE: Set trimmed
edges into the cor-
ner of the shower
area. They will be
covered with side
panel.
INSTALLATION PROCEDURE
Allow panels to adjust to room temperature (65
o
to 90
o
) for at least 6
hours.
Next, turn off hot and cold water supply, remove faucet handles,
escutcheons, filler spouts and any fittings mounted to the wall that will
be covered i.e. towel bars, soap dishes, etc.
Use hammer and chisel to remove objects cemented to walls. Old ceramic
tiles, if solidly adhered to walls, may be covered with this kit and need
not be removed.
Loose ceramic tiles must be removed and sub walls sanded smooth.
Front edge ceramic tiles may be reset for appearance only. Remove soap
film and all dirt from wall surface using detergent. Wipe dry. Wall surface
must be dry before panels can be applied.
READ ALL INSTALLATION INSTRUCTIONS (INCLUDING ANY ACCESSORIES) BEFORE STARTING.
47”
23
1
⁄2”
23
1
⁄2”
IMPORTANT
Trial fit before you begin. Swanstone panels have a finished surface side
and a non-finished backer side. Before trial fit, note which side of the
Swanstone panel has a sticker or stickers attached. This will be the non-
finished backer side and, upon installation, should be placed against the
sub-wall.
MEASURE BEFORE YOU START
The Swanstone wall panel system allows for variety of size applications.
One-, two-, or three-panel cartons may be combined for installing over
any shower floor situation.
NOTE
We recommend that professional installers be consulted on applications
for Swanstone panels not covered in these installations instructions.
1. IF TRIMMING IS
REQUIRED
Transfer measurements
of the back wall onto
the back wall panel.
Cut the panel from the
back side with a saber
saw. Sand the cut edge
with fine or medium
sandpaper.
2. BACK WALL
Apply the pressure sen-
sitive tape (see SS-29 or
SS-72 installation kit) 1
"
from each edge.
Apply adhesive as
shown above. Keep
adhesive at least one
inch from the tape.
3. Remove the backing
from the pressure sensi-
tive tape. Carefully,
place panel edge into
the corner (left or right)
and press firmly into
place. Use hand pres-
sure up and down, side-
to-side, to make firm
contact to the wall.
3a. If your wall panel kit
requires a batten strip
application, apply a 1/8
"
bead of adhesive to the
back of the batten strip.
Keep the adhesive at
least one inch from the
panel edges.
Carefully, center the
panel and firmly press,
from top to bottom,
making sure of a solid
contact.
4. SIDE WALL
If wall or tub are out of
square, cut the bottom
edge of side panel(s) for
a level edge across the
top from the back
panel(s). Measure loca-
tion of the plumbing
outlets from the back
wall forward and from
the top tub ledge
upward. Transfer these
measurements to the
side panel.
6. Trial fit each panel
before proceeding. For
an attractive installa-
tion, it is important that
the top edges properly
align.
5. Cut holes 1/2
"
larger
than the diameter of the
pipes. Drill from the fin-
ished side of the panel.
For best results place a
scrap of wood beneath
the hole to be made.
This will ensure a clean
cut.
IMPORTANT
USE ROUTER, SPADE
BITS, TWIST DRILLS
OR HOLE SAWS ONLY.
DO NOT USE
AUGER BITS
7. Apply adhesive and
tape as indicated in step
two.
AS-1075
Recessed
Accessory Shelf
SS-7211
Corner Soap Dish
ES-2
Two corner Soap
Dishes included
with SK-363672,
SK-344872, and
SS-326072 show-
er wall panel
system.
SS-29
Installation Kit.
The SE-363672,
SK-344872, and
SK-326072
includes all instal-
lation materials
SS-72
Installation Kit
3

8. Remove the backing
from the pressure sensi-
tive tape. Place the
appropriate panel edge
carefully into the corner
seam and press entire
panel firmly to the wall.
Use hand pressure up
and down and side-to-
side. Make sure all
areas are in solid con-
tact with the wall.
Repeat the above for
the opposite panel.
9. CAULKING
Follow the instructions
on the caulking tube
and apply a bead of
caulk along the bottom
and top edge of the
back and side walls.
Also apply caulk to all
vertical seams and
edges.
11. CORNER MOLDING
Trial fit placement of cor-
ner moldings and transfer
the height measurement
of the vertical seam to
the corner molding. Trim
moldings and apply a
3/16" bead of adhesive
in each corner seam.
Press corner moldings
firmly into appropriate
corners. Immediately
remove any excess adhe-
sive with a damp cloth.
Temporarily secure corner
moldings to the back and
side walls with masking
tape.
CLEANING
Clean your Swanstone Bathtub panels as you would any other fine bath fixture, using normal
household detergents and cleansers. Just wiping the wall surfaces, quickly removes watermarks and
residue. Occasional scrubbing with household abrasive cleansers maintains Swanstone’s beautiful luster.
REPAIRING
Use 400 grit sandpaper to remove scratches and gouges in the surface. A “Scotchbright pad” can be
used to blend the repair into the surrounding area.
FORM #522-3-07-5M
10. BATHTUB APRON
STRIP INSTALLATION,
SSIT-60-3 ONLY.
Apron strips provide a
finished look to your
installation. Measure
the wall area in front
of the bathtub and
cut the apron strips
to fit. Apply a bead of
adhesive to back of
apron strips and
press into place.
Adhesive cures
overnight.
NOTE
To promote contact until adhesive sets, use temporary
bracing and allow adhesive to cure overnight.
Temporary bracing may be constructed by wedging, as
illustrated, lengths of 1 x 2’s, 2 x 2’s, and 1 x 3’s.
POSITIVELY NO
HAMMERING OR
NAILING IS TO BE DONE
Tape
The Swan Corporation One City Centre Suite 2300 St. Louis, MO 63101 p (800) 325-7008 f (314) 231-8165
Trial Fit All Panels Prior To Final Application
Mark a line indicating
the amount to be
sanded if necessary.
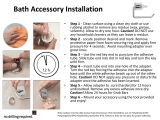
1. Select a desirable
location for the mount-
ing of the soap dish.
While Swan recommends
a minimum distance of
42
"
from the shower
floor ledge to the soap
dish, you may choose to
stack the soap dishes in
one corner or set them
in opposite corners.
2. After settling on a
location, draw a 4
"
level line on both walls.
These lines will be used
to line up the top edges
of the soap dish.
TRIAL FIT
3. Prior to applying
adhesive, set the soap
dish into position. This
will insure that it will
fit tightly against the
wall. If the wall is not
exactly 90 degrees
square, it will be nec-
essary to sand one
side in order to achieve
proper fit. Use a course
grit (60 grit) sandpaper.
4. Apply a generous
amount of adhesive to
both sides and the
sculpted back of the
soap dish.
7. Temporarily secure
with masking tape as
illustrated. Remove
tape after approximate-
ly two hours. Do not
place anything on the
soap dish for at least
24 hours.
NOTE
You may have extra
color coordinated caulk
left over from your
Swanstone wall instal-
lation. If this is the
case, you can run a
bead of caulk around
the soap dish installa-
tion. Do this after the
adhesive has dried.
5. Line up to the 4
"
level line and press and
hold into place. Wipe off
excess adhesive. You will
want a uniform bead on
both top and bottom.
ES-2 SOAP DISHES INSTALLATION
4
/