Page is loading ...

TACHOMETER
2650-1691-00 Rev. A
INSTALLATION INSTRUCTIONS
ULTIMATE III PLAYBACK
Thank you for purchasing the Auto Meter Ultimate III Tachometer. This
is one of the most advanced tachs we’ve made in over 50 years of
building the world’s finest performance instruments. The Ultimate III
allows for simultaneous recording of both your engine and driveshaft
RPM to provide you with a very clear picture of how your vehicle gets
down the track. This guide will walk you through the installation of
your tach and familiarize you with its functions and operations.

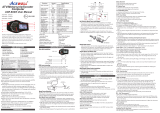
Fuse
* See Caution
Wiring Your Ultimate III
WARNING
Warranty will be void if connected to coil when using
an aftermarket ignition box such as, but not limited to
products from the following manufacturers: MSD, Crane,
Jacobs, Mallory, Holley, Etc.. Prior to installation of your
tachometer, check with the ignition box manufacturer for
recommended tachometer signal location.
Blue Wire
In some cases, the driver will not be able to reach the tach buttons once they’re strapped
in the vehicle. In these instances, a normally open momentary switch can be installed on
the blue wire and the 12v power source. This will allow the driver to remotely arm the tach
to record. The process of “arming” the tach is explained in the RECORD section of the
instructions. Additionally, this switch can be used to change the channel on the display.
Per NHRA rules, the blue wire cannot be connected to the transbrake. The tach will not
function if this is done.
Caution!
As a safety precaution, the
+12V terminal of this product
should be fused before
connecting to the 12V ignition
switch. We recommend using a
3 AMP automotive type fuse.

Drive Shaft Magnet Installation
NOTE: An aluminum collar is available for most models to hold the magnets.
Please call Auto Meter Products for further information.
Although it is possible to install magnets without removing the four universal
joint bearing caps that are attached to the differential pinion end yoke; it is highly
recommended that they be removed. This allows for a better job of cleaning
surfaces, and applying the J-B Weld brand adhesive.
Caution: Use J-B Weld brand adhesive only. Many other brands were tested, and
only J-B Weld withstands the centrifugal forces encountered.
1. Remove the U-bolts or straps that retain the universal joint bearing caps to the
end yoke on the differential.
2. Slide the driveshaft forward into the transmission while being careful not to
allow the bearing caps to fall off the universal joint.
3. Gently slide the two bearing caps that were contained by the end yoke off of
the universal joint cross. Be careful not to lose any of the needle bearings.
4. Place needle bearings in a safe place until ready to reassemble.
5. Clean any surface rust (etc.) from bearing cap end with a wire brush attached
to a bench grinder or drill.
6. Using the 80-grit emery paper supplied, roughen up the end of the bearing
cap to improve J-B Weld adhesion.
7. Using the sharp edge of a file, scratch the yellow end of the magnets so
that the end can be identified after the paint is removed during cleaning of the
magnets. (See Figure 1)
NOTE: The magnet is painted yellow on one end to identify the south side. The
sensor supplied will only work with the end of the magnet.
South (Painted)
End of Magnet
Figure 1
8. Using a CLEAN rag, apply acetone or lacquer thinner to the rag. Wipe the
bearing cap ends and magnets clean. Allow the cleaner to evaporate.
NOTE: The surfaces must be clean, and free of all residues to provide a strong
bond with the J-B Weld.
9. J-B Weld consists of two parts. Squeeze equal parts from each tube onto
any clean disposable surface. Mix together thoroughly with the wooden stick
provided.
Optional Magnet Collars
9387 - 1.875" I.D. Four Magnet Collar
9388 - 2.125" I.D. Four Magnet Collar
9389 - 1.49" I.D. Machineable Four Magnet Collar
Optional Shift Lights
5329 - Chrome Quick-Lite
5330 - Black Quick-Lite
5331 - Silver Quick-Lite
5328 - Mini LED Shift-Lite
5332 - Black Super-Lite
5333 - Silver Super-Lite
(Download to a PC or Laptop)
• Connect the USB cable (not included) between the tach and the PC.
• Using the Up (
) and Down ( ) Arrow to select and then press Enter
( ). Start the DataPro Software included with the Tach. Click on the Recorder
Menu and select Playback Tach Download or press F9.
• Click on the Download button. The display on the Ultimate III will show
while data is being transferred. This should take about 5 seconds. Then the
display will show to indicate the download process is complete.
• Press (X) to exit the download mode.

10. Apply a small amount of J-B Weld onto the end of the bearing cap. With the
south side of the magnet facing away from the J-B Weld and bearing cap,
place the magnet in the center of the J-B Weld on the bearing cap as shown.
(See Figure 2.)
South End
Figure 2
J-B Weld
Bearing Cap
Bearing Cap
Side View
Magnet
11. Tear off a thin piece of paper, and place it onto the 5⁄8" diameter steel slug.
Place the paper and slug onto the south end of the magnets as shown.
(See Figure 3.)
NOTE: Since J-B Weld has steel in it, the J-B Weld will be attracted to the south
end of the magnet, and will flow away from where its needed most. The
steel slug placed on the south end of the magnet prevents this from
happening. The paper prevents bonding of the steel slug to the magnet.
Figure 3
South End
Steel Slug
Paper
Bearing Cap
12. Apply a liberal amount of J-B Weld to form a cone shape as shown.
(See Figure 4.)
Figure 4
Paper
Steel
Slug
Bearing Cap
J-B Weld
(cone shape)
- (Record A Run)
This is the menu you use when you are ready to record a run. There are two
ways to trigger a recording, either by using the buttons or by remote triggering
along the blue wire.
To record a run using the buttons on the tach:
When you are in Record mode, press the Enter ( ) Key and the display will show
.This can be done at any time prior to your run. Press the Enter
(
) Key again, and the display will change to . Your recording will
automatically begin when your engine RPM reaches the threshold you set earlier
(See ). The recording will then run for 60 seconds. You don’t need to press
anything to stop it and the run will automatically be saved, even if you shut down
the vehicle.
To record a run using the blue remote trigger wire.
Just like when using the buttons on the tach, press Enter (
) on the Record
mode and the tach will display . This can be done at any time prior to your
run. Instead of Pressing Enter (
) to “arm” the tach, you can use a normally open
momentary push button on the blue wire to apply 12V. Hold the button for at least
one second and release it. Once that 12V is taken away, the tach will move to
Armd. . Your recording will automatically begin when engine RPM reaches the
threshold you set earlier (See thrE). The recording will then run for 60 seconds.
You don’t need to press anything to stop it and the run will automatically be
saved, even if you shut down the vehicle.
- (Playback Run)
Pressing Enter (
) under the Playback menu will allow you to play back your run
on the tach itself. You can have up to 4 different runs stored on the tach at one
point in time. You can move between them using the run menu item. You can
switch between Engine or Driveshaft RPM on the display using the menu
item.
- (Playback Speed)
When playing back a run, you can play it at full speed (real time), 1/2 speed or
1/3 speed. Simply use the Up (
) and Down ( ) Arrows to select the speed
you want and press Enter ( ) to save.You can also press Cancel (X) to back out
without making a change.

13. Allow the J-B Weld to cure for 24 hours before putting into use. J-B Weld
cures slower if used at temperatures below 60°F. After J-B Weld has
cured for 6 hours, a heat lamp or light bulb placed near the weld will
speed up curing time in cooler temperatures. Do not apply heat before
6 hours of room temperature curing, as this may cause the weld to
become brittle.
NOTE: In hot weather, let the J-B Weld set-up for about 15 to 20 minutes after
mixing, this lets it thicken and prevents running or sagging.
14. After J-B Weld has cured, remove the steel slugs and paper. Make sure
that no J-B Weld protrudes above the magnets, if so a file may be
carefully used to remove the excess. Also be sure that the J-B Weld does
not interfere with the bearing cap retainer tang on the end yoke.
15. Assemble the bearing caps. Use an approved grease to hold the needle
bearings in the bearing caps. Make sure there are no missing needle
bearings. Place the bearing caps onto universal joint cross.
16. Reassemble the driveshaft and universal joint to the end yoke. Replace
the U-boltsor straps, and torque to the manufacture specifications. When
magnets are mounted according to these instructions, the magnets will
withstand at least 10,000 RPM. A collar is recommended for cars 10
seconds and faster.
A bracket must be fabricated to hold the sensor near the magnets that were
installed on the universal joint bearing caps. The bracket must be very rigid,
as not to allow the sensor to come in contact with the magnets under extreme
vibration. If the sensor touches the magnets they will break off, and also possibly
damage the sensor. We recommend using rigid channel steel for the bracket.
The bracket should be bolted directly to the differential case. This insures a
constant sensor to magnet clearance with any suspension travel. Mount the
sensor through a 7⁄16" diameter hole in the bracket. Adjust the sensor to magnet
clearance to .200”+/-.030”, and lock down the jam nuts supplied on the sensor.
Verify the clearance is correct for all magnets. (See Figure 5.)
Sensor Mounting for Driveshaft RPM Pickup
Optional: Driveshaft collars are available direct from Auto Meter for many
performance applications. (See page 10 for details)
Rotate the driveshaft by hand to make sure there is adequate clearance between
the bracket and sensor assembly and the differential pinion end yoke. (See
Figure 6.) Tie the wires away from any moving objects and hot exhaust pipes.
- (Normal Tach Mode)
This is your normal operating mode. When Tach is selected, the pointer will
display the current engine RPM and the shift light will always come on when the
RPM reaches the first shift point (see section for more information). This
is the default setting for the Ultimate III and will always come up when the unit is
powered up.
- (Playback Display Channel)
This setting allows you to change which reading is shown on the tach’s digital
display during normal operation and during playback (when a run is played
back on the tach). Press Enter (
) to begin. Using the Up ( ) and Down
( ) Arrows, you can select between Engine RPM or Driveshaft RPM. Press
( ) to confirm your selection or press (X) to exit without saving changes.
Please note that due to NHRA rules, Driveshaft RPM cannot be viewed while
the tach is recording. The display will go blank during your run.
- (Playback on Pointer)
When playing a run back on the tach itself, you can watch either the Engine
or Driveshaft RPM. This option allows you to select between the two. Please
note that the tach will always display Engine RPM under normal operation,
regardless of your setting here. Press Enter ( ) to start & use the Up ( )
and Down ( ) arrows to select between the two. Press Enter ( ) to save or
Cancel (X) to exit without making a change.
- (Set Run)
The Ultimate DL can record 4 separate 60 second runs. Pressing Enter
( ) on this setting will allow you to select different runs using the Up ( )
and Down ( ) Arrows. Once you’ve selected the run you want to use, press
Enter ( ) to save or Cancel (X) to back out without making a change. The
tach will always stay on the run you currently have selected and will simply
overwrite the existing run if you record a new one and there is one stored
in memory. As an example, Run 4 cannot be affected if you have Run 1
selected. Making two recordings on Run 1 will automatically erase/overwrite
the data from the earlier run.

Setting Up Your Tach
Here we’ll set up your tach. Most of these steps will only need to be done once,
but can be changed at any time. Use the Up ( ) and Down Arrows ( ), scroll
through the menu options and press the Enter (
) Button to enter that setting.
Cancel (X) will always back up one step without saving changes.
- (Pulse Per Revolution – Engine Cylinder Calibration)
This is the menu you use to tell the tach how many ignition pulses it sees for
each revolution of the crank. On most engines, this number will be 1⁄2 the number
of cylinders the engine has because only half of the cylinders are fired on each
revolution of the crank. For example, a typical V8 engine will be set to 4.0 PPR. To
set your , go to the Set mode and press Enter (
). Using the Up
(
) and Down ( ) Arrows you can adjust your setting between .5 and 6
pulses per revolution. Once you’ve found the setting you need, press the Enter
Button ( ) to save that setting.You can also press Cancel (X) to back out of the
menu without making a change. If the settings are programmed incorrectly,
the tach will still function but will display the incorrect RPM.
-(Set Shift Points)
This sets the rpm levels for the four stage shift light. Press Enter ( ). The display
will show . Press the Up (
) and Down ( ) Arrows to change the selected
shift point. Press Enter (
) to review or change the rpm of the selected shift point.
Press Up the ( ) and Down ( ) Arrows to change the rpm of the selected shift
point. Press Enter ( ) to save the new setting, or press Cancel (X) to exit without
changing the setting. Press the Up ( ) and Down ( ) Arrows to change to the
next shift point or press Cancel (X) to exit Set Shift Points.
- (Set Backlighting Mode):
Press Enter (
) to see what the current mode is, On or AdJ Selecting AdJ
makes the backlight intensity proportional to the voltage on the white wire. This
should be connected to dash lighting. Selecting On sets the backlight intensity
to a constant level. Press the Up ( ) or Down ( ) Arrows to change the mode.
Press Enter ( ) when desired mode is displayed. If On is selected, the display
will show a backlighting level of 0-10, 0 is off, 10 is maximum brightness. Press
the Up ( ) or Down ( ) Arrows to change the fixed level. Press ( ) to save the
new level or press (X) to exit without changing the level.
Differential Case
Bracket
Driveshaft
Sensor
Magnet
Figure 6
Check For
Adequate
Clearance
Moving Through The Menus
The Ultimate III's functions are broken up in a series of menus. Navigating these
menus is accomplished using the four push buttons on the right side of the tach.
The buttons functions are:
Differential Case
Bracket
Driveshaft
Sensor
Magnet
Figure 5
.200” +/- .030”
Magnet
(UP)
(DOWN)
(ENTER)
X
(CANCEL)
- (RPM Threshold)
The Ultimate III uses your engine RPM to know when to start recording your run.
When your engine reaches a certain RPM, the tach knows you’re about to launch
and starts recording. The theE setting is where you configure this. Press the
Enter (
) button to display the threshold RPM. Move the RPM to the desired RPM
by using the Up ( ) and Down ( )Arrows. Once you’ve reached the desired
RPM to start your recording, press Enter ( ) to save the setting. You can also
press Cancel (X) to back out without making a change.
/