Page is loading ...

ModelNumber
SerialNumber
Themodel and serial numhers for your unit are located inside unit
on side of blower housing. Record this information in the space
allotted above.
Thismanualwasdesignedtoprovideyou
andyourinstallerwithinformationneeded
to mount,operate,inspect,maintain,and
troubleshootyourcooler.
Atthe end ofthis booklet there is a chart
providing useful hints for increasing the
benefits ofyour evaporativecooler.
Thefirstsection,InstallationandStart-Up,
isespeciallyforthe installer.
TheRegular Maintenance section contains
operation and maintenance instructions for
the owner, whilethe Troubleshooting
section includes information on commonly-
encountered problems.
mo_on ..........................2
Mountingof DownDischargeModels ......... 2
Mountingof HorizontalModels ............. 2
DuctPlacement......................... 3
Required ExhaustOpenings................ 3
ElectricalInstallation(Docted ModeLs) ....... 3
MotorInstallation(DuctedModels) .......... 3
OverflowStandpipeInstallation ............. 4
DrainLineInstallation .................... 4
Bleed-OffInstallation ..................... 4
AdjustingWater LevelandFloat Level......... 4
Ge.entlI__mxtion
Start-UpInspection...................... 4
Start-UpChecklist....................... 4
CabinetInspectionChecklist............... 4
_R..e_ularMainten_ce
ChangingCoolerPads .................... 5
AdjustingBeltTension.................... 5
Lubrication............................ 5
CleaningWaterPump .................... 5
DrainingandTouch-Up................... 5
Flat SupportInstallation .................. 6
ChainKitInstallation ..................... 6
ElectricalWiringon W'mdowModels ......... 6
T_ ........................ 7
Th: , m • O_oer ......... 7
Note: Your warranty does not cover shipping damage. Report all shipping damage at once to dealer or carrier making deliver_
L907103A • 12/99

INTRODUCTION
Evaporativecoolingworkson the principleofheatabsorptionbymoistureevaporation.Whena swimmer
leavesthewater on a windyday,he feelscool becausethe moistureon his bodyis evaporatingand
absorbingheat.
Yourevaporativecooler drawsexteriorairintospecialpadssoakedwithwater,wheretileair iscooledby
evaporation,thencirculatedintoyourhome.
Yourevaporativecooler makesthe best possibleuseofthe evaporativeprocess bymeteringthe flowof
water,distributingit evenlythroughthefiltermedia,and blowinga steadystreamof cooledairintoyour
home.Theair isthen channeledthroughthebuildingand ventedout ofthe homethroughopen
windows, doors or vents.
5 l 3
678
Infiu__g_.L!are themajorpartsofyourcooler thatkeep thisprocess operatingefficientl_Themotor (1) __
drivesthe blower (2) whichdrawsair fromoutsidethroughthe pads (3) saturatedwithwaterfromthe
pump (4) viathe waterdistributionsystem(5). Thefloatvalve(6) and standpipe(7) holdthe waterin a
reservoir(8) at a constantlevel. FIGURE1
INSTALLATION
MountingOfDownDischargeAndHorizontalModels
1_ Read these instructions
carefully before installing,
operating or servicing your
evaporative cooler.
ShFETY
Caution:
Disconnect all
electrical power
to the cooler
before attempting
to install, open, or service your
cooler. If the cooler is
thermostatically controlled, the
thermostat is not to be used as a
disconnect as it may reset and start
the unit unexpectedly.
Evenwhileroutinelyinspectingor servicingthe
inside,thecoolercanbeaccidentallystacmd.Keep
childrenandpetsawayfromthecoolerand
electricalsupplywhenyouareworkingonit.
Mwaysusetherecommendedtoolslistedinthis
manual.Don'tattempttoperformanypartofthe
installationdescribedinthisbookunlessyouare
fully qualified to doso.MIelectricalworkmust
meetlocalcodesandmustbeperformedby
qualifiedpersonnelunl'_
Toinstallcooler cabinet, the followingtools are
required:
• wood Strip
• 5/32" bex keyAllenwrench
• Pliers
• Adjustablewrenches
• Tubingcutter
• Screwdrivers
Your cooler may be... a horizontal
discharge, a down discharge,or a windowmodel.
Horizontal discharge units are designed for
installationon the side ofa building,on a flat or
pitchedroof, or on a slab at ground level.Down
discharge coolers are designedfor flator pitched
roofs. Window models attach easilytowindow
apertures or throughthewall.Variousinstallation
techniquesare shownin thefollowingsection.
If the cooler you have selected is to be
mounted on the roof of your home, remember
these important rules:
• Neverattempt to install or service a cooler during
astorm or in high windconditions. Besiderisking
loss or damage to parts, youcouldbe risking
substantialinjury
• Neverwear shoes withslick soles whenworking
or walkingon a roof.Whenyou leastexpectit you
mayend up slipping.
• Neverdrain waterdirectlyon a roof. Usea drain
hose to runwater to the ground or toa rain gutter.
Beforeattemptingtoinstallthecooler,make
sure thefollowingpreparationshavebeen
made:
• Assurethatthe mountingsurface is strong enough
to bearthe weightof the cooler when in use;
remember thatwhen the systemfillswithwater,the
cooler will be much heavier thanwhen dry.For
operating weight,see accompanyingparts list.
• Makesure you haveadequate meansfor liftingthe
cooler in place.
• Checktheelectrical supplyto see that it matches
therequirements shownon the motor name plate.
• Makesure the mountingsurface is levelin all
directions.
• Makesure anyductwork and electrical needs
complywithlocal, state, countyand federal codes.
• Makesure cooler is secure to the standor leg kit
andthat is secure tothe roof.
ffthecooleristobemountedontheroof,construct
asuitableroofstandtosupporttheentireweightof
theunit.Aroofjackshouldnotbeusedtosupport
anyweightoftheunit.Werecommenda#785legkit
tosupporttheunitandtosecureittotheroof.Place
thecoolerovertheroofjackandpositionsothatit
islevel.Carefullysealthespacebetweentheroof
jackandbottomofcoolerwithcaulkingcompound,
silicone,asphaltor industrialsealingtapetoprevent
airleakage.Thencarefullysealtheroofjacktoroof
withasphaltor caulkingcompoundtopreventair
leakagefromcooleror rainwaterfromleaking
intoroof.
2 Evaporative Cooler Use and Care Manual

Duct Placement
Figures2-6showcommonmethodsofduct
placementforeffectivecooleroperation.
Required Exhaust Openings
Usingstandard CFMratings, a common methodfor
determininghowmuch to open doom or windows
for proper exchangeis: 2 square feet
per 1,000 CFM.
FIGURE2_
7?ansitionDuct_l_==_
, fin N N
Blower
Rt_er
- RoofSland I I ____[q_oof Stand_
Separately
, Ouct FIGURE6
Boxed
Opening
Electrical Installation
(DuctedModels)
C_ Disconnect all electrical
power to the cooler before
attempting to install, open, or
service your cooler. If the
cooler is thermostatically
trolled, the thermostat is
ot to be used as a disconnect
it may reset and start the unit
ctedly.
lio°
Locatediejunctionboxinstalledincabinetcorner.
Notethattherearetwoplug-ins,onefordiemotor
andonefordiepump(seeFigure7). Thesemaybe
indiejunctionboxorpartsbag.Thepowersupply
fromyourhousemustbeconnectedtothisjunction
boxtoprovidepumpandmotorpower.Thewiring
diagraminFigure8showstheseconnections.
Grounding
Installagroundwiretosuitableelectricalground.
Attic
Ceiling
I "- -.._ with g¢'giste_
Closed in/area sends as duct
FIGA_ . j
Oiling AngleIrotl
Supl_lrt
Alignment Pullel,
Set ,9_'rew Pitch Set
Scre_t
Motor Mounting Motor
Bracket B!ou_r Straps
PullO'
I I _" / _" rt I SuplJort
F_ [ _ Adjustment
\ Bracket
FIG_ U 1! I
FIGURE11
MotorInstallation(DuctedModels)
Installation
1.Adjustsupportbrackets,ffnecessary,towidthof
motor.
2. Placemotorin brackets,withclosedportionof
motorcaseontop.
3. Placemotorstrapovereachresilientringmotor,
atthetabs.
4. Securetobracketwithmachinescrewsandnuts.
5. Insertsheaveontodiemotorshaft.
6. Installbeltfrommotorsheavetodieblower
pulley.Alignthesheaveandpulleyas short;.
Movemotorsheavetoachievealignment;donot
moveblowerpulley(seeFigure9).
7. Tightenbelttothepropertension.When
correctlytightened,diebeltwilldeflectabout1/2
inchbyhand(seeFigure10).
8. Rotateblowerwheelbyhandtoseethatitmoves
freelywithoutrubbingagainsthousing.
Checkmotormountingto besureallscrewsand
nutsaretighteneddown.
checkmotoramperage.Topreventoverloadingof
motor,checkamperagewithallwindowsanddoors
openandallairreliefsystemsoperating.Notesheave
pitchsetscrew(seeFigure10).
Removal
Unplugmotorcordfromjunctionbox,loosenset
screwinmotorpulleytoremovebeltandpulley.
Loosenandremovenutsandscrewson support
brackets.Removemotorstrapsfrommotor.Pull
motorfrombrackets(seeFigure11).
Do not exceed maximum amperage
output as stamped on the motor
specification plate or motor can
overload. Only qualiJ'led persons A _ _
with proper electrical
equtpraent and knowledge
should adjust variable pitch _
sheaves. Do not allow water to _ I _
get on the motor, as it will burn _V_
out the windings. _
Disconnect all electrical
power to the cooler and insure that belt
is not rotating before adjusting belt tension by
changing diameter of adjustable sheave. Adjust
belt tension only by adjusting motor bracket.
ffcoolerisconnectedtoductwork,airdeliveryand
motoramperagewillbedecreasedduetoincreased
ductresistance.Tocompensateforthis,themotor
pulleyisadjustedoutor in,usinganammeterto
II5V l-Speed Electrical Wiring
(Tape backunused orange and red wires)
ll5V2-SpeedWectrical_Sring
(Tapebackunus_l_sg¢ w_re)
btot_r
230VI-sl_e_ ElectricalWiring
(Tapebackunusedwhitewire)
Evaporative Cooler Use and Care Ma_val 3

OverflowStandpipeand
DrainLineInstallation
I. Installoverflowdrain bushingin bottom of
cooler,
2. Screwoverflowstandpipe into drain bushingand
tightensnuglyto prevent leakage.
3. Slide rubber washer over drain bushing,push
drain bushing through bouom ofcooler, and
tightennut.
4. Connect(copper/pvc/garden hose) to drain
bushingand drain in accordance tolocal codes
(see Figure 12).
._Over)qow Standpipe
F_
Connect Water Supply
Awatervalveshouldbe installedataconvenient
locationtoallowthewatersupplytobe turnedon
andoff(seeFigure14);1/4"tubingisusedto
providewatertothecooler.Awaterconnectorkit,
availablefromyourdealer,providesthenecessary
items.
l. Remove7/16"knock-outfromcornerleg.
2. Insertendoftubingthroughthisopening.
3. Plaeetubenutandferruleoverendoftubing.
4. Installfloatvalvethroughbracketprovided.
5. Inserttubeintofloatvalveandtightentosecure.
Note:Softwaterequipmentshouldnotbe
attachedtoany waterlinesgoingtoa cooler
"Softwater"willcausecorrosionanddecrease
effectivelifeofa cooler
Bracket
ut LockWasher
Faucel Water
InstallBleed-Off
Ableed-offsystemhas been provided withyourcooler.
Its purpose is to eliminatea small quantityof water from
recirculation;this reduces scale build-up. Thisbleed-off
assemblymerelyrequires insertingthe bleed-offhose
into the pump assemblyand routingbleed-line hose
through standpipeopening.
1.Installbleed-lineintopumpassemblybleed-offtap.
2. Routefarendofbleed-lineintostandpipe.
3. Installclampwithscrewonbleed-hne.
4. Adjustscrewtoobtainflowrateforappropriate
modelindicatedintableatright.
Models Gallons Per Hour
Side/Bow_ Molor HP (Recommended)
wlrdow
S/D330 I/3 24
R_5aO
R_4aO0
,_)430 t/3 36
RW4500
S/D430 I/2 42
RgSO00
S/D630 I/2 47
S/I)630 3/4 _ 5
S/08OO 3/4 _5
S/OSO0 I 60
$t,_nd**
140
95
80
7O
60
60
53
*_t _p soa 12-ouncebeveragecanfilled by bleed-offin
thisntanyseconds.
Note:Bleedratemaydegradeslightlyaftertwoweeksandshould
becheckedtwotofour weeksafter initialsettingandreadjusted
AdjustingWaterLeveland FloatValve
Fillreservoiras follows:
1.Tornwatersupplyon. Checkfor good
pressure andflowfrom float valve.
2. Whenfloat valveshutsoff, check waterlevel.
Waterlevelshould be from 1/2"to 1" below
top edgeof overflowstandpipe.
3. Tornon waterand adjust floatvalveby
bendingthe rod (see Figure 15).
FIGURE15
Clamp with
BLEED-OFFKIT
GENERAL INSPECTION
Start-UpInspection
Beforestartingthe cooler motorand pump to check
outoperation,makesure allinstallationsand
adjustmentshavebeen properlyand thoroughly
made. Assurethat:
• Coolermountingis level;duetis sealed.
• Cabinetis securely fastened to mounting.
• Coolercabinetisgrounded.Electrical
connectionsare safeand secure.
• Motor,pump,endfloatinstalled.Motorend
pumppluggedintojunctionbox (on window
models, theyare factory-wired).
• Pumpimpellertoms freely.Removepumpend
basket.Removeimpeller cover(see illustration
on page6) andspin the impellerto assurefree
rotation.
• Waterlinesconnectedsecurelywithoutleaks.
Watersupplyturnedon.
• Floatadjustedfor properwaterlevel.
• Blower,shaft,collar,andpulleyset bolts are
snug(do not ovet_ightenpulleybolt).
• Pulleyalignmentokay;belttension okay(see
page3 and4 for instructions).
• Blowerbearingsare lubricated.Fill oil cupwith
agoodgrade SAE20Wor 30Woil.
• Padspresoakedend correctlyinstalled.
• Allfreeaspen fibers are removedfromboUom
panto preventblockageofwater distribution.
• Trimcontsolswitchto PUMPONLYposition.
Checkto see that pumpstartsend thatwater
flowsevenlythrough alldistributionoutlets.
Start-UpCheckList
Tocheckoutinstallation,aninitialsturt-up
procedureshouldbefollowed:
I. Turnelectricalsupplyon.
2. Turncontrolswitchto PUMPONLYposition.
Checkto see that pumpstartsandpadsare
evenlywet.
3. Openwindowsor vents in house.
4. Startblowerbyswitchingto COOL.
5. Checkfor cool airdelivery.(Note:anaromaof
dampwoodwill be presentduringinitialuse of
newpads.)
In caseof troublein anyof thesesteps,referto the
TmublesheotingChartonpageZ
Cabinet Inspection Check List
1. Checkfor leaks.
2. Checkto see that the cooler andtroughsare
level.
3. Checkcoolerpads forunevenwettingor open
spots.
4. Checkwaterlevel(see page 4).
5. Checkwulerdistribution systemfor lull even
flow.
6. Makesuretroughopeningsare unclogged.
7. Rotateblowerwheelfor free movement,Align
belt (see page3).
8. Checkbelt tension andcondition.
9. Checkthat set screwsandnutson pulleys,
blowerwheelend collarsare tight.
te caseoftroublein anyof thesesteps,referto the
TroubleshootingChartonpage Z
4 _orativeCoolerUseawACareManual

REGULAR MAINTENANCE
Regular,careful maintenancewill "allowyouto
enjoya long, more efficientservice life from
yourcooler. Befores'fartinganymaintenance
operation, read thorunghlyall operatingand
maintenance instructions andobserve atl
cautionsand warnings.
Changing Cooler Pads
Yourcooler padsshould be changed atleast
twicea year.., atthebeginningof a season and
midwaythrough.
PressRetainerWiresDownToClearFrame Butyour
tadPrrame_""'--"--'7_ padsmay
need to be
changedmore
frequently,
dependingon
localair and
waterconditions.
For instance,in
FIGURE 16 areas where
mineral content of
the water is high, deposits maybuild up in the
cooler pads, restricting air flovz
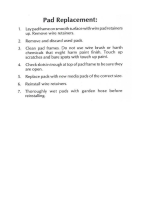
Replacepadsasfollows:
l. Removepad assemblyfrom cabinet.
2. Removepadframe stiffenerfrom frame, using
cautionas stiffener can spring back. Carefully
removeall pad from retainers. Removeand
discard pads (see Figure 17).
3. Usinga mild detergent,wash dirt and scalefrom
pad frames.Wirebrushing is not recommended.
Rinsewithfresh
water.
PadRetainer 4. Laynew pad in
frame,startingat
troughend, malting
sure pad is snug
againsttroughand
~stiffener outer edges withno
air spaces.
5. Padthickness
should be uniform
across the frame.
Note: Pad must
completelyfillframe or hot air mayenter house.
6. Replacepad retainers and lock under edgeof
frame.Sharp points mustbe buried in pad.
7. Pre-soak pads and reinstallpad flame.
8. Startpump and allowtroughs tofill.., check
waterlevel in troughsbyslightlytiltingeachpad
frameout.
Adjusting Belt Tension
Each timeyou inspect your cooler,be sore to check
belttensionon motor/blowerassembly.Checkbelt
CabinetInspection
ChangingCooler Pads
I.ubrication
AdjustingBeltTension
CleaningWaterPump
Cleaning& TouchUp
Drain MIWater Lin_
5
5
5
5
5
5
ft'
€'
t/
t/
€'
t/
it'
t/
€
condition and replace it iffraysor defectsappear.
Checkalignmentof blower pulleywithmotor pulley
(see page 3 for detailed steps).
Lubrication
Blowershaft bearingsneed periodic lubrication.The
oil cups onthe blowershaft bearingsshould befilled
with agood grade SAE20Wor 30Woil when
necessary.Under normaluse, oiling is required every
three monthsofoperation. Do Not Over-Oil. The
pump and blower motors do not require lubrication.
Cleaning Water Pump
Disassembleandcleanwaterpumpasfollows(see
Figure18):
1. Withpowersupplydisconnected,
unplug pump cord. _ FourSnap-Out
2. Removepump. _f/_Tabs
3. TOprevent
breakage, carefully
releasethe four soap-
out tabs, and lift
impellerbase plate
from thepump body
4. Usinga milddetergent FIGURE18
solution, washalldeposits
frominside
aroundimpeller
andimpellerbase
plate.
5, Spinimpellerto
dislodgeany
foreignmaterial.
6. Rinseand
reinstallimpeller
baseplate.
7. Reinstallpump.
8, Connectcord.
t_j
'/" lmm_
Bv,se P/ate
I
Caufion..Bonot allowpump to toppleowr and become
subraergedsince waterwiUdanutgepumprtmtor.
_ Neverwashyour coolercabtnetwithagardenhose
since watermayharmmotorandpump orseepinto ductumrk.
t/
€
Caution:
Disconnect all
electrical power to the
cooler before attempting to
install, open, or service
your cooler. If tbe cooler is
thermostatically controlled,
the tbennostat is not to be
used as a disconnect as it
may reset and start the unit
unexpectedly.
Note: Do Not Undercoat The
Water Reservoir
Yourcooler's water reservoir is finished
with a PolybondTuapphance-type finish.
It is so hard that asphalt-type cooler
undercoating will not stick to it.
Undercoat will break free and clog pump
and water disMbutor.
Do not use cooler cleaners, cooler
treatments, or other additives in this
evaporative cooler. The use of any of
these products will void your
warrantyand may impair the life of
your evaporative cooler.
Drainingand Touch-Up
Cleanthecoolercabinet(withpoweroffand
framesremoved)asfollows:
1. Connecta drain hose to the drain fittingto the
bottomof the reservoir.
2. Removestandpipefrom the drain fittingand
allowwater to drain(never drain wateronto a
roof,make sure drain hose is long enough to
reacha gutteror over edge ofhouse).
3. Cleanreservoir.
The hardness, adhesion and smoothnessofthe
internal and externalfinishon yourcooler makes
it extremelyunlikelythat scratches or chipping
willoccur. In dieevent thatfinishdamagedoes
occur, it shouldbe promptlyrepaired bythe
followingprocedures:
1. Sandthearea around bare metalspots.
2. Primeand paintwith a qualitypaint.
£vapo_tlve Cooler Use atuI Care Mam_l 5

MOUNTING WINDOW MODELS
Assurethatthemountingsurfaceis strong elmughto
beartheweightof thecooler ',','henin nse.
Rememberthatwhen timsystemfillswithwater;the
cooler willbe num]lIleavierthatl whendry For
operatingweigfu,see accompanyingPartsList.
To Install FIGURE19_
Cooler On A
Flat Support
"['he most conmlon
method of
installation _ _
involvesmounting :"
the cooler on a
llat support or
,...it
stand provided by
the installer.The
ductand grille
pmtinn are placed
through the
windowopening
andwindowpanels are fittedintoposition (see
Figure19).
• FlatSupport
Anothermethodofinstallationinvolvestheuseofa
chainkitandstandoffhardware.
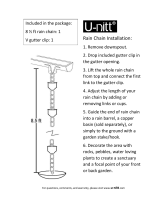
To Install Cooler Using A Chain Kit
(seeFigures20,21, 22)
1. Attachscrewhooks tooutside windowframe
approximatelytwofeetabovecooler. Besure
hook is insertedto full depthin framefor
maximumstrength.Attachchain to eachhook.
2. If your cooler does not have holes
predrilled, drill 3/16" holes 1"aboveeach pad
framecorner at rear ofcooler cabinet. Bolt
hanger tabstocooler (notched end up) using
machine screwsand nuts provided.
3. Placeleglevelingbolts in holesin cabinetfront
withnut, washer and angleto outsideof cabinet.
4. Checkwindowsilloffset.., todetermine the
thicknessof the woodstrip for clearance. This
clearance willprovidespace for the grilleand
winterizingcover ffused. Secure woodstrip with
nailsor screws.Fastenthe twobrackets with
screwsprovided, makingsure theyace square
withthewindowsash.
5. Placecooler in windowallowingduct torest on
sill.Usingchain link that bringscooler closestto
levelposition,place link overhanger tab.Turn
link to lock it into notches on hanger tab.
6. Place leg levelingbracketon leglevelingbolt with
bracketagainstwall.Adjustbolts andchain to
levelcooler.Secure brackets to wall witheight
#10 Phillipshead screws provided.
Note: Cooler may need to be re-leveled later to
compensate for added weight of water
7. Optionalwindowfillerkit is availablefromyour
dealer (RK227).
: _ Wa#
:_ si_
FIGURE20
, m_l
LevelingBolts
WaftBracket_ if:
Wintenzin
Cover
SeparateO
FI_!9_._____
I
I
i
i
i
i
i
i
I
I
i
I
I
m
I
m
I
k
i
i
i
'J"Bo_s With
BracketUsed
Forlgveling
! !
Caution:To
reduce the risk
ofelectric
shock, connect only
to an outlet provided with a
ground fault circuit
interrupting device.
Electrical Wiring on Window Models
Yourunit has been pre-wired atthe factoryso
furtherwiringis not necessary Figure23 shows the
wiringdiagramof your unit in case ofelectrical
componentreplacement.For motor wiringuse
diagramon motor backplate.
Two Speed Motor Wiring
PUMP SWITCH MOTOR SWITCH
ON OFF LOW OFF NIGH
FIGURE23
Caution:All
by qualifled personnel.
6 Evaporative Cooler Use and Care Manual

Troubleshooting
Thefollowing troubleshooting guide is intended to address tilemost common symptoms and is by no means exhanmive. If
symptmns persist, call a qualified servicem_. Electricalwork should be completed bya certified electrician. Turn off all
power to the cooler before attempting to troubleshootany of the fulinwingsymptoms.
SYMPTOM POSSIBLE CAUSES REMEDY
Unitfailstostartordeliverair
1 NoelectricalpewerIntrait
A.Fuseblown
B.Orcuitbreakertripped
C.Cord(s)unpluggedor damaged
2. Beltimproperl)adjustedor broken
3. Motoroverheatedand/orfrozen
A.Belttootightor broken
B.Blowerwheelbearings
dry/shaftfrozen
C.Motoroverloaded
D.Faultywiringor shorts
I. Check power
A.Replace fuse*
B. Reset breaker*
• Ifcmtdition [_'rstsls tail el_:trtllan
C.Plug incord(s) or replace if
damaged
2. Adjustbelt tension
3. Replace motor
A.Adjust beh tensionor replace
B. hubricate or replace blower
bearings
C. Usingammeter, adjust motor to full
loadnameplate amps
D.Callelectrician
Unitstarts
butairdeliveryinadequate
1. Lackofsufficientair exhaust
2. Motoruuderloaded
(ductedunitsonly)
3. Belttooloose
1.Openwindowsor doors toincrease
ventilation
2. Usingammeter,adjustmotortofull
loadnameplateamps
3.Adjustbelttensionor replaceif
needed
Inadequatecooling
1. Inadequateexhaustin house
2. Airregistersimproperlypositioned
3. Insufficientwater/ pad not wet
A.Pads plugged
B. Dryor open spots on pads
C. Troughholes clogged
D.Pump not working
1.Openwindowsor doors toincrease
ventilation
2.Adjustto directair asdesiredor
insta!llowerrestrictionregisters
3.Checkwaterdistributionsystem
A.Replacepads
B. Repackpads
B.Cleantroughsandunplugholes
D.Unplugpomp.Cleanimpeller
housingofforeignmatterand
reinstall
E. Loose connections in water system ft.Check forleaks and correct
E Distributor clogged or corroded F.Clean or replace
Motorfailstooperate 1. Excessivebelt tension 1.Adjust belt tension
2. Blower shafttightor frozen 2. Lubricate blower bearings
3. Motor overloaded 3. Correct - do not exceed motor
nameplate amps
4. Incorrect sheaveadjustment 4. Serviceman shouldcorrect
5. Pulleysudsaligned 5. Check and correct alignment
Waterdrainingfrom 1.Floatarmimproperlyadjusted 1, Adjustfloat
overflowmadpipe 2. Seat in floatvalveleaking 2. Replace floatvalve
3. Standpipe not tight 3. 'lighten standpipe
inockingorbangingsound 1. Bearings dry 1. Lubricate blower bearings or replace
if badly worn.
2. Wheel rubbingblower housing 2. Inspect blower shaft, collars, belt and
or rotating off-balance pulley alignment and motor mounting
3. Loose parts 3. Resecure or reconnect
Blowershakesorraffles 1. Belt or pulley loose 1.Inspect and adjust, or replace belt
and/or pulley as needed.
Exctfah.'thnm_ity in house 1. Inadequate exhaust 1.Open doors or windows to increase
ventilation
Mustyoru#a_utt odor I. Staleor stagnant water in reservoir I. Drain, flush and clean reservoir,
install bleed-off kit
2. Replace pads
3. Turnon water before starting unit
2. Padsmildewedor dogged
3. Padsnotcompletelywetbefore
cooleris turnedon
GettingTheMost
FromYourCooler
Yotlr evaporative cooler is a finely crafted, economically
tolerating unit htllll on decades ofkno\_ffin_x and
research. It ser_es as the heart of an ovrrall air enoltilg
alld tnuvtug 5ystelu for yOtlrJlolne lllll Ihet'e are :tn_lulher
nf ways yml can maximizethecomfort,t'fficiellc}_ eeonom!,
and convenience of your Iota] coo]aig system
Maintenance
Regularmaintenmzeeasrecommendedhi titisinanualit,
essentialforcnolingcomfort,extendingtileIth'of}_tll
cooler,andmrnidingunnecessaryparts replaceamnt'_.
Start-up,mid-seasonand shut-do;vnseta,ictugshould
neverheoverinoked.Changepadsatleastt_icea year,or
sooner,ifmineraldepositsor dustbuild-up.
Add-OnCoolers
Coolerscome in a,,vide arrayof sizes,horsepower, and
capacities suitable for patio, garage, guestroom, mid so
forth.More thanone cooler in a singlehome improves the
cooling effectivenessof theentire system. Owners of
refrigerated air conditioning have found that the addition
ofan evaporativecooler rosilyreduces theirelectric bills.
insulation
Onceyourcooler fozees cooled air intoyour home and
pushes the hot air out, good insulation around your
duclwork willkeep theair as cool as possible. Whole
house insulation will prevent heat from seeping in and will
improve cooling comfort.
MniB-SpeedMotor
The coolingrate can be controlled by increasing and
reducing the amount ofcooled air blown intoyour home.
Two-speedmotors allowyou touse higher speeds during
the honest part of the day,lower speeds for milder
temperatures.
Bleed-off
Bleed-offcomponents are included _th each cooler and
should be installed as instructed in this manual.
AtticVents
Byexhausting cool air throughtheattic, you can reduce
thetemperatureofthishot spot and makeyour home
more comfortable. Itis imporiant to remember to provide
adequate exhaust in the area. Again,provide 2 square feet
ofrelief for every 1,0(_ CFMofair delivery.
ShadetheCooler
Shadingthecoolerkeepsdietemperatureofintakeair
lower.
ThermostatControl
Thecooler can he set to turn on and offautomaticallyat
the temperature desired.
TunerControl
Thecooler can be programmed to turn on and off
automaticallywhen desired.
ReplacementParts
When ordering replacement parts, alwaysrefer tothe
serial and model number of yourcooler. Usethe part
numbers listed in the accompanyingparts list, as
illustratedin the diagrams foryourmodel.
Evaporative Cooler Use atttl Care ara#ual 7

AdobeAir, Inc.
500 South 15thStreet * Phoenix,Arizona85034
8 Et_mtiveO_l*rtJse_ml_Mas_€l
/