Page is loading ...

INSTALLATION
USE AND CARE
PARTS REPLACEMENT
Evaporative cooling works on the principle of heat absorption by moisture evaporation.
Your evaporative cooler draws outside air into specially made pads soaked with water, where the air is
cooled by evaporation, then circulated into your home.
Your MasterCool evaporative cooler has been designed to provide more efficient, consistent cooling
through use of a long-life MasterCool pad. It is a cellulose fiber treated with stiffening and wetting agents
to provide the most reliable evaporative pad ever devised.
Your cooler has two modules - wet and dry - which may be separated for service and cleaning, and
incorporates the most reliable components for long, trouble-free life.
MODELS"
MC43/44B .....
HC43/44A
MC63/64B
HC63/64A
REQUIRED: A special MasterCool motor kit is necessary for installation.
NOTE! READ AND SAVE THIS MANUAL -
"IMPORTANT SAFETY INSTRUCTIONS"
Model Number
Serial Number
The model and serial numbers for your unit
are located on the data plate attached to your cooler.
Record this information in the space allotted above.
This product covered by City of Los Angeles
Research Reports RR930224 (for all single
phase applications), or RR930190 (for 3 phase
applications) Electrical, and RR8141 Mechani-
cal. Copies of these reports are available from
the manufacturer upon request.
MasterCoot_I1. I

Installation and Start-Up ............................................................................................
Mounting and Securing ....................................................................... 3
Electrical Connections ........................................................................ 3
Grounding ........................................................................................... 3
Installing Motor ................................................................................... 3
installing Overflow Standpipe and Drain Line ...................................... 4
Connecting Water Supply ................................................................... 4
Faucet Use ......................................................................................... 4
Adjusting Water Level and Float Valve ............................................... 4
installing Bleed-Off ............................................................................. 4
installing Float Shield ......................................................................... 4
Maintenance Schedule
Annual Start-Up/Shut-Down ............................................................... 5
Required Exhaust Openings ............................................................... 5
Pre Start-Up Inspection ...................................................................... 5
Periodic Inspection ............................................................................. 5
Checklist ............................................................................................. 5
Cabinet Cleaning & Touch-Up ............................................................ 5
Scratches & Bare Metal ...................................................................... 5
Changing Pad ..................................................................................... 5
Adjusting Belt Tension ........................................................................ 6
Lubrication .......................................................................................... 6
Cleaning Water Pump ......................................................................... 6
Snugging Down Set Screws and Nuts ................................................ 6
Washing Pad ...................................................................................... 6
Parts Replacement
Motor .................................................................................................. 6
Pump .................................................................................................. 6
Float.................................................................................................... 6
Bleed-Off ........................................................................................... 6
Troubleshooting ........................................................................................................ 7
Getting the most from your cooler .......................................................................... 7
Maintenance ....................................................................................... 7
Add-On Coolers .................................................................................. 7
Insulation ............................................................................................ 7
Multi-Speed Motor .............................................................................. 7
Attic Vents .......................................................................................... 7
Thermostat Control .......................................................................... 3,7
2 • MasterCooP II

Installation and Start-Up
Read carefully before installing your MasterCo'bl evaporative cooler.
To install the unit the following tools are
needed:
• 5/32" hex key allen wrench
• Channel locks
• Pliers
• Adjustable wrenches
• Tubing cutter
• Screwdrivers
• Hammer
• 1/4" Socket wrench
• 7/16" Socket wrench
Before attempting to install the cooler,
make sure the following preparations have
been made:
• Assure that the mounting surface rs
strong enough to bear the weight of the
cooler when in use; remember that
when the system fills with water, the
cooler will be much heavier than when
dry. The operating weight for MC units is
250 pounds, and for HC units is 295
pounds.
• Make sure you have adequate means
for lifting the cooler in place.
• Make sure the mounting surface is level
in all directions.
• Make sure any ductwork and electrical
needs comply with local, state, county,
and federal codes.
Caution: All electrical in-
stallations must comply
with local building and
safety codes, and must be
performed by quafified
personnel only.
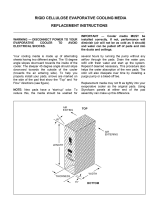
Mounting
The blower module and the media module
can be separated before mounting by re-
moving four bolts and one shipping screw
-see drawing below.
B°lts_ w
Placement and Securing
The duct opening for the 63/64 units
should be about 20" x 20". The cooler
discharge opening for these models is
19-3/4 x 19-3/4". For the 43/44 units the
duct opening should be about 18" x
18". The cooler discharge opening for
these models is 17-3/4" x 17-3/4".
Ifthe cooler isto be mounted on the roof,
construct a suitable roof stand to support
the entire weight of the cooler. (The roof
jack or ducting should NOT be used to
support any weight of the unit). For models
MC63 or MC64 our #785 leg kit, sold sepa-
rately as an accessory, willadequately sup-
port the unit and secure it to the roof For
High-Performance models HC43. HC44
HC63 and HC54 we recommend that a fuji
stand be constructed in such a manner as
to support the entire perimeter of the
cooler. A leg kit only may not provide
adequate support for these mods!s due to
their increased size and weight.
Place the cooler over the roof jack and
position so that it is level. Carefully seal
the space between the roof jack and bot-
tom of cooler with caulking compound,
silicone, asphalt or industrial sealing
tape to prevent air leakage. Then care-
fully seal the roof jack to roof with asphalt
or caulking compound to prevent air leak-
age from cooler or rain water from leaking
into roof. (See Figure ! ). There should be
24 inches clearance on all sides of the
cooler for maintenance.
For maximum cooling performance
and even water distribution, the cooler
must be level. The base of the cooler
at the drain fitting should have at least
4" clearance to allow drain installation.
Electrical Connections
For the convenience of thermostat con-
trol, we recommend installing a
MasterStat TM Universal Cooler Control
Kit, Model CCl000A. Complete installa-
tion instructions are furnished with the
CCl000A Kit. For electrical connections
to a rotary wall switch, use the following
instructions:
Locate the junction box installed in the dry
module. Junction box is to be installed
with the receptacle facing away from
the pad. Make cedain all electrical cords
are clear of the belt, water, pulleys and
blower wheel. Note that there are two
plug-ins, one for the motor and one for the
pump. The building power supply must be
connected to this junction box to provide
power to the motor and pump. The wiring
diagram in Figure 1 shows how the junc-
tion box receptacle should be connected
to the power supply. Make sure contro
switch and circuit breaker are in the OFF
position. Low voltage electrical supply
(below 105 V) may cause insufficient
water supply to pad.
Caution: Turn off all elec-
trical power to the cooler
before attempting to in-
stall, open, or service
your cooler.
Grounding
Install a ground wire to suitable ground
according to local codes.
Install Motor
NOTE: A special MasterCool motor kit
is necessary for installation due to the
custom designed receptacle in the
junction box.
1. Adjust motor cradle spacing.
2. Place motor in cradle (see Figure 2).
3. Place straps over each end, connect to
cradle and tighten.
4. Align sheave (motor pulley) with blower
pulley by moving sheave in and out on
motor shaft until visual alignment is
achieved. Tighten alignment set screw
to 125 in-lbs. Do not adjust to the point
where the motor sheave comes in con-
tact with the motor face plate (see Figure
2). Belt tension should be adjusted sothe
belt will deflect 1/2 to3/4inch atthecenter
of the span per Figure 3. Re-adjust belt
tension after any pulley adjustment. Re-
place worn or damaged belts.
Rgu.,2
MOTOR STRAPS
SUPPORT BRACKETS
ADJUSTMENT
BRACKET
Figure 3
Figure I
WHITE _C_
* T_E SACK t_U_D W_I_:S _G
115 VOLT INSTALLATION
aLaCK" PUMP _,FU_ _
I l,---4---JlI ' -°
[ G _,I_EN GREEN
III I I h
, T_pE BACK UNt._=F_DWIPJE6
230 VOLT INSTALLATION
Mas_rC_P #.3

®
Caution: Disconnect ell
electrical power to the
cooler and insure that belt
is not rotating before ad-
justing belt tension. Do
not adjust belt tension by
changing diameter of ad-
justable sheave. Adjust
belt tension only by ad-
justing motor brackeL
Rotate blower wheel by hand to see that it
moves freely without rubbing against
housing.
Check motor mounting to be sure all
screws and nuts are tightened down.
If cooler is connected to ductwork, air
delivery and motor amperage will be de-
creased due to increased duct resistance.
To compensate for this, the motor pulley is
adjusted out or in, using an ammeter to
check motor amperage. For maximum air
flow check motor amperage with all ser-
vice panels in place. To prevent overload-
ing ofthe motor, check amperage with all
windows and doors open and all relief
systems operating. Tighten pulley set
screw to 125 in-lbs.
A qualified serviceman is required to ad-
just mOtor before start-up.
Caution: Do not exceed
maximum amperage out-
put as stamped on the mo-
tor specification plate or
motor can overload. Only
qualified persons with proper electrical
equipment and knowledge should ad-
just variable pitch sheaves. Do not allow
water to get on the motor, as it will burn
out the windings.
Note on multi-speed switches: A switch
with separate terminals for the pump is
recommended.
Install Overflow
Standpipe and Drain Line
Install overflow drain bushing in bottom
wet section onthe right side. Screw plastic
overflow standpipe into the drain bushing
and tighten snugly. Slide rubber washer
over drain bushing, push through bottom
of cooler, and tighten nut. Connect a per-
manent drain (copper/pvc/garden hose) to
the drain bushing for draining the unit and
overflow protection. Drain should be in
accordance with local plumbing codes.
Rgure 4
WASHER
,_.====.==__=:=,_ COOLERBO'l'rOM
LOCKRUT
4 • MasterCooP II
Connect Water Supply
Connect water line to cooler as follows:
• A water valve should be installed at a
convenient location, to allow the water
supplyto be tureed onand off. 1/4" tubing
isused to provide water to the cooler. A
water connector kit, available from your
dealer provides the necessary items.
• Install float valve in the side panel of the
wet section opposite the pump.
• Place tube nut and ferrule over end of
tubing.
• Insert tube intofloat valve, and tighten to
secure.
NOTE: Soft water equipment should not be
attached to any water lines going to a
cooler. "Soft Water" will cause corrosion
and decrease effective life of cooler.
Figure 5
COMPRESSION NUT
_ FLOAT ROD
FERRULE WASHERS _.
Fasten 1/4 inch water supply line to cooter
stand using tubing clamp and self-drilling
screw. Locate tubing clamp 18 inches or
less from water supply line entry into cabi-
net. (See Figure 5A)
_3ELF-ORILUNG
SCREW
1/4" WATER
SUPPLY UNE
Faucet Use
Connect water line to water supply, as fol-
lows (refer to Figure 6).
• Install a sillcock and water valve on
faucet, as shown. Place tubing nut and
ferrule on tube end and insert in valve.
Tighten nuts onvalve and tube.
Iffaucet isnot to be used for water supply,
installvalve on water linetobe used. Follow
instructions above for securing tubing to
valve.
Rgure 6 -, -,=_-^/_-_TUBING FROM
½ .RO,=
s,,,coCKT i
Adjusting Water Level
and Float Valve
Fill reservoir as follows:
• Turn water supply on. Check for good
pressure and flow from float valve.
• When float valve shuts off, check water
level. Water level should be from 1/2 to
1 inch below top edge of overflow
standpipe. It may be necessary to adjust
float valve by bending the rod (refer to
Figure 5).
• Check reservoir and all connections for
leaks.
Install Bleed-Off
A bleed-off system is provided with your
MasterCool cooler. We recommend the
bleed-off be installed and maintained
while operating this unit. its purpose is to
eliminate a small quantity of water from
racirculation thus reducing scale build-up.
Install bleed-off as
Figure7 follows:
• Install 1/4" black
plastic tubing into
pumpasshown in
t/4" Figure 7.
TUBE • Insert smaller
/ black plastic
tubing into 1/4"
tubing as shown
in Figure 7.
Adjust bleed-off by shortening small tube to
get the proper bleed rate shown below.
Disposal of bleed-off water should comply
with local codes. Use of chemical additives
or any water treatment other than bleed-off
is not recommended for this cooler. Failure
to use the bleed-off with MasterCool pad
greatly increases the mineral deposits and
reduces the expected life of the
MasterCool pad, and could result in early
replacement of pad at your expense.
SECONDSTOFILLA12OZ.CAN
Model
MC43/44
MC43144
HC43/44
HC43144
MC63,64
MC63/64
HC63/64
HC63/64
Motor Hp Seconds to nil
1/2 100
3/4 80
1/2 80
3/4 65
3/4 70
1.0 60
3/4 60
1.0 50
Install Float Shield
• Install shield overfloat valve as shown in
Figure 8.
• Loop of cotter pin fits into hole in shield.
• Cotter pin loop and hole must face
MasterCool pad.
lE_'r'_ RPIN

Required Exhaust
Openings
Using standard CFM ratings, a common ((_
method of determining how much to open
doors or windows for proper exchange is:
2 square feet per 1000 CFM.
Pre-Start-Up Inspection
Assure that:
• Cooler mounting is level; duct is sealed.
• Cabinet issecurely fastened tomounting.
• Cooler cabinet is grounded. Electrical
connections are safe and secure.
• Motor,pump,andfloatinstalled,Motor
and pumppluggedintojunctionbox.
• Pump impellerturnsfreely. Remove pump
and basket. Remove impeller cover (see
Figure10 and spin the impellerto assure
free rotation).
• Water lineconnectedsecurelywithout
leaks.Water supplyturnedon.
• Floatadjusted for properwaterlevel,
• Blower, shaft; collar, and pulley set bolts
are snug (do not overtighten pulley bolt).
• Pulley alignment okay; belt tension okay
(see page 3 for instructions).
• Blowerbearingsarelubricated.Filloilcup
witha goodgradeSAE20W or30W oil.
• Pad is pra-soakad. Check to see that
pump starts end pad is evenly wet.
• Open windows or vents in house.
• In case oftrouble in any ofthese stages,
refer to the Troubleshooting Chart on
page 7.
Caution: Never operate unit
with service panels, pad
or inlet filter removed. This
will result in an overloaded
condition and may damage
the blower motor.
Periodic Inspection
In addition to the planned maintenance
schedule, regular inspection of your
MasterCool cooler willenhance the chance
for long trouble-free service life.
Checklist
[J Chsckfor leaks
CI Is cooler level?
O Are there dry spots on the pad when
cooler is in operation?
O Does blower turn freely?
_1 Is there 25 Ibs.tension (models 63/64)
20 Ibs.tension (modeLs43144) on drive
belt?
O Are bolts, nuts, and sat screws snug?
_1 Is float set correctly?
_1 Iswater pan clean?
Cabinet Cleaning and
Touch-up
The cabinet and all internal parts except
blower and drives are furnished with a hard
appliance-type Polybond ® coating. This
surface is highlyresistant to scale and cor-
rosion.A soft cloth, warm water, and a mild
cleanser will bring all surfaces back to like
new appearance. Avoid steel wool orsand-
paper in normal cleaning of the cabinet.
Scratches and Bare Metal
Inthe unlikelyevent that scratches or bare
metal areas occur, sand orrubthe area with
steel wool to prepare the finish. Paint with
standard paint or touch-up paint available
through your dealer.
Changing Pad
This shouldbe done after 5 years or if
passagesareclogged,
NOTE: Hosingoff inletface of pad can
unclogpassagesof dust.and mineralsac-
cumulatedthere.Lightscrapingsof the in-
take edges of the pad will not harm its
openingsand willremove morestubbom
scale.
Caution: Avoid splashing
water on blower motor.
• Remove wet section top.
• Remove water distributor assembly,
disconnecting hose.
• Lift out used pad sections.
• Replace with new MastarCool pad only,
available from your dealer. Aspen and
other evaporative pads WILL NOT
WORK.
Maintenance Schedule
Regular maintenance isa key to longsuccessful service ofyour MasterCool cooler. The service schedule willhelp you maintain an efficient
unit with good appearance.
MAINTENANCE REQUIREMENTS
(LOCATION IN MANUAL)
Changingpad (p.5)
Cleaning&touch-up(p, 5)
Cleaningwaterpump(p. 6)
Lubrication (p. 6)
Adjustingbelttehsion(p.6)
Periodicinspection(p. 5)
Snuggingdownsetscrews&nuts(p.6)
A_ustingbleed-off(p,4)
Washingdownpadwithhoes(p.6)
Drainallwaterinestoendfromthe
coolertopreventfreezing
ANNUAL
START-UP
Atbeginningof6th
yearor ifpassages
areblocked.
X
X
X
Duringcodingseason
X
X
ANNUAL
SHUTDOWN
x
As needed
Duringcoolingssascn
X
X
NOTES:
DO NOT UNDERCOAT THE WATER
RESERVOIR.
Your MasterCool II cooler's water reser-
voirisfinLshedwitha Polybond®appliance
type finish. It is so hard, asphalt type
coolerundercoatwillnotstick toit. Under-
coat will break free and clog pump and
waterdistributor.
DO not use cooler cleaners,
cooler treatments, or other
additives in this evaporative
cooler. The use of any of
these products will void your
warranty and may impair the
life of your evaporative cooler.
MesterCooPfl• 5

Adjust Belt Tension
Each timeyou inspect your cooler, be sure to
check belt tension on motor/blower assem-
bly. Check belt condition and replace it if
frays or defects appear. Check alignment of
blower pulley with motor pulley.
Lubrication
Blower shaft bearings need periodic lubri-
cation. The oil cups on the blower shaft
bearings should be filled with a good grade
SAlE20W or 30W oil when necessary. Under
normal use, oiling is required every three
months of operation. DO NOT OVER OIL.
The pump and blower motor do not require
lubrication.
Four Figure 9
out tabs
) ,'>
Cleaning Water Pump
Disassemble and clean water pump as
follows:
• Disconnect pump from electrical box.
• Remove pump
• To prevent breakage, carefully release
the four snap-out tabs, and lift impeller
base plate from the pump body.
• Using a mild detergent solution, wash
all deposits from inside around impeller
and impeller base plate.
• Spin impeller to dislodge any foreign
material.
• Rinse and reinstall impeller base.
• Reinstall pump.
• Make sure to use a pump screen or
basket. Check to see if old one needs
replacing due to clogging
Caution: Do not allow pump
to topple over and become
submerged; water will
damage pump motor.
f
Impeller
_" base plate
Rgure 10
Snugging Down Set
Screws and Nuts
Location of set screws and hardware that
should be snugged down.
• Pulley set screw (150 in-lbs)
• Blower set screws (150 in-lbs)
• Wet and dry module connection bolts
Washing Pad
Annually, mineral accumulation and dust
should be washed off the intake surface of
the pad. Use garden hose and nozzle. A
paint scrapper may be used to remove hard-
ened scale from edges of intake passages in
pad.
Parts Replacement
Motor
Removing old motor
• Disconnectpowertocooler
• UnplugfiornjunclJonbox-4pinplug
• Loosenalignmentsetscrewon
motorpdley(onmotorsideof pulley)
andmm_'e baitandmotorpulley.
• Removemotorstrops.
• Pullmotorftombrackets.
Replacing motor
• Reverseprocedureto install
newmotor.
Pump
Removing old pump
• Disconnectpoworto cooler,
• UnplugfromjuecflonPOx(3pinplug),
• UnserawpumpbreckeL
• Liftoot pump.
Replacing pump
• Removeimpellerbase plateat
bottomofpumpby releasingfour
tabs.
• Spin impellertu assurefree
rotation.
• Reinstallimpellerbase p_ata.
• Cleanoldpumpbasketorreplace,
• Placepumpin basket,
• Attachbrackettocabinet.
• Connectpumpplugtojunction
box(3 pinreceptacle).
• Connectpumphosetohose
fitting.
Bleed-off
Removal of old bleed-off
• Replacebleedlineifnecessary.
Installation of bleed-off
assembly
• TOinstallbleedlineto pump see
Figure7.
• BleedlineshooldfUe 12ounce
beveragecanasindicatedinchart
on page4.
• Adjustbleed rateby shortening
smellbleedtube.
Float
Removing old float
• Removefloatshield
• Removenutand ferrulefrom
waterline.
• Removelockwasherendnutfrom
valve.
• Liftfloat outofcabinet.
Replacing or installing float
valves:
• Securenutandlockwasher
holdingfoet tocabinet.
• piecetubenutandferruleoverand
oftubing.
• Inserttubeintofloat valveend
tightentosecure.
• Turnon faucetallowingwaterto
enterthroughvalve.
• Fillfrom lf2 to1 inchbelowtop
edgeofoverflowstandpipe.
• Adjust float ballbybending_e
floatarmwith a pairofpliersto
achievecorrectangle,
• Reinstallfloatshield.

Troubleshooting
Symptom Possible Causes
• Unit fells to start or deliver No electrical power to unit
air • Fuse blown
• Cimuit breaker Iripped
• Cord(s) damaged or
unplugged
• Belt too laose or too tight
• Motor overheated and frozen
• _ft tco tighto_b_'oksn
• Blower wheel beadngs dP/
• MotOr overloaded
• Faulty wtdng orshorts
Remedy
Check power
• Replace fuse"
• Reset breaker"
*If condition persists, call
electrician
• Plug in cord or replace if
damaged
• Adjust belt tension
• Replace motor
• Adjust holt tension or replace
• Lu4_rk_teblower hoadngs
• Using ammeter, adjust
motor to full load a.rnps(see
motor nameplete).
• Call elestd_an
• Unit starts but air delivery
tnad_uate
• Inadequate ooolln 0
of sufflolactair exhaust
Motor undeitoadad
Beit too laose
MasterCool pad pluggad
Inadaqga_e exhaust in house.
/_r registers improper_
positioned.
lasuffidenl wster flow te pad, pad
nct wst.
• Pump not working
• Loo_ cennection lo v,c*t_r
system
• Insufficientblaed-off wster
• Pump I_sket dogged
Openwindowsordoorsto
k'=ueaseventilstion
Usingammeter,adjustmotorto
fullamps(seemotornameplate)
Adjusthoiftensionorreplaceif
needed
Rinseorrep_cepad
Open windows or door to
Increase ventilation.
Adjust to direct air as dastted.
Check water distribution system
• Rime or replace pad
• Clear holes
• Unplug pump. Clean impeller
housing of all foreign matter
• Choc_ for leaks and correct
• Reset or replace bleed-off kit
• Clean basket
• Motor cycles on end off Excessk,e belt tension
• Blower shagtightor frozen
Motor ovedoeded
Incorrect sheave adjustment
Pulleys mlsalignad
SeMce panels, pad or In_ flier
removed
Adjust holt tension
• Lubricate blower beadngs and
rotate shaft by hand (power off)
Correct_:lo not exceed name
plate amps.
Serviceman should adjust
Check alignment
Never operate unit with service
panels, pad or inletfiller removed.
This will result in an overloaded
condl_onand may damage motor.
overgow standplpo a_usted
* Seal in go_ val_ iaaldag • R_a_
. sta_'_l:,_r_xt_ht •"rbgrifenslan_A_'q,e
• Knocking or banging Beadaged_y Luhocstel_m_erhoadags
sound * W_ _U_ _o_x •Inspact blawerst_t, cola,'s,
_x_ =ro_ o_hoarse benandpu_ _rrne_ _
rnstormo_n_
• LOOSepar_ • Re-seoJre or _
i B_wer =helm or _1_ Beif o( pullay loose In_ bal and ed_ I _eaded.
• Excessl_ humM_ in _a_e exhaust Open _ or_ to
house _.
m Musty or unpleasant odor Stele orslal_ wa_erInreservoir Drakl, flushmKIclean rese_No_
, Ped mildawad or dnggad • Chock bk_d-off setUng
. Ped not completely wet before Dly pad and b<_lompen
costerIs lumad on • Turn on wster ho_orestealingunl
• New bad • NOTE:Thoi'e willho aslg/odor
no6cadc_ i'&laJsted-ep. Tho odor
wil dsadpear v//Z¢nthoItst tew
da_ ohopa_lan I I_ed-o_ ls usad.
Getting the most
from your cooler
Your evaporative cooler isa finely crafted, eco-
nomically operating unit built on decades of
know-how and reseamh. Itserves as the heart of
an overall air coolingand moving system foryour
home. But there are a number of ways you can
maximize the comfort, efficiency, economy and
convenience of your total cooling system.
Maintenance
Regular maintenance as recommended in this
manual, isessential for cooling comfort, extend-
ingthe life ofyour cooler, and avoiding unneces-
sary parts replacements. Start-up and shutdown
servicing should never be overlooked.
Add-On Coolers
Coolers come in a wide array of sizes, horse-
power, and capacities, suitable for patio, garage,
guestroom, and soforth, More than one cooler in
a single home improves the cooling effective-
ness of the system. Owners of refrigerated air
conditioning have found that the addition of an
evaporative cooler vastly reduces their electric
bills.
Insulation
Once your cooler forces cooled air into your
home and pushes the hotair out, good insulation
around yourductwork willkeep the air as cool as
possible. Whole-house insulation will prevent
heat from seeping in and willalso improve cool-
ing comfort.
Multi-Speed Motor
The cooling rate can be controlled by increasing
and reducingthe amount ofcooled air blown into
your home. Two-speed motors allow you to use
higher speeds duringthe hottest part of the day,
lower speeds for milder temperatures.
Attic Vents
By exhausting cool airthrough the attic, you can
reduce the temperature ofthis hotspot and make
your home more comfortable.
Thermostat Control
The addition of automatic control makes your
system convenient and efficient. We recommend
the MasterStat TM, Model CC1000A, Universal
Evaporative Cooler Thermostat and Control Kit.
MasterCool e II* 7

AO_beAlr, Inc. • 500 S. 15th Street • Phoenix, AZ 85034
L411OO4A• 1ig6
/