Page is loading ...

USER MANUAL
Acoustic Solutions
150

Acoustic Solutions 150
2
IMPORTANT SAFETY INSTRUCTIONS
THE LIGHTNING FLASH WITH ARROWHEAD SYMBOL, WITHIN AN
EQUILATERAL TRIANGLE, IS INTENDED TO ALERT THE USER TO
THE PRESENCE OF UNINSULATED “DANGEROUS VOLTAGE”
WITHIN THE PRODUCT’S ENCLOSURE THAT MAY BE OF A
SUFFICIENT MAGNITUDE TO CONSTITUTE A RISK OF ELECTRIC
SHOCK TO PERSONS.
THE EXCLAMATION MARK WITHIN AN EQUILATERAL TRIANGLE, IS
INTENDED TOALERT THE USER TO THE PRESENCE OF IMPORTANT
OPERATING AND MAINTENANCE INSTRUCTIONS IN THE
LITERATUREACCOMPANYING THE APPLIANCE.
WARNING:
TO REDUCE THE RISK OF FIRE OR ELECTRIC
SHOCK DO NOT EXPOSE TH APPIS ARATUS TO
RAIN OR MOISTURE.
1) Read these instructions.
2) Keep these instructions.
3) Heed all w rningsa.
4) all cFollow instru tions.
5) is apparatus near waterDo not use th .
6) only with dryClean cloth.
7) Install in accordance with theDo not block any ventilation openings.
manufacturer’s instructions.
8) Do not install near any heat sources such as radiators, heat registers, stoves, or
other apparatus (including amplifiers) that produce heat.

12) Use only with the cart, stand, tripod, braket, or table specified by
the manufacturer, or sold with the apparatus. When a cart is used, use
caution when m ving the cart/apparatus combination to avoid injuryo
from tip-over.
Do not cover the dissipation heat sink.
Leave space around the amplifier to ensure a good ventilation.
The apparatus shall not be exposed to dripping or splashing and no objects
filled with liquids, such as vases shall be placed on the apparatus.,
The apparatus shall be connected to an outlet with a protective earthing
connection.
Install the apparatus so that the mains plug and the appliance coupler remain
readily operable.
No naked flame sources, such as lighted candles, should be placed on the
apparatus.
3
9) Do not defeat the safety purpose of the polarized or grounding-type plug. A
polarized plug has two blades with one wider than the other. A grou ding type plugn
has two blades and a third grounding prong. The wide blade or the third prong are
provided for your safety. If the provided plug does not fit into your outlet, consult an
electrician for replacement of the obsolete outlet.
10) Protect the power cord from being walked on or pinched particularly at plugs,
convenience receptacles, and the point where they exit from the apparatus.
11) Only use attachments/accessories specified by the manufacturer.
Acoustic Solutions 150
13) Unplug this apparatus during lightning storms or when u sed for long periodsnu
of time.
14) Refer all servicing to qualified service personnel. Servicing is required when
the apparatus has been damaged in any way, such as power-supply cord or plug is
damaged, liquid has been spilled or objects have fallen into the apparatus, the
apparatus has been exposed to rain or moisture, does not operate normally, or
has been dropped.


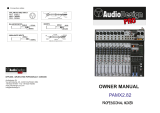
28- GND LIFT: switch grounding of the electronic circuit. Revert the position
in the event of a humming noise generated by the power supply.
29- OFF-ON: main switch.
30- POWER IN: socket for the power cord (supplied) to connect to the mains.
28
30
29
8
Acoustic Solutions 150
12 345 6 7 89
Acoustic Solutions150
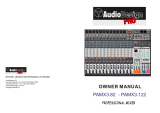
1- MIC IN: XLR balanced microphone input impedance, electronically 1KΩ.
Allows you to connect a low impedance source and a low output level.
2- INPUT: input jack with unbalanced impedance of 1MΩ (to simulate the
valve) to connect any instruments with high output signal. You can not use
both the MIC and LINE because LINE excludes MIC.
3- PK: This LED lights up when the preamp section of the first stage is too
high (follow instructions - GAIN).4
4- GAIN: gain control of the input stages MIC IN-LINE IN. For proper
adjustment, gradually increase the GAIN until the PEAK LED ( ) lights up,3
then go back down until the LED is turned off again, even with signal
peaks.
5- 6- 7- HIGH – MID – LOW: treble controls ( ), medium ( ), low ( ). The567
variations of these controls are +- 15db. Placing the controls in the middle
do not give magnification or attenuation of the corresponding
frequencies.
8- EFF.: This control is used to adjust the amount of signal to be sent to the
DSP effect circuit.
9- VOLUME: volume control for the individual channel. This control is
dependent on the MASTER volume (26).
MIXER SECTION
5
Acoustic Solutions 150

6
7
Acoustic Solutions 150
Acoustic Solutions 150
10- Line input with RCA connectors, with input impedance of 22Ω for the
connection of high output signal types, such as iPods - computers -
keyboards.
11- output with RCA connectors for connections to external devices such as
recorders - computers - iPods, etc..
12- STEREO IN: Volume control for each channel (10) to be sent to the
MASTER volume (26).
13 - 14- Tone control input (10), treble (13), bass (14) with a variation of + -
15db. Placing the controls in the middle do not give magnification or
attenuation of the corresponding frequencies.
15- STEREO OUT: control output volume (11). This control is independent
from the MASTER volume (26)
16- amplified output headphone jack stereo connector, pre master
independent of the MASTER volume (26). (The headphone amplifier is
class A).
17- PHONES: volume control for headphone output (16). This control is
independent from the MASTER volume (26).
18- DIRECT OUT: electronically balanced output with XLR connector, POST
EQ for connection to other sound systems.
19- LINE OUT: unbalanced output with JACK POST EQ connector for
external amplification systems where the cable to connect them are not
long.
10 1217
19
22 25 27 20 21 26
23
24
13 14 1511
18
16
20- VOL. LINE OUT: level control of LINE OUT (19) independent from the
MASTER volume (26).
21- EFF. RET.: Volume that controls the amount of the DSP to send to
MASTER (26).
22- EFF. (LED AND SWITCH): the SWITCH allows you to slide the flashes of
the led 1-8 so that you can hear all the effects and stop at the most suitable
for that type of instrument.
23- OFF-ON RESONANCE: When pressing the button the led turns on, and
the resonant circuit starts working. This circuit is used to make sure that
when you plug in an acoustic guitar at a high volume the guitar does not go
into resonance.
24- RESONANCE: potentiometer which (once the button is pushed), by
turning moves the NOTCH FILTER from a frequency of 100 Hz to a
frequency of 250Hz. The attenuation of NOTCH FILTER is 12db.
25- PH (LED AND SWITCH): The switch allows you to enable or disable the
PH for powering condenser microphones. When the PH is active, the LED
is on.
26- MASTER: general volume of the amplifier. When this knob is set to 0, any
instrument is connected does not come out.
27- PW: power indicator.
/