Apera TN400 User manual

Type
User manual

Apera TN400 is a portable turbidity meter designed to measure the cloudiness or haziness of water samples in various applications like environmental monitoring, water treatment, and industrial processes. With its advanced nephelometric method and wide range (0-1000 NTU), it provides accurate and reliable results. The intuitive interface, auto-calibration, and data logging capabilities make it user-friendly and efficient for both lab and field use.

Apera TN400 is a portable turbidity meter designed to measure the cloudiness or haziness of water samples in various applications like environmental monitoring, water treatment, and industrial processes. With its advanced nephelometric method and wide range (0-1000 NTU), it provides accurate and reliable results. The intuitive interface, auto-calibration, and data logging capabilities make it user-friendly and efficient for both lab and field use.

- 1 -
TN400 Portable Turbidity Meter
Instruction Manual
APERA INSTRUMENTS (Europe) GmbH
www.aperainst.de
- 2 -
Table of Contents
1 Overview .......................................................................................................... - 3 -
2 Technical Specifications .................................................................................... - 3 -
2.1 Technical Parameters .................................................................................. - 3 -
2.2 Others ........................................................................................................ - 4 -
3 Instrument Description .................................................................................... - 4 -
3.1 Instrument Overview .................................................................................. - 4 -
3.2 Meter and Accessories ............................................................................... - 5 -
3.3 Display ........................................................................................................ - 6 -
3.4 Keypad ........................................................................................................ - 6 -
3.5 Battery Installation ..................................................................................... - 7 -
4 Meter Calibration ............................................................................................. - 7 -
4.1 Calibration Frequency ................................................................................. - 7 -
4.2 Calibration Procedure ................................................................................. - 8 -
4.3 Calibration Standards ............................................................................... - 9 -
4.4 Calibration Notes ........................................................................................ - 9 -
5 Turbidity Measurement .................................................................................... - 9 -
5.1 Sample Vial Handling .................................................................................. - 9 -
5.2 Measurement Preparation ....................................................................... - 10 -
5.3 For Single Measurement ........................................................................... - 10 -
5.4 For Continuous Measurement .................................................................. - 10 -
5.5 Measurement Notes ................................................................................. - 11 -
6 Warranty ........................................................................................................ - 12 -
- 3 -
1 OVERVIEW
Thank you for selecting our portable TN400 turbidity meter.
This meter is an outstanding combination of the most advanced electronic technology and
software design, and is the most cost-effective portable turbidity meter. This meter operates
on the nephelometric principle of turbidity measurement and is designed to meet the criteria
specified in ISO7027 and DIN 27027 standards. TN400 allows you to measure the turbidity
of an aqueous sample both in laboratory and in the field.
With built-in microprocessor chips, elegant design, easy to use, the meter has the following
remarkable characteristics:
Smart functions, such as automatic calibration, operating instructions, automatic power-
off, low voltage display and etc.
Large TFT color screen, with blue background in measuring mode, green background
in calibration mode, and text and graphics in operational directive.
With advanced digital processing technology, the accuracy of the meter is greatly
improved.
The structure design meets the requirements of IP67 level of protection and is suitable
for use in field and on-site.
Contained in customized portable case, calibration standards, sample vials and other
necessary accessories are more convenient to use and carry.
2 TECHNICAL SPECIFICATIONS
2.1 Technical Parameters
Measuring Method
ISO 7027 compliant nephelometric method90°
Measuring Range
0 ~ 1000 NTU, automatic range selection:
0.01~19.99 NTU
20.0~99.9 NTU
100~1000 NTU
Resolution
0.01 / 0.1 / 1 NTU
Reading Error
≤ ±2 % of reading±stray light
Repeatability
≤ ± 1% of reading or 0.02 NTU, the greater of the two
- 4 -
Calibration Standards
0.02 NTU, 20.0 NTU, 100 NTU, 800 NTU(Polymer)
Light Source
Infrared light emitting diode850nm wavelength
Detector
Silicon photovoltaic
Display
TFT Color screen
Sample Vials
Φ25×60 mm, high borosilicate glass with screw cap
Sample Volume
18 ml
Operating Temp. Range
0~50°C32˚F~122˚F
2.2 Others
Power Supply
4× “AAAlkaline Batteries
IP Rating
IP67
Dimension/Weight
Meter(90×203×80)mm / 385 g
Portable Case(310×295×110)mm / 1.5 kg
Quality and Safety Certificate
ISO9001:2015 & CE
3 INSTRUMENT DESCRIPTION
3.1 Instrument Overview
Diagram-1
- 5 -
Housing
— Flip cover of the sampling well (Close the cover when measuring)
— Display
— Keypad
— Dust proof plug (Take off the plug when measuring)
— Sampling well
— Calibration vials or sample vials
— Positioning mark (Align the mark with the mark on the calibration vial or the sample
vial)
— Battery cover
3.2 Meter and Accessories
— Standard solution: 0.02NTU, 20.0NTU, 100NTU, 800 NTU
— Portable case
— TN400 Meter
— Soft cloth
— “AA” Alkaline battery×4
— Silicon oil (10 ml)
— Sample vial×3
Diagram-2
- 6 -
— Screwdriver (to remove battery cover)
— Instruction manual
3.3 Display
Measuring Mode
Calibration Mode
Calibration Menu Mode
3.4 Keypad
Diagram- 3
— Measuring mode icon
— Reading/Unit
— Progress bar
— Operational directive
— Low battery display
— Calibration mode icon
— Reading/Unit
— Progress bar
— Operational directive
— Calibration mode Icon
— Standard solution value
— Operational directive
- 7 -
Key
Functions
Power on/off
The meter will automatically shut off 10 mins after last key press
Initiate /Exit the calibration mode
In measuring mode: Short press the key to perform
single-shot measurement; long press the key to perform
continuous measurement in calibration mode: press the
key to confirm the calibration.
In calibration mode, press the key to select standard solution.
3.5 Battery Installation
1. Use the screwdriver to remove the four screws on the battery cover and open the
battery cover.
2. Insert 4 pieces of “AA” alkaline battery. Please make sure the polarity is correct.
3. Put on the battery cover and screw tightly.
4 METER CALIBRATION
4.1 Calibration Frequency
1) Please turn on the meter and warm-up it for 3 minutes. Please perform 4 points
calibration for first time use. For normal use, 2~4 points of calibration can be selected
for subsequent use according to requirement. Better result is obtained if it is in the range
of the above two points.When calibrating, press or to select calibration
standard. After calibrating, press button to confirm. Press button to quit and
enter into measurement mode.
2) To measure low turbidity less than 5 NTU, please perform calibration with 0.02 and 20.0
NTU standard solution before using the meter every time, or perform verification
test with 0.02 NTU stand solution. If the error is big, it is necessary to calibrate the meter.
To measure sample with turbidity value lower than 5NTU, one and the same sample
vial should be used. Please use 1# sample vial.
3) To measure turbidity higher than 5 NTU, it is suggested to calibrate the meter weekly or
monthly; or the user can perform verification test, which is to test the standard solution
that is close to the value of the test sample. If the error is big, it is necessary to calibrate
the meter. Please use 2# and 3# sample vial for measure turbidity higher than 5 NTU.
- 8 -
4.2 Calibration Procedure
1Apply a little silicone oil on the
calibration vial and wipe with the soft
cloth to obtain an even distribution.
Turn the vial of 20.0, 100, 800 NTU
upside down several times and set it
still for 2 mins.(0.02 NTU doesn’t
need to be overturned)
2) Press key to turn on the
meter. The meter indicates
measuring mode.
3) Open the flip cover and put in
0.02 NTU calibration vial. Align the
mark on the vial with the mark on
the sample well and then close the
cover.
4) Press key to enter into
calibration menu, and press
key to perform calibration when
cursor indicates on 0.02 NTU.
5) After calibration with 0.02 NTU
standard, press key to return
to calibration menu.
6) When cursor indicates on 20.0
NTU, put the calibration vial of 20.0
NTU into the sample well and press
key to calibrate.
7) After calibration with 20.0 NTU
standard, press key to return
to calibration menu.
8) When cursor indicates on 100
NTU, put the calibration vial of 100
NTU into the sample well and press
key to calibrate.
9) After calibration with 100 NTU
standard, press key to return
to calibration menu.
10) When cursor indicates on 800
NTU, put the calibration vial of 800
NTU into the sample well and
Press key to calibrate.
11) After calibration with 800 NTU
standard, press key to
confirm.
12) Press key, the meter
resume to measuring
mode.
- 9 -
4.3 Calibration Standards
TN400 turbidity meter adopts US EPA certified Reagecon high molecular weight polymer
turbidity standard solution. Compared with traditional Formazin standard solution, Reagecon
standard solution has a lot of advantages, such as non-toxicity, high accuracy, long shelf-
life, traceable to NIST and so on. The standard solution supplied in the TN400 turbidity meter
kit has a shelf-life of 12 months (from the date of manufacture). Please check the date on
the bottom of the vials before using.
4.4 Calibration Notes
1) Place turbidity meter on a flat and level surface, and please do
not hold the instrument in hand.
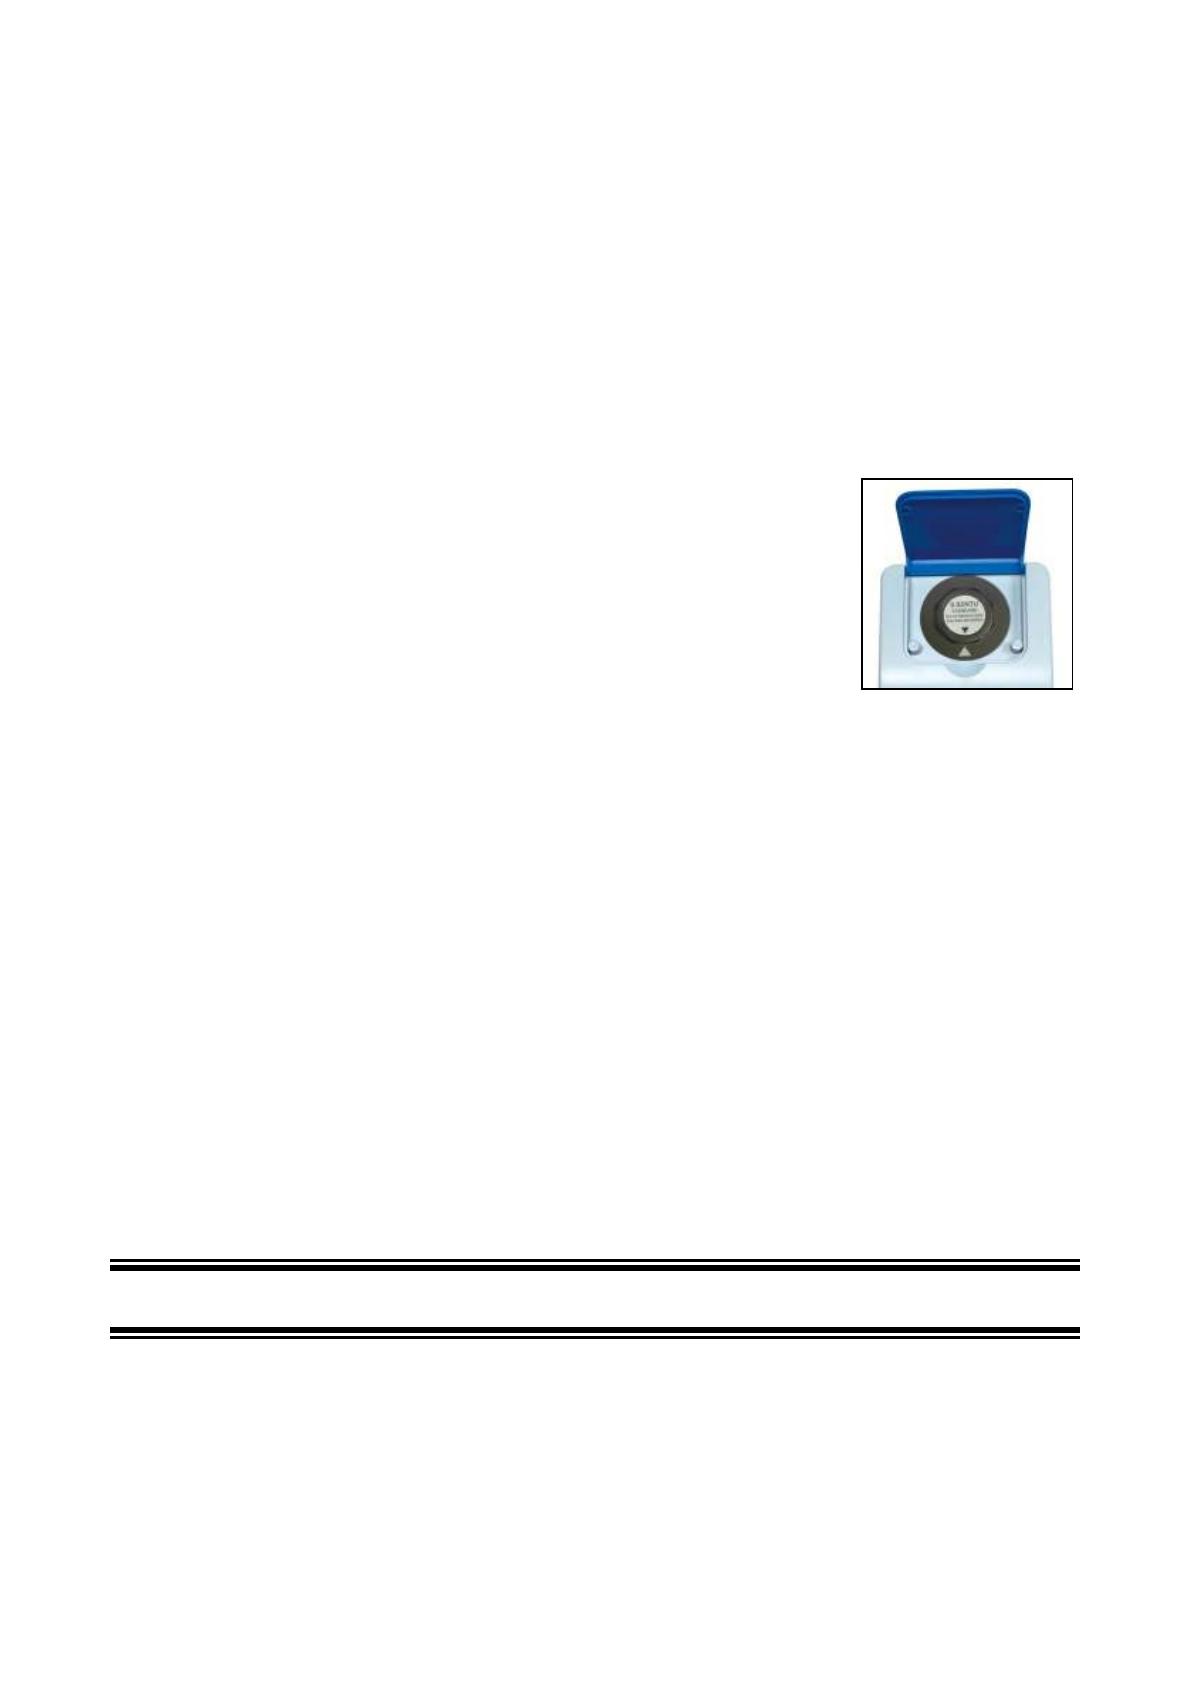
2) When a calibration vial is placed into measuring well, the arrow
mark on vial cap must be aligned with the arrow mark on the
measuring well. See diagram-4
3) Apply little drop of silicone oil on the calibration vial and wipe
even with soft cloth to improve light scattering. Please don't apply
too much silicone oil, and the vial must be wipe and cleaned up. Otherwise it will affect
measuring accuracy. After wiping and cleaning, set the calibration vial still on the table
for at least 2 minutes to eliminate micro bubble in solution. For 0.02 NTU calibration vial,
the standing time should be at least 5 minutes.
4) If Formazin standard is used to calibrate, note the diluted Formazin standard is not
stable. Please make sure to use new prepared Formazin standard to ensure calibration
precision.
5) Please do not open the cap of calibration vial. Inspect the expiration of calibration
standard. Make sure the calibration vial free from dust, dirt, fingerprint and scratch.
6) Please use the same method to calibrate every time, and establish standard operating
procedures (SOPs).
5 TURBIDITY MEASUREMENT
5.1 Sample Vial Handling
1) There are 3 sample vials contained in the case, marked 1#, 2# and 3# on the cap and
bottom of the vial. Please note the number of sample vial should be same as that of vial
cap, and do not mix up. Please always use 1# sample vial to measure low turbidity less
than 5 NTU.
Diagram- 4
- 10 -
2) Sample vial has been meticulously cleaned and disinfected. It can be used directly for
the first time. Before subsequent uses, sample vial should be thoroughly cleaned:
wash the interior and exterior of the vial in a detergent solution repeatedly rinse
with clean distilled water or deionized water. Rinse sample vial with sample solution
twice fill sample vial with sample solution screw the vial cap tightly.
5.2 Measurement Preparation
1) Collect sample solution in a clean vessel, fill sample solution to the 4/5
position of sample vial (approximately 18ml), see diagram-5, screw the
vial cap tightly.
2) Before measuring, please make sure sample solution is uniform. Gently
shake the sample vial to make sample solution uniform, and wait until
air bubbles disappear.
3) Wipe the sample vial surface with the soft cloth. Ensure that the outside of the vial is
dry, clean and free from smudges.
4) Apply 1~2 drops of silicone oil on the surface of the vial. Wipe with a soft cloth to obtain
an even distribution over the entire surface, in order to ameliorate scratches and flaws
and improve light scattering.
5) Place turbidity meter on a flat and level surface, please do not hand held the instrument.
6) Hold vial cap, align the arrow mark on vial cap with the arrow mark on the calibration
well, and insert sample vial into the measuring well and close the cover
5.3 For Single Measurement
Press button, the display shows progress bar(see
diagram-6). It will display measured value after 8 seconds.
Please press button again for repeated measurement.
5.4 For Continuous Measurement
1) Press and hold button, release it until the display shows
the wire frame of progress bar (see diagram-7).The instrument
enters continuous measuring mode. The display is updated
every 8 seconds with continuous measurements and display.
Press button again to exit and then the instrument entrs
single measurement mode.
Diagram- 5
Diagram-6
Diagram-7
- 11 -
2) Continuous measuring mode can be used to observe the process of stabilizing turbidity
values. It’s also suitable for a sample solution which precipitates faster, since it records
every measuring value and calculates the average value.
5.5 Measurement Notes
Turbidity is a very complex analytical measurement which can be affected by many
factors. Some are inherent in the design of instrument. However, there are also other
factors such as stray light, air bubbles, vial handling and other operating technique.
1) Sample Vial
Sample vial must be meticulously cleaned and free from spots and scratches. Its
surface should be applied with some silicone oil to treat the outside with a uniform thin
coating. This is to mask minor imperfections and scratches that may contribute to stray
light. Do not apply large quantity of oil as this may collect dirt and dust and extra oil
should be wiped off with soft cloth. When wiping, user should grip the cap to avoid
leaving fingerprints on the surface of glass vial.
2) Silicone Oil
The refractive index of silicone oil should be same with that of glass vial. It is
recommended to use silicone oil supplied with the instrument.
3) Mixing and Degassing
Samples should not be violently shaken or agitated. It is recommended user gently
shake sample vial to make solution uniform. Air bubbles in solution will cause big error
to turbidity measurement. So air bubble must be eliminated before measuring. But
mixing and degassing simultaneously is a difficult process to handle, especially for
solution with precipitates, which requires some operating experience and experimental
conditions. For example, same mixing condition and equilibrating time for degassing are
required for two measurements to be comparable.
4) Other Requirements
a) On the premise of ensuring uniform sample, sample should be measured immediately
to prevent temperature changing and precipitates from affecting measuring values.
b) Avoid the sample dilution for measurement as much as possible.
c) Avoid operating under direct sunlight.
d) Do not pour solution into measuring well. Sample vial must be used for measurement.
e) Please do not try to wash the measuring well as this may damage its optical structure.
- 12 -
6 WARRANTY
6.1 We warrant this instrument to be free from defects in material and workmanship and
agree to repair or replace free of charge, at option of APERA INSTRUMENTS (Europe)
GmbH, any malfunctioned or damaged product attributable to responsibility of APERA
INSTRUMENTS (Europe) GmbH for a period of TWO YEARS (SIX MONTHS for the
probe) from the delivery.
6.2 This limited warranty does not cover any damages due to:
Transportation, storage, improper use, failure to follow the product instructions or to
perform any preventive maintenance, modifications, combination or use with any
products, materials, processes, systems or other matter not provided or authorized in
writing by us, unauthorized repair, normal wear and tear, or external causes such as
accidents, abuse, or other actions or events beyond our reasonable control.
APERA INSTRUMENTS (Europe) GmbH
Wilhelm-Muthmann-Straße 18
42329 Wuppertal, Germany
Contact: info@aperainst.de
Website: www.aperainst.de
Tel. +49 202 51988998
  • Page 1 1
  • Page 2 2
  • Page 3 3
  • Page 4 4
  • Page 5 5
  • Page 6 6
  • Page 7 7
  • Page 8 8
  • Page 9 9
  • Page 10 10
  • Page 11 11
  • Page 12 12

Apera TN400 User manual

Type
User manual

Apera TN400 is a portable turbidity meter designed to measure the cloudiness or haziness of water samples in various applications like environmental monitoring, water treatment, and industrial processes. With its advanced nephelometric method and wide range (0-1000 NTU), it provides accurate and reliable results. The intuitive interface, auto-calibration, and data logging capabilities make it user-friendly and efficient for both lab and field use.

Ask a question and I''ll find the answer in the document

Finding information in a document is now easier with AI