Hampton Products International Corp.
50 Icon, Foothill Ranch, CA 92610-3000
email: [email protected]
www.hamptonproducts.com
1-800-562-5625
Made in China, Fabriqué en Chine, Hecho en China
©2012 Hampton Products International Corp.
95020000_REVB 02/12
INSTALLATION DIAGRAM:
SCHÉMA D'INSTALLATION :
DIAGRAMA DE INSTALACIÓN:
STRIKE SCREWS
VIS DE GÂCHE
TORNILLOS DE LA
PLACA HEMBRA
STRIKE PLATE
GÂCHE
PLACA HEMBRA
FULL LIFETIME WARRANTY - This product is fully warranted to be free of defects in material and workmanship for the life of the product. If a defect in material or workmanship occurs, call 800-562-5625 for instructions on how
to have it replaced or repaired free of charge. This warranty is null and void if the product was used for purposes for which it was not designed, is abused, misused, modied or improperly installed, operated, maintained, and/or
repaired. NOT LIABLE FOR INCIDENTAL, INDIRECT, OR CONSEQUENTIAL DAMAGES. Some states do not allow the exclusion or limitation of incidental or consequential damages, so the above limitation or exclusion may not apply
to you. This warranty gives you specic rights, and you may also have other rights that vary from state to state.
GARANTIE TOTALE À VIE - Ce produit est garanti comme étant dépourvu de vices de fabrication et de main d’œuvre pour toute la durée de service du produit. Si un tel vice se manifeste, composer le 1-800-562-5625 pour obtenir
les instructions permettant de faire réparer ou de remplacer gratuitement le produit. Cette garantie est nulle et non avenue si le produit a été utilisé à des ns autres que celles pour lesquelles il a été conçu, s'il a subi des abus, s'il
a été mal utilisé ou modié, ou s'il a été incorrectement installé, utilisé, entretenu et/ou réparé. NOTRE RESPONSABILITÉ NE PEUT ÊTRE MISE EN JEU POUR DES DOMMAGES INDIRECTS QUELS QU’ILS SOIENT. Certains états
ou provinces ne permettent pas l’exclusion ou la limitation des dommages indirects et il est possible que les limites ou l’exclusion ci-dessus ne vous soient pas applicables. Cette garantie vous confère des droits spéciques et il
est possible que vous déteniez d’autres droits variant d’un état ou d’une province à l’autre.
GARANTÍA TOTAL DE POR VIDA - Este producto está totalmente garantizado de no tener defectos en materiales y mano de obra durante la vida del producto. Si ocurre un defecto en materiales o en la mano de obra, llame al
teléfono 800-562-5625 para obtener instrucciones sobre cómo poder reemplazarlo o repararlo sin costo alguno. Esta garantía es nula y sin valor si el producto se utilizó para objetivos para el que no fue diseñado, o sufre abuso,
mal uso, es modicado o instalado, accionado, mantenido y/o es reparado incorrectament. NO HAY RESPONSABILIDAD ALGUNA POR DAÑOS INCIDENTALES O INDIRECTOS. Algunos estados no permiten la exclusión o limitación de
daños incidentales o indirectos, por lo que esta exclusión puede no ser aplicable a usted. Esta garantía le proporciona derechos legales y usted podrá tener otros derechos que varían de estado a estado.
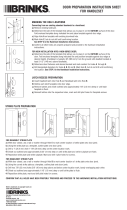
INSTALLATION INSTRUCTIONS FOR STORM DOOR LATCH - FOR DOORS 7/8" TO 1-3/8" THICK
NOTE: Apply light lubricant to center of spindle (FIG. D) prior to assembly.
Step 1 - Insert case (FIG. A) in hole in edge of door. Place spring (FIG. B) inside case.
Step 2 - Insert latch bolt assembly (FIG. C) in case and depress with nger enough to allow spindle (FIG. D) to
pass through the cross hole of the case. Insert spindle through door face hole and pass through case. Note
spindle pocket position.
Step 3 - Place roses on spindle. Screw knob and lever onto spindle until they stop on roses. Position roses so
that hole are lined up vertically and the locking slide is away form the edge of door. Mark rose screw hole
locations on both side of door.
Step 4 - Remove knob, lever and roses. Drill pilot holes for screws with 1/16" drill bit.
Step 5 - Secure roses to door. Screw knob and lever onto spindle until they stop on roses.Tighten set screws
located on shank of knob and lever.
Step 6 - Install strike on jamb exactly opposite center point of latch bolt. Secure with remaining screws provided.
INSTRUCTIONS POUR L’INSTALLATION D’UN VERROU DE CONTRE-PORTE POUR DES PORTES DE 22.2 mm
(7/8 po) À 35 mm (1-3/8 po) D’ÉPAISSEUR
REMARQUE: Appliquer un lubriant léger au centre de la tige carrée (FIG. D) avant l’assemblage.
Étape 1 - Insérer le boîtier (FIG. A) dans le trou percé dans le bord de la porte. Placer le ressort (FIG. B) à
l’intérieur du boîtier.
Étape 2 - Insérer le mécanisme du pêne de verrou (FIG. C) dans le boîtier et appuyer avec le doigt sufsamment
pour que la tige carrée (FIG. D) passe à travers le trou transversal du boîtier. Insérer la tige à travers le trou percé
dans la face de la porte et la faire passer à travers le boîtier. Noter la position de la poche de la tige.
Étape 3 - Mettre les rosettes en place sur la tige. Visser le bouton et la poignée sur la tige jusqu’à ce qu’ils
buttent sur les rosettes. Placer les rosettes de manière à ce qu’elle soient alignées verticalement et que la
languette de verrouillage glisse en direction opposée au bord de la porte. Marquer les emplacements des trous
de vis de la rosette des deux côtés de la porte.
Étape 4 - Enlever le bouton, la poignée et les rosettes. Percer des trous pilotes pour les vis avec une mèche de
1.6 mm (1/16 po).
Étape 5 - Fixer les rosettes sur la porte. Visser le bouton et la poignée sur la tige jusqu’à ce qu’ils buttent sur les
rosettes. Serrer les vis de blocage situées dans la tige du bouton et de la poignée.
Étape 6 - Installer la gâche sur le chambranle exactement à l’opposé du centre du pêne de verrou. Fixer avec le
reste des vis de montage fournies.
INSTRUCCIONES DE INSTALACIÓN DE CERROJO DE PUERTA DE TORMENTA – PARA PUERTAS DE 22.2 mm
(7/8") A 35 mm (1-3/8") DE ESPESOR
NOTA: Aplique lubricante ligero al centro del huso (FIG. D) antes del ensamble.
Paso 1 - Inserte la caja (FIG. A) en el agujero en el canto de la puerta. Coloque el resorte (FIG. B) dentro de la
caja.
Paso 2 - IInserte el conjunto del pasador de cerrojo (FIG. C) en la caja y empuje con el dedo lo suciente para
permitir que el huso (FIG. D) pase a través del agujero en cruz de la caja. Note la posición de la cavidad del huso.
Paso 3 - Coloque las rosetas en el huso. Atornille la perilla y la manija sobre el huso hasta que se detienen
contra las rosetas. Coloque las rosetas de manera tal que los agujeros se alinean verticalmente, y que la
corredera de trabado está alejada del canto de la puerta. Marque la posición de los agujeros de los tornillos de
las rosetas en ambos lados de la puerta.
Paso 4 - Quite la perilla, la manija y las rosetas. Perfore agujeros piloto para los tornillos con una broca de
taladro de 1.6 mm (1/16").
Paso 5 - Fije las rosetas contra la puerta. Atornille la perilla y la manija sobre el huso hasta que se detienen en
las rosetas. Apriete los tornillos prisioneros situados en los vástagos de la perilla y de la manija.
Paso 6 - Instale la placa hembra en la jamba directamente opuesta al punto central del pasador del cerrojo.
Fíjela con los tornillos que aún quedan.
CAUTION: INSTALL ABOVE HEIGHT OF ENTRANCE SET ON APPLICATIONS WITH NARROW JAMBS.
Step 1 - With door in closed position, fold template and place on door at desired height.
Step 2 - Mark centers of holes (#1 & #2) on face and edge of door.
Step 3 - Using a 5/8" drill bit, bore hole #1 in exact center of edge of door a full 2-3/4" deep.
Step 4 - Using a 3/4" drill bit, bore hole #2 through door.
Step 5 - To install strike: Mark frame opposite center point of latchbolt with 5/8" bit. Drill hole 5/16" deep.
ATTENTION : INSTALLER AU-DESSUS DE LA HAUTEUR DE L’ENTRÉE AMÉNAGÉE DANS LES APPLICATIONS À CHAMBRANLE DE PORTE ÉTROIT.
Étape 1 - La porte étant fermée, plier et placer le gabarit sur la porte à la hauteur choisie.
Étape 2 - Marquer les centres des trous (N° 1 & 2) sur la face et le bord de la porte.
Étape 3 - À l’aide d’une perceuse de 16 mm (5/8 po), percer le trou N° 1 exactement au centre du bord de la porte sur une profondeur
totale de 70 mm (2-3/4 po).
Étape 4 - À l’aide d’une perceuse de 19 mm (3/4 po), percer le trou N° 2 en traversant complètement la porte.
Étape 5 - Pour installer la gâche : marquer le chambranle au point opposé au centre du pêne de verrou avec une mèche de 16 mm (5/8 po).
Percer un trou de 8 mm (5/16 po) de profondeur.
PRECAUCIÓN: INSTALE ARRIBA DE LA ALTURA DE LA CERRADURA DE ENTRADA EN APLICACIONES CON JAMBAS ANGOSTAS.
Paso 1 - Con la puerta en posición cerrada, doble la plantilla y colóquela sobre la puerta a la altura deseada.
Paso 2 - Marque los centros de los agujeros (#1 y #2) en la cara y canto de la puerta.
Paso 3 - Con una broca de 16 mm (5/8"), perfore el agujero #1 en el centro exacto del canto de la puerta a una profundidad de 70 mm (2-3/4").
Paso 4 - Con una broca de 19 mm (3/4"), perfore el agujero #2 a través de la puerta.
Paso 5 - Para instalar la placa hembra: Marque el marco en el punto opuesto del centro del pasador del cerrojo con la broca de 16 mm (5/8").
Perfore el agujero a una profundidad de 8 mm (5/16").
MARK CENTER
MARQUER LE CENTRE
MARQUE EL CENTRO
3/4"
19 mm
(HOLE #2)
(TROU N° 2)
(AGUJERO 2)
1-3/4"
44,45 mm
44.45 mm
HOLE #1
TROU N° 1
AGUJERO 1
HOLE #2
TROU N° 2
AGUJERO 2
DOOR
PORTE
PUERTA
OUTSIDE KNOB
BOUTON EXTÉRIEUR
PERILLA EXTERIOR
INSIDE LEVER
POIGNÉE INTÉRIEUR
MANIJA INTERIOR
LOCKING SLIDE
LANGUETTE DE VERROUILLAGE
CORREDERA DE TRABADO
LOCKING ROSE
ROSETTE DE VERROUILLAGE
ROSETA DE RETENCIÓN
OUTSIDE ROSE
ROSETTE EXTÉRIEUR
ROSETA EXTERIOR
MOUNTING SCREWS
VIS DE MONTAGE
TORNILLOS DE MONTAJE
LATCH BOLT ASSEMBLY
MÉCANISME DU PÊNE DE VERROU
MECANISMO PASADOR DEL CERROJO
CASE
BOÎTIER
CAJA
SPRING
RESSORT
RESORTE
JAMB
CHAMBRANLE
JAMBA
MOUNTING SCREWS
VIS DE MONTAGE
TORNILLOS DE MONTAJE
SPINDLE
TIGE CARRÉE
HUSO
SPINDLE POCKET
POCHE DE LA TIGE
CAVIDAD DEL HUSO
CUT OUT TEMPLATE ALONG THIS DOTTED LINE. • DÉCOUPER LE GABARIT LE LONG DE CETTE LIGNE POINTILLÉE. • CORTE LA PLANTILLA A LO LARGO DE ESTA LÍNEA DE PUNTOS.
CUT OUT TEMPLATE ALONG THIS DOTTED LINE. • DÉCOUPER LE GABARIT LE LONG DE CETTE LIGNE POINTILLÉE. • CORTE LA PLANTILLA A LO LARGO DE ESTA LÍNEA DE PUNTOS.
Hold a ruler rmly along this line and fold down. Lay over edge of door.
Maintenir une règle fermement le long de cette ligne et plier. Appliquer le gabarit surle
bord de la porte.
Sostenga rmemente una regla a lo largo de esta línea y doble hacia abajo. Coloque
sobre el borde de la puerta.
FIG. D
FIG. A
FIG. B
FIG. C
Locate hole center on line. Drill hole
5/8" diameter by 2-3/4" deep. (HOLE
#1)
Localiser le centre du trou sur la
ligne. Percer un trou de 16 mm (5/8
po) de diamètre sur 70 mm (2-3/4
po) de profondeur. (TROU N° 1)
Localice el centro del agujero en la
línea. Perfore un agujero de 16 mm
(5/8") de diámetro a una profundidad
de 70 mm (2-3/4"). (AGUJERO #1)
V2200BR, V2200SN
INSTALLATION INSTRUCTIONS FOR STORM DOOR LATCH
INSTRUCTIONS POUR L’INSTALLATION D’UN VERROU DE CONTRE-PORTE
INSTRUCCIONES DE INSTALACIÓN DE CERROJO DE PUERTA DE TORMENTA
Call Customer Care
at 1-800-562-5625
for drill template.
Call Customer Care
at 1-800-562-5625
for drill template.
/