Page is loading ...

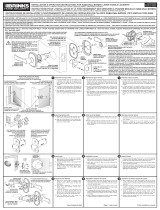
Step 1 - Verify existing hole spacing on your door.
Step 2 - Open the door and remove the old handle & pull.
Step 3 - Latch hook should curve up. (Fig. 1) If hook curves up proceed to step 4. If hook curves down proceed
to step 3a thru 3e.
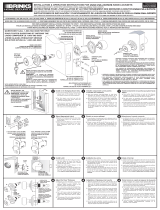
Step 3a - Locate the plastic lock retainer that surrounds the thumb lever. (Fig. 3) Insert a small slotted
screwdriver into the slot just behind the thumb lever gently lift or bow one leg, then the other until they are
clear of the cut-out in the handle. Slide forward and remove.
Step 3b - Make sure the latch hook is in the extended position (3c) and push lock assembly housing inward
(3b) to unseat the locking assembly. (Fig.3)
Step 3c - Slide the lock assembly to the right. (Fig. 3)
Step 3d - Push the lock assembly out of the housing as shown (Fig. 4)
Step 3e - Flip lock assembly 180 degrees reinstall into the internal handle and secure with the lock retainer.
Step 4 - Align the holes in the interior and exterior pull handles to the holes in your door, and secure with
screws provided.
Step 5 - Install keeper and keeper cover. (Fig. 2) Adjust up or down to ensure proper alignment with hook and
anti-lift bar, tighten screws.
Étape 1 - Vérier l’espacement des trous existants de la porte.
Étape 2 - Ouvrir la porte, démonter les poignées anciennes intérieure et extérieure.
Étape 3 - Le crochet du pêne doit être recourbé et pointer vers le haut. (Fig. 1) Si cela est le cas, passer à
l’étape 4. Si le crochet est recourbé et pointe vers le bas, accomplir les opérations des étapes 3a à 3e.
Étape 3a - Repérer la pièce de retenue en plastique qui entoure le levier du bouton. (Fig. 3) Insérer un petit
tournevis plat dans la fente située juste derrière le levier du bouton et soulever ou recourber délicatement une
patte après l’autre jusqu’à ce qu’elles soient hors de l’échancrure de la poignée. Faire glisser vers l’avant et
l’enlever.
Étape 3b - S’assurer que le crochet du pêne est en position étendue (3c) et pousser le boîtier de l’ensemble
de verrou vers l’intérieur (3b) pour déloger l’ensemble de verrou. (Fig. 3)
Étape 3c - Faire glisser l’ensemble de verrou vers la droite. (Fig. 3)
Étape 3d - Pousser l’ensemble de verrou pour le faire sortir du boîtier, comme illustré. (Fig. 4)
Étape 3e - Faire pivoter l’ensemble de verrou sur 180 degrés an de le réinstaller dans la poignée intérieure
et bloquer avec la pièce de retenue du verrou.
Étape 4 - Aligner les trous des poignées intérieure et extérieure sur les trous existants de la porte puis xer à
l’aide des vis fournies.
Étape 5 - Installer la gâche et le couvre-gâche. (Fig. 2) Ajuster vers le haut ou vers le bas pour assurer
l’alignement correct avec le crochet et la barre de sécurité, puis visser à fond.
Paso 1 - Verique la distancia entre agujeros ya perforados en su puerta.
Paso 2 - Abra la puerta y desmonte las manijas y el jalón antiguos.
Paso 3 - El gancho de cerrojo debe curvar hacia arriba (Fig. 1). Si el gancho está curvado hacia arriba, pase al
Paso 4. Si el gancho está curvado hacia abajo, pase a los Pasos 3a hasta 3e inclusive.
Paso 3a - Encuentre el retén de cerradura plástico que rodea a la palanca de mariposa (Fig. 3). Inserte un
destornillador/desarmador plano pequeño en la ranura situada justo atrás de la palanca de mariposa; con
cuidado levante o doble una pata y luego la otra hasta que salgan completamente de la abertura en la manija.
Deslice hacia delante y sáquelo.
Paso 3b - Asegúrese que el gancho de cerrojo está en posición extendida (3c) y empuje el conjunto de la
cerradura hacia adentro (3b) para desasentar el conjunto de cerradura (Fig. 3).
Paso 3c - Deslice el conjunto de cerradura hacia la derecha (Fig. 3).
Paso 3d - Empuje el conjunto de cerradura fuera de la carcasa tal como se muestra (Fig. 4).
Paso 3e - Gire el conjunto de cerradura 180 grados; vuelva a instalar dentro de la manija interior y fíjelo con el
retén de cerradura.
Paso 4 - Alinee los agujeros de las manijas interior y de jalón exterior con los agujeros en su puerta, y sujete
las manijas con los tornillos provistos.
Paso 5 - Instale el cerradero y la cubierta del cerradero (Fig. 2). Ajuste hacia arriba o hacia abajo para
asegurar una alineación correcta con el gancho y con la barra antialzado, y apriete los tornillos.
FULL LIFETIME WARRANTY - This product is fully warranted to be free of defects in material and workmanship for the life of the product. If a defect in material or workmanship occurs, call 800-562-5625 for instructions on
how to have it replaced or repaired free of charge. This warranty is null and void if the product was used for purposes for which it was not designed, is abused, misused, modied or improperly installed, operated, maintained,
and/or repaired. NOT LIABLE FOR INCIDENTAL, INDIRECT, OR CONSEQUENTIAL DAMAGES. Some states do not allow the exclusion or limitation of incidental or consequential damages, so the above limitation or exclusion
may not apply to you. This warranty gives you specic rights, and you may also have other rights that vary from state to state.
GARANTIE COMPLÈTE À VIE - Ce produit est garanti à vie et exempt de défauts de matériau et de main d’œuvre. En cas de défaut de matériau ou de main d’œuvre, appeler le 800 562 5625 pour obtenir les directives de
remplacement ou de réparation sans frais. La présente garantie est nulle si le produit a été utilisé à des ns autres que celles prévues, s’il est malmené, mal utilisé, modié, ou mal installé, mal utilisé, mal entretenu et/ou réparé
de façon non conforme. AUCUNE RESPONSABILITÉ N’EST ASSUMÉE EN CAS DE DOMMAGES ACCESSOIRES, INDIRECTS OU CONSÉCUTIFS. Certains états ne permettent pas l’exclusion ou la limitation des dommages
accessoires ou consécutifs; aussi les limites ou exclusions ci-dessus pourraient ne pas être applicables dans votre cas. La présente garantie vous donne des droits spéciques; vous pouvez avoir d’autres droits selon l’état.
GARANTÍA DE POR VIDA - Este producto está totalmente garantizado de no tener defectos en materiales y mano de obra durante la vida del producto. Si ocurre un defecto en materiales o en la mano de obra, llame al teléfono
800-562-5625 para obtener instrucciones sobre cómo poder reemplazarlo o repararlo sin costo alguno. Esta garantía es nula y sin valor si el producto se utilizó para objetivos para el que no fue diseñado, o sufre abuso, mal
uso, es modicado o instalado, accionado, mantenido y/o es reparado incorrectamente. NO HAY RESPONSABILIDAD ALGUNA POR DAÑOS INCIDENTALES O INDIRECTOS. Algunos estados no permiten la exclusión o limitación
de daños incidentales o indirectos, por lo que esta exclusión puede no ser aplicable a usted. Esta garantía le proporciona derechos legales y usted podrá tener otros derechos que varían de estado a estado.
Hampton Products International Corp.
50 Icon, Foothill Ranch, CA 92610-3000
email: [email protected]
www.hamptonproducts.com
1-800-562-5625
Made in Taiwan, Fabriqué à Taïwan, Hecho en Taiwán
©2012 Hampton Products International Corp.
95027000 REVC 10/13
INSTALLATION INSTRUCTIONS FOR PATIO DOOR HANDLE
INSTRUCTIONS POUR L’INSTALLATION POIGNÉE INTÉRIEURE POUR PORTE-FENÊTRE
INSTRUCCIONES DE INSTALACIÓN PARA MANIJA INTERIOR PARA PUERTA DE PATIO
V1100
INTERIOR HANDLE
POIGNÉE INTÉRIEURE
MANIJA INTERIOR
EXTERIOR PULL
POIGNÉE
EXTÉRIEURE
JALÓN EXTERIOR
Fig. 1
LATCH HOOK
CROCHET À SÉCURITÉ
GANCHO DE CERROJO
ANTI-LIFT BAR
BARRE DE SÉCURITÉ
BARRA ANTIALZADO
Fig. 3
3a
3b
3c
LOCK RETAINER
DISPOSITIF DE RETENUE
RETÉN DE CERRADURA
LOCK ASSEMBLY
ENSEMBLE DE VERROU
CONJUNTO DE CERRADURA
LATCH HOOK
CROCHET À SÉCURITÉ
GANCHO DE CERROJO
LOCK RETAINER
LOCK RETAINER
RETÉN DE CERRADURA
KEEPER COVER
COUVRE-GÂCHE
CUBIERTA DE CERRADERO
KEEPER
GÂCHE
CERRADERO
Fig. 2
Fig. 4
3d
/