Page is loading ...

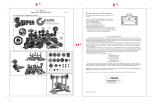
Motorized
Bumper Boat
with Squirt Gun

C
ongratulations on your purchase of the Motorized
Bumper Boat with Squirt Gun from Excalibur. Sit on
your very own inflatable throne as you cruise the water
thanks to the powerful, single propeller.
Please read this manual thoroughly, especially noting safety
and care instructions. Keep this manual for reference. This
package contains 1 Bumper Boat with Squirt Gun and its
parts for assembly, 1 air pump, and one userʼs manual.
Main Parts List
Steering Wheel
and Battery Cover
Control Arm Sleeve
Propeller
Attachment
Air Pump
2

Table of Contents
Introduction....................................................................................page 2
Main Parts List................................................................................page 2
Inflation...........................................................................................page 3
Assembling your Motorized Bumper Boat.....................................page 4
Operating your Motorized Bumper Boat........................................page 6
Battery Information........................................................................page 6
Safety and Care...............................................................................page 6
Limited 90-Day Warranty...............................................................page 7
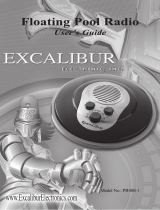
Inflation
1. Remove the valve cover.
2. There are two “cavities”
where the Bumper Boat needs
to be inflated. Insert the nozzle
into the air cavity and begin
pumping air by stepping on
the foot pump repeatedly.
3. Close the valve cover after filling each cavity.
3

1. Use the wrench (included) to
unscrew the nuts on the battery
cover.
2. Assemble the battery cover
with the nuts and bolts in place.
3. Place the nut onto the bolt and
then into the battery compartment.
4. Insert 6 D-cell (not included)
batteries in the battery compart-
ment, matching the polarity
(+ and -) with the diagram in the
compartment.
5. Align the battery compartment
cover by matching inside.
6. Fasten the nuts with the
wrench. It is generally best to start
at the two nuts directly across
from the handle, then the two nuts
on both sides of the handle, then
the remaining two.
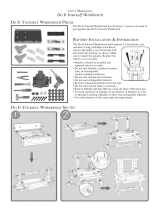
Assembling your Motorized Bumper Boat
Once you have properly inflated the Bumper Boat, you can begin
assembling the motor and steering wheel.
4

7. Hold the Bumper Boat verti-
cally. This will make it easier for
the final steps of the assembly.
Insert the control arm sleeve set
into the hole located at the front-
center of the Bumper Boat.
8. Insert the electrical connection
line into the motor subassembly
that encloses the propeller.
9. Insert the control arm through
the top of sleeve set. Insert the
electrical line through the bottom
of the control arm sleeve set.
10. From the bottom of the
Bumper Boat, you can see the
“1” printed on both sides of the
control arm and propeller.
11. Push the connection up and
make sure that it is tightly secured
into the propeller.
12. You have finished assembling
the Bumper Boat.
13. After step 12, insert the air
pump and inflate the small cavity
in the middle of the Bumper Boat
until firm.
5

Operating your Motorized Bumper Boat
The accelerator button is located on the right hand top of the steering
wheel. The left hand top is the squirt gun. Press to activate the propeller
and make the Bumper Boat go!
Use the steering wheel to control in which direction you move. The
steering wheel can rotate 360°.
Battery Information
• Use 6 D-cell batteries
• Use alkaline batteries for best performance
• Do not use rechargeable batteries
• Do not mix old and new batteries
• Remove exhausted batteries from unit
• Remove batteries when Bumper Boat is not in use
• To avoid explosion or leakage, do not dispose of batteries in a fire or attempt to recharge standard or alkaline batteries
• Do not mix alkaline, standard ( carbon-zinc) or rechargeable (nickel-cadmium) batteries
Safety and Care
• When assembling, please make sure that you tighten the screws on the battery compartment so that water does not get
on the inside of the compartment. This will damage the electrical system of the Bumper Boat.
• Children under 8 years of age should not operate this product without parental supervision.
• This product is designed for pool use only. It may be used in ponds or small lakes only within the range of the userʼs
comfortable ability to swim to shore, provided that there are no strong currents, waves, or water crafts present which
could create wakes. Do not use in any other body of water or in salt water.
• This product is designed to hold one person not exceeding 200 lbs.
• Keep hands, hair, and loose objects such as clothing away from the propeller.
• If an object becomes lodged in the propeller, make sure that this product is turned off before attempting to dislodge.
• Always inspect the pool area before use to ensure it is free of hazards and/or obstacles, such as pool toys and
swimmers.
• Never ride into or over swimmers.
• Keep this product away from hot or sharp objects.
• Always use caution and common sense.
• Never jump or dive off this product.
FCC Part 15 Compliance
This device complies with Part 15 of the FCC Rules. Operation is subject to the following two conditions: (1) this
device may not cause harmful interference, and (2) this device must accept any interference received, including inter-
ference that may cause undesired operation.
NOTE: This equipment has been tested and found to comply with the limits for a Class B digital device, pursuant to
Part 15 of the FCC Rules. These limits are designed to provide reasonable l interference in a residential installation.
This equipment generates, uses and can radiate radio frequency energy and, if not installed and used in accordance with
the instructions, may cause harmful interference to radio communications. However, there is no guarantee that interfer
-
ence will not occur in a particular installation. If this equipment does cause harmful interference to radio or television
reception, which can be determined by turning the equipment off and on, the user is encouraged to try to correct the
interference by one or more of the following measures:
- Reorient or relocate the receiving antenna.
- Increase the separation between the equipment and receiver.
- Connect the equipment into an outlet on a circuit different from that to which the receiver is connected.
- Consult the dealer or an experienced radio/TV technician for help.
6

90-Day Limited Warranty
EXCALIBUR ELECTRONICS, INC., warrants to the original consumer that
its products are free from any electrical or mechanical defects for a period of
90 DAYS from the date of purchase. If any such defect is discovered within the
warranty period, EXCALIBUR ELECTRONICS, INC., will repair or replace
the unit free of charge upon receipt of the unit, shipped postage prepaid and
insured to the factory address below.
The warranty covers normal consumer use and does not cover damage that
occurs in shipment or failure that results from alterations, accident, misuse,
abuse, neglect, wear and tear, inadequate maintenance, commercial use, or
unreasonable use of the unit. This warranty does not cover cost of repairs made
or attempted outside of the factory.
Any applicable implied warranties, including warranties of merchantability and
fitness, are hereby limited to 90 DAYS from the date of purchase. Consequen-
tial or incidental damages resulting from a breach of any applicable express or
implied warranties are hereby excluded. Some states do not allow limitations
on the duration of LIMITED 90-DAY WARRANTY implied warranties and do
not allow exclusion of incidental or consequential damages, so the above limi-
tations and exclusions in these instances may not apply. The only authorized
service center in the United States is:
Excalibur Electronics, Inc.
13755 SW 119th Ave
Miami, Florida 33186 U.S.A.
Phone: 305.477.8080
Fax: 305.477.9516
www.ExcaliburElectronics.com
Ship the unit carefully packed, preferably in the original carton, and send it
prepaid, and adequately insured. Include a letter, detailing the complaint and
including your daytime telephone number, inside the shipping carton. If your
warranty has expired and you want an estimated fee for service, write to the
above address, specifying the model and the problem.
NOTE: Please do not send your unit without first receiving an estimate for
servicing from EXCALIBUR ELECTRONICS, INC. Contact us before sending
your unit. We cannot store your unit!
Excalibur Electronics, Inc. reserves the right to make technical changes with
-
out notice in the interest of progress.
7

Motorized Bumper Boat with Squirt Gun
Model No: PR11BK-2
PR11BK-2 BumpBoat wSquirt (MA) 0
32708
/