


EPSON
®
DFX-8000
User’s Manual

FCC COMPLIANCE STATEMENT FOR AMERICAN USERS
This
quipment
has been tested and found
to.&&
with
@te
limits for a class
B
digital
device.
p
ursuant
to Part
15
of the
FCC
&da.
‘Yhaee
limits
pe
designed to provide reasonable
protection against harmful interference in a residential installation. This equipment generates,
uses and can radiate radio frequency energy and, if not installed and used in accordance with
the instructions, may.
w,
no guarantee that
&&e&e
‘-
YtiP
.wtorodioc
~ca&uu.
However, there is
not~jttapar&&rin&l#&m.Ifthisquipment
does cause
harmful~@gf&+e,~.radid
qr
*ion
*on,
w&h
.FM
be determined by
turning
the equipment off and on, the user is encouraged to try to correct the interference by
one or more of the following measures:
.
Reorient or relocate the receiving antenna.
.
Increase the separation between the
quipment
and receiver.
.
Connect the
quipment
into an outlet on a circuit different from that to which the
receiver is connected.
.
Consult the dealer or an experienced radio/TV technician for help.
WARNING
The connection of a non-shielded printer interface cable to this printer will invalidate the FCC
Certification of this device and may cause
interfemnce
levels which exceed the
limits
establiied
by the
FCC
for this
quipment.
If this
quipment
has more than one interface
connector, do not leave cables connected to unused interfaces.
Seiko
Epson Corporation shall not be liable against any damages or problems
arisii
from the
use of any options or any consumable products other than those designated as
Origmal
Epson
Products or Epson Approved Products by Seiko Epson Corporation.
All rights reserved. No part of this publication may be reproduced, stored in a retrieval
system, or transmitted, in any form
or by any means, mechanical, photocopying, recording,
or otherwise, without the prior written
permission
of Epson America, Inc. No patent liability
is assumed with respect to the use of the information contained herein. While every
precaution has been taken in the preparation of this book, Epson America, Inc. assumes no
responsibility for errors or omissions. Neither is any liability assumed for damages
resultiq
from the use of the information contained herein.
FOR CANADIAN USERS
This digital apparatus does not exceed the Class
B
limits for radio noise emissions from digital
apparatus as set out in the radio interference regulations of the Canadian Department of
Communications.
Le
pr4sent
appareil
num6rique
n&et
pas de bruits radioflectriques
depassant
les
limites
applicables
aux
appareils nun&iques de
Classe
B
prescrites
darts
le
r4glement
sur
le
brouillage
radidlectrique’
6dicte
par
le
Minis&e
des
Communications
du
Canada.
Epson and Epson
ESC/P
are registered trademarks of Seiko Epson Corporation.
IBM is a registered trademark of International Business Machines Corporation.
Graphics created with
UniPaint
by Unison World Inc. and Epson JD-Graph.
Copyright
0
1989
by Epson America Inc.
Torrance, California

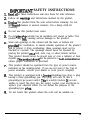
IlWORTANT
SAFETY INSTRUCTIONS
Readall
of these instructions and save them for later reference.
Follow all warnings and instructions marked on the product.
Unphrg this product from the wall outlet before cleaning. Do not
use liquid cleaners or aerosol cleaners. Use a damp cloth for
cleaning.
1.
2.
3.
4.
5.
6.
7.
8.
9.
Do not locate this product where the cord will be walked on.
Do not use this product near water.
Do not
pbce
this
product on an unstable cart, stand, or table. The
product may
fall,
causing serious damage to the product.
Slots and openings in the cabinet and the back or bottom are
provid&d
for ventilation; to ensure reliable operation of the product
and to protect it from overheating, these openings must not be
blocked or covered. The openings should never be blocked by
placing the product
.on-a
bed, sofa, rug, or other similar surface.
This product should never be placed near or over a radiator or heat
register.
This$rdduct’should
not be placed in a built-in instAlation
unless proper ventilation is provided.
This product should be operated from the type of power source
indicated on the marking label. If you are not sure of the type of
power available, consult your dealer or local power company.
This product is equipped with a &wire grounding-type plug, a plug
having a third (grounding) pm. This plug will only fit into a
grounding-type power outlet.
This
is a safety feature.
If
you are
unable to insert the plug into the outlet, contact your electrician to
replace your obsolete outlet. Do not defeat the purpose of the
grounding-type
phrg.
iii

10.
If an
extension
cord’is
used
with‘&
product, make sure that the
total of the ampere ratings on the products
piugged
into the
extension cord does not
exceed’the
extension cord ampere rating.
Also, make sure that the total
.of
all products plugged into the
wall outlet does not exceed
15
amperes.
11.
Never
puih
objects of any kind into this product through cabinet
slots as they may touch dangerous voltage points or short out parts
that could result in a risk of fire or electric shock. Never spill liquid
of any kind on the product.
12.
Except as specifically explained in the User’s Manual, do not
attempt to service this product yourself. Opening or removing
those covers that are marked ‘Do Not
Remove”
may expose you to
:
dangerous voltage points or other risks. Refer all servicing
,in
those
compartments to service personnel.
13.
Unplug this product from the wall outlet and refer servicing to
qualified service personnel under the following conditions:
A. When the power cord or
~1%
is damaged or frayed.
B.
If liquid has been spilled into the product.
C.
If the product has been exposed to rain or water.
D.
If the
product.does
not operate normally when the operating
instructions are followed. Adjust only those controls that are
covered by the operating instructions since improper
adjustment of other controls may result in damage and will
often require extensive work by a qualified technician to restore
the product to normal operation.
E.
If the product has been dropped or the cabinet has been
damaged.
F.
If the product exhibits a distinct change in performance,
indicating a need for service.
iv

Contents
About This Manual
1
Introduction
3
Chapter 1 Setting Up the Printer
1-1
Unpacking the Printer
................................................
1-2
Choosing a Place for the Printer
..................................
1-7
Assembling the Printer
...............................................
1-9
Testing the Printer
....................................................
1-13
Connecting the Printer to Your Computer
.....................
1-26
Setting Up Your Application Software
..........................
1-36
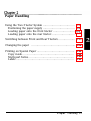
Chapter 2
Paper
Handling
2-1
Using the Two-Tractor System
....................................
2-2
Switching between Front and Rear Tractors
...................
2-20
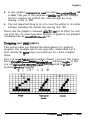
Changing the Paper
...................................................
2-24
Printing on Special Paper
...........................................
2-29
Chapter 3 Using the Printer
3-1
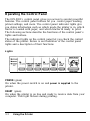
Operating the Control Panel
.......................................
3-2
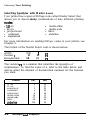
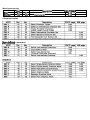
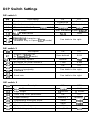
Setting the DIP Switches
............................................
3-7
Page Length
.............................................................
3-17
Skip Over Perforation
...............................................
3-18
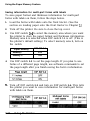
Using the Paper Memory Feature
.................................
3-20
Adjusting the Top of Form Position
.............................
3-33
Adjusting the Printing Position
....................................
3-37
Using Short Tear-Off
.................................................
3-40
Selecting Typestyless
...................................................
3-43
Contents
v

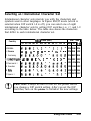
Selecting an International Character Set
........................
3-47
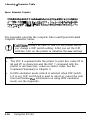
Choosing a Character Table
........................................
3-49
Data Dump Mode
.....................................................
3-51
Chapter 4 Software and Graphics
4-1
Enhancing
Your Printing
............................................
4-2
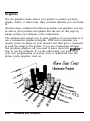
Graphics
.................................................................
4-10
User-defined Characters
..............................................
4-22
Chapter 5 Using the Printer Options
5-1
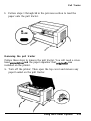
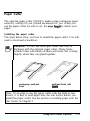
Pull Tractor.............................................................
5-2
Paper Cutter
............................................................
5-19
Interface Boards
........................................................
5-32
Chapter 6 Maintenance
6-1
Cleaning the Printer..................................................
6-2
Replacing the Ribbon
.................................................
6-4
Transporting the Printer
.............................................
6-9
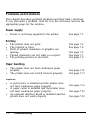
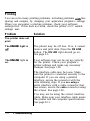
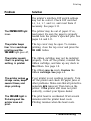
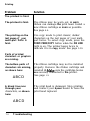
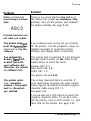
Chapter 7 Troubleshooting
7-1
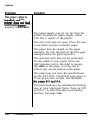
Problems and Solutions
..............................................
7-2
Power Supply
..........................................................
7-3
Printing...................................................................
7-4
Paper Handling........................................................
7-13
Options...................................................................
7-18
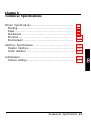
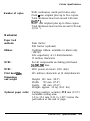
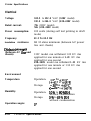
Chapter 8 Technical Specifications
8-1
Printer Specifications
.................................................
8-2
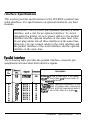
Interface Specifications
...............................................
8-11
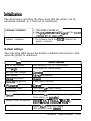
Initialization
.............................................................
8-17
vi
Contents

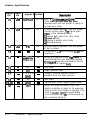
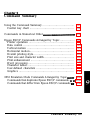
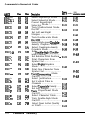
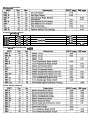
Chapter 9 Command Summary
9-l
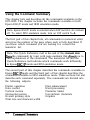
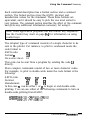
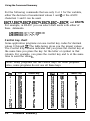
Using the Command Summary
....................................
9-2
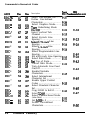
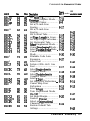
Commands in Numerical Order
...................................
9-5
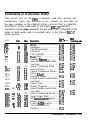
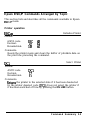
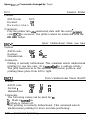
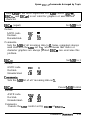
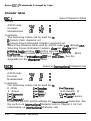
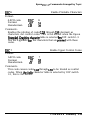
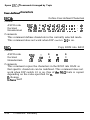
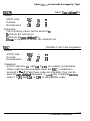
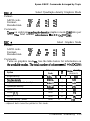
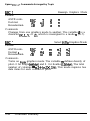
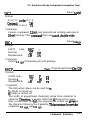
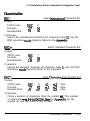
Epson ESC/P Commands Arranged by Topic
.................
9-9
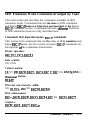
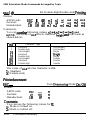
IBM Emulation Mode Commands Arranged by Topic..
....
9-41
Appendix
A-l
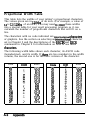
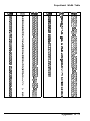
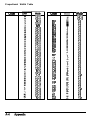
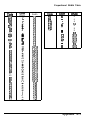
Proportional Width Table
.
.
.
.
.
.
.
.
.
.
.
.
.
.
.
.
.
.
.
.
.
.
.
.
.
.
.
.
.
.
.
.
.
.
.
.
.
.
.
.
.
.
A-2
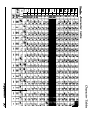
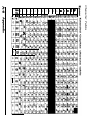
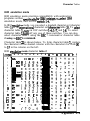
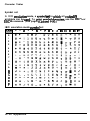
Character Tables
.
.
.
.
.
.
.
.
.
.
.
.
.
.
.
.
.
.
.
.
.
.
.
.
.
.
.
.
.
.
.
.
.
.
.
.
.
.
.
.
.
.
.
.
.
.
.
.
.
.
.
.
.
.
A-6
Glossary
GL-1
Index
IN-1
Contents vii

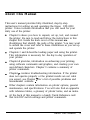
About This Manual
This user’s manual provides fully-illustrated, step-by-step
instructions for setting up and operating the
Epson
DFX-8000
printer. It also includes information that you will need for your
daily use of the printer.
Chapter
1
shows you how to unpack, set up, test, and connect
the printer. Be sure to read and follow the instructions in this
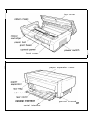
chapter first. Inside the back cover of this manual
are
illustrations that identify the parts of the printer. You may want
to unfold the cover and refer to these illustrations as you set up
and operate the printer.
Chapters
2
and 3 describe loading paper and using the printer.
This information is necessary for -the day-to-day operation of
your printer.
Chapter
4 provides, information on enhancing your printing,
using software commands and graphics, and creating your own
user-defined characters. Chapter
9
contains a summary of
printer commands.
Chapter
7
contains troubleshooting information. If the printer
does not operate properly or the printed results are not what
you expect, see Chapter
7
for a list of possible problems and
recommended solutions
.
Other chapters contain information on printer options, general
maintenance, and specifications. You will also find an appendix
with reference tables, a glossary of printer terms, and an index.
At the back of this manual is a handy Quick Reference card
that lists DIP switch settings and printer commands.
About This Manual
1

About This
Manual
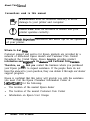
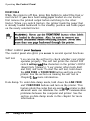
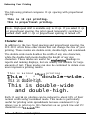
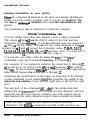
Conventions used in this manual
61
WARNINGS must be followed carefully to avoid
damage to your printer and computer.
CAUTIONS must be followed to ensure that your
printer operates correctly.
Notes
containimportant
information and useful tips on the operation
of your printer.
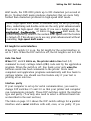
Where to Get Help
Customer support and service for Epson products are provided by a
network of authorized Epson dealers and Customer Care Centers
throughout the United States. Epson
America
provides product
information and support to its
dealem
and Customer Care
Centers.
Therefore, we
a&
that you
contact the business where you purchased
your Epson product to request assistance. If the people there do not
have the answer to your question, they can obtain it through our dealer
support program.
Epson is confident that this policy will provide you with the assistance
you need. Call the Epson Consumer Information Center at
1-800-922-8911
for the following:
l
The location of the nearest Epson dealer
l
The location of the nearest Customer Care Center
l
Information on Epson User Groups.
2
About This Manual

Introduction
The Epson
DFX-8000
printer is an advanced dot matrix printer
designed for business applications. The printer combines high
performance and reliability with a wide range
of-f-es,
including
high speed printing and automatic paper handling.
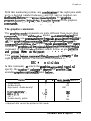
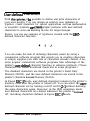
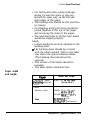
Features
In addition to the high-quality printing and ease of operation you
expect from Epson printers, the
DFX-8000
offers the following:
Extra-fast printing speeds of up to
1066
characters
per
second at
10
cpi
(characters per inch) or
960
characters per second at
I.2
cpi,
Two built-in push tractors (front and rear) for convenient paper
handling. This dual system lets you switch between types of
continuous paper quickly
and.easily. The printer remembers
separate top of form positions for each tractor,
An automatic paper back-out feature that allows you to switch
between paper loaded on the front or rear tractor without
removing either paper supply.
A short tear-off feature that saves paper. When a sheet of
continuous paper is torn off at the end of a printout, the printer
reverse-feeds the remaining paper so that printing can begin at
the top of the next sheet.
A paper memory feature that produces high quality printing on
your multi-part forms by using stored paper format and
thickness information to adjust the print head.
A width detection feature that automatically adjusts the printing
to match the width of the paper loaded in the printer. This
prevents the printer from printing directly on the platen, which
damages the print head.
Introduction
3

Introduction
l A micro-adjustment feature that allows you to feed the paper
forward or backward to finely adjust the top of form, loading,
and short tear-off positions.
l An improved control panel design that lets you select almost
any feature with a single button.
l Compatibility with the Epson
ESC/P@
commands used by
FX-850/1050
and
DFX-5000
,printers.
l An
IBM@
emulation mode that provides compatibility with
application programs written specifically for IBM printers.
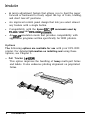
Options
The following options are available for use with your
DFX-8000
printer. For detailed information on installing and using these
options, see Chapter
5.
l
Pull
Tractor 4~8309)
This option improves the handling of heavy multi-part forms
and labels. It also enhances printing alignment on preprinted
forms.
4
Introduction

Introduction
l Paper Cutter
(C815001)
This option allows you to handle continuous paper more easily
by cutting off printed documents for you.
l Interface Boards
You can use several optional interface boards to supplement the
printer’s built-in parallel and serial interfaces. Chapter 5
provides guidelines for choosing the right interface and
instructions for installing an interface board.
Introduction 5

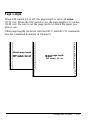
Introduction
Coax and Twinax interface boards
Two
interface
boards (Coax and
Twinax)
let. you use the
DFX-8000
as a local printer
fez
an IBM mainframe or
minicomputer. These boards connect directly to the printer and
allow it to function as a local IBM printer without the addition
of any other circuitry or components.
6
Inkduction

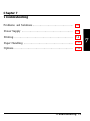
Chapter
1
Setting Up the Printer
Unpacking the Printer
................................................
1-2
Checking the parts
.................................................
1-3
Removing the protective materials
.............................
1-4
Choosing a Place
for
the Printer
..................................
1-7
Assembling the Printer
...............................................
l-9
Installing the ribbon cartridge
...................................
l-9
Testing the Printer
....................................................
1-13
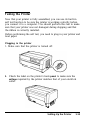
Plugging in the printer
............................................
1-13
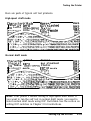
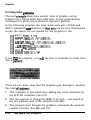
Running the self test
...............................................
1-15
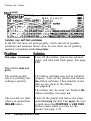
Solving any self test problems
..................................
1-24
Connecting the Printer to Your Computer
.....................
l-26
The parallel interface
..............................................
1-27
The serial interface
.................................................
1-31
Setting Up Your Application Software
.
.
.
.
.
.
.
.
.
.
.
.
.
.
.
.
.
.
.
.
.
.
.
.
.
.
l-36
Setting
Up the Printer l-l

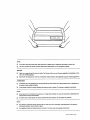
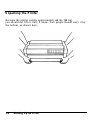
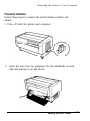
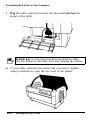
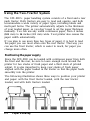
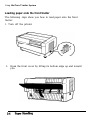
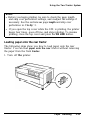
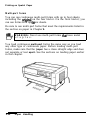
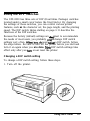
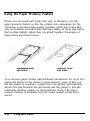
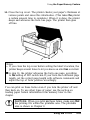
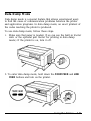
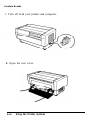
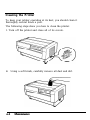
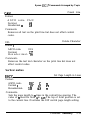
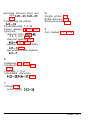
Unpacking the Printer
Because the printer weighs approximately
64
lbs.
(29
kg),
you should not lift or carry it alone. Two people should carry it by
the bottom, as shown here:
1-2
Setting Up
the Printer

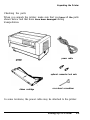
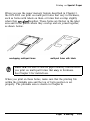
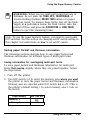
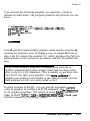
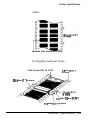
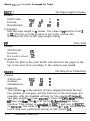
Unpacking the Printer
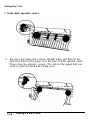
Checking the parts
When you unpack the printer, make sure that you
have all the parts
shown
below
and that none have
been
damaged during
transportation.
power cable
optional connector
lock
nuts
ribbon cartridge
cross-head screwdriver
In some locations, the power cable may be attached to the printer.
Setting Up the Printer
1-3

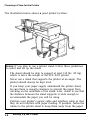
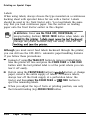
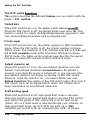
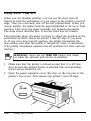
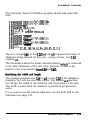
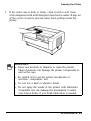
Unpacking the Printer
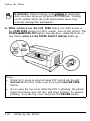
WARNING: There are several different versions of the
printer designed for different electrical
standards.
The
power
supply voltage is shown on the label on the back
of the printer. If the voltage shown is not correct for your
country, contact your dealer. It is not possible to adjust
the printer for use with different voltages.
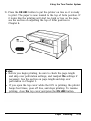
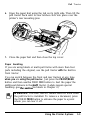
After you unpack the printer, save the packaging materials in case
you ever need to transport your printer.
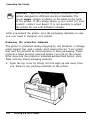
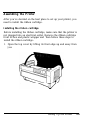
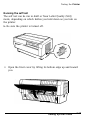
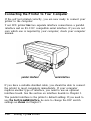
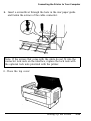
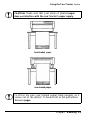
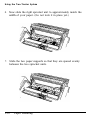
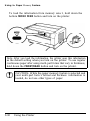
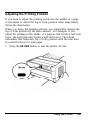
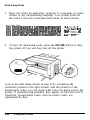
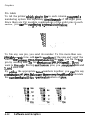
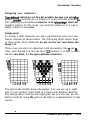
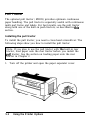
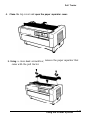
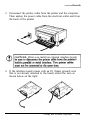
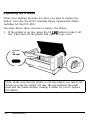
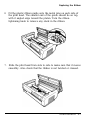
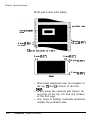
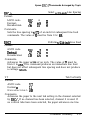
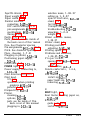
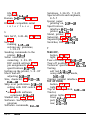
Removing the protective materials
The printer is protected during shipping by two brackets, a carriage
guide support bar, and a plastic print head protector. Your printer
may also be protected by several pieces of foam packaging. These
protective items must be removed before you turn on the printer.
After removing the protective materials
as described below, store
them with the other packaging material.
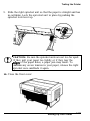
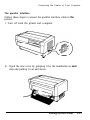
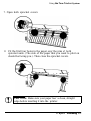
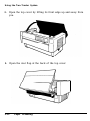
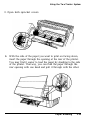
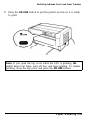
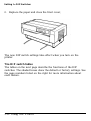
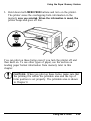
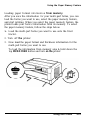
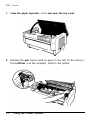
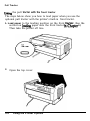
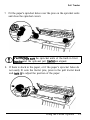
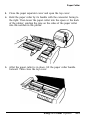
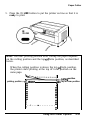
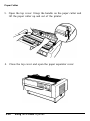
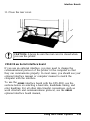
1.
Open the top cover by lifting its front edge up and away from
you. Remove any packing materials in the printer.
1-4
Setting Up the Printer

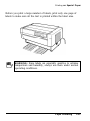
Unpacking the Printer
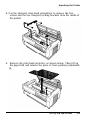
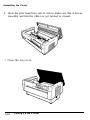
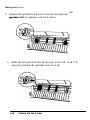
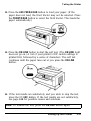
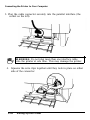
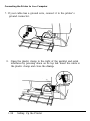
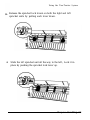
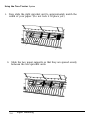
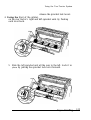
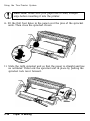
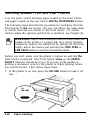
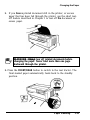
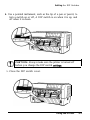
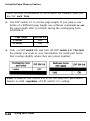
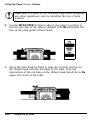
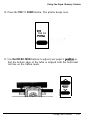
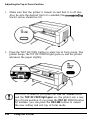
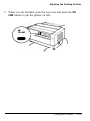
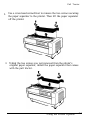
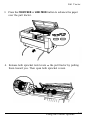
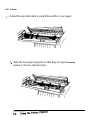
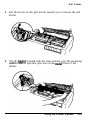
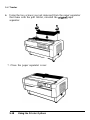
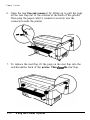
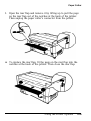
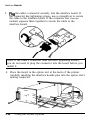
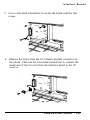
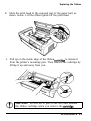
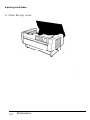
2.
Use the enclosed cross-head screwdriver to remove the five
screws and the two transport locking brackets from the inside of
the printer.
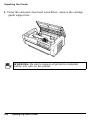
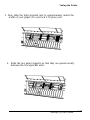
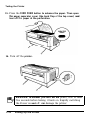
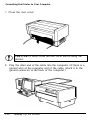
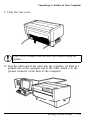
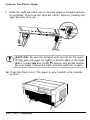
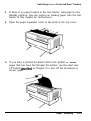
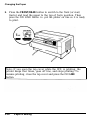
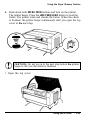
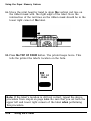
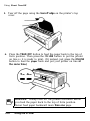
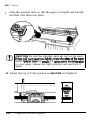
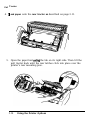
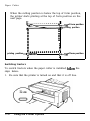
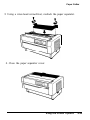
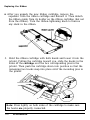
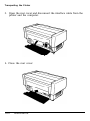
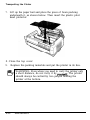
3.
Remove the print head protector, as shown below. Then lift up
the paper bail and remove the piece of foam packing underneath
it.
Setting Up the Printer
1-5
Page is loading ...
Page is loading ...
Page is loading ...
Page is loading ...
Page is loading ...
Page is loading ...
Page is loading ...
Page is loading ...
Page is loading ...
Page is loading ...
Page is loading ...
Page is loading ...
Page is loading ...
Page is loading ...
Page is loading ...
Page is loading ...
Page is loading ...
Page is loading ...
Page is loading ...
Page is loading ...
Page is loading ...
Page is loading ...
Page is loading ...
Page is loading ...
Page is loading ...
Page is loading ...
Page is loading ...
Page is loading ...
Page is loading ...
Page is loading ...
Page is loading ...
Page is loading ...
Page is loading ...
Page is loading ...
Page is loading ...
Page is loading ...
Page is loading ...
Page is loading ...
Page is loading ...
Page is loading ...
Page is loading ...
Page is loading ...
Page is loading ...
Page is loading ...
Page is loading ...
Page is loading ...
Page is loading ...
Page is loading ...
Page is loading ...
Page is loading ...
Page is loading ...
Page is loading ...
Page is loading ...
Page is loading ...
Page is loading ...
Page is loading ...
Page is loading ...
Page is loading ...
Page is loading ...
Page is loading ...
Page is loading ...
Page is loading ...
Page is loading ...
Page is loading ...
Page is loading ...
Page is loading ...
Page is loading ...
Page is loading ...
Page is loading ...
Page is loading ...
Page is loading ...
Page is loading ...
Page is loading ...
Page is loading ...
Page is loading ...
Page is loading ...
Page is loading ...
Page is loading ...
Page is loading ...
Page is loading ...
Page is loading ...
Page is loading ...
Page is loading ...
Page is loading ...
Page is loading ...
Page is loading ...
Page is loading ...
Page is loading ...
Page is loading ...
Page is loading ...
Page is loading ...
Page is loading ...
Page is loading ...
Page is loading ...
Page is loading ...
Page is loading ...
Page is loading ...
Page is loading ...
Page is loading ...
Page is loading ...
Page is loading ...
Page is loading ...
Page is loading ...
Page is loading ...
Page is loading ...
Page is loading ...
Page is loading ...
Page is loading ...
Page is loading ...
Page is loading ...
Page is loading ...
Page is loading ...
Page is loading ...
Page is loading ...
Page is loading ...
Page is loading ...
Page is loading ...
Page is loading ...
Page is loading ...
Page is loading ...
Page is loading ...
Page is loading ...
Page is loading ...
Page is loading ...
Page is loading ...
Page is loading ...
Page is loading ...
Page is loading ...
Page is loading ...
Page is loading ...
Page is loading ...
Page is loading ...
Page is loading ...
Page is loading ...
Page is loading ...
Page is loading ...
Page is loading ...
Page is loading ...
Page is loading ...
Page is loading ...
Page is loading ...
Page is loading ...
Page is loading ...
Page is loading ...
Page is loading ...
Page is loading ...
Page is loading ...
Page is loading ...
Page is loading ...
Page is loading ...
Page is loading ...
Page is loading ...
Page is loading ...
Page is loading ...
Page is loading ...
Page is loading ...
Page is loading ...
Page is loading ...
Page is loading ...
Page is loading ...
Page is loading ...
Page is loading ...
Page is loading ...
Page is loading ...
Page is loading ...
Page is loading ...
Page is loading ...
Page is loading ...
Page is loading ...
Page is loading ...
Page is loading ...
Page is loading ...
Page is loading ...
Page is loading ...
Page is loading ...
Page is loading ...
Page is loading ...
Page is loading ...
Page is loading ...
Page is loading ...
Page is loading ...
Page is loading ...
Page is loading ...
Page is loading ...
Page is loading ...
Page is loading ...
Page is loading ...
Page is loading ...
Page is loading ...
Page is loading ...
Page is loading ...
Page is loading ...
Page is loading ...
Page is loading ...
Page is loading ...
Page is loading ...
Page is loading ...
Page is loading ...
Page is loading ...
Page is loading ...
Page is loading ...
Page is loading ...
Page is loading ...
Page is loading ...
Page is loading ...
Page is loading ...
Page is loading ...
Page is loading ...
Page is loading ...
Page is loading ...
Page is loading ...
Page is loading ...
Page is loading ...
Page is loading ...
Page is loading ...
Page is loading ...
Page is loading ...
Page is loading ...
Page is loading ...
Page is loading ...
Page is loading ...
Page is loading ...
Page is loading ...
Page is loading ...
Page is loading ...
Page is loading ...
Page is loading ...
Page is loading ...
Page is loading ...
Page is loading ...
Page is loading ...
Page is loading ...
Page is loading ...
Page is loading ...
Page is loading ...
Page is loading ...
Page is loading ...
Page is loading ...
Page is loading ...
Page is loading ...
Page is loading ...
Page is loading ...
Page is loading ...
Page is loading ...
Page is loading ...
Page is loading ...
Page is loading ...
Page is loading ...
Page is loading ...
Page is loading ...
Page is loading ...
Page is loading ...
Page is loading ...
Page is loading ...
Page is loading ...
Page is loading ...
Page is loading ...
Page is loading ...
Page is loading ...
Page is loading ...
Page is loading ...
Page is loading ...
Page is loading ...
Page is loading ...
Page is loading ...
Page is loading ...
Page is loading ...
Page is loading ...
Page is loading ...
Page is loading ...
Page is loading ...
Page is loading ...
Page is loading ...
Page is loading ...
Page is loading ...
Page is loading ...
Page is loading ...
Page is loading ...
Page is loading ...
Page is loading ...
Page is loading ...
Page is loading ...
Page is loading ...
Page is loading ...
Page is loading ...
Page is loading ...
Page is loading ...
Page is loading ...
Page is loading ...
Page is loading ...
Page is loading ...
Page is loading ...
Page is loading ...
Page is loading ...
Page is loading ...
Page is loading ...
Page is loading ...
Page is loading ...
Page is loading ...
Page is loading ...
Page is loading ...
Page is loading ...
Page is loading ...
Page is loading ...
Page is loading ...
Page is loading ...
Page is loading ...
Page is loading ...
Page is loading ...
Page is loading ...
Page is loading ...
Page is loading ...
Page is loading ...
Page is loading ...
Page is loading ...
Page is loading ...
Page is loading ...
Page is loading ...
Page is loading ...
Page is loading ...
Page is loading ...
Page is loading ...
Page is loading ...
Page is loading ...
Page is loading ...
Page is loading ...
-
 1
1
-
 2
2
-
 3
3
-
 4
4
-
 5
5
-
 6
6
-
 7
7
-
 8
8
-
 9
9
-
 10
10
-
 11
11
-
 12
12
-
 13
13
-
 14
14
-
 15
15
-
 16
16
-
 17
17
-
 18
18
-
 19
19
-
 20
20
-
 21
21
-
 22
22
-
 23
23
-
 24
24
-
 25
25
-
 26
26
-
 27
27
-
 28
28
-
 29
29
-
 30
30
-
 31
31
-
 32
32
-
 33
33
-
 34
34
-
 35
35
-
 36
36
-
 37
37
-
 38
38
-
 39
39
-
 40
40
-
 41
41
-
 42
42
-
 43
43
-
 44
44
-
 45
45
-
 46
46
-
 47
47
-
 48
48
-
 49
49
-
 50
50
-
 51
51
-
 52
52
-
 53
53
-
 54
54
-
 55
55
-
 56
56
-
 57
57
-
 58
58
-
 59
59
-
 60
60
-
 61
61
-
 62
62
-
 63
63
-
 64
64
-
 65
65
-
 66
66
-
 67
67
-
 68
68
-
 69
69
-
 70
70
-
 71
71
-
 72
72
-
 73
73
-
 74
74
-
 75
75
-
 76
76
-
 77
77
-
 78
78
-
 79
79
-
 80
80
-
 81
81
-
 82
82
-
 83
83
-
 84
84
-
 85
85
-
 86
86
-
 87
87
-
 88
88
-
 89
89
-
 90
90
-
 91
91
-
 92
92
-
 93
93
-
 94
94
-
 95
95
-
 96
96
-
 97
97
-
 98
98
-
 99
99
-
 100
100
-
 101
101
-
 102
102
-
 103
103
-
 104
104
-
 105
105
-
 106
106
-
 107
107
-
 108
108
-
 109
109
-
 110
110
-
 111
111
-
 112
112
-
 113
113
-
 114
114
-
 115
115
-
 116
116
-
 117
117
-
 118
118
-
 119
119
-
 120
120
-
 121
121
-
 122
122
-
 123
123
-
 124
124
-
 125
125
-
 126
126
-
 127
127
-
 128
128
-
 129
129
-
 130
130
-
 131
131
-
 132
132
-
 133
133
-
 134
134
-
 135
135
-
 136
136
-
 137
137
-
 138
138
-
 139
139
-
 140
140
-
 141
141
-
 142
142
-
 143
143
-
 144
144
-
 145
145
-
 146
146
-
 147
147
-
 148
148
-
 149
149
-
 150
150
-
 151
151
-
 152
152
-
 153
153
-
 154
154
-
 155
155
-
 156
156
-
 157
157
-
 158
158
-
 159
159
-
 160
160
-
 161
161
-
 162
162
-
 163
163
-
 164
164
-
 165
165
-
 166
166
-
 167
167
-
 168
168
-
 169
169
-
 170
170
-
 171
171
-
 172
172
-
 173
173
-
 174
174
-
 175
175
-
 176
176
-
 177
177
-
 178
178
-
 179
179
-
 180
180
-
 181
181
-
 182
182
-
 183
183
-
 184
184
-
 185
185
-
 186
186
-
 187
187
-
 188
188
-
 189
189
-
 190
190
-
 191
191
-
 192
192
-
 193
193
-
 194
194
-
 195
195
-
 196
196
-
 197
197
-
 198
198
-
 199
199
-
 200
200
-
 201
201
-
 202
202
-
 203
203
-
 204
204
-
 205
205
-
 206
206
-
 207
207
-
 208
208
-
 209
209
-
 210
210
-
 211
211
-
 212
212
-
 213
213
-
 214
214
-
 215
215
-
 216
216
-
 217
217
-
 218
218
-
 219
219
-
 220
220
-
 221
221
-
 222
222
-
 223
223
-
 224
224
-
 225
225
-
 226
226
-
 227
227
-
 228
228
-
 229
229
-
 230
230
-
 231
231
-
 232
232
-
 233
233
-
 234
234
-
 235
235
-
 236
236
-
 237
237
-
 238
238
-
 239
239
-
 240
240
-
 241
241
-
 242
242
-
 243
243
-
 244
244
-
 245
245
-
 246
246
-
 247
247
-
 248
248
-
 249
249
-
 250
250
-
 251
251
-
 252
252
-
 253
253
-
 254
254
-
 255
255
-
 256
256
-
 257
257
-
 258
258
-
 259
259
-
 260
260
-
 261
261
-
 262
262
-
 263
263
-
 264
264
-
 265
265
-
 266
266
-
 267
267
-
 268
268
-
 269
269
-
 270
270
-
 271
271
-
 272
272
-
 273
273
-
 274
274
-
 275
275
-
 276
276
-
 277
277
-
 278
278
-
 279
279
-
 280
280
-
 281
281
-
 282
282
-
 283
283
-
 284
284
-
 285
285
-
 286
286
-
 287
287
-
 288
288
-
 289
289
-
 290
290
-
 291
291
-
 292
292
-
 293
293
-
 294
294
-
 295
295
-
 296
296
-
 297
297
-
 298
298
-
 299
299
-
 300
300
-
 301
301
-
 302
302
-
 303
303
-
 304
304
-
 305
305
-
 306
306
-
 307
307
-
 308
308
-
 309
309
-
 310
310
-
 311
311
-
 312
312
-
 313
313
-
 314
314
-
 315
315
-
 316
316
-
 317
317
-
 318
318
-
 319
319
-
 320
320
-
 321
321
-
 322
322
-
 323
323
-
 324
324
-
 325
325
-
 326
326
-
 327
327
-
 328
328
-
 329
329
-
 330
330
-
 331
331
-
 332
332
-
 333
333
-
 334
334
-
 335
335
-
 336
336
-
 337
337
-
 338
338
-
 339
339
-
 340
340
-
 341
341
-
 342
342
-
 343
343
-
 344
344
-
 345
345
-
 346
346


Ask a question and I''ll find the answer in the document
Finding information in a document is now easier with AI
Related papers
Other documents
-
Star Micronics NP-IO User manual
-
-
-
-
-
-
Compuprint 4247L03 4247L03plus User guide
-
Compuprint 9070 plus User manual
-
-